Home>Gardening Techniques>Plant Care>How To Take Care Of Tulip Bulbs

Plant Care
How To Take Care Of Tulip Bulbs
Modified: January 22, 2024
Learn the essential steps of plant care to ensure the health and beauty of your tulip bulbs. Discover expert tips for planting, watering, and maintaining these stunning flowers.
(Many of the links in this article redirect to a specific reviewed product. Your purchase of these products through affiliate links helps to generate commission for Chicagolandgardening.com, at no extra cost. Learn more)
Table of Contents
Introduction
Welcome to the world of tulip bulbs! If you’re a plant lover looking to add some stunning beauty to your garden, tulips are an excellent choice. These vibrant and elegant flowers are known for their wide range of colors and varieties, creating a picturesque display when in bloom.
However, to ensure the long-lasting health and beauty of your tulips, proper care is essential. Whether you’re a seasoned gardener or a beginner, this comprehensive guide will provide you with all the necessary information to successfully care for your tulip bulbs.
Tulips are native to regions with a cold winter climate and thrive in well-drained soil. They are classified as perennial plants, meaning they can survive and bloom for several years with proper care. By understanding the key aspects of plant care, from choosing the right bulbs to handling pests and diseases, you’ll be able to enjoy a stunning display of tulips year after year.
In this guide, we will cover the step-by-step process of planting and maintaining tulip bulbs, including soil preparation, watering techniques, fertilization, mulching, and more. We’ll also discuss how to deal with common pests and diseases that may affect your tulips.
Additionally, we’ll cover the important task of removing tulip bulbs after they have finished blooming and provide guidance on how to store them for future planting, ensuring a continuous cycle of vibrant blooms in your garden.
So, whether you’re looking to create a colorful spring display or enhance the beauty of your garden year-round, let’s jump into the world of tulip bulb care and discover the secrets to cultivating these magnificent flowers.
Choosing the Right Tulip Bulbs
When it comes to tulip bulbs, selecting the right ones is crucial for a successful and vibrant display. With so many varieties to choose from, it’s essential to consider a few key factors:
- Choose Healthy and Firm Bulbs: When purchasing tulip bulbs, always opt for ones that are firm and have no signs of mold or damage. Avoid bulbs that feel soft or have visible rot, as they may not produce healthy plants.
- Consider the Bloom Time: Tulips come in early, mid, and late-season varieties, each with different bloom times. Consider the desired timing of your tulip display and choose bulbs accordingly. If you want a longer blooming period, select a mix of early, mid, and late-season varieties.
- Select the Desired Colors and Shapes: Tulips offer a wide range of colors and shapes, from classic single-petaled tulips to fringed, parrot, and double-flowered varieties. Consider the color scheme and style of your garden and choose bulbs that will complement the overall aesthetic.
- Pay Attention to Height: Tulips vary in height, ranging from shorter varieties of 6-12 inches to tall ones reaching 24-30 inches. Take into account the desired height for your display and choose bulbs accordingly to create visually appealing arrangements.
Remember to read the labels or descriptions provided by the bulb supplier for specific information on each variety’s characteristics. This will help you make informed decisions and select the tulip bulbs that best suit your preferences and garden design.
By choosing healthy bulbs and considering factors such as bloom time, colors and shapes, and height, you can ensure a stunning and well-coordinated tulip display that will be the envy of your neighborhood.
Planting Tulip Bulbs
Planting tulip bulbs properly is essential for their growth and development. Here’s a step-by-step guide to help you plant your tulip bulbs:
- Choose the Right Planting Time: The ideal time to plant tulip bulbs is in the fall, typically around late September to mid-November. This ensures that the bulbs have enough time to establish roots before the ground freezes.
- Select a Suitable Location: Tulips thrive in areas with full sun or light shade. Choose a spot in your garden that receives at least 6-8 hours of direct sunlight each day. Well-drained soil is also important, as tulips dislike wet or waterlogged conditions.
- Prepare the Soil: Before planting, prepare the soil by removing any weeds, rocks, or debris. Loosen the soil to a depth of 10-12 inches, ensuring it is loose and crumbly.
- Planting Depth: Dig a hole for each bulb, ensuring it is two to three times the height of the bulb. As a general guideline, plant smaller bulbs around 4-6 inches deep, and larger bulbs around 6-8 inches deep. Place the bulbs in the hole with the pointed side facing upwards.
- Spacing: Space the bulbs with a distance of 4-6 inches between them to allow for proper growth and air circulation. If you are planting multiple rows, maintain a separation of 6-8 inches between rows.
- Backfill and Water: Gently backfill the holes with soil, covering the bulbs completely. Firm the soil around the bulbs to ensure good soil-to-bulb contact. After planting, water the area thoroughly to settle the soil and initiate root growth.
- Label the Planting Area: It’s easy to forget the exact location of your tulip bulbs, especially when they are dormant. To help you remember, consider placing markers or labels in the soil indicating where the bulbs are planted.
Remember to water the planted area periodically throughout the fall season, especially if there is a lack of rainfall. This will help the bulbs establish their roots before winter sets in.
Once planted, you can look forward to the anticipation of colorful tulip blooms in the coming spring.
Proper Soil Preparation
Preparing the soil properly is crucial for the growth and development of your tulip bulbs. Here are some important steps to follow for proper soil preparation:
- Test the Soil pH: Before planting tulip bulbs, it’s essential to test the soil pH. Tulips prefer slightly acidic to neutral soil with a pH range of 6.0 to 7.0. You can easily test the soil using a pH testing kit available at garden centers or online.
- Improve Drainage: Tulips dislike wet or waterlogged soil. If your soil is heavy or has poor drainage, you can improve it by adding organic matter such as compost, well-rotted manure, or peat moss. These amendments will help loosen the soil and enhance drainage.
- Remove Weeds and Debris: Clear the planting area of any weeds, rocks, or debris. Weeds compete with tulips for nutrients and water, so it’s important to remove them to create a favorable environment for your bulbs.
- Loosen the Soil: Using a garden fork or a tiller, loosen the soil to a depth of at least 10-12 inches. This will provide an optimal growing environment for the tulip bulbs and allow their roots to penetrate the soil easily.
- Add Nutrients: Incorporating organic matter into the soil will not only improve drainage but also provide essential nutrients for the bulbs. Mix in compost, well-rotted manure, or a balanced organic fertilizer according to the manufacturer’s instructions.
- Level the Soil Surface: After adding amendments, level the soil surface using a rake. This will create a smooth and even planting bed for your tulip bulbs.
By properly preparing the soil, you create a favorable growing environment for your tulip bulbs. The improved drainage, optimal pH, and added nutrients will support healthy root development, ensuring vigorous growth and vibrant blooms.
Remember that soil preparation is a one-time task. Once you have prepared the soil, it will benefit not only your tulips but also any other plants you wish to grow in the future.
Watering Tulip Bulbs
Proper watering is crucial for the health and vitality of your tulip bulbs. While tulips prefer well-drained soil, they still require consistent moisture, especially during their growth and blooming stages. Here are some important tips to ensure proper watering for your tulip bulbs:
- Establish a Watering Schedule: Determine a regular watering schedule for your tulip bulbs. In general, it’s recommended to water them once a week, providing approximately 1 inch of water. However, adjust the frequency and amount of water based on the local climate, rainfall, and soil conditions.
- Water at the Base: When watering tulip bulbs, always aim to water at the base of the plant rather than overhead. This helps prevent water accumulation on the leaves, which can promote fungal diseases. Additionally, watering at the base ensures that the water reaches the roots where it is needed the most.
- Monitor Soil Moisture: Check the soil moisture regularly by inserting your finger into the soil. If it feels dry 1-2 inches below the surface, it’s time to water. Avoid overwatering, as this can lead to root rot and other issues. Tulips prefer moist but not soggy soil.
- Consider Rainfall: Take into account the amount of rainfall your area receives. If there is adequate rainfall, you may not need to water your tulips as frequently. However, during dry spells or drought conditions, supplemental watering may be necessary.
- Avoid Watering in the Evening: Watering tulip bulbs in the evening can lead to prolonged leaf wetness, increasing the risk of fungal diseases. It’s best to water in the early morning, allowing the foliage to dry out during the day.
Remember that proper watering is crucial during key stages of growth, such as bulb formation and flowering. Well-hydrated bulbs produce healthier and more vibrant blooms.
By following these watering tips, you can ensure that your tulip bulbs receive adequate moisture for optimal growth and a stunning floral display.
Fertilizing Tulip Bulbs
Fertilizing tulip bulbs is important to provide the necessary nutrients for their growth and blooming. While tulips can grow in relatively poor soil, adding fertilizer can enhance their overall health and vigor. Here are some guidelines for fertilizing your tulip bulbs:
- Choose the Right Fertilizer: When selecting a fertilizer for tulip bulbs, look for a balanced slow-release fertilizer with equal ratios of nitrogen (N), phosphorus (P), and potassium (K). These three essential nutrients help promote healthy root development, foliage growth, and flower formation.
- Application Timing: Prior to planting tulip bulbs, it’s beneficial to incorporate fertilizer into the soil during the soil preparation stage. Alternatively, you can apply a slow-release granular fertilizer at the time of planting, following the recommended dosage on the package. This will provide a steady supply of nutrients as the bulbs establish roots.
- Additional Application: If you planted your tulip bulbs in nutrient-rich soil or applied fertilizer during planting, additional fertilizer application may not be necessary. However, if you notice weak growth or pale foliage during the growing season, a light application of a balanced fertilizer can be beneficial.
- Avoid Excess Nitrogen: While nitrogen is important for foliage growth, excessive nitrogen can lead to lush foliage at the expense of flower production. Avoid using high-nitrogen fertilizers or over-fertilizing, as it may result in weak or floppy stems and fewer blooms.
- Apply Fertilizer Carefully: When applying fertilizer, avoid direct contact with the bulb itself, as it can cause damage. Instead, spread the fertilizer evenly around the planting area, keeping it a few inches away from the bulbs. Water the area thoroughly after fertilizing to help the nutrients reach the root zone.
Remember that tulips generally do not require heavy fertilization. Applying fertilizer judiciously and providing a balanced nutrient supply will help support their growth and flowering potential without compromising their natural beauty.
By following these fertilizer guidelines, you can enhance the overall health and vitality of your tulip bulbs, ensuring a magnificent display of colorful blooms.
Mulching Tulip Bulbs
Mulching tulip bulbs is an effective way to protect them and improve their overall growing conditions. Mulch helps to maintain soil moisture, suppress weed growth, and regulate soil temperature. Here are some tips to mulch your tulip bulbs effectively:
- Timing: Mulch your tulip bulbs after the ground has cooled down in late fall or early winter, just before the first frost. This will help to insulate the soil and provide protection during the winter months.
- Choose the Right Mulch: Use organic mulch materials such as straw, shredded leaves, or wood chips. These materials provide insulation while allowing air circulation and water penetration. Avoid using heavy or compact mulches that may smother the bulbs.
- Apply a Layer: Spread a layer of mulch about 2-3 inches thick over the planting area. Be careful not to bury the tulip bulbs too deeply as they need access to light and air for proper growth.
- Avoid Direct Contact: When mulching, be mindful not to let the mulch come into direct contact with the tulip stems or foliage. This can lead to moisture buildup and increase the risk of fungal diseases.
- Leave Air Circulation Space: Leave a small gap around the base of each tulip plant to allow for air circulation. This will help prevent moisture accumulation and minimize the risk of rot or disease.
- Mulch Removal in Spring: In early spring, once the danger of frost has passed and the tulips start to emerge, gradually remove the mulch layer. This will allow the sun to reach the plants and promote healthy growth.
Mulching tulip bulbs can help protect them from extreme temperatures and maintain consistent soil moisture. It also aids in reducing weed competition, which can rob nutrients from the bulbs.
By following these mulching tips, you can create an optimal growing environment for your tulip bulbs, ensuring their successful emergence and beautiful blooming in the spring.
Controlling Pests and Diseases
Like any plants, tulips are susceptible to pests and diseases that can hinder their growth and impact their overall health. Here are some common pests and diseases that may affect tulip bulbs, along with methods to control and prevent them:
1. Aphids:
Aphids are small, soft-bodied insects that feed on plant sap, causing curled leaves and stunted growth. To control aphids, you can try spraying a mixture of water and dish soap to deter them. Additionally, attracting natural enemies like ladybugs and lacewings or using organic insecticides can help keep their population in check.
2. Slugs and Snails:
Slugs and snails are nocturnal pests that leave behind trails of slime and can cause significant damage to tulip leaves and flowers. To control them, you can introduce natural predators like frogs or birds. Creating barriers, like copper tape or crushed eggshells, around the tulips can also help deter them.
3. Botrytis Blight:
Botrytis blight, also known as tulip fire, is a fungal disease that causes brown spots, distorted blooms, and gray mold on tulip plants. To prevent botrytis blight, ensure proper air circulation by spacing tulip bulbs appropriately. Remove and destroy infected plant material, and apply fungicides if necessary.
4. Bulb Rot:
Bulb rot is a common issue that affects tulip bulbs, usually caused by excessively wet or poorly drained soil. To prevent bulb rot, choose well-drained soil for planting and avoid over-watering. Additionally, you can treat bulbs with a fungicide before planting to provide some protection against rot-causing pathogens.
5. Deer and Rodents:
Deer, rabbits, and rodents can be a nuisance in the garden, often feeding on tulip plants and bulbs. To deter them, use physical barriers such as fences or netting to prevent access. Applying repellents or using decoy plants can also help keep these animals away from your tulips.
Regularly inspecting your tulips for signs of pests or diseases and taking appropriate action early on can help prevent further damage and ensure the long-term health of your plants. Remember to maintain good garden hygiene by removing any decaying plant material, and practice crop rotation to prevent the buildup of pests and diseases in the soil.
By implementing these pest and disease control measures, you can protect your tulips and enjoy a flourishing and vibrant display in your garden.
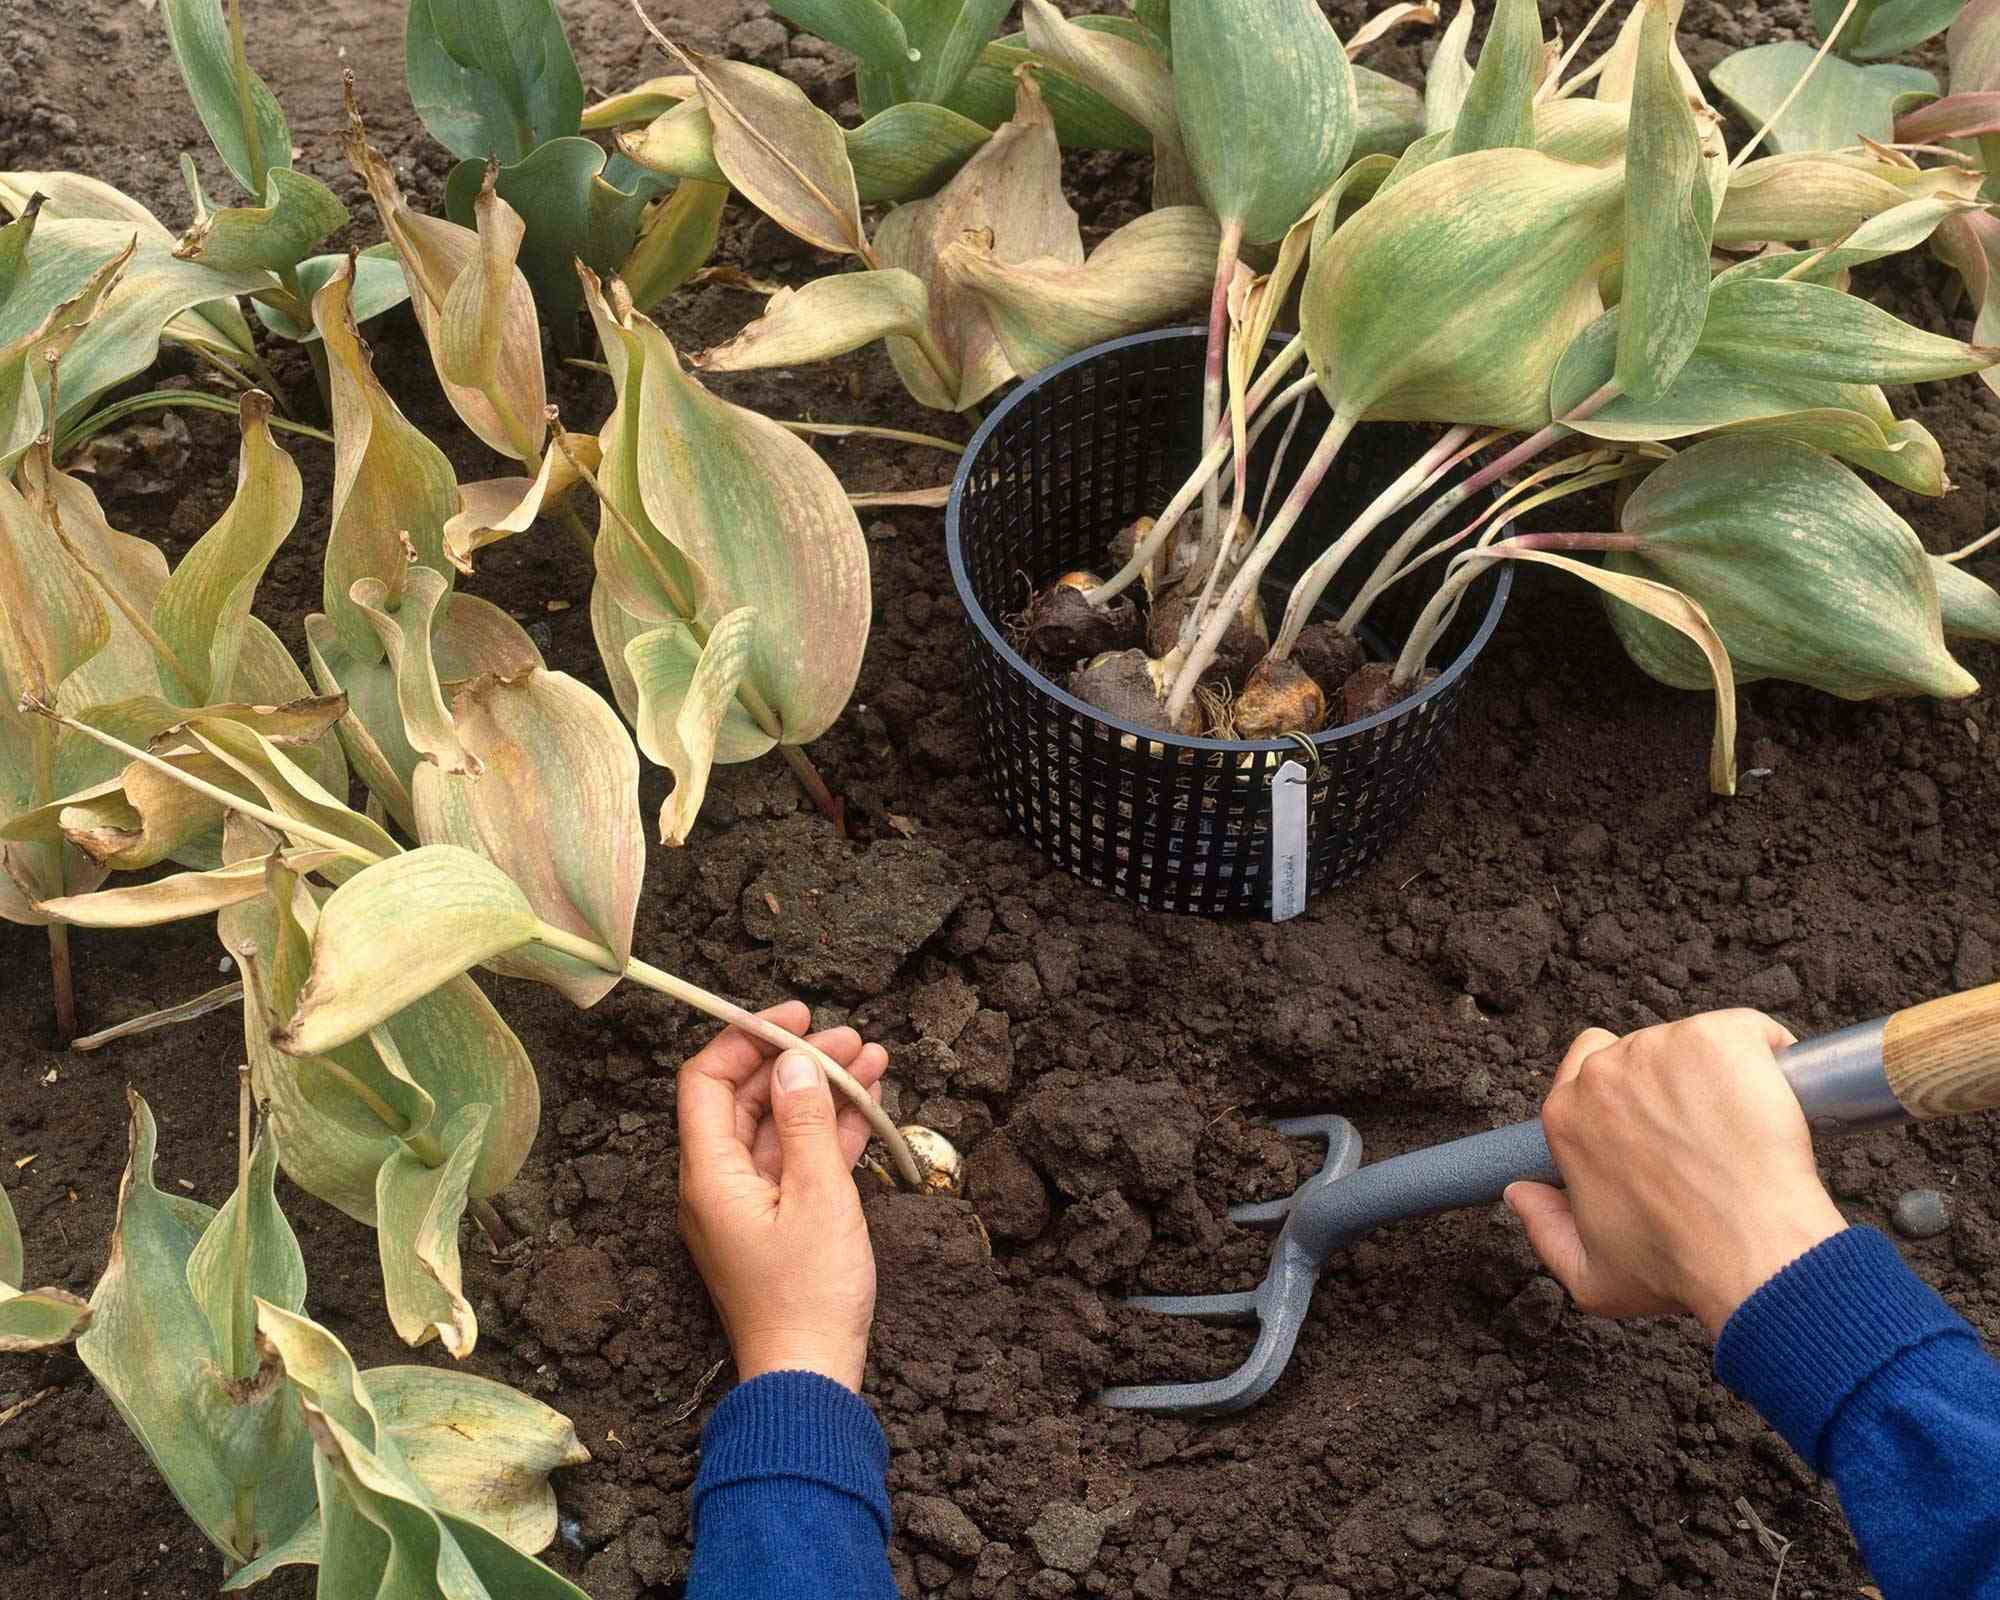
Removing Tulip Bulbs after Blooming
Once the colorful display of tulip blooms has faded, it’s time to remove the bulbs to ensure the vitality and longevity of your tulip plants. Here’s a step-by-step guide on how to remove tulip bulbs after blooming:
- Allow the Foliage to Wither: After the tulip blooms have finished, allow the foliage to turn yellow and wither naturally. This stage is crucial for the bulbs to gather energy and nutrients for next year’s growth.
- Do Not Cut Back the Foliage: Resist the temptation to cut back the foliage prematurely. Cutting the foliage too early prevents the bulbs from fully replenishing their reserves, which may result in weaker and fewer blooms in the following year.
- Gently Remove the Bulbs: Once the foliage has completely withered, carefully grasp the foliage near the base and gently pull the bulbs out of the soil. Use a digging fork or trowel if needed to loosen the bulbs without causing damage.
- Inspect the Bulbs: As you remove the bulbs, examine their condition. Discard any bulbs that show signs of rot, disease, or damage. Keep only the healthy bulbs for future replanting.
- Allow the Bulbs to Dry: After removing the bulbs, place them in a well-ventilated area and allow them to dry completely. This drying period helps to prevent fungal diseases and ensures better storage conditions.
- Store the Bulbs: Once the bulbs are fully dry, store them in a cool, dry, and dark location. Use breathable containers such as mesh bags or paper bags to ensure proper air circulation around the bulbs. Avoid storing them in plastic bags, as it can lead to excess moisture and rot.
It’s important to note that tulip bulbs gradually decrease in vigor over time. Therefore, it’s recommended to replant fresh bulbs every few years to maintain a healthy and vibrant display of tulip blooms.
By following these steps for removing tulip bulbs after blooming, you can ensure the long-term success of your tulip plants and continue to enjoy their stunning beauty year after year.
Storing Tulip Bulbs for Future Planting
Proper storage of tulip bulbs is essential to preserve their quality and ensure successful planting in the future. Storing tulip bulbs correctly allows them to remain dormant until the next planting season. Here’s a guide on how to store tulip bulbs for future planting:
- Dry the Bulbs: After removing the tulip bulbs from the ground, gently brush off any excess soil. Place them in a well-ventilated area and allow them to dry completely. This drying process helps prevent rot and fungal diseases during storage.
- Inspect for Damage or Disease: Before storing the bulbs, carefully inspect them for any signs of damage, rot, or disease. Discard any bulbs that appear unhealthy, as they can negatively impact the quality of the stored bulbs and future plantings.
- Remove Foliage and Roots: Trim off the dried foliage and any remaining roots from the bulbs. This helps minimize the risk of disease transmission and keeps the storage area clean.
- Choose a Suitable Storage Container: Select a breathable storage container, such as a mesh bag or a paper bag, that allows for air circulation. Avoid plastic bags, as they can trap moisture and lead to bulb rot. Label the containers with the tulip variety and planting date if desired.
- Add Desiccant or Dry Material: To further prevent moisture retention, it’s helpful to add a desiccant or dry material, such as silica gel packets or dry sawdust, to the storage containers. These absorb moisture and help keep the bulbs dry.
- Create Cool Storage Conditions: Find a cool, dry, and dark location for storing the tulip bulbs. Ideally, the storage area should maintain a consistent temperature between 40-50°F (4-10°C). Avoid areas prone to extreme temperature fluctuations or high levels of humidity, such as basements or garages.
- Check Periodically: During the storage period, check the bulbs periodically for any signs of mold or rot. If you notice any issues, remove the affected bulbs immediately to prevent spreading to healthy bulbs.
It’s important to note that tulip bulbs have a limited storage life. To ensure the best results, it’s recommended to plant the stored bulbs within one to two years. Older bulbs may have diminished viability and reduced blooming potential.
By following these storage guidelines, you can preserve the quality and viability of your tulip bulbs for future plantings, ensuring a stunning display of vibrant blooms in the seasons to come.