Home>Gardening Techniques>Plant Care>Where To Plant Juniper Shrubs
Plant Care
Where To Plant Juniper Shrubs
Modified: February 7, 2024
Discover the best spots to plant juniper shrubs and learn important plant care tips for a thriving garden. Enhance your green thumb with our expert advice.
(Many of the links in this article redirect to a specific reviewed product. Your purchase of these products through affiliate links helps to generate commission for Chicagolandgardening.com, at no extra cost. Learn more)
Table of Contents
- Introduction
- Factors to Consider Before Planting Juniper Shrubs
- Sunlight Requirements
- Soil Conditions
- Drainage Considerations
- Space and Location
- Types of Juniper Shrubs
- Planting Process
- Preparing the Site
- Digging the Hole
- Placing the Juniper Shrub
- Backfilling and Mulching
- Watering and Care Instructions
- Pruning and Maintenance
- Troubleshooting Common Issues
- Conclusion
Introduction
Welcome to the world of plant care, specifically focusing on the magnificent Juniper shrubs. If you’re a plant enthusiast or a newbie gardener looking to add some beauty to your outdoor space, you’ve come to the right place. Juniper shrubs are versatile, hardy plants that can enhance the aesthetics of any garden or landscape.
With their vibrant foliage, unique textures, and an array of varieties to choose from, Juniper shrubs are a popular choice among landscapers and homeowners alike. Whether you’re looking to create a privacy screen, add structure to your garden, or simply want to enjoy the natural beauty they bring, Juniper shrubs are a fantastic option.
Before you dive into planting your own Juniper shrubs, there are a few factors you need to consider. Understanding their sunlight requirements, soil conditions, and drainage needs, among other things, will ensure their successful growth and longevity. This article will guide you through the essential steps to help you make the right decisions and create an environment where your Juniper shrubs can thrive.
So, get ready to discover the secrets of planting and caring for Juniper shrubs. From selecting the right type of Juniper to understanding the proper planting process and maintenance, we’ve got you covered. Let’s dive in and unravel the wonders of Juniper shrub care!
Factors to Consider Before Planting Juniper Shrubs
Before digging into the process of planting Juniper shrubs, it’s essential to consider a few key factors. These factors will ensure that your Juniper shrubs thrive in their new environment and continue to add beauty to your outdoor space for years to come.
Sunlight Requirements: Juniper shrubs are typically sun-loving plants that require at least six hours of direct sunlight per day. Before planting, assess the sunlight conditions in your intended planting location. Make sure it provides adequate sunlight throughout the day to promote healthy growth and vibrant foliage.
Soil Conditions: Juniper shrubs prefer well-drained soil that is slightly acidic to neutral. Before planting, test the soil pH and make adjustments if necessary. Adding organic matter such as compost or peat moss can improve soil drainage and fertility, creating an ideal environment for Juniper shrubs to thrive.
Drainage Considerations: Good drainage is crucial for the overall health of Juniper shrubs. These plants are susceptible to root rot if their roots sit in waterlogged soil. Avoid areas with poor drainage, such as low-lying spots or areas prone to flooding. If your soil has poor drainage, consider creating raised beds or amending the soil to improve drainage before planting.
Space and Location: Juniper shrubs come in a variety of sizes, from low-growing ground covers to larger, upright specimens. When selecting your Juniper shrub, consider the available space and the desired function in your landscape. If you’re using it as a privacy screen or border, choose taller varieties. If you want it to fill in gaps or control erosion, select low-growing varieties.
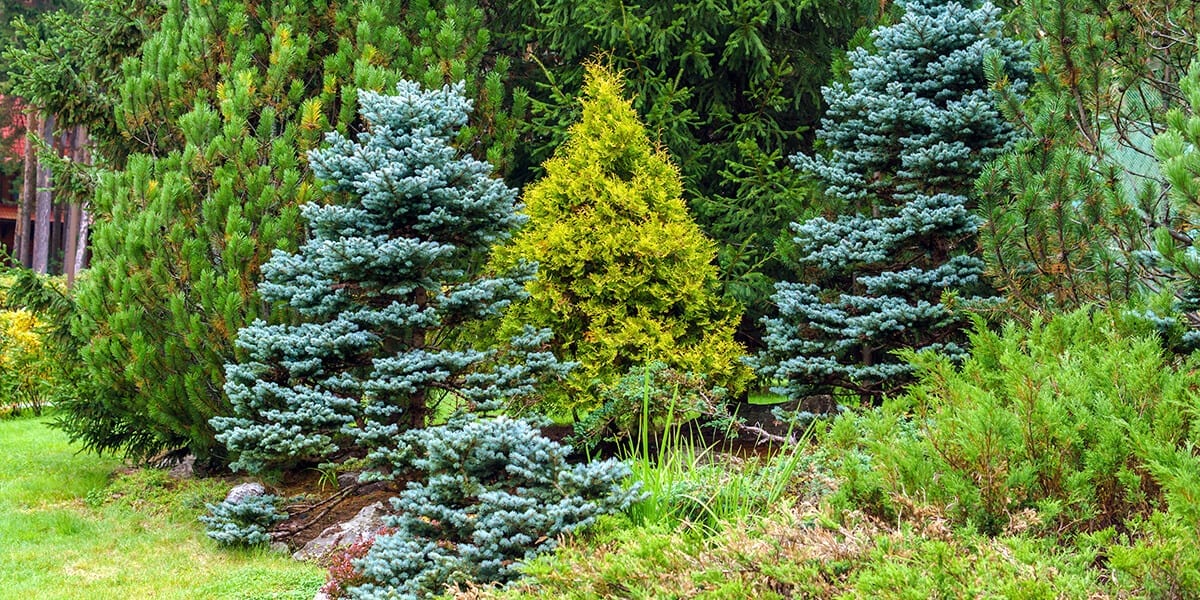
Types of Juniper Shrubs: Juniper shrubs come in countless varieties, each with its own unique characteristics. Some popular options include Blue Star Juniper, Skyrocket Juniper, and Golden Juniper. Research different varieties to find the one that suits your aesthetic preferences and complements your existing landscape.
By considering these factors before planting your Juniper shrubs, you’ll set a solid foundation for their growth and ensure they thrive in their new environment. Now that you have a better understanding of the key considerations, let’s move on to the exciting part – the planting process!
Sunlight Requirements
Juniper shrubs are sun-loving plants that thrive in areas with ample sunlight. Understanding their sunlight requirements is essential for their overall health and growth. Here are some key points to consider:
- Full Sun: Juniper shrubs prefer full sun, which means they require at least six hours of direct sunlight daily. Choose a planting location that receives maximum sunlight throughout the day. Avoid shaded areas or spots that are blocked by structures or trees.
- Partial Shade: While Juniper shrubs thrive in full sun, some varieties can tolerate partial shade. If your garden has areas with less sun exposure, consider selecting Juniper cultivars that are known for their adaptability to partial shade. However, keep in mind that prolonged shade can affect their growth and foliage color.
- Light Requirements for Different Varieties: Different Juniper varieties may have specific light requirements. Some varieties, such as the Blue Star Juniper, thrive in full sun and may suffer in shaded areas. On the other hand, there are cultivars like the Pfitzer Juniper that can tolerate a wider range of light conditions. Before choosing a Juniper variety, research its specific sunlight preferences to ensure optimal growth.
Providing Juniper shrubs with the right amount of sunlight is crucial for their photosynthesis process and overall vigor. Adequate exposure to sunlight promotes sturdy growth, vibrant foliage color, and enhances their resilience to diseases and pests.
When planting Juniper shrubs, ensure that the location you choose allows access to sufficient sunlight. Regularly monitor the planting area to ensure that it isn’t obstructed by nearby trees or structures that cast shade during certain hours of the day.
Remember, though Juniper shrubs are sun-loving plants, extreme heat conditions can also impact their health. In regions with scorching summers, it’s essential to provide some protection during the hottest part of the day. Applying a layer of organic mulch around the base of the shrubs can help conserve soil moisture and moderate soil temperature.
By understanding and meeting the sunlight requirements of your Juniper shrubs, you’ll create an optimal environment for their growth, maximizing their beauty and longevity.
Soil Conditions
The soil conditions play a crucial role in the successful growth of Juniper shrubs. Providing the right soil environment ensures that the plants receive adequate nutrients, water drainage, and root development. Here are some important considerations when it comes to soil conditions for Juniper shrubs:
- Well-Drained Soil: Juniper shrubs prefer well-drained soil that allows water to flow freely through it. They are susceptible to root rot if the soil becomes waterlogged. Avoid planting Juniper shrubs in heavy clay soils that retain excess moisture. Instead, focus on improving soil drainage by amending it with organic matter like compost or sand.
- pH Level: Juniper shrubs thrive in slightly acidic to neutral soil conditions. The ideal pH range for Juniper shrubs is between 6.0 and 7.0. You can test your soil pH using a soil testing kit and make necessary adjustments by adding organic matter or soil amendments to achieve the desired pH level.
- Soil Fertility: Juniper shrubs are generally adaptable to different soil fertility levels. However, they benefit from soil that is moderately fertile. Adding organic matter, such as compost or well-decomposed manure, can improve the soil fertility and provide a steady supply of nutrients to the plants.
- Soil Texture: Juniper shrubs can tolerate a wide range of soil textures, including sandy, loamy, and clay soils. Sandy soils drain quickly but may require more frequent watering, while clay soils hold water longer and may need additional amendments for improved drainage. Loamy soil, with a balanced texture, is ideal for most Juniper shrubs.
Prior to planting Juniper shrubs, it’s advisable to prepare the soil by removing any weeds, rocks, or debris. Loosen the soil using a garden fork or tiller to improve aeration and root penetration. To enhance drainage and fertility, incorporate organic matter such as compost or peat moss into the soil.
Regular maintenance of the soil is essential for healthy Juniper shrubs. Mulching around the base of the plants with a layer of organic mulch, such as wood chips or straw, helps conserve soil moisture, regulates soil temperature, and inhibits weed growth. Avoid piling mulch directly against the stems to prevent moisture retention, which could lead to rot.
By providing Juniper shrubs with well-drained, fertile soil that matches their pH and texture preferences, you’ll create a foundation for their growth and ensure the plants have the necessary nutrients to thrive.
Drainage Considerations
Good drainage is essential for the overall health and well-being of Juniper shrubs. Poor drainage can lead to waterlogged soil, which can cause root rot and other plant health issues. Consider the following drainage considerations when planting Juniper shrubs:
- Natural Drainage: Assess the natural drainage of the planting area before choosing to plant Juniper shrubs. Avoid areas with poor drainage, such as low-lying spots or areas prone to standing water. Excessively wet soil can suffocate the roots and lead to root rot.
- Avoid Heavy Clay Soil: Heavy clay soil tends to hold water and has slow drainage rates. If your garden has clay soil, improve drainage by adding organic matter such as compost or well-rotted manure. This helps to break up the soil, increase porosity, and enhance water movement.
- Raised Beds or Mounds: If the natural drainage of your soil is inadequate, consider creating raised beds or mounds to elevate the planting area. This allows excess water to drain away more easily. Raised beds also provide better control over soil composition and drainage conditions.
- Amending Soil: If the soil in your planting area has poor drainage, you can improve it by adding materials such as coarse sand, perlite, or vermiculite. These amendments help to create air pockets in the soil, improving aeration and enhancing water drainage.
- Watering Practices: Proper watering practices can also help maintain good drainage. Water deeply, but infrequently, allowing the soil to dry out between watering sessions. This prevents overwatering, which can lead to waterlogged soil and root damage.
Before planting Juniper shrubs, take the time to assess the drainage conditions of your chosen location. If needed, amend the soil or create raised beds to ensure that excess water can flow away from the plants’ roots.
It’s also important to monitor the irrigation practices to prevent overwatering. Consistent inspection of the soil’s moisture level will help determine when and how much water the Juniper shrubs require.
By ensuring proper drainage for your Juniper shrubs, you will promote healthy root development, prevent water-related issues, and help the plants thrive in their new environment.
Space and Location
When it comes to planting Juniper shrubs, considering the available space and selecting the appropriate location is essential. By carefully considering space and location, you can optimize the visual impact and functionality of your garden. Here are some key points to keep in mind:
- Available Space: Before choosing a Juniper shrub, assess the available space in your garden or landscape. Consider the mature size of the shrub, both in height and width, and ensure that it has enough room to grow without overcrowding other plants or structures nearby.
- Function and Purpose: Determine the purpose of planting Juniper shrubs in your landscape. Are you looking to create a privacy screen, define borders, or add visual interest? Understanding the functional aspect will help you choose the right size and shape of Juniper shrub to fulfill your desired purpose.
- Placement: Consider the placement of the Juniper shrubs in relation to other elements in your garden. Planting them strategically can create focal points, provide accent color, or balance the overall design. Avoid planting Junipers too close to structures or other plants to allow for proper air circulation and growth.
- Growth Rate and Maintenance: Different Juniper shrub varieties have varying growth rates. Some grow more quickly and may require additional space for their expansion, while others have slower growth rates and remain more compact. Consider the growth rate of the specific Juniper variety you choose to ensure it fits well in the designated space.
When selecting the location for planting Juniper shrubs, take into account the sunlight requirements and soil conditions discussed earlier. Find a spot that meets these needs while also accommodating the desired purpose and aesthetics of your landscape.
Additionally, consider the future growth of the Juniper shrubs and their impact on surrounding plants and structures. Avoid planting them too close to the house or in areas where they may obstruct walkways or obstruct views.
By carefully planning the space and location for your Juniper shrubs, you can create a harmonious and visually pleasing landscape that showcases the unique beauty of these plants.
Types of Juniper Shrubs
Juniper shrubs come in a wide variety of sizes, shapes, and colors, making them a versatile choice for any garden or landscape. Each type of Juniper offers its own unique characteristics, which allows for endless possibilities in creating your desired aesthetic. Here are some popular types of Juniper shrubs to consider:
- Blue Star Juniper (Juniperus squamata ‘Blue Star’): This compact, low-growing Juniper shrub features beautiful silvery-blue foliage that retains its color throughout the year. It forms a dense, star-like shape and is perfect for adding texture and color contrast to rock gardens, borders, or as a ground cover.
- Skyrocket Juniper (Juniperus scopulorum ‘Skyrocket’): With its narrow, columnar shape and vibrant blue-green foliage, the Skyrocket Juniper provides a striking vertical accent in any landscape. This fast-growing Juniper shrub is often used as a privacy screen or as an architectural element in garden designs.
- Golden Juniper (Juniperus chinensis ‘Kaizuka’): Known for its graceful, weeping branches and golden-yellow foliage, the Golden Juniper adds a touch of elegance to any garden. Its unique form and color make it a focal point in the landscape, particularly in Japanese-inspired gardens or as a specimen tree.
- Pfitzer Juniper (Juniperus chinensis ‘Pfitzeriana’): This versatile Juniper shrub has a spreading, low-mounding habit and soft, feathery foliage. It comes in several varieties, ranging from green to golden hues, making it a popular choice for ground covers, erosion control, and mass plantings.
- Wichita Blue Juniper (Juniperus scopulorum ‘Wichita Blue’): This Juniper shrub is known for its intense blue-gray foliage that retains its color all year round. Its upright, pyramidal form makes it an excellent choice for creating focal points or as a hedge. It provides a stunning contrast to surrounding greenery.
These are just a few examples of the many Juniper shrub varieties available. When selecting a Juniper type, consider factors such as size, growth habit, foliage color, and the specific requirements of your landscape.
Research different Juniper varieties, visit local nurseries, or consult with landscaping professionals to find the perfect Juniper shrubs that will complement your garden and fulfill your desired design aesthetic.
By incorporating a variety of Juniper shrub types, you can create a dynamic landscape that showcases their unique colors, textures, and growth habits, adding interest and beauty to your outdoor space.
Planting Process
The planting process is a crucial step in ensuring the successful establishment and growth of Juniper shrubs. Following the proper procedure will provide them with a strong foundation and optimize their chances of thriving in their new environment. Here is a step-by-step guide for planting Juniper shrubs:
- Preparing the Site: Start by preparing the planting site. Remove any weeds, grass, or debris from the area. Loosen the soil using a garden fork or tiller, breaking up any clumps and creating a friable texture.
- Digging the Hole: Dig a hole that is two to three times the width of the root ball and slightly shallower than the root ball’s depth. This will allow the roots to expand outward and establish themselves more easily.
- Placing the Juniper Shrub: Carefully remove the Juniper shrub from its container or wrap if it’s bare-root. Gently loosen the roots without damaging them. Place the shrub in the center of the hole, making sure it sits at the same level as or slightly above the surrounding ground.
- Backfilling and Mulching: Backfill the hole with the soil you dug out, ensuring that the roots are properly covered. Lightly firm the soil around the base of the shrub. Apply a layer of organic mulch, such as wood chips or bark, around the base, leaving a gap around the stem to prevent moisture buildup that could lead to rot.
- Watering and Care Instructions: Water the newly planted Juniper shrub thoroughly after planting. Provide enough water to saturate the soil and settle it around the roots. Monitor the soil moisture regularly and water when needed, ensuring that the soil doesn’t become waterlogged.
It’s important to note that the planting process may vary slightly depending on the specific type of Juniper shrub you are planting and your local climate. Some Juniper varieties may require specific soil amendments or additional protection during extreme weather conditions.
When planting multiple Juniper shrubs, space them according to their mature size to allow them room to grow and prevent overcrowding. Follow the recommended planting distances for the specific variety you are working with.
After planting, it’s important to continue monitoring the Juniper shrubs for the first few weeks to ensure they are well-established. Regularly check for signs of sufficient moisture, and provide additional watering if necessary.
By following the proper planting process and providing the necessary care, you will set your Juniper shrubs on the path to thriving in their new home, bringing beauty and joy to your landscape for years to come.
Preparing the Site
Properly preparing the planting site is a crucial step in ensuring the success of your Juniper shrubs. Taking the time to adequately prepare the site will provide the plants with a favorable environment to establish their roots and promote healthy growth. Here’s a breakdown of the key steps involved in preparing the site:
- Clearing the Area: Start by removing any existing vegetation, weeds, or grass in the area where you plan to plant the Juniper shrubs. This will prevent competition for nutrients and ensure that the shrubs have ample space to grow.
- Soil Testing: Conduct a soil test to determine the pH level and nutrient content of the soil. This will help you understand the soil’s characteristics and identify any necessary amendments. Soil testing kits are readily available at garden centers or through local agricultural extension offices.
- Amending the Soil: Based on the soil test results, amend the soil as needed to create a suitable growing environment for Juniper shrubs. Add organic matter, such as compost or well-rotted manure, to improve soil structure, increase nutrient content, and enhance drainage capabilities if necessary.
- Removing Rocks and Debris: Ensure that the planting site is cleared of any rocks, roots, or debris that may impede the growth of the Juniper shrubs or interfere with their root development. Clearing the area will provide a clean and unobstructed space for the plants to thrive.
- Proper Drainage: Evaluate the natural drainage of the site. Juniper shrubs prefer well-drained soil, so if the area has poor drainage, consider creating raised beds or amending the soil with sand or organic matter to improve drainage capabilities.
- Site Accessibility: Take into consideration the accessibility of the site for maintenance and care. Ensure that there is sufficient space to navigate around the Juniper shrubs for pruning, watering, and other necessary tasks.
By preparing the site properly, you establish a solid foundation for the growth and health of your Juniper shrubs. Taking the time to clear the area, amend the soil, and ensure proper drainage will create an ideal environment for your plants to thrive.
Before proceeding with planting, it’s essential to research the specific requirements of the Juniper shrub variety you have chosen. Different varieties may have specific preferences and needs that should be considered during site preparation.
Remember, careful site preparation is crucial in providing the best conditions for your Juniper shrubs to establish themselves and flourish in their new home.
Digging the Hole
Digging the hole properly is a critical step in the planting process for Juniper shrubs. Creating the right-sized hole will give the shrubs enough space for their roots to establish and grow, setting them up for success. Here’s a guide on how to dig the hole for planting Juniper shrubs:
- Measuring the Hole: Before digging, determine the appropriate size for the hole. It should be two to three times wider than the root ball of the Juniper shrub. The depth of the hole should be slightly shallower than the height of the root ball.
- Making the Markings: Mark the area where the hole will be dug using stakes or spray paint. This will help you maintain the desired size and location as you start digging.
- Removing the Grass or Vegetation: Clear the marked area of any grass, weeds, or vegetation. Use a sod cutter or a shovel to remove the top layer of turf or vegetation to expose the bare soil.
- Starting the Hole: Use a shovel or a spade to start digging the hole. Begin by breaking up the soil at the perimeter of the marked area. Work your way inwards, loosening the soil as you go.
- Checking the Depth: Periodically check the depth of the hole as you dig to ensure it matches the height of the root ball. The top of the root ball should sit slightly above the surrounding ground to allow for settling.
- Sloping the Sides: Slope the sides of the hole as you dig to allow for easier planting and root expansion. The slope should be gradual and not too steep to prevent soil collapse.
- Breaking Up Clumps: As you dig, break up any large clumps of soil and remove any rocks or obstructions that may hinder root growth.
When digging the hole, it’s crucial to maintain the proper dimensions. A hole that is too small may restrict root growth, while one that is too large can cause the soil to settle unevenly around the roots.
Remember to consider the specific needs of the Juniper shrub variety you’re planting. Some varieties may have more extensive root systems or require a slightly different planting depth, so it’s important to research and adjust accordingly.
By taking the time to dig the hole properly, you provide the Juniper shrubs with a spacious and well-prepared area in which to establish their roots, helping them thrive in their new environment.
Placing the Juniper Shrub
Placing the Juniper shrub in the hole correctly is a crucial step in the planting process. Proper placement ensures that the shrub is positioned at the right height and orientation to optimize its growth and overall appearance. Here’s a step-by-step guide on how to place the Juniper shrub:
- Removing the Juniper Shrub: Carefully remove the Juniper shrub from its container or unwrap the roots if it’s a bare-root plant. Avoid pulling on the stem or branches, as this can cause damage.
- Examining the Root Ball: Inspect the root ball of the Juniper shrub. Look for any tangled or circling roots and gently untangle them or trim them to encourage proper growth.
- Placing the Shrub in the Hole: Lower the Juniper shrub into the hole, positioning it at the center. Ensure that the top of the root ball is level with or slightly above the surrounding ground. This slight elevation accounts for settling and helps prevent the shrub from sinking too deeply.
- Checking the Orientation: Take a step back and assess the orientation of the Juniper shrub. Make sure that its best side, featuring the fullest and most attractive foliage, is facing the desired viewing angle.
- Backfilling the Hole: Use the soil that was dug out earlier to backfill around the root ball. Fill the hole gradually, gently pressing down the soil with your hands to eliminate air pockets. Avoid compacting the soil too tightly, as this can restrict water and oxygen movement.
- Watering and Settling: Once the hole is backfilled, water the soil thoroughly around the Juniper shrub. This helps settle the soil and ensure good root-to-soil contact. Add more soil if needed to maintain the proper level around the shrub.
During the placement process, be mindful of the Juniper shrub’s specific growth habits and natural form. Aim to position it in a way that showcases its best features and allows room for its mature size and shape.
Take care not to plant the Juniper shrub too deeply, as this can lead to moisture retention and suffocate the roots. Likewise, avoid planting it too high, as it may be prone to drying out. The top of the root ball should be level with or slightly above the ground.
By properly placing the Juniper shrub, you set the stage for its healthy growth and ensure that it is showcased in the best possible way within your landscape.
Backfilling and Mulching
After placing the Juniper shrub in the hole, the next step is to backfill the hole and apply mulch around the base. This stage is crucial for providing the necessary support and protection to promote healthy growth. Here is a guide on backfilling and mulching your Juniper shrub:
- Backfilling: Use the soil that was removed when digging the hole to backfill around the root ball. Gently fill in the hole, ensuring that the soil covers the roots completely. Avoid burying the stem or lower branches of the Juniper shrub.
- Firming the Soil: As you backfill the hole, lightly firm the soil around the base of the Juniper shrub. Use your hands or a gardening tool to gently press down the soil to eliminate air pockets. Be cautious not to compact the soil too tightly as this can restrict root growth and water absorption.
- Mulching: Apply a layer of organic mulch around the base of the Juniper shrub. Use materials such as wood chips, bark, or straw. Mulching helps conserve soil moisture, suppresses weed growth, and regulates soil temperature.
- Mulch Depth: Apply the mulch in a layer that is two to three inches deep. Be careful not to pile the mulch against the stem of the Juniper shrub, as this can create excessive moisture around the trunk and lead to rot or disease. Leave a gap between the mulch and the trunk.
- Mulch Placement: Extend the mulch layer two to three feet beyond the outermost branches of the Juniper shrub. This will help suppress weeds and provide a beneficial moisture buffer for the roots.
When selecting mulch, choose organic materials that will break down over time to enrich the soil. Avoid using thick layers of non-organic materials like pebbles or rocks that can retain heat and moisture, potentially causing root damage.
Remember to periodically check the mulch layer and replenish it as needed. Over time, the mulch will break down and decompose, so it is essential to maintain the appropriate depth for optimum benefits.
Proper backfilling and mulching contribute to the overall health and success of your Juniper shrub. They help retain moisture, regulate temperature, suppress weed growth, and provide a protective layer for the roots.
By following these steps, you are providing the Juniper shrub with a solid foundation and optimal conditions for healthy growth and long-term vitality.
Watering and Care Instructions
Proper watering and care are essential for the health and longevity of your Juniper shrub. Establishing a regular watering routine, along with other necessary care practices, will ensure that your shrub thrives in its new environment. Follow these guidelines for watering and caring for your Juniper shrub:
- Initial Watering: Immediately after planting, water the Juniper shrub thoroughly. This helps settle the soil and ensures good root-to-soil contact. Water until the soil is evenly moist, but avoid overwatering, as this can lead to root rot.
- Monitoring Soil Moisture: Regularly monitor the soil moisture around the Juniper shrub. Stick your finger into the soil about an inch or two deep. If it feels dry, it’s time to water. If it feels moist, hold off on watering to avoid waterlogged conditions.
- Watering Frequency: Juniper shrubs generally prefer moderate moisture levels. Water deeply, allowing the water to penetrate the root zone, and then let the soil dry out slightly between waterings. This helps promote healthy root growth and prevents issues caused by overwatering.
- Deep Watering vs. Light Sprinkling: Instead of frequent shallow watering, which encourages shallow root growth, opt for deep watering sessions. This allows the water to penetrate the soil deeply, reaching the plant’s roots and encouraging a stronger root system.
- Watering Considerations: While Juniper shrubs are generally drought tolerant, newly planted shrubs and those in extreme heat conditions may require more frequent watering. Water in the morning or evening to reduce water loss due to evaporation.
- Weed Control: Keep the area around the Juniper shrub free from weeds. Weeds compete with the shrub for water and nutrients. Regularly remove any weeds that may sprout around the base of the shrub to prevent them from hindering its growth.
- Pruning: Juniper shrubs generally require minimal pruning, but occasional pruning may be necessary to maintain their shape and size. Prune in late winter or early spring before new growth emerges. Remove any dead or damaged branches and prune back any overgrown areas as desired.
- Pest and Disease Control: Monitor your Juniper shrub regularly for any signs of pests or diseases. Common issues include spider mites, scale insects, and fungal diseases. If detected, take appropriate measures to control and treat the problem. Consult with a local nursery or garden expert for guidance.
Each Juniper shrub variety may have specific water and care requirements, so it’s important to research the specific needs of your selected variety. Consider the climate, local conditions, and individual plant characteristics when determining watering and care routines.
By providing consistent and appropriate care to your Juniper shrub, you’ll ensure its health and beauty, allowing it to thrive and enhance your garden or landscape for years to come.
Pruning and Maintenance
Pruning and regular maintenance are important aspects of caring for Juniper shrubs. Proper pruning helps maintain their shape, improves their overall health, and enhances their visual appeal. Additionally, ongoing maintenance tasks ensure that your Juniper shrubs remain vibrant and free from potential issues. Here are some guidelines for pruning and maintaining your Juniper shrubs:
- Timing: Prune Juniper shrubs in late winter or early spring before new growth emerges. This allows the plant to recover quickly and minimizes stress. Avoid pruning during periods of extreme heat or frost.
- Tools: Use sharp and clean pruning shears or loppers to make precise cuts. Sterilize your tools with rubbing alcohol or a bleach solution before and after each use to prevent the spread of diseases.
- Remove Dead and Diseased Branches: Regularly inspect your Juniper shrubs and remove any dead, damaged, or diseased branches. This helps enhance the overall appearance and prevents the spread of pathogens to other parts of the plant.
- Shape and Size Control: Juniper shrubs can be pruned to maintain a specific shape or size. Use pruning shears to selectively trim back branches to encourage dense growth or achieve a desired form. Be mindful of the plant’s natural growth habit and aesthetics.
- Thinning: If your Juniper shrub becomes too dense, you can selectively thin out branches to improve airflow and light penetration. This helps reduce the risk of fungal diseases and promotes healthy growth.
- Annual Maintenance: Conduct regular maintenance tasks, such as removing fallen leaves and debris from around the base of the shrub. This helps keep the area clean and minimizes the risk of pests and diseases that thrive in decomposing organic matter.
- Fertilization: Juniper shrubs generally do not require heavy fertilization. However, if your soil lacks nutrients, you can apply a balanced slow-release fertilizer in early spring. Follow the manufacturer’s instructions and avoid over-fertilizing, as this can lead to excessive growth and nutrient imbalances.
- Monitoring for Pests and Diseases: Regularly inspect your Juniper shrubs for signs of pests, such as spider mites or scale insects, and symptoms of diseases, including browning foliage or fungus growth. Treat any issues promptly to prevent further damage.
Always remember to consider the specific requirements of your Juniper shrub variety when pruning and maintaining. Some varieties may have different growth habits or pruning preferences, so it’s important to research and adapt your approach accordingly.
By following proper pruning techniques and consistently maintaining your Juniper shrubs, you will help them stay healthy, well-shaped, and visually appealing for years to come.
Troubleshooting Common Issues
While Juniper shrubs are generally hardy and resilient, they may encounter some common issues that can impact their health and appearance. Understanding and troubleshooting these issues can help you address and mitigate potential problems. Here are some common issues you may encounter with Juniper shrubs and how to deal with them:
- Spider Mites: Spider mites are tiny pests that can infest Juniper shrubs, causing yellowing leaves and fine webbing. To control them, regularly inspect your shrubs for signs of infestation, rinse the foliage with a strong jet of water, and consider using insecticidal soap or horticultural oils.
- Scale Insects: Scale insects are sap-sucking pests that can weaken Juniper shrubs. They appear as small, raised bumps on branches. To combat them, prune and dispose of infested branches, and consider treatment with insecticidal soap or horticultural oils.
- Diseases: Juniper shrubs can be susceptible to fungal diseases, such as cedar apple rust, tip blight, and twig dieback. To prevent and manage diseases, ensure proper air circulation and avoid overhead watering. Prune and dispose of infected branches, and consider applying fungicides as directed by a professional.
- Root Rot: Root rot can occur in poorly drained soil, causing yellowing leaves, wilting, and decline. To avoid root rot, ensure proper soil drainage and avoid overwatering or planting in compacted soil. Treat root rot by improving drainage, pruning affected roots, and applying appropriate fungicides.
- Browning Foliage: Browning foliage in Juniper shrubs can indicate various issues such as drought stress, overwatering, nutrient deficiencies, or pests. Monitor soil moisture, adjust watering practices, fertilize as needed, and regularly inspect for pests to determine the cause of browning foliage and take appropriate corrective measures.
- Winter Damage: In colder regions, Juniper shrubs can suffer from winter damage, including browning or discoloration of foliage. Protect your shrubs by providing windbreaks, avoiding late-season pruning, and keeping them adequately hydrated before the onset of winter.
Regularly inspecting your Juniper shrubs, practicing good cultural practices, and promptly addressing any issues can help maintain the health and vitality of your plants. Consulting with a local nursery or a professional landscaper can provide specific guidance and recommendations based on your region and the specific issues you may encounter.
By troubleshooting common issues and taking appropriate remedial actions, you can help your Juniper shrubs overcome challenges and continue to thrive and enhance your garden or landscape.
Conclusion
Congratulations on your journey into the world of Juniper shrub care! By understanding the factors to consider before planting, such as sunlight requirements, soil conditions, drainage considerations, and the available space and location, you are well-equipped to create the ideal environment for your Juniper shrubs to flourish.
Remember to choose the right type of Juniper shrub that suits your aesthetic preferences and complements your landscape. Take the time to properly prepare the site, dig the hole to the appropriate size, and place the shrub at the right height and orientation. Backfill the hole, apply mulch, and establish a regular watering and care routine to ensure the health and vitality of your Juniper shrub.
Don’t forget about pruning and ongoing maintenance. Regularly inspect your Juniper shrubs for pests, diseases, and common issues, and take appropriate measures to address them. With proper care, you can enjoy the beauty and benefits of your Juniper shrubs for many years to come.
Remember, each Juniper shrub is unique, and it’s important to adapt your care practices to the specific requirements of the variety you choose. Consult with local experts, nursery professionals, or landscapers for guidance tailored to your region and individual circumstances.
Planting and caring for Juniper shrubs can be a rewarding experience, as these versatile plants bring beauty, texture, and structure to any garden or landscape. Enjoy the process, embrace the learning opportunities, and watch as your Juniper shrubs thrive and enhance the natural beauty of your outdoor space.