Home>Gardening Basics>Understanding Soil>How To Use A PH Meter For Soil

Understanding Soil
How To Use A PH Meter For Soil
Published: February 9, 2024
Learn how to use a pH meter to understand soil better. Discover the importance of monitoring soil pH levels for optimal plant growth and nutrient absorption
(Many of the links in this article redirect to a specific reviewed product. Your purchase of these products through affiliate links helps to generate commission for Chicagolandgardening.com, at no extra cost. Learn more)
Table of Contents
- Introduction
- What is a pH Meter?
- Why is Measuring Soil pH Important?
- Step-by-step Guide: How to Use a pH Meter for Soil Testing
- Preparing the pH Meter for Use
- Collecting Soil Samples
- Calibrating the pH Meter
- Testing the Soil pH
- Interpreting the pH Meter Readings
- Adjusting Soil pH Based on the Readings
- Tips and Precautions for Using a pH Meter for Soil Testing
- Conclusion
Introduction
Welcome to the world of soil science, where we dive deep into the fascinating realm of soil and unlock its secrets. One of the most important factors to understand about soil is its pH level. pH measures the acidity or alkalinity of the soil, and it plays a crucial role in the health and productivity of plants. To accurately determine soil pH, one of the most effective tools to use is a pH meter.
A pH meter is a device that measures the concentration of hydrogen ions (H+) in a solution, in this case, the soil. By assessing the soil pH, you can gain valuable insights into its nutrient availability, microbial activity, and overall growing conditions. Whether you are a gardener, farmer, or environmental enthusiast, possessing a pH meter and knowing how to use it can significantly enhance your understanding of soil dynamics and help you make informed decisions for optimizing plant growth.
This article will guide you through the process of using a pH meter for soil testing. We will cover everything from preparing the meter for use to interpreting the readings and making necessary adjustments to the soil pH. So, grab your pH meter and let’s embark on this soil science adventure!
What is a pH Meter?
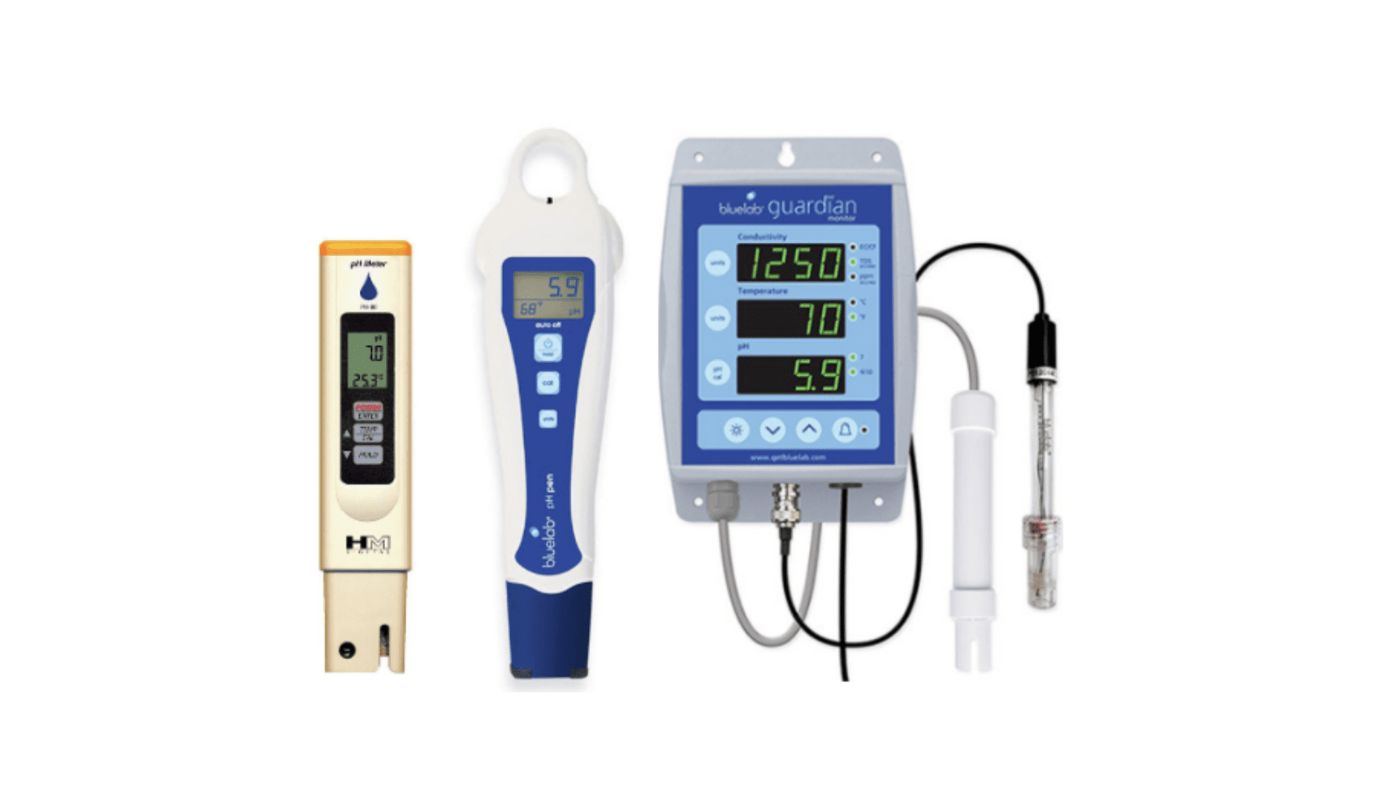
A pH meter is a sophisticated electronic device specifically designed to measure the acidity or alkalinity of a solution, including soil. It uses a glass electrode to detect the concentration of hydrogen ions (H+) present in the liquid being tested. The pH meter translates this information into a numerical value known as the pH level, which ranges from 0 to 14.
The pH meter consists of several key components. The glass electrode, also known as the pH sensor, is the most critical part. It has a bulb at the bottom that interacts with the solution being tested. Inside the electrode, there is a reference electrode that maintains a stable electrical potential. The pH meter also includes a temperature sensor that compensates for changes in temperature, as pH readings can be influenced by temperature variations.
Most pH meters today are digital and provide real-time readings on an easy-to-read display. They may also have additional features such as automatic calibration, data logging, and the ability to measure other parameters like temperature and conductivity.
Using a pH meter offers several advantages over other traditional methods of measuring soil pH, such as using pH test strips or chemical indicators. pH meters provide more accurate and precise results, allowing for better decision-making when it comes to soil management. They also eliminate the subjectivity and human error that can occur when interpreting color changes on test strips or relying on visual observations.
It’s important to note that pH meters require periodic calibration and maintenance to ensure their accuracy. Regular cleaning and calibration with standard pH buffer solutions are necessary to maintain the reliability of the readings. However, with proper care and usage, a pH meter can be a valuable tool in evaluating the pH levels of various solutions, including soil.
Why is Measuring Soil pH Important?
Measuring soil pH is crucial for understanding the quality and fertility of the soil. The pH level directly influences the availability of essential nutrients to plants, as well as the activity of soil microorganisms. Here are some key reasons why measuring soil pH is important:
- Nutrient Availability: Each nutrient has an optimal pH range at which it is most readily available to plants. By knowing the soil pH, you can determine whether the soil conditions are favorable for nutrient uptake. For example, most plants prefer slightly acidic to neutral soil (pH 6.0-7.0) for optimal nutrient availability. If the pH deviates from this range, certain nutrients may become locked in the soil and less accessible to plants, leading to nutrient deficiencies or imbalances.
- Soil Microbial Activity: Soil microorganisms play a crucial role in nutrient cycling and maintaining soil health. Different microbial species thrive under different pH conditions. Measuring soil pH helps determine whether the soil environment is suitable for beneficial microorganisms to thrive. For instance, acid-loving microbes may dominate in acidic soils, while alkaline soils may support different microbial communities. Understanding the soil pH can guide the management practices needed to support beneficial microbial activity.
- Plant Health and Growth: Soil pH greatly influences plant growth, root development, and overall plant health. Some plants have specific pH requirements to thrive. Measuring soil pH allows you to create optimal growing conditions for specific plant species. For example, blueberries prefer highly acidic soil (pH 4.5-5.5), while other plants like lettuce or tomatoes prefer slightly acidic to neutral soil. Adjusting the pH of the soil can help maximize plant growth and productivity.
- Environmental Impact: Soil pH can affect environmental parameters, such as the leaching of nutrients and the release of certain elements into groundwater. Highly acidic or alkaline soils can negatively impact adjacent water bodies and ecosystems. By monitoring and managing soil pH, you can minimize the potential environmental impacts associated with soil management practices.
- Optimizing Soil amendments: Depending on the current pH level, soil amendments can be applied to adjust the pH and create favorable growing conditions. For example, adding lime can raise the pH of acidic soils, while sulfur or peat moss can lower the pH of alkaline soils. Accurate pH measurements guide the selection and application of appropriate amendments.
By measuring soil pH, you gain valuable insights into the soil conditions, nutrient availability, and microbial activity, enabling better decision-making for sustainable soil management and plant growth.
Step-by-step Guide: How to Use a pH Meter for Soil Testing
Using a pH meter for soil testing is a straightforward process that requires proper preparation, calibration, and careful testing procedures. Follow these step-by-step instructions to effectively measure the pH level of your soil:
- Preparing the pH meter for use: Start by ensuring that your pH meter is clean and in good working condition. If necessary, follow the manufacturer’s instructions for cleaning the electrode and calibrating the meter. Remember to have fresh batteries or ensure that the meter is adequately charged to avoid any interruptions during testing.
- Collecting soil samples: Collect representative soil samples from the area you want to test. Use a clean sampling tool, such as a soil auger or shovel, and avoid areas with obvious variations in soil conditions. Take samples from multiple locations within the area of interest and combine them to create a representative composite sample.
- Calibrating the pH meter: Before testing, it’s essential to calibrate the pH meter using standard buffer solutions. Refer to the manufacturer’s instructions for the specific calibration process. Typically, you’ll need two buffer solutions, one with a pH of 4.0 and another with a pH of 7.0 or 10.0. Immerse the electrode in each solution and adjust the meter to match the pH values of the buffers.
- Testing the soil pH: Once the pH meter is calibrated, it’s time to test the soil pH. Take a small portion of your composite soil sample and place it into a clean container. Add distilled water in a 1:1 ratio (equal parts soil and water) to create a slurry. Mix the slurry thoroughly to ensure a uniform sample.
- Inserting the pH meter: Immerse the clean pH electrode of the meter into the soil slurry. If your meter has a temperature sensor, ensure that it is also submerged in the slurry. Gently stir the mixture while avoiding any contact between the electrode and the container walls. Allow a few seconds for the reading on the meter display to stabilize.
- Recording the pH reading: Once the pH reading stabilizes on the display, take note of the value. This reading represents the pH level of the soil sample you tested. Repeat the process for multiple samples from different areas if you want a more comprehensive understanding of the soil pH in your target area.
- Interpreting the pH meter readings: Use the recorded pH meter readings to assess the acidity or alkalinity of the soil. Compare the readings to the optimal pH range for the plants you intend to grow. If the pH falls outside the desired range, adjustments may be necessary to create favorable conditions for plant growth.
- Adjusting soil pH based on the readings: If soil pH needs to be adjusted, you can use specific amendments to raise or lower it. Common amendments include lime to raise pH and sulfur or peat moss to lower pH. Follow the recommended application rates for the chosen amendment and retest the soil after applying the adjustments to ensure the desired pH level is achieved.
By following these steps, you can effectively use a pH meter to measure the pH level of your soil and make informed decisions to optimize plant growth and soil health.
Preparing the pH Meter for Use
Before conducting soil pH testing, it’s essential to properly prepare the pH meter to ensure accurate and reliable measurements. Here are the key steps to prepare your pH meter for use:
- Clean the pH electrode: The pH electrode is the part of the meter that comes into direct contact with the soil sample. Begin by gently rinsing the electrode with distilled water to remove any debris or residue. Avoid using tap water, as it may contain chemicals or impurities that can affect the accuracy of the measurements. Pat the electrode dry with a clean tissue or cloth.
- Check the electrode condition: Inspect the pH electrode for any signs of damage or wear. Look for cracks, chips, or discoloration. If any issues are detected, it may be necessary to replace the electrode or consult the manufacturer for guidance.
- Calibrating the pH meter: Calibration is a critical step to ensure accurate readings. Follow the manufacturer’s instructions for calibrating your specific pH meter model. Most pH meters require calibration using standard buffer solutions with known pH values. Two buffer solutions are typically used: pH 4 and pH 7 or pH 10. Immerse the electrode in the buffer solutions and adjust the meter settings to match the pH values specified for the buffers.
- Condition the electrode: If the pH meter has been sitting idle for an extended period or if it’s a new meter, it’s important to condition the electrode. Conditioning involves immersing the electrode in a storage solution or electrode conditioning solution recommended by the manufacturer. This step helps to ensure optimal performance and accuracy of the meter. Generally, conditioning involves soaking the electrode for a specific period, as indicated in the instructions provided.
- Final checks: Before using the pH meter for soil testing, perform some final checks. Ensure that the batteries are fully charged, or the meter is connected to a power source. Check the display to ensure it is working correctly and provides a clear and readable output. Inspect any additional features or functionalities of the meter, such as temperature compensation, and make sure they are properly set for accurate results.
By taking the time to properly prepare the pH meter, you can ensure accurate and reliable pH measurements when testing soil samples. Following these steps will help you start the testing process on the right foot and lay the foundation for obtaining accurate soil pH results.
Collecting Soil Samples
Collecting representative soil samples is a critical step in accurately assessing the pH level of your soil. By following proper sampling techniques, you can obtain reliable results that reflect the overall soil conditions in your target area. Here’s a step-by-step guide for collecting soil samples:
- Determine the sampling locations: Identify the areas within your target site that you want to assess for pH levels. Consider factors such as variations in soil type, topography, vegetation, and past soil management practices. Divide the area into zones if necessary, especially if there are noticeable differences that may affect soil pH.
- Choose the right sampling tool: Select a clean and appropriate tool for collecting soil samples. A soil auger, shovel, or soil probe are commonly used tools. Ensure that the tool is free from any contaminants that may affect the pH readings.
- Determine the sampling depth: The depth at which you collect soil samples may vary depending on the purpose of the analysis. For most cases, collecting soil samples from the top 6-8 inches (15-20 cm) of soil is sufficient, as this is the zone where the majority of plant roots are present.
- Remove surface debris: Clear away any surface debris, such as leaves, grass, or rocks, from the sampling area. This will ensure that you collect a representative sample without any interference from external factors.
- Collect multiple sub-samples: Within each sampling location, collect multiple sub-samples to create a composite sample that represents the entire area. Take sub-samples at regular intervals across the sampling area in a zigzag or random pattern. The number of sub-samples to collect depends on the size of the area being assessed, but a minimum of six to eight sub-samples is recommended.
- Collect sub-samples uniformly: When collecting sub-samples, ensure that you collect them at a consistent depth and take care to include both the surface soil and the underlying soil. Place each sub-sample in a clean container or bucket, labeling it with a unique identifier to keep track of its location.
- Combine sub-samples: Once you have collected all the sub-samples from a specific location, thoroughly mix them together in the labeled container. This will create a composite soil sample that represents the entire sampling location.
- Repeat the process: Repeat the sub-sampling process for each identified location within your target area, ensuring that you collect an adequate number of sub-samples to create representative composite samples.
- Document the sampling details: Keep a record of the sampling locations, the number of sub-samples collected, and any notable observations about each location. This information will help you interpret the pH readings in relation to the specific areas within your target site.
By following these guidelines for collecting soil samples, you can ensure that the samples are representative of the overall soil conditions in your target area. This will lead to more accurate pH measurements and enable you to make informed decisions regarding soil management and plant growth.
Calibrating the pH Meter
Calibrating the pH meter is a crucial step to ensure accurate and reliable pH measurements. Calibration involves aligning the pH meter with known pH values using calibration buffer solutions. By following the proper calibration procedure, you can trust that your pH meter will provide accurate readings. Here is a step-by-step guide to calibrating the pH meter:
- Gather the necessary materials: To calibrate the pH meter, you will need the pH meter itself, fresh calibration buffer solutions with known pH values, and clean containers to hold the buffer solutions.
- Select the appropriate buffer solutions: The choice of buffer solutions depends on the pH range you expect to measure. Two common buffer solutions used for pH calibration are pH 4.0 and pH 7.0. pH 10.0 buffer solution may also be needed for certain pH meters. Make sure the buffer solutions are fresh and have not expired.
- Prepare the calibration containers: Label two clean containers as “pH 4.0” and “pH 7.0” respectively. Rinse the containers with distilled water to remove any contaminants and dry them thoroughly.
- Start with the pH 7.0 buffer solution: Pour enough pH 7.0 buffer solution into the “pH 7.0” labeled container to submerge the pH electrode of the meter. Ensure that the electrode is fully immersed in the solution, but that it does not touch the sides or bottom of the container.
- Calibrate the pH meter: Turn on the pH meter and allow it to stabilize. Immerse the clean pH electrode into the pH 7.0 buffer solution and gently stir the solution. Refer to the manufacturer’s instructions for the recommended calibration process for your specific pH meter model.
- Adjust the pH 7.0 reading: Once the pH meter stabilizes, check the reading on the display. If it deviates from the expected pH value of 7.0, use the calibration adjustments on the meter to match the value indicated by the buffer solution. This may involve using buttons or knobs to adjust the display reading accordingly.
- Rinse the electrode: After calibrating with the pH 7.0 buffer solution, rinse the pH electrode with distilled water to remove any buffer residue. Gently pat the electrode dry with a clean tissue or cloth.
- Repeat with the pH 4.0 buffer solution: Follow the same steps outlined above, but this time with the pH 4.0 buffer solution. Pour enough pH 4.0 buffer solution into the “pH 4.0” labeled container and immerse the pH electrode into the solution. Adjust the pH meter reading, if necessary, to match the pH 4.0 value indicated by the buffer solution.
- Rinse and dry the electrode: Once the pH meter is calibrated with both the pH 7.0 and pH 4.0 buffer solutions, rinse the pH electrode with distilled water and pat it dry again to ensure there is no cross-contamination between the buffer solutions.
- Confirm the calibration: To ensure the calibration is accurate, some pH meters may offer the option to perform a verification check using a third buffer solution, such as pH 10.0. This step can help validate the accuracy of the calibration and provide additional confidence in the pH meter’s measurements.
Calibrating the pH meter is a vital step to ensure precise pH measurements. Regular calibration, based on the manufacturer’s recommended frequency, will help maintain the accuracy of the pH meter and provide reliable results during soil pH testing.
Testing the Soil pH
Once the pH meter is prepared and calibrated, it’s time to test the soil pH. Testing the soil pH involves creating a soil slurry and immersing the pH electrode into the mixture to obtain a pH reading. Here is a step-by-step guide on how to test the soil pH using a pH meter:
- Create a soil slurry: Take a small portion of your composite soil sample and place it into a clean container. Add an equal amount of distilled water to the container, creating a 1:1 ratio of soil to water. This will help create a slurry that allows for accurate pH measurements.
- Mix the soil slurry: Thoroughly mix the soil and water in the container to ensure a uniform and consistent sample. Stir the slurry gently with a clean spoon or spatula to avoid excessive agitation, which can introduce air bubbles and potentially impact the pH reading.
- Prepare the pH meter: Make sure the pH meter is turned on and calibrated properly according to the manufacturer’s instructions. Ensure that the pH electrode is clean and dry before proceeding.
- Immerse the pH electrode: Carefully insert the clean pH electrode into the soil slurry, making sure it reaches the solution without touching the container’s sides or bottom. For more accurate readings, it’s recommended to hold the electrode in the slurry for at least 30 seconds to allow the pH reading to stabilize.
- Read the pH value: Look at the pH meter’s display and note the pH reading. This number represents the soil’s pH level based on the slurry sample tested. Take note of any additional features on the pH meter, such as temperature compensation, which may affect the final pH reading.
- Repeat for multiple samples: If desired, repeat the testing process using different soil samples from various locations within your target area. This will provide a more comprehensive understanding of the soil pH variability across the site.
- Rinse the pH electrode: After each pH measurement, rinse the pH electrode with distilled water to remove any soil or slurry residue. Gently pat the electrode dry with a clean tissue or cloth before proceeding to the next sample.
Testing the soil pH using a pH meter provides accurate and real-time measurements, allowing you to make informed decisions about soil amendments and plant selection. By following these steps, you can effectively determine the pH level of your soil and gain insight into the soil’s acidity or alkalinity.
Interpreting the pH Meter Readings
Once you have obtained the pH meter readings from testing the soil samples, it is important to interpret the results to understand the soil’s acidity or alkalinity. The pH meter readings provide valuable insights into the soil’s pH level, which can impact nutrient availability, microbial activity, and plant growth. Here is a guide on how to interpret pH meter readings:
- Understanding pH scale: The pH scale ranges from 0 to 14, with 7 being considered neutral. A pH value below 7 indicates acidic soil, while a value above 7 indicates alkaline soil. The closer the pH value is to 0 or 14, the more extreme the acidity or alkalinity, respectively.
- Considering optimal pH range: Different plants have specific pH preferences. Research the pH preferences of the plants you intend to grow and compare the pH meter readings to the optimal pH range for those plants. If the pH falls within the desired range, the soil conditions are favorable for the selected plants.
- Identifying acidic soil: If the pH meter reads below 7, the soil is acidic. The lower the pH value, the more acidic the soil. Acidic soil can limit the availability of certain nutrients, such as phosphorus, calcium, and magnesium, which can negatively impact plant growth. If the pH is extremely low, below 5.5, it may indicate the potential for aluminum or manganese toxicity.
- Recognizing alkaline soil: If the pH meter reads above 7, the soil is alkaline. Alkaline soil can limit the availability of certain nutrients, such as iron, manganese, and zinc. Additionally, alkaline soil may have high levels of soluble salts, which can affect plant growth. It is important to note that certain plants, like cacti and some desert-adapted species, can tolerate alkaline soil.
- Considering amendments: If the pH meter readings are outside the recommended range for your target plants, adjustments may be necessary. Acidic soil can be amended by adding materials like lime or wood ash to raise the pH. Alkaline soil, on the other hand, can be amended with elemental sulfur or organic matter like compost to lower the pH. Consult with a local agricultural extension service or a soil expert for recommendations on specific amendments.
- Monitoring trends: It is beneficial to monitor pH meter readings over time to identify trends or changes in soil pH. Regular soil testing and monitoring can help you assess the effectiveness of soil amendments and management practices in maintaining the desired pH level for optimal plant growth.
Interpreting pH meter readings is crucial to understanding the soil conditions and making informed decisions about soil amendments and plant selection. By considering the pH scale, optimal pH ranges, and potential nutrient limitations, you can take appropriate steps to create favorable growing conditions for your plants.
Adjusting Soil pH Based on the Readings
After interpreting the pH meter readings and assessing the soil’s acidity or alkalinity, adjusting the soil pH may be necessary to create optimal growing conditions for your desired plants. Here are some steps to consider when adjusting soil pH:
- Identify target pH range: Determine the optimal pH range for the plants you intend to grow. Research the specific pH requirements of your selected plant species to ensure accuracy.
- For acidic soil: If the pH meter readings indicate acidic soil below the desired range, you may need to raise the pH. The most common method is by applying agricultural lime or dolomite. These materials contain calcium and magnesium carbonates, which neutralize the acidity in the soil, thus raising the pH. Follow the recommended application rates specific to your soil type and the manufacturer’s instructions.
- For alkaline soil: If the pH meter readings indicate alkaline soil above the desired range, you may need to lower the pH. This can be achieved by applying elemental sulfur or acidic organic matter such as peat moss. These materials help in sulfate formation, which reacts with the soil to release acidity, lowering the pH. Again, follow the recommended application rates and guidelines provided for the specific amendment used.
- Spread amendments evenly: To ensure an even distribution of the soil amendments, spread them uniformly across the target area. Use appropriate tools, such as a spreader or a rake, to help blend the amendments into the soil effectively.
- Consider incorporating amendments: For large planting areas or when the soil pH needs significant adjustment, it may be beneficial to incorporate the amendments into the soil. This can be done by tilling or mixing the amendments into the top layer of soil. The depth of incorporation depends on the plant’s root zone and the target pH range.
- Repeat soil testing: After applying the amendments, allow some time for them to react with the soil and alter the pH. Typically, it is recommended to wait several weeks to months before retesting the soil pH. This allows the amendments to fully integrate into the soil and provide an accurate assessment of the new pH level.
- Monitor and adjust: Regularly monitor the soil pH after adjusting it to ensure it remains within the desired range. Conducting periodic soil tests will help you keep track of pH fluctuations and make any necessary adjustments in a timely manner.
- Consider pH buffers: In some cases, maintaining a stable pH level in the soil can be challenging due to external factors or natural soil characteristics. Using pH buffers, such as high-quality compost or organic matter, can help stabilize pH and provide a more consistent growing environment.
Adjusting soil pH based on the pH meter readings is a crucial step in creating optimal conditions for plant growth. By following these steps and using the appropriate amendments, you can effectively modify the soil pH to meet the requirements of your desired plant species and promote healthy, vibrant growth.
Tips and Precautions for Using a pH Meter for Soil Testing
Using a pH meter for soil testing is a valuable tool in assessing soil pH levels accurately. To ensure accurate and reliable results, it is important to follow some tips and precautions. Here are some key considerations to keep in mind:
- Calibrate regularly: Regular calibration is crucial for accurate pH measurements. Follow the manufacturer’s recommendations for calibration frequency and ensure that the calibration solutions are fresh and within their expiration dates.
- Use distilled water: Always use distilled water when creating the soil slurry or rinsing the pH electrode. Tap water may contain minerals, chemicals, or impurities that can affect pH readings and accuracy.
- Keep the electrode clean: Regularly clean the pH electrode before and after each use. Rinse it with distilled water to remove any residue or contaminants, and pat it dry gently with a clean tissue or cloth. This helps maintain the accuracy of the readings.
- Handle the electrode with care: The glass electrode of the pH meter is delicate and can be easily damaged. Handle it with care to avoid cracks or chips. Avoid touching the electrode bulb with bare hands, as oils and residues from skin contact can affect accuracy.
- Prevent electrode contamination: Avoid cross-contamination between samples by rinsing the pH electrode with distilled water and gently patting it dry before moving on to the next sample. This prevents soil or slurry residue from impacting subsequent readings.
- Stir the slurry gently: When creating the soil slurry, stir it gently to avoid introducing air bubbles or causing excessive agitation. Air bubbles can affect the pH readings, leading to inaccuracies.
- Test multiple locations: To obtain a comprehensive understanding of the soil pH in your target area, test multiple locations and create composite samples. This helps account for potential variations in pH within the site.
- Allow time for stabilization: When immersing the pH electrode in the soil slurry, allow sufficient time for the pH reading to stabilize. This usually takes a few seconds to ensure an accurate measurement.
- Follow safety guidelines: When handling soil samples and amendments, it is important to prioritize personal safety. Wear gloves and wash hands thoroughly after soil sampling and working with soil amendments to avoid potential hazards.
- Consult experts if needed: If you are unsure about the interpretation of pH meter readings or need guidance on soil amendments, consult with agricultural extension services, soil testing laboratories, or experienced professionals. They can provide valuable insights and recommendations specific to your region and soil conditions.
By following these tips and precautions, you can maximize the accuracy and reliability of your pH meter readings, ensuring that you obtain precise information about the soil pH and make informed decisions for optimal soil management and plant health.
Conclusion
Understanding and monitoring soil pH is essential for successful gardening, farming, and land management. By using a pH meter for soil testing, you can accurately assess the acidity or alkalinity of the soil, and make informed decisions to optimize plant growth and nutrient availability. We have covered the step-by-step process of using a pH meter, from preparing the meter to interpreting the readings and making necessary adjustments to the soil pH.
Throughout the article, we highlighted the importance of regularly calibrating the pH meter to ensure accurate measurements. We also emphasized the significance of collecting representative soil samples and creating a soil slurry for testing. Interpreting the pH meter readings allows for a better understanding of the soil conditions and the ability to adjust pH levels accordingly.
Additionally, we provided several tips and precautions to ensure reliable pH meter results. Regular maintenance, cleaning of the pH electrode, and proper handling techniques were emphasized to maintain the accuracy of the meter and prevent cross-contamination between samples.
Remember, adjusting soil pH should be done gradually after careful consideration of the optimal pH range for the specific plants you intend to grow. Consultation with soil experts or agricultural extension services may provide valuable insights for a successful amendment strategy.
Using a pH meter for soil testing empowers you to take proactive measures in optimizing soil health, enhancing nutrient availability, and promoting robust plant growth. By incorporating the knowledge and techniques outlined in this article, you can confidently navigate the world of soil pH and create an environment primed for healthy, vibrant vegetation.