Home>Gardening Techniques>DIY Projects>How To Make A Bonsai Fruit Tree

DIY Projects
How To Make A Bonsai Fruit Tree
Modified: February 9, 2024
Learn how to create your own bonsai fruit tree with this step-by-step DIY projects guide. Discover the art of cultivating miniature fruit trees in your backyard.
(Many of the links in this article redirect to a specific reviewed product. Your purchase of these products through affiliate links helps to generate commission for Chicagolandgardening.com, at no extra cost. Learn more)
Table of Contents
Introduction
Welcome to the fascinating world of DIY projects! If you have ever dreamt of growing your own fruit tree and shaping it into a beautiful bonsai, you’ve come to the right place. Bonsai, which translates to “tray planting,” is a Japanese art form that involves cultivating small, potted trees that mimic the appearance of their full-sized counterparts in nature.
Creating a bonsai fruit tree is a rewarding and fulfilling endeavor. Not only does it provide a sense of accomplishment, but it also allows you to have a unique and striking addition to your home or garden. With a little patience, dedication, and careful nurturing, you can transform an ordinary fruit tree into a stunning bonsai masterpiece.
In this article, we will guide you through the process of making a bonsai fruit tree from start to finish. We will explore the steps involved in selecting the right fruit tree, preparing it for bonsai cultivation, and the various pruning and shaping techniques required to achieve the desired aesthetic appeal. Additionally, we will discuss essential care practices, such as repotting, root pruning, fertilizing, watering, and dealing with pests and diseases.
Creating a bonsai fruit tree is a unique DIY project that requires a combination of artistry, horticultural knowledge, and a love for nature. It allows you to connect with the beauty of bonsai and express your creativity while enjoying the satisfaction of nurturing a living masterpiece. So, let’s embark on this rewarding journey and learn how to make a bonsai fruit tree that will be the envy of all who see it.
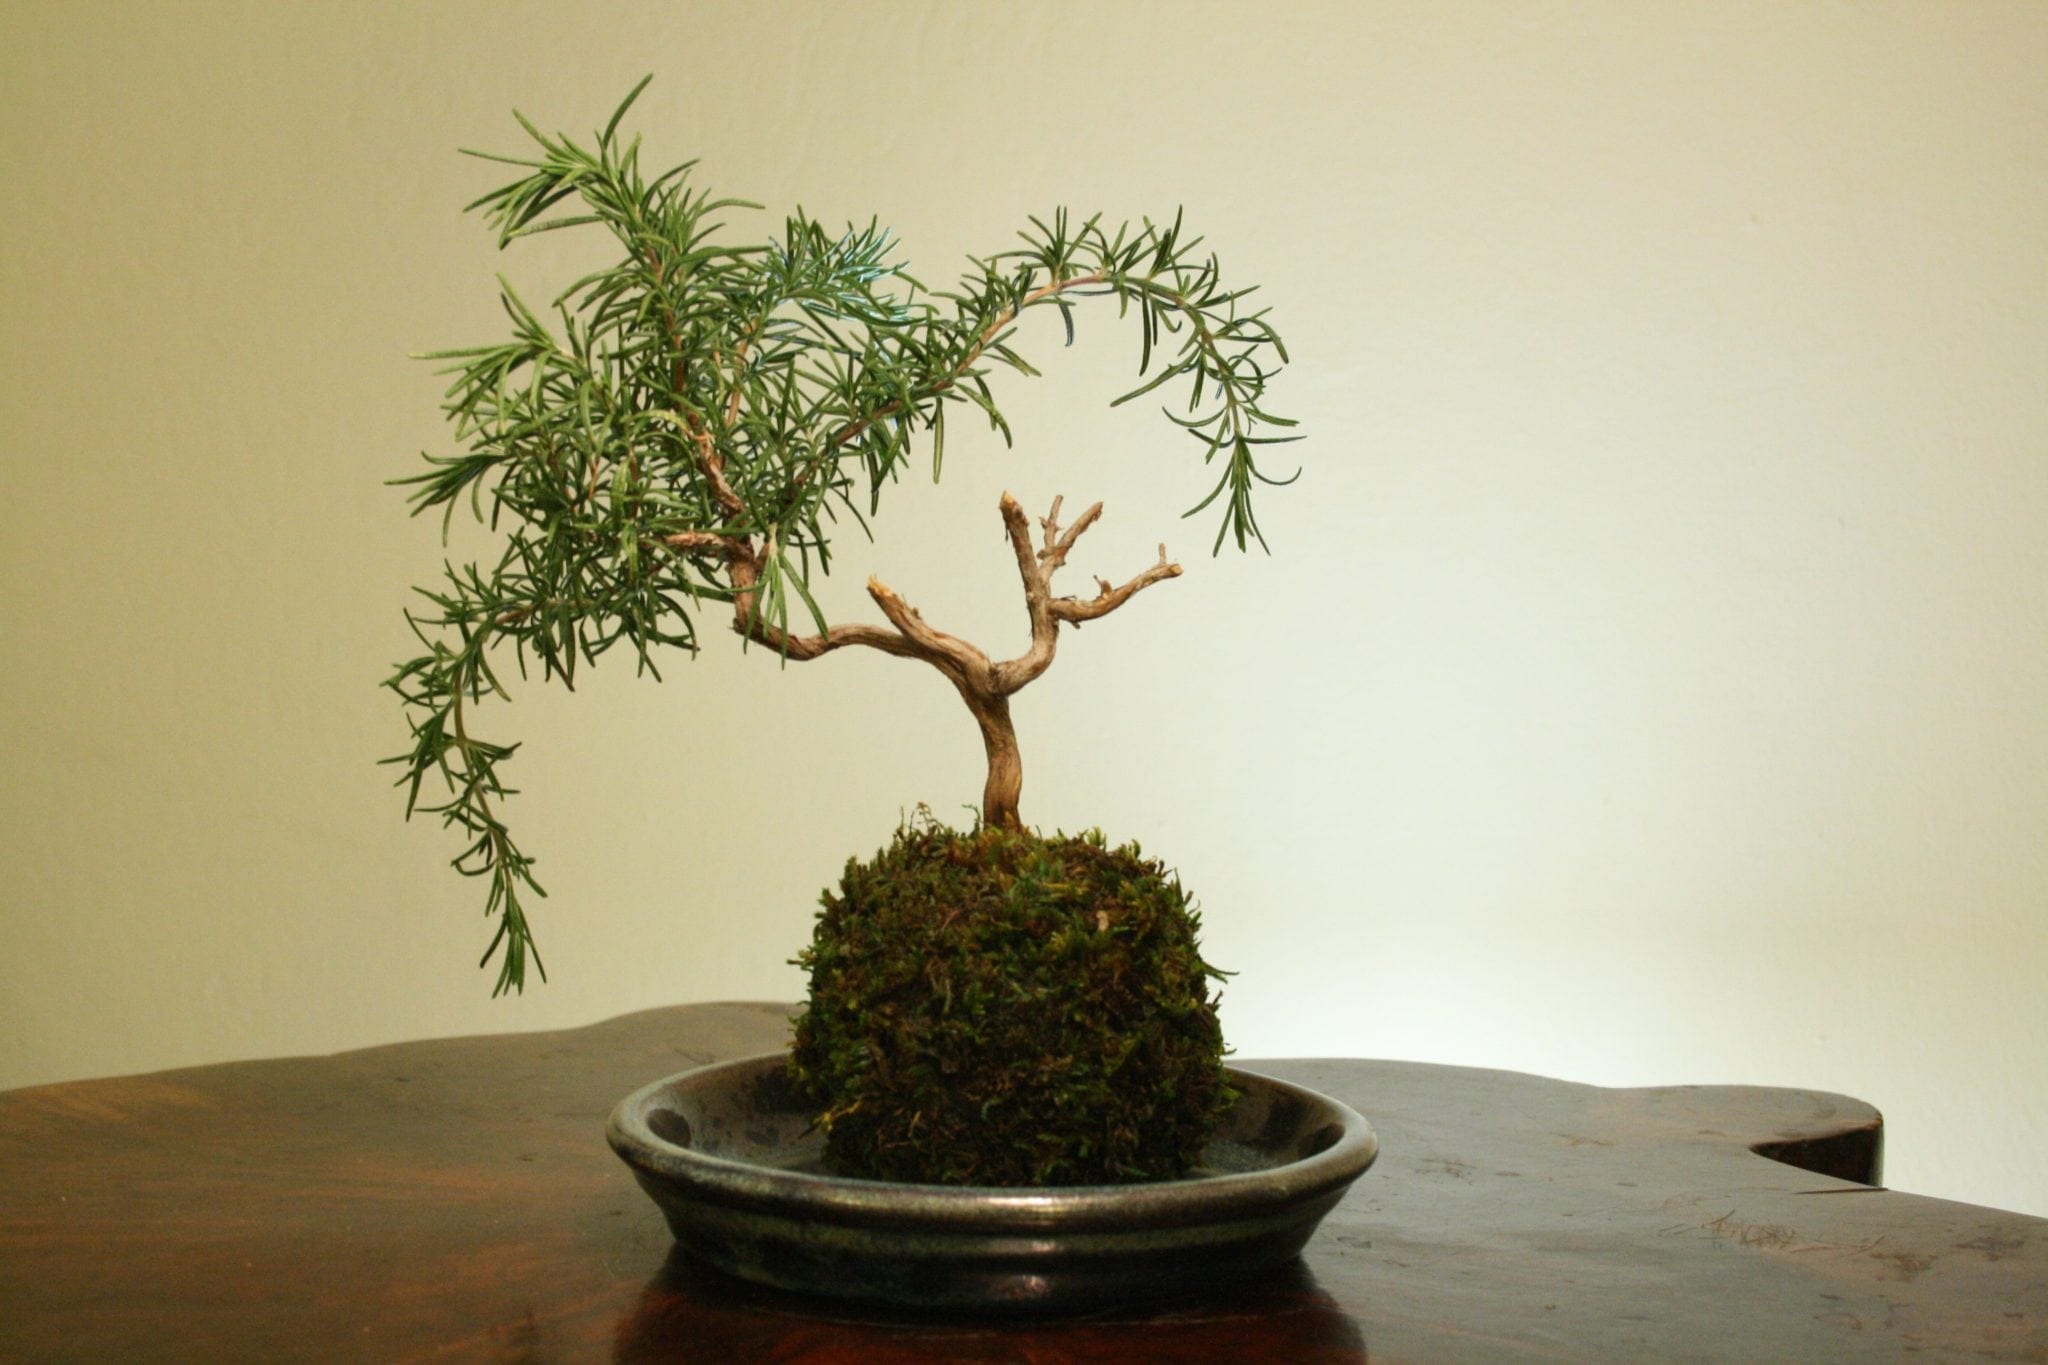
Choosing the Right Fruit Tree
The first step in creating a bonsai fruit tree is selecting the right type of fruit tree to work with. It’s important to choose a tree that is well-suited for bonsai cultivation and has the potential to thrive in a confined space. Here are a few factors to consider when making your selection:
- Hardiness: Choose a fruit tree species that is suitable for your climate. Consider the average temperatures, humidity levels, and sunlight conditions in your area. This will ensure that the tree can survive and thrive in your specific environment.
- Size: Select a fruit tree species that naturally stays small or can easily be trained and pruned to maintain a compact size. Avoid trees that grow too tall or have extensive root systems, as they may be challenging to transform into bonsai.
- Shape and Form: Look for fruit trees with interesting trunk shapes and branch structures. Consider the natural tendencies of the species, such as a tree with a gnarled or twisted trunk, as these characteristics can add visual appeal to the final bonsai composition.
- Leaf Size: Choose a fruit tree species with small leaves, as they are more proportionate to the scale of a bonsai tree. Small leaves also allow for more intricate styling and create a sense of refinement in the overall design.
Some popular fruit tree varieties that are well-suited for bonsai include the Ficus, Japanese Maple, Crabapple, and Citrus trees. These trees have small leaves, interesting branch structures, and can withstand the rigorous pruning and shaping required for bonsai cultivation.
Before purchasing a fruit tree, conduct research to learn about its specific care requirements. Consider factors such as sunlight, watering needs, and soil preferences. Understanding the tree’s unique needs will help ensure its longevity and success as a bonsai.
Remember, the selection of the fruit tree is the foundation of your bonsai project. Take your time in choosing the right species that aligns with your goals and preferences. With the right tree in hand, you are ready to move on to the next steps of preparing it for bonsai cultivation.
Preparing the Fruit Tree for Bonsai
Once you have chosen the perfect fruit tree for your bonsai project, it’s time to prepare it for the transformation into a miniature masterpiece. Preparing the tree involves several crucial steps to ensure its health and readiness for bonsai cultivation:
- Inspect and Prune: Begin by carefully examining the tree for any diseased, damaged, or weak branches. Pruning these undesirable branches will promote healthy growth and improve the overall structure of the tree. Use clean and sharp pruning shears or branch cutters to make clean cuts, ensuring minimal damage to the tree.
- Trunk Development: Determine the desired thickness and shape of the trunk, as it plays a crucial role in the aesthetics of the bonsai. If the trunk is too thick, you may need to consider trunk chop techniques to reduce its size gradually over time. If the trunk lacks taper, you can use various wiring and shaping methods to improve its visual appeal.
- Root Pruning: Carefully remove the tree from its container and inspect the root system. Trim away any excessively long or circling roots, maintaining a balanced root structure. Prune the roots to fit into a shallow bonsai pot, ensuring that the tree remains stable. Use a bonsai root rake or root scissors to untangle and trim the roots, allowing for proper drainage and oxygenation.
- Soil Mixture: Prepare a well-draining bonsai soil mixture by combining ingredients such as Akadama, pumice, and lava rock. This mixture provides the tree with adequate water retention while allowing excess moisture to drain away. Fill the bonsai pot with the soil mixture, ensuring that the tree is positioned securely and the roots are evenly spread out.
After completing these preparation steps, carefully place the tree back into its bonsai pot, ensuring that it is positioned at the desired angle and height. Gently fill in any gaps with additional soil mixture, being careful not to damage the roots.
Once the tree is securely potted, water it thoroughly to settle the soil and hydrate the roots. Place the bonsai tree in a location that receives adequate sunlight while providing protection from harsh weather conditions.
Preparing the fruit tree for bonsai is a crucial step in the journey towards creating a stunning miniature tree. By taking the time to inspect, prune, and prepare the tree for bonsai cultivation, you are setting the stage for the next phase of shaping and styling your bonsai fruit tree.
Pruning and Shaping Techniques
Pruning and shaping are essential techniques in the art of bonsai that help create the desired aesthetics and overall form of the tree. Through strategic pruning, you can control the growth, structure, and balance of branches, while shaping techniques allow you to sculpt the tree into a visually appealing composition. Here are some key pruning and shaping techniques to master:
- Branch Pruning: Regular branch pruning is necessary to maintain the desired shape and proportions of the tree. Remove any branches that detract from the overall design, such as crossing or competing branches. Use sharp pruning shears to make clean cuts just above a bud or node, promoting new growth in the desired direction.
- Leaf Pruning: In bonsai, leaf pruning is used to reduce the size of leaves and encourage finer growth. This is accomplished by selectively removing large leaves, promoting the growth of smaller, more proportionate foliage. Leaf pruning can be done by gently pinching off larger leaves or using scissors to trim them back to a smaller size.
- Wiring: Wiring enables the shaping and positioning of branches to create the desired silhouette of the bonsai tree. Choose aluminum or annealed copper wire that is appropriate for the size and flexibility of the branches. Wrap the wire around the branch in a spiral motion, ensuring it is snug but not too tight. Carefully bend and position the branches, being mindful not to cause damage or breakage.
- Selective Pruning: As your bonsai tree continues to grow, selective pruning helps maintain balance and refine the structure. Regularly evaluate the tree’s growth and remove any vigorous shoots or branches that disrupt the overall harmony. This process encourages back-budding and the development of finer twigs, enhancing the tree’s aesthetics.
- Apex Pruning: Pruning the apex or top of the tree allows you to control the height and shape of the bonsai. By removing the terminal bud or cutting the top portion of the tree, you can promote branching and create a more compact and balanced form.
When performing pruning and shaping techniques, it is crucial to consider the tree’s health and vigor. Avoid excessive pruning, as it can weaken the tree and hinder its ability to recover. Regular monitoring, observation, and careful adjustments will help you achieve the desired form and style of your bonsai fruit tree.
Remember, bonsai is an art form, and each tree is unique. Take your time, experiment, and let your creativity flow as you prune and shape your bonsai fruit tree. With practice and patience, you will be able to create a visually stunning and harmonious composition that reflects your artistic vision.
Wiring the Branches
Wiring is an essential technique in bonsai cultivation that allows you to shape and position the branches of your bonsai fruit tree. By applying wire to the branches, you can guide their growth and create the desired structure and form of the tree. Here is a step-by-step guide on how to wire the branches of your bonsai:
- Choose the Right Wire: Select a wire that is appropriate for the size and flexibility of the branches. Aluminum or annealed copper wire is commonly used in bonsai. Choose a wire size that is approximately one-third the thickness of the branch you intend to wire. For younger, more flexible branches, you can use a slightly thicker wire.
- Prepare the Branch: Before applying the wire, evaluate the branch’s position and direction. Look for areas that need shaping or repositioning. Use your fingers to gently bend the branch into the desired position, providing a guideline for where the wire should be placed.
- Start Wiring: Begin by anchoring the wire to the trunk or base of the branch. Take the wire and wrap it around the branch in a spiral motion, making sure the wire is snug but not too tight. Start from the base of the branch and work your way up towards the tip. Leave a small gap between each coil to prevent wire biting into the branch as it grows.
- Guide the Branch: As you wrap the wire, gently manipulate the branch into the desired shape and position. Use your fingers or branch benders to bend the branch as needed, ensuring a natural and fluid form. Pay attention to the angles and curves, aiming for an aesthetically pleasing composition.
- Continue Wiring: If the branch is longer, continue wrapping the wire along its length, ensuring even spacing between coils. As you approach the tip of the branch, use a pair of pliers or bonsai wire cutters to trim the excess wire. Make sure the cut end is tucked away to avoid accidental injury.
Remember to be careful while wiring to avoid damaging the bark or snapping the branch. Take your time, work carefully, and adjust as necessary to achieve the desired shape. Wiring should be performed during the tree’s active growing season when it is supple and more pliable.
It’s important to note that wiring should not be left on for extended periods. Monitor the growth of your bonsai tree regularly and remove the wire once the branches have set into the desired position. Leaving wire on for too long can cause it to bite into the branches, leading to damage or even death of the branch.
Wiring is a valuable technique that allows you to exercise artistic control and finesse over the shape and structure of your bonsai fruit tree. With practice and experience, you will discover new possibilities for shaping your bonsai and bringing your creative vision to life.
Repotting and Root Pruning
Repotting and root pruning are essential practices in bonsai cultivation that promote the health and vitality of your bonsai fruit tree. Repotting allows you to refresh the soil, address root congestion, and encourage new growth, while root pruning helps maintain a compact root system. Here is a step-by-step guide on how to repot and prune the roots of your bonsai:
- Timing: Repotting should be done during the tree’s dormant period, typically in early spring or late winter before new growth begins. This allows the tree to recover and establish itself in the new pot without the added stress of active growth.
- Prepare the Bonsai Pot: Select a bonsai pot that is proportionate to the size of your tree, allowing ample space for root growth while maintaining aesthetic balance. Ensure that the pot has drainage holes to prevent waterlogging. Soak the pot in water to prevent the dry soil from absorbing excess moisture during the repotting process.
- Remove the Tree from the Pot: Gently and carefully remove the tree from its existing pot, using a root hook or chopstick to untangle any entwined roots. Take your time to avoid damaging the delicate root system. If necessary, prune some thick secondary roots to establish a neater and more compact root structure.
- Inspect and Prune the Roots: Examine the roots for any circling or overly long roots. Use root pruning shears or scissors to trim away these roots, making clean cuts. Aim to maintain a balance between the tree’s overall size and the root system. Be sure to retain sufficient healthy roots to support the tree’s growth and stability.
- Prepare the Soil: Mix a well-draining bonsai soil that is appropriate for your tree species. This can include a blend of Akadama, pumice, and lava rock. The soil mixture should allow for adequate water retention while ensuring good drainage. Avoid using regular garden soil, as it may not provide the necessary aeration and drainage required for bonsai cultivation.
- Repot the Tree: Place a layer of soil at the bottom of the bonsai pot, creating a gentle mound towards the center. Position the tree in the pot, ensuring that the nebari (visible surface roots) is level with the soil surface. Gently fill the remaining space with the soil mixture, carefully spreading it among the roots to eliminate air pockets.
- Water and Settling: After repotting, thoroughly water the tree to hydrate the roots and settle the soil. Keep the newly repotted tree in a shaded area for a few weeks to allow it to recover from the process. Monitor the moisture levels and provide appropriate care during this time.
Repotting and root pruning should be performed every one to three years, depending on the growth rate and vigor of your bonsai fruit tree. Observing the root system and understanding the growth patterns of your tree will help you determine the ideal repotting frequency.
By regularly repotting and root pruning your bonsai fruit tree, you create an environment that promotes healthy growth, prevents root congestion, and ensures the overall well-being of your tree. These practices are crucial steps in the ongoing care and maintenance of your bonsai masterpiece.
Fertilizing and Watering Tips
Fertilizing and watering are vital aspects of maintaining the health and well-being of your bonsai fruit tree. Proper nourishment and hydration contribute to vibrant growth, lush foliage, and strong roots. Here are some essential tips to ensure your bonsai receives the right balance of nutrients and moisture:
- Fertilizer Selection: Choose a balanced, slow-release bonsai fertilizer that provides the necessary nutrients for your fruit tree’s specific needs. Look for a fertilizer with a balanced NPK (nitrogen, phosphorus, and potassium) ratio. Additionally, consider using organic fertilizers or liquid fertilizer solutions to provide additional trace elements beneficial to the tree.
- Fertilizer Application: Follow the recommended dosage instructions provided by the fertilizer manufacturer. Apply the fertilizer evenly across the soil surface, being mindful not to concentrate it in one area. Fertilize your bonsai during the growing season, typically from spring to autumn, as this is when the tree requires the most nutrients to support its active growth.
- Watering Frequency: Watering is one of the most critical aspects of bonsai care. Achieving the right balance of moisture is essential to prevent waterlogging or drought stress. Water your bonsai fruit tree thoroughly when the top inch of soil feels slightly dry. This ensures that the roots have access to necessary moisture, while excess water drains away.
- Watering Technique: When watering, use a gentle stream of water to thoroughly saturate the soil and allow excess water to drain out from the drainage holes in the bonsai pot. Avoid overwatering, as it can lead to root rot and other issues. It’s essential to consider external factors such as climate, temperature, and humidity levels, as they can impact the watering needs of your bonsai.
- Observe and Adjust: Regularly monitor the moisture levels of your bonsai tree’s soil. Pay attention to the tree’s response to watering and fertilizing. Adjust your watering schedule and fertilizer application accordingly, ensuring that the tree receives the right amount of nourishment without being overwhelmed or lacking in nutrients.
- Seasonal Variations: Adapt your watering and fertilizer regimen based on the seasons. During the warmer months, your bonsai tree may require more frequent watering to compensate for increased evaporation. In winter, reduce the amount of fertilizer and water to accommodate the tree’s dormancy period.
Remember, achieving the right balance in fertilizing and watering your bonsai fruit tree requires observation, patience, and understanding of its unique needs. Regularly assess the tree’s health, growth patterns, and response to your care practices to ensure optimal results.
By providing the appropriate nutrients and moisture, you will create an ideal environment for your bonsai to flourish and develop into a mesmerizing work of art.
Dealing with Pests and Diseases
While bonsai fruit trees are generally resilient, they are still susceptible to pests and diseases. It’s important to promptly identify and address any issues to ensure the health and vigor of your bonsai. Here are some common pests and diseases that may affect your bonsai fruit tree, along with techniques for managing them:
- Scale Insects: Scale insects are small, immobile pests that attach themselves to the branches and leaves of the tree. They appear as small bumps or scales and can cause wilting and yellowing of the foliage. To control scale insects, gently scrape them off with a soft brush or cotton swab dipped in rubbing alcohol. Repeat this process as necessary.
- Aphids: These tiny insects are common pests that feed on the sap of the tree, causing stunted growth and distorted leaves. To combat aphids, use a solution of mild soapy water to wash them off the leaves. Alternatively, introduce natural predators like ladybugs to help control the aphid population.
- Fungal Diseases: Fungal diseases such as powdery mildew and root rot can affect bonsai fruit trees. Powdery mildew appears as a white powdery substance on the leaves, while root rot causes wilting, yellowing leaves, and root decay. To treat powdery mildew, use a fungicidal spray, and ensure good air circulation around the tree. For root rot, trim away diseased roots and repot the tree in fresh, well-draining soil.
- Spider Mites: Spider mites are tiny pests that spin fine webs and feed on the undersides of leaves, causing yellowing and discoloration. Regularly misting the tree to increase humidity can help deter spider mites. If an infestation occurs, use insecticidal soap or horticultural oil to control their population.
- Caterpillars: Caterpillars can quickly defoliate bonsai fruit trees if left unchecked. Handpick the caterpillars from the tree or use a targeted biological pesticide to control their numbers. Additionally, inspect the underside of leaves regularly to detect eggs and remove them before they hatch.
- Preventive Measures: Good bonsai care practices, such as providing adequate sunlight, maintaining proper airflow, and avoiding excessive moisture, can help prevent many pest and disease issues. Regularly inspect your bonsai tree for any signs of pests or diseases, and take immediate action to address the problem.
Remember, prevention is key when it comes to managing pests and diseases in your bonsai fruit tree. By practicing good hygiene, maintaining a healthy environment, and promptly addressing any issues that arise, you can keep your bonsai thriving and pest-free.
If you are unsure about the specific pests or diseases affecting your bonsai fruit tree, consult with a local horticulturist, bonsai expert, or extension service for guidance and tailored solutions.
Displaying and Caring for Your Bonsai Fruit Tree
The way you display and care for your bonsai fruit tree greatly contributes to its overall beauty and longevity. Proper placement and regular maintenance ensure that your bonsai thrives and continues to captivate viewers. Here are some tips for displaying and caring for your bonsai fruit tree:
- Choosing the Right Location: Place your bonsai fruit tree in a location that provides the right balance of sunlight and shade. Most fruit trees require ample sunlight, but be mindful of extreme heat or direct sun exposure, as it can cause leaf burn. Consider the specific light requirements of your tree species and position it accordingly.
- Indoor vs. Outdoor: Determine whether your bonsai fruit tree is best suited for indoor or outdoor display. Some fruit tree species thrive indoors, while others require the outdoor environment to fulfill their growth requirements. Consider factors such as temperature, humidity, and available space when deciding where to display your tree.
- Pot Selection: Select a pot that complements the aesthetics of your bonsai fruit tree. Depending on your preference and the style of your tree, you can choose from traditional ceramic pots, stone pots, or even wooden containers. Ensure that the pot is the appropriate size for the tree’s root system, allowing room for growth while maintaining stability.
- Pruning and Maintenance: Regularly prune your bonsai fruit tree to maintain its form and balance. Remove any dead, damaged, or unwanted branches to promote healthy growth. Additionally, remove any unwanted shoots or suckers that can divert the tree’s energy. Clean the foliage regularly by gently wiping the leaves to remove dust and debris.
- Watering and Fertilizing: Consistent watering and fertilization are essential for the health of your bonsai fruit tree. Water it thoroughly whenever the topsoil feels slightly dry, ensuring that excess water drains away. Feed it with a balanced bonsai fertilizer during the growing season to provide the necessary nutrients. Adjust your watering and fertilizer schedule based on the tree’s needs and response.
- Training and Repotting: As your bonsai fruit tree grows, regularly check its wiring, ensuring that it does not cut into branches. Adjust the wiring as needed to maintain the desired shape. Repot your bonsai every one to three years to refresh the soil and prune the roots. Repotting promotes healthy root growth and prevents root congestion.
- Seasonal Care: Adapt your care practices based on the changing seasons. Adjust watering and placement during hot summers to prevent dehydration and protect from intense sunlight. In colder months, protect your bonsai from freezing temperatures by providing shelter or moving it indoors, if necessary. Be mindful of your tree’s specific cold hardiness and adjust care accordingly.
Displaying and caring for your bonsai fruit tree is an ongoing process that requires attention, observation, and adjustment. Regularly assess the health and aesthetics of your tree, taking necessary steps to maintain its beauty and vigor.
Remember, each bonsai fruit tree is unique, and it may require personalized care based on its species and environment. Consult with local bonsai experts or horticulturists for specific guidance and tips tailored to your tree’s needs.
Conclusion
Congratulations! You have now gained valuable knowledge on how to make a bonsai fruit tree and care for it. By following the steps outlined in this article, you can embark on a rewarding journey of creating a captivating bonsai masterpiece.
From choosing the right fruit tree and preparing it for bonsai cultivation to applying pruning and shaping techniques, you have learned the key aspects of crafting a beautiful bonsai fruit tree. Understanding the importance of wiring, repotting, fertilizing, and watering ensures the health and longevity of your tree.
Remember, part of the artistry of bonsai lies in the ongoing care and maintenance of your tree. Regular observation, adjustment, and adapting to the changing seasons are crucial for the well-being of your bonsai fruit tree.
Feel free to explore different species of fruit trees and experiment with various styles and shapes. Each bonsai fruit tree is unique in its own way, allowing you to express your creativity and bring a touch of nature’s beauty into your living space or garden.
As you embark on your bonsai journey, join bonsai communities, attend workshops, and learn from experienced enthusiasts. Their guidance and expertise can further enrich your understanding and help you refine your skills in bonsai cultivation.
Remember, creating a bonsai fruit tree is not just about the end result but also about the joy and satisfaction that comes from nurturing a living work of art. It requires patience, dedication, and a special connection with nature.
So, go ahead and dive into the magical world of bonsai. Let your creativity and love for trees guide you as you shape and care for your own unique bonsai fruit tree. Enjoy the journey and the beauty that unfolds as your bonsai fruit tree grows and flourishes!