Home>Gardening Basics>Tools and Equipment>How To Install Rain Bird Drip Irrigation
Tools and Equipment
How To Install Rain Bird Drip Irrigation
Modified: January 22, 2024
Learn how to install Rain Bird drip irrigation with the right tools and equipment. Properly water your plants and save water with this step-by-step guide.
(Many of the links in this article redirect to a specific reviewed product. Your purchase of these products through affiliate links helps to generate commission for Chicagolandgardening.com, at no extra cost. Learn more)
Table of Contents
- Introduction
- Step 1: Gather the necessary tools and materials
- Step 2: Plan your drip irrigation system layout
- Step 3: Measure and cut the irrigation tubing
- Step 4: Attach fittings to the tubing
- Step 5: Lay out the tubing in the desired area
- Step 6: Install emitters or drippers
- Step 7: Connect the system to a water source
- Step 8: Test and adjust the system
- Step 9: Cover the tubing with mulch or soil
- Conclusion
Introduction
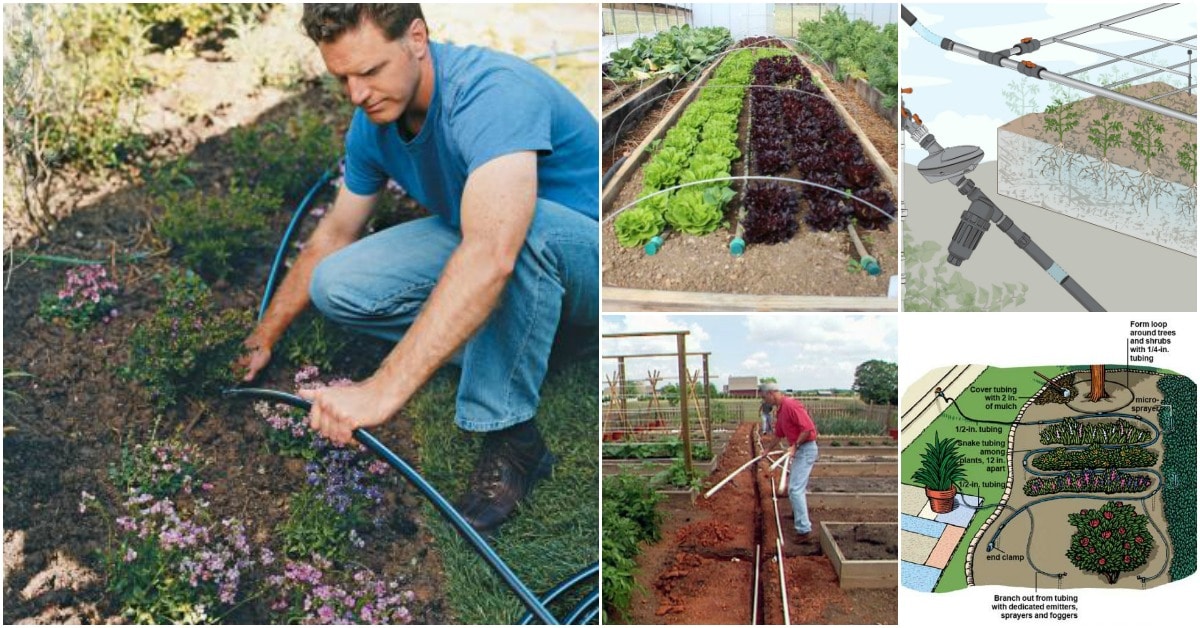
Welcome to the world of rain bird drip irrigation! If you’re looking to efficiently water your plants and garden while conserving water, drip irrigation is the perfect solution. Rain Bird, a trusted and reliable brand in the irrigation industry, offers a wide range of tools and equipment to help you install and maintain a drip irrigation system.
Drip irrigation is a method of applying water directly to the base of plants through a system of tubing and emitters. Unlike traditional sprinkler systems that spray water over a wide area, drip irrigation delivers water precisely where it is needed, minimizing water waste and keeping the foliage dry to prevent disease. This targeted watering technique promotes healthier plant growth and allows for more effective water usage.
Installing a rain bird drip irrigation system may seem daunting at first, but with the right tools and materials, it can be a straightforward process. In this article, we will guide you through the step-by-step process of installing a rain bird drip irrigation system, from planning the layout to connecting it to a water source.
By the end of this guide, you’ll have the knowledge and confidence to set up a rain bird drip irrigation system and enjoy the benefits of efficient and effective watering in your garden.
Step 1: Gather the necessary tools and materials
Before you start installing your rain bird drip irrigation system, it’s important to gather all the necessary tools and materials. Having everything on hand will make the installation process smoother and more efficient.
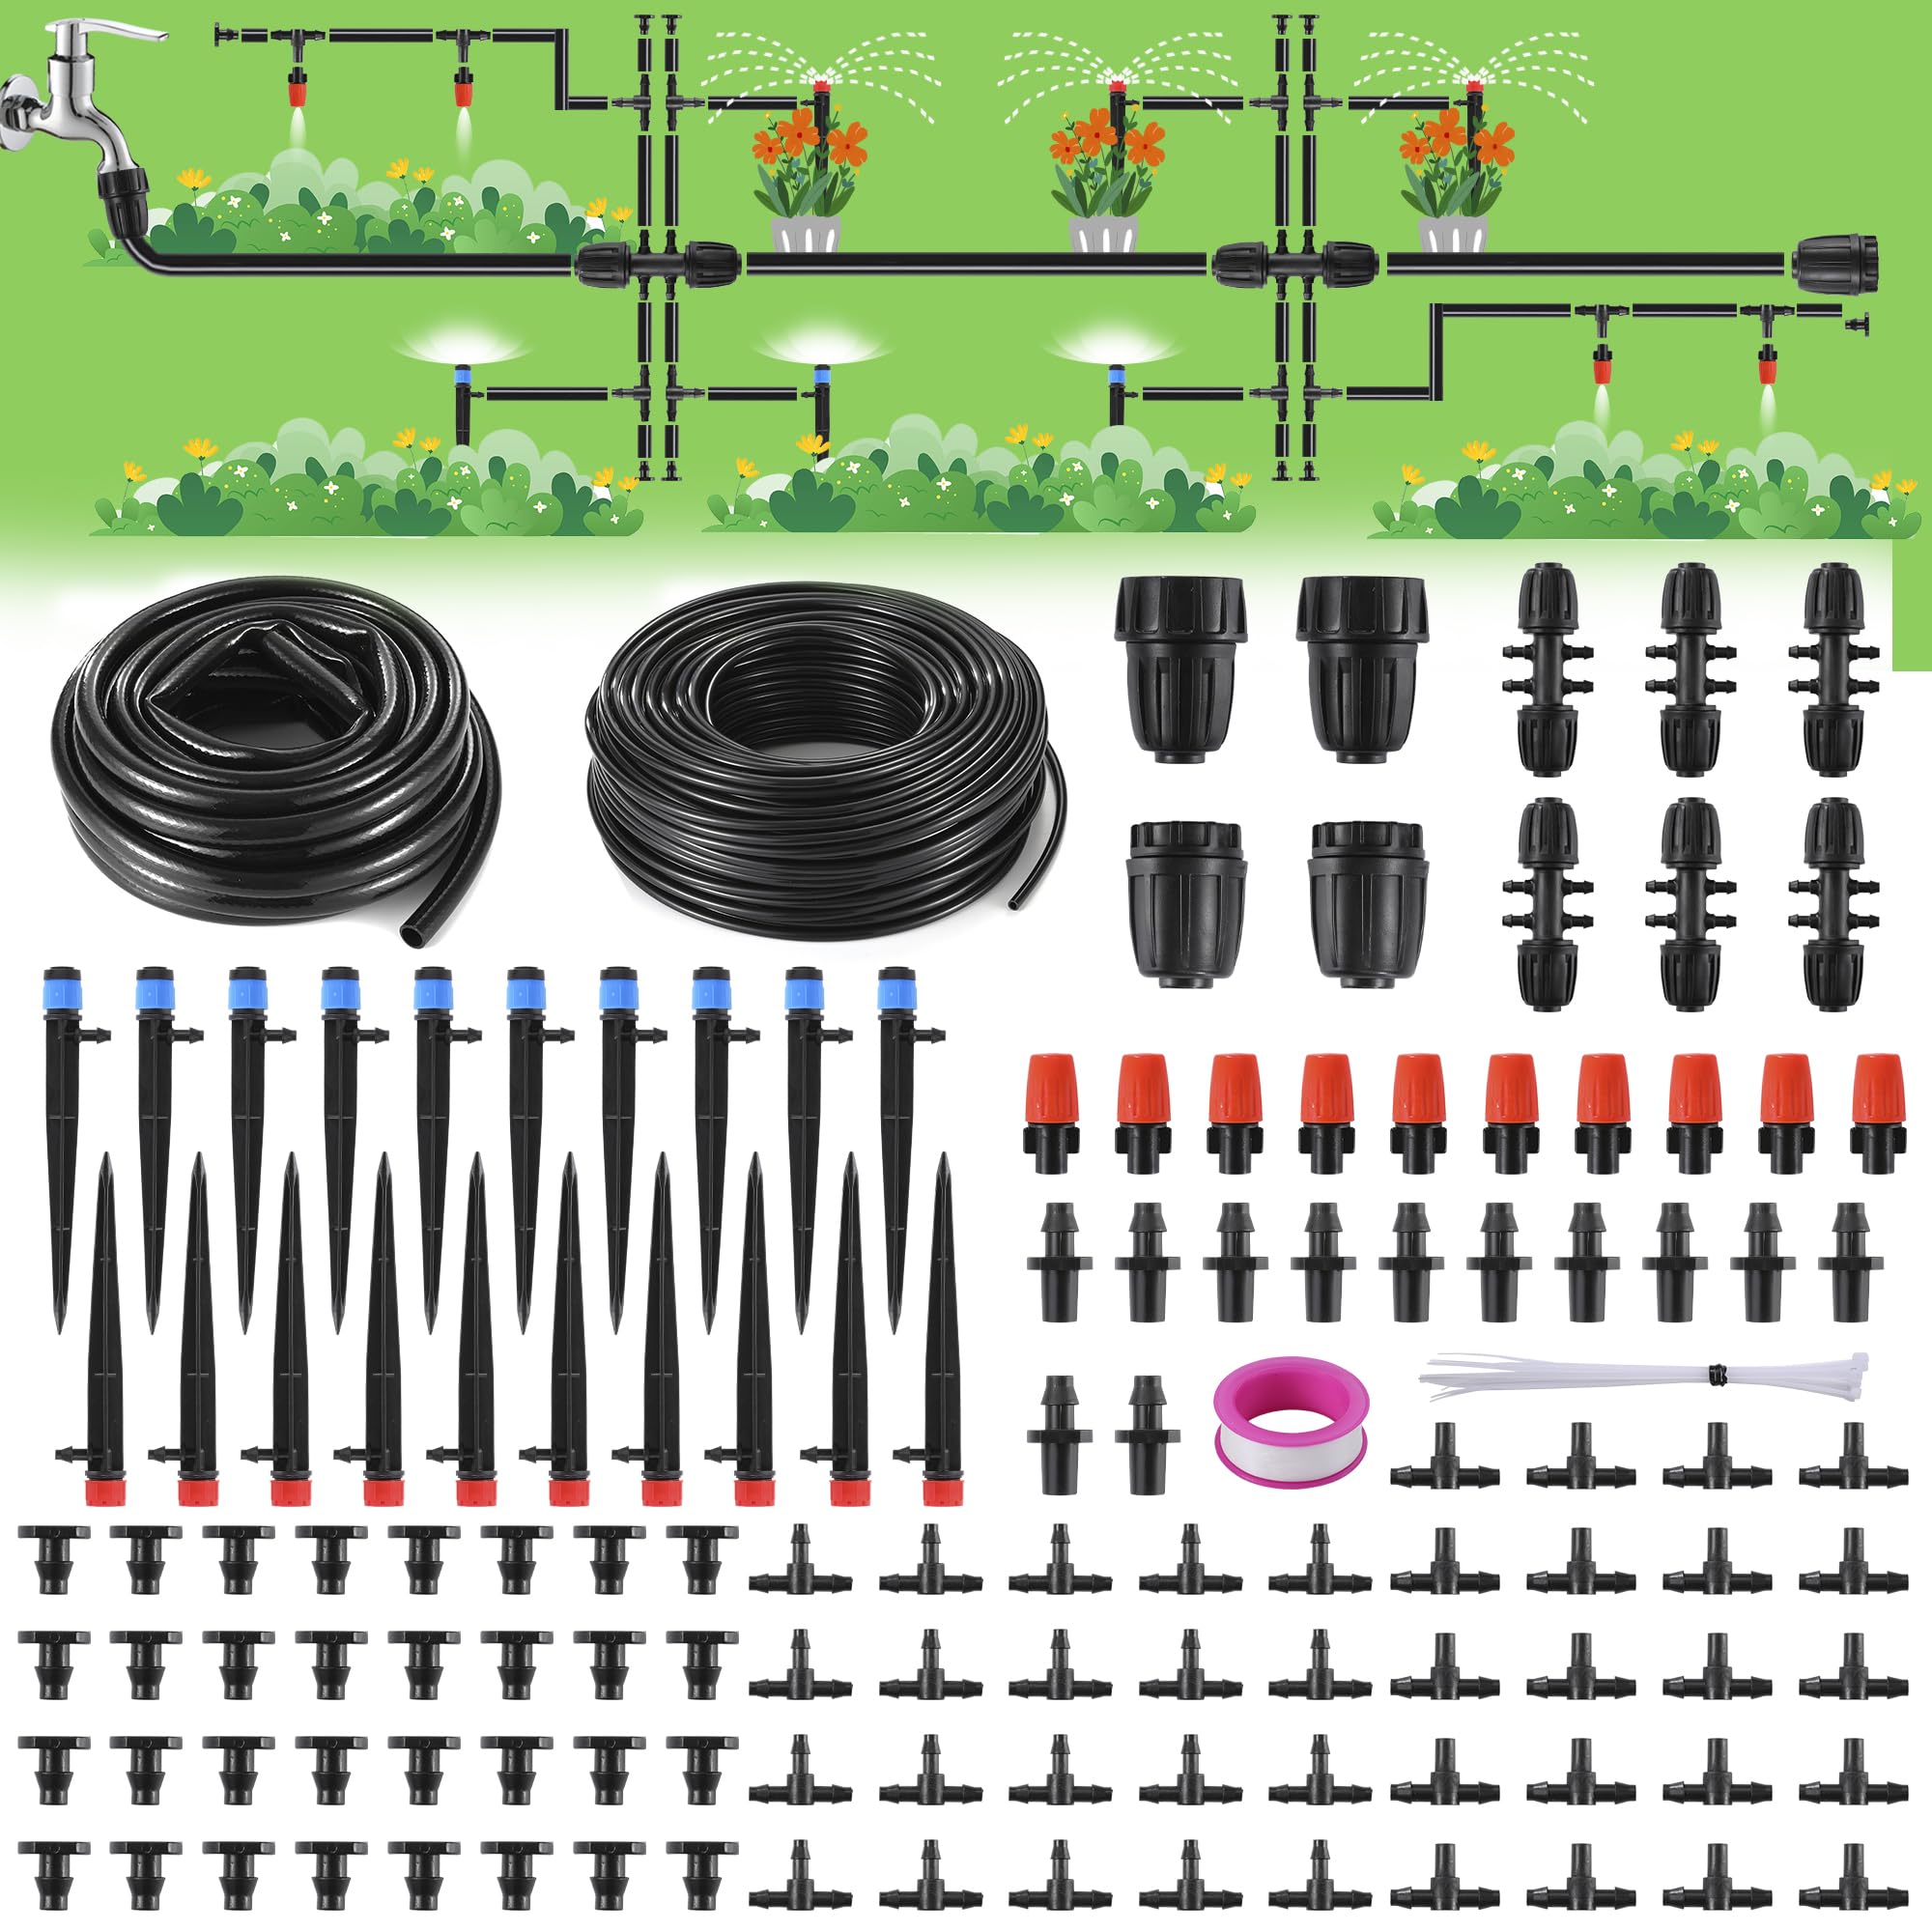
Here’s a list of the essential tools and materials you’ll need:
- Irrigation tubing: This is the main component of your drip irrigation system. Choose a quality tubing that is durable and resistant to UV rays. Rain Bird offers a variety of tubing options to suit your needs.
- Emitters or drippers: These are the devices that deliver water directly to the plants. Rain Bird offers a range of emitters, from pressure-compensating ones to adjustable ones, depending on your watering requirements.
- Pressure regulator: A pressure regulator is important to ensure that your drip irrigation system operates at the correct pressure, preventing damage to the tubing and emitters. Make sure to choose a pressure regulator that is compatible with your water source.
- Filter: Installing a filter is crucial to prevent debris and sediment from clogging the tubing and emitters. Choose a filter that is suitable for drip irrigation systems.
- Connectors and fittings: You’ll need connectors and fittings to join the tubing and create the desired layout for your system. Rain Bird offers a wide range of options, including tees, elbows, couplers, and end caps.
- Punch tool: A punch tool is used to create holes in the tubing for the placement of emitters. Make sure to use a punch tool that is specifically designed for drip irrigation systems.
- Scissors or tubing cutter: These tools are needed to cut the irrigation tubing to the desired length. It’s important to make clean and precise cuts to ensure proper connections.
- Tape measure: A tape measure will help you accurately measure the distances between plants and plan your system layout.
- Stakes or clips: These are used to secure the tubing in place, preventing it from shifting or being damaged by foot traffic or garden equipment.
By gathering all these tools and materials before you begin, you’ll have everything you need to complete the installation process efficiently and successfully.
Step 2: Plan your drip irrigation system layout
Planning is a crucial step in installing a rain bird drip irrigation system. Taking the time to carefully plan your layout will ensure that water is distributed evenly to all plants and that you make efficient use of your resources. Here are the steps to plan your drip irrigation system layout:
- Map out your garden: Start by creating a simple sketch or map of your garden area. Note the location of plants, flower beds, and any other areas that will require watering. Consider the size and spacing of your plants, as well as any obstacles such as trees or pathways.
- Measure distances: Use a tape measure to measure the distances between plants and other key landmarks in your garden. This will help you determine the length of tubing you’ll need and the placement of emitters.
- Determine water sources: Identify the water source or sources that will supply your irrigation system. This can be an outdoor faucet, a rainwater collection system, or a dedicated water line. Ensure that the water source is easily accessible and provides adequate water pressure and flow.
- Plan tubing placement: Based on your garden map and measurements, plan the placement of the irrigation tubing. Lay out the tubing along the pathways, making sure to avoid any sharp bends or kinks. Consider the location of the water source and connections to ensure easy access.
- Decide on emitter placement: Determine where you’ll place the emitters or drippers along the tubing. This will depend on the water needs of your plants and the spacing between them. Consider using different types of emitters for plants with varying water requirements.
- Adjust spacing: Fine-tune the spacing of emitters to ensure even water distribution. If necessary, adjust the layout to accommodate plants with different watering needs.
- Consider water conservation: To conserve water, group plants with similar water requirements together. This will allow you to control the water flow to different zones and avoid overwatering or underwatering.
By carefully planning your drip irrigation system layout, you’ll have a clear roadmap for installation and ensure that your plants receive optimal water distribution. Take your time during this step to avoid any potential errors or inefficiencies in your system.
Step 3: Measure and cut the irrigation tubing
Once you have planned your drip irrigation system layout, it’s time to measure and cut the irrigation tubing to the appropriate lengths. Making precise cuts will ensure a proper fit and effective water distribution throughout your garden. Follow these steps to measure and cut the irrigation tubing:
- Measure the desired length: Using the measurements from your garden layout plan, use a tape measure to determine the length of tubing needed for each section. Add a few extra inches to account for any curves or bends in the layout.
- Mark the measurement: Use a marker or pencil to mark the desired length on the tubing. Make sure the mark is visible and precise.
- Secure the tubing: To ensure a clean and straight cut, it’s important to securely hold the tubing in place. You can use clamps or have someone assist you by holding the tubing steady.
- Cut the tubing: Using sharp scissors or a tubing cutter, carefully cut the tubing along the marked line. Make smooth and precise cuts to ensure proper connections later on.
- Inspect the cut: After cutting, inspect the tubing end to ensure it is clean and free from any debris or frayed edges. Trim any excess or uneven sections if necessary.
- Repeat the process: Repeat these steps for each section of tubing in your irrigation system, ensuring that you have the correct length for each area of your garden.
Remember to take your time and double-check your measurements before cutting the tubing. It’s better to measure twice and cut once to avoid any wastage or errors in the installation process. Keep in mind that the tubing will need to connect to different fittings and connectors, so ensure that the cut ends are straight and smooth for secure connections.
Step 4: Attach fittings to the tubing
With the irrigation tubing cut to the appropriate lengths, the next step in installing your rain bird drip irrigation system is to attach fittings to the tubing. Fittings are essential for connecting the tubing, creating angles, and directing the water flow. Follow these steps to securely attach fittings to the tubing:
- Prepare the tubing: Before attaching any fittings, ensure that the cut end of the tubing is clean and free of any debris. If needed, trim any excess or uneven sections for a smooth connection.
- Select the appropriate fittings: Based on your planned layout, choose the necessary fittings such as tees, elbows, couplers, or end caps. Consider the specific requirements of your irrigation system and ensure that the fittings are compatible with your tubing.
- Insert the fittings into the tubing: Carefully push the fittings into the tubing, making sure that they are properly seated. For a secure connection, ensure that the fittings are inserted all the way into the tubing without any gaps.
- Secure the fittings: Depending on the type of fittings you are using, secure them in place. Some fittings may require clamps or locking mechanisms, while others may need additional accessories like o-rings or adhesive for a tight seal.
- Check for leaks: After attaching the fittings, check for any signs of leaks or gaps in the connections. If necessary, make adjustments or reapply sealant to ensure a watertight seal.
- Repeat the process: Repeat these steps for each section of tubing where fittings are needed. Take time to align and position the fittings correctly to ensure an efficient and effective irrigation system.
It’s important to follow the manufacturer’s instructions when attaching fittings to the tubing, as different types of fittings may have specific guidelines for proper installation. By securely attaching the fittings, you’ll have a reliable and leak-free connection, ensuring that your drip irrigation system functions optimally.
Step 5: Lay out the tubing in the desired area
Now that you have prepared the tubing and attached the necessary fittings, it’s time to lay out the tubing in the desired area of your garden. Properly positioning the tubing will ensure that water is distributed evenly to your plants and that your drip irrigation system operates efficiently. Follow these steps to lay out the tubing:
- Begin at the water source: Start at the water source or connection point and lay out the tubing from there. This will ensure that water flows smoothly through the system.
- Follow your garden plan: Use your garden layout plan as a guide to position the tubing accurately. Place the tubing along the pathways and beds, following the measurements and spacing determined during the planning phase.
- Avoid excessive bends or kinks: While laying out the tubing, ensure that it doesn’t have excessive bends or kinks. These can restrict water flow and affect the efficiency of your system. Use gentle curves and secure the tubing with stakes or clips to keep it in position.
- Connect the tubing sections: If you have multiple sections of tubing, connect them using the appropriate fittings. Ensure that the connections are secure and watertight.
- Leave room for expansion: Allow some extra length in the tubing for future expansions or adjustments to your drip irrigation system. This will give you flexibility in expanding and adapting the system as your garden evolves.
- Avoid overstretching the tubing: It’s important not to overstretch the tubing, as this can cause tension and potential damage. Allow for some slack in the tubing to accommodate environmental factors such as soil movement and plant growth.
- Check for proper alignment: Step back and assess the overall layout of the tubing. Ensure that it is aligned with your garden plan and that each plant or area receives sufficient coverage.
Take your time to lay out the tubing carefully, making adjustments as needed to ensure proper alignment and coverage. This step is crucial in setting up an efficient drip irrigation system that delivers water effectively to your plants while conserving water.
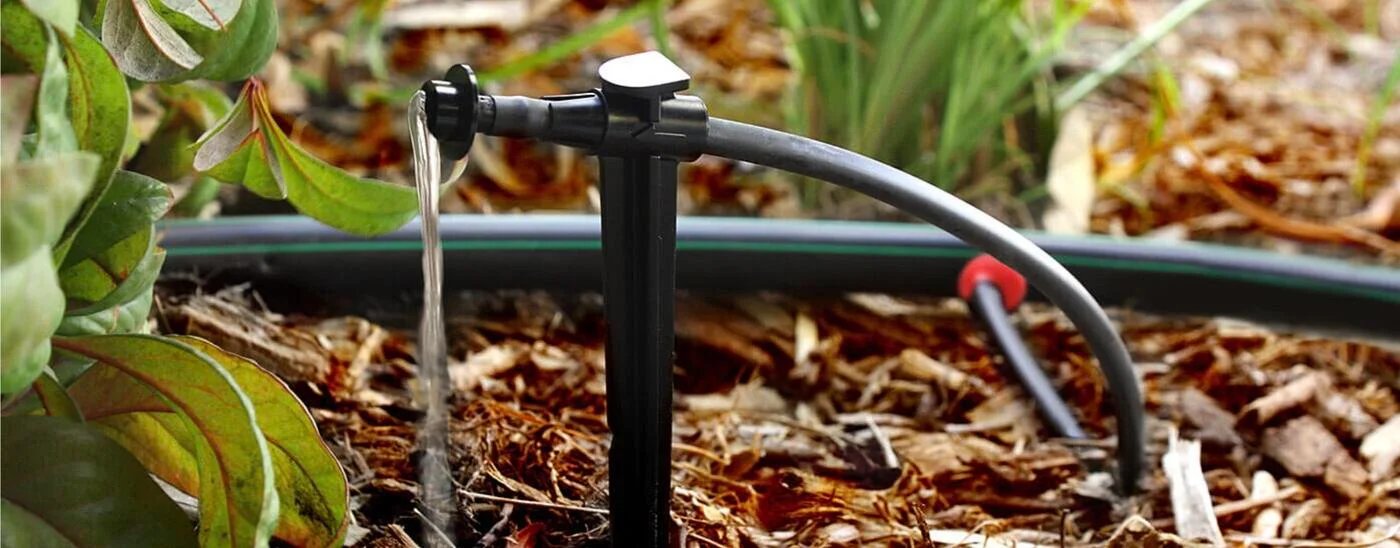
Step 6: Install emitters or drippers
Once you have laid out the tubing in your garden, the next step is to install emitters or drippers. These devices deliver water directly to your plants, ensuring they receive the right amount of water for healthy growth and development. Follow these steps to install emitters or drippers:
- Choose the appropriate emitters: Depending on your plant’s water needs and your irrigation system design, select the appropriate emitters or drippers. Consider factors such as flow rate, adjustability, and pressure compensation.
- Use a punch tool: With a punch tool specifically designed for drip irrigation systems, create holes in the tubing where you want to install the emitters. Follow the manufacturer’s recommendations for hole spacing and placement.
- Insert the emitters: Carefully insert the emitters or drippers into the punched holes. Ensure that they are securely attached and properly seated.
- Avoid over-inserting: Be cautious not to push the emitters too far into the tubing, as this can disrupt their functionality. Follow the manufacturer’s guidelines for proper insertion depth.
- Adjust the flow rate: If your emitters have adjustable flow rates, adjust them according to the water needs of the specific plants they are serving. This allows you to fine-tune the water delivery for optimal plant health.
- Install drip line stakes (optional): If you’re using drip line stakes, insert them into the ground next to the emitters to keep them stable and in place. This prevents accidental movement or damage.
- Check the emitters: After installing the emitters, visually inspect them to ensure there are no leaks or blockages. Make any necessary adjustments or replacements if you spot any issues.
Installing emitters or drippers is a crucial step in your drip irrigation system setup. Ensure that the emitters are adequately spaced, particularly for plants with different watering needs. Regularly monitor and maintain the emitters to ensure proper water distribution and efficient operation of your drip irrigation system.
Step 7: Connect the system to a water source
With the tubing and emitters in place, the next step is to connect your rain bird drip irrigation system to a water source. This will allow the water to flow through the system and provide the necessary irrigation to your plants. Follow these steps to connect the system to a water source:
- Locate the water source: Identify the outdoor faucet, rainwater collection system, or dedicated water line that will supply your irrigation system with water. Ensure that the water source is easily accessible and provides adequate water pressure and flow.
- Attach a backflow device (optional): It’s recommended to install a backflow device to prevent any contamination of the water supply. Follow the local regulations and manufacturer’s guidelines for appropriate backflow prevention.
- Connect the tubing to the water source: Depending on your setup, connect the tubing to the water source using a connector or fitting. Ensure that the connection is secure and watertight.
- Turn on the water: Slowly turn on the water at the source to allow the water to flow through the system. Check for any leaks or bursts in the tubing connections. If needed, make adjustments or repairs to ensure proper water flow.
- Check for equal water distribution: Observe the emitters and drippers to ensure that water is evenly distributed to all plants. If you notice any uneven flow or water pooling in certain areas, adjust the emitters or tubing positioning to achieve proper water distribution.
- Monitor the system: Regularly monitor the system for any irregularities, such as leaks, clogged emitters, or inconsistent water flow. Address any issues promptly to maintain the efficiency and effectiveness of your drip irrigation system.
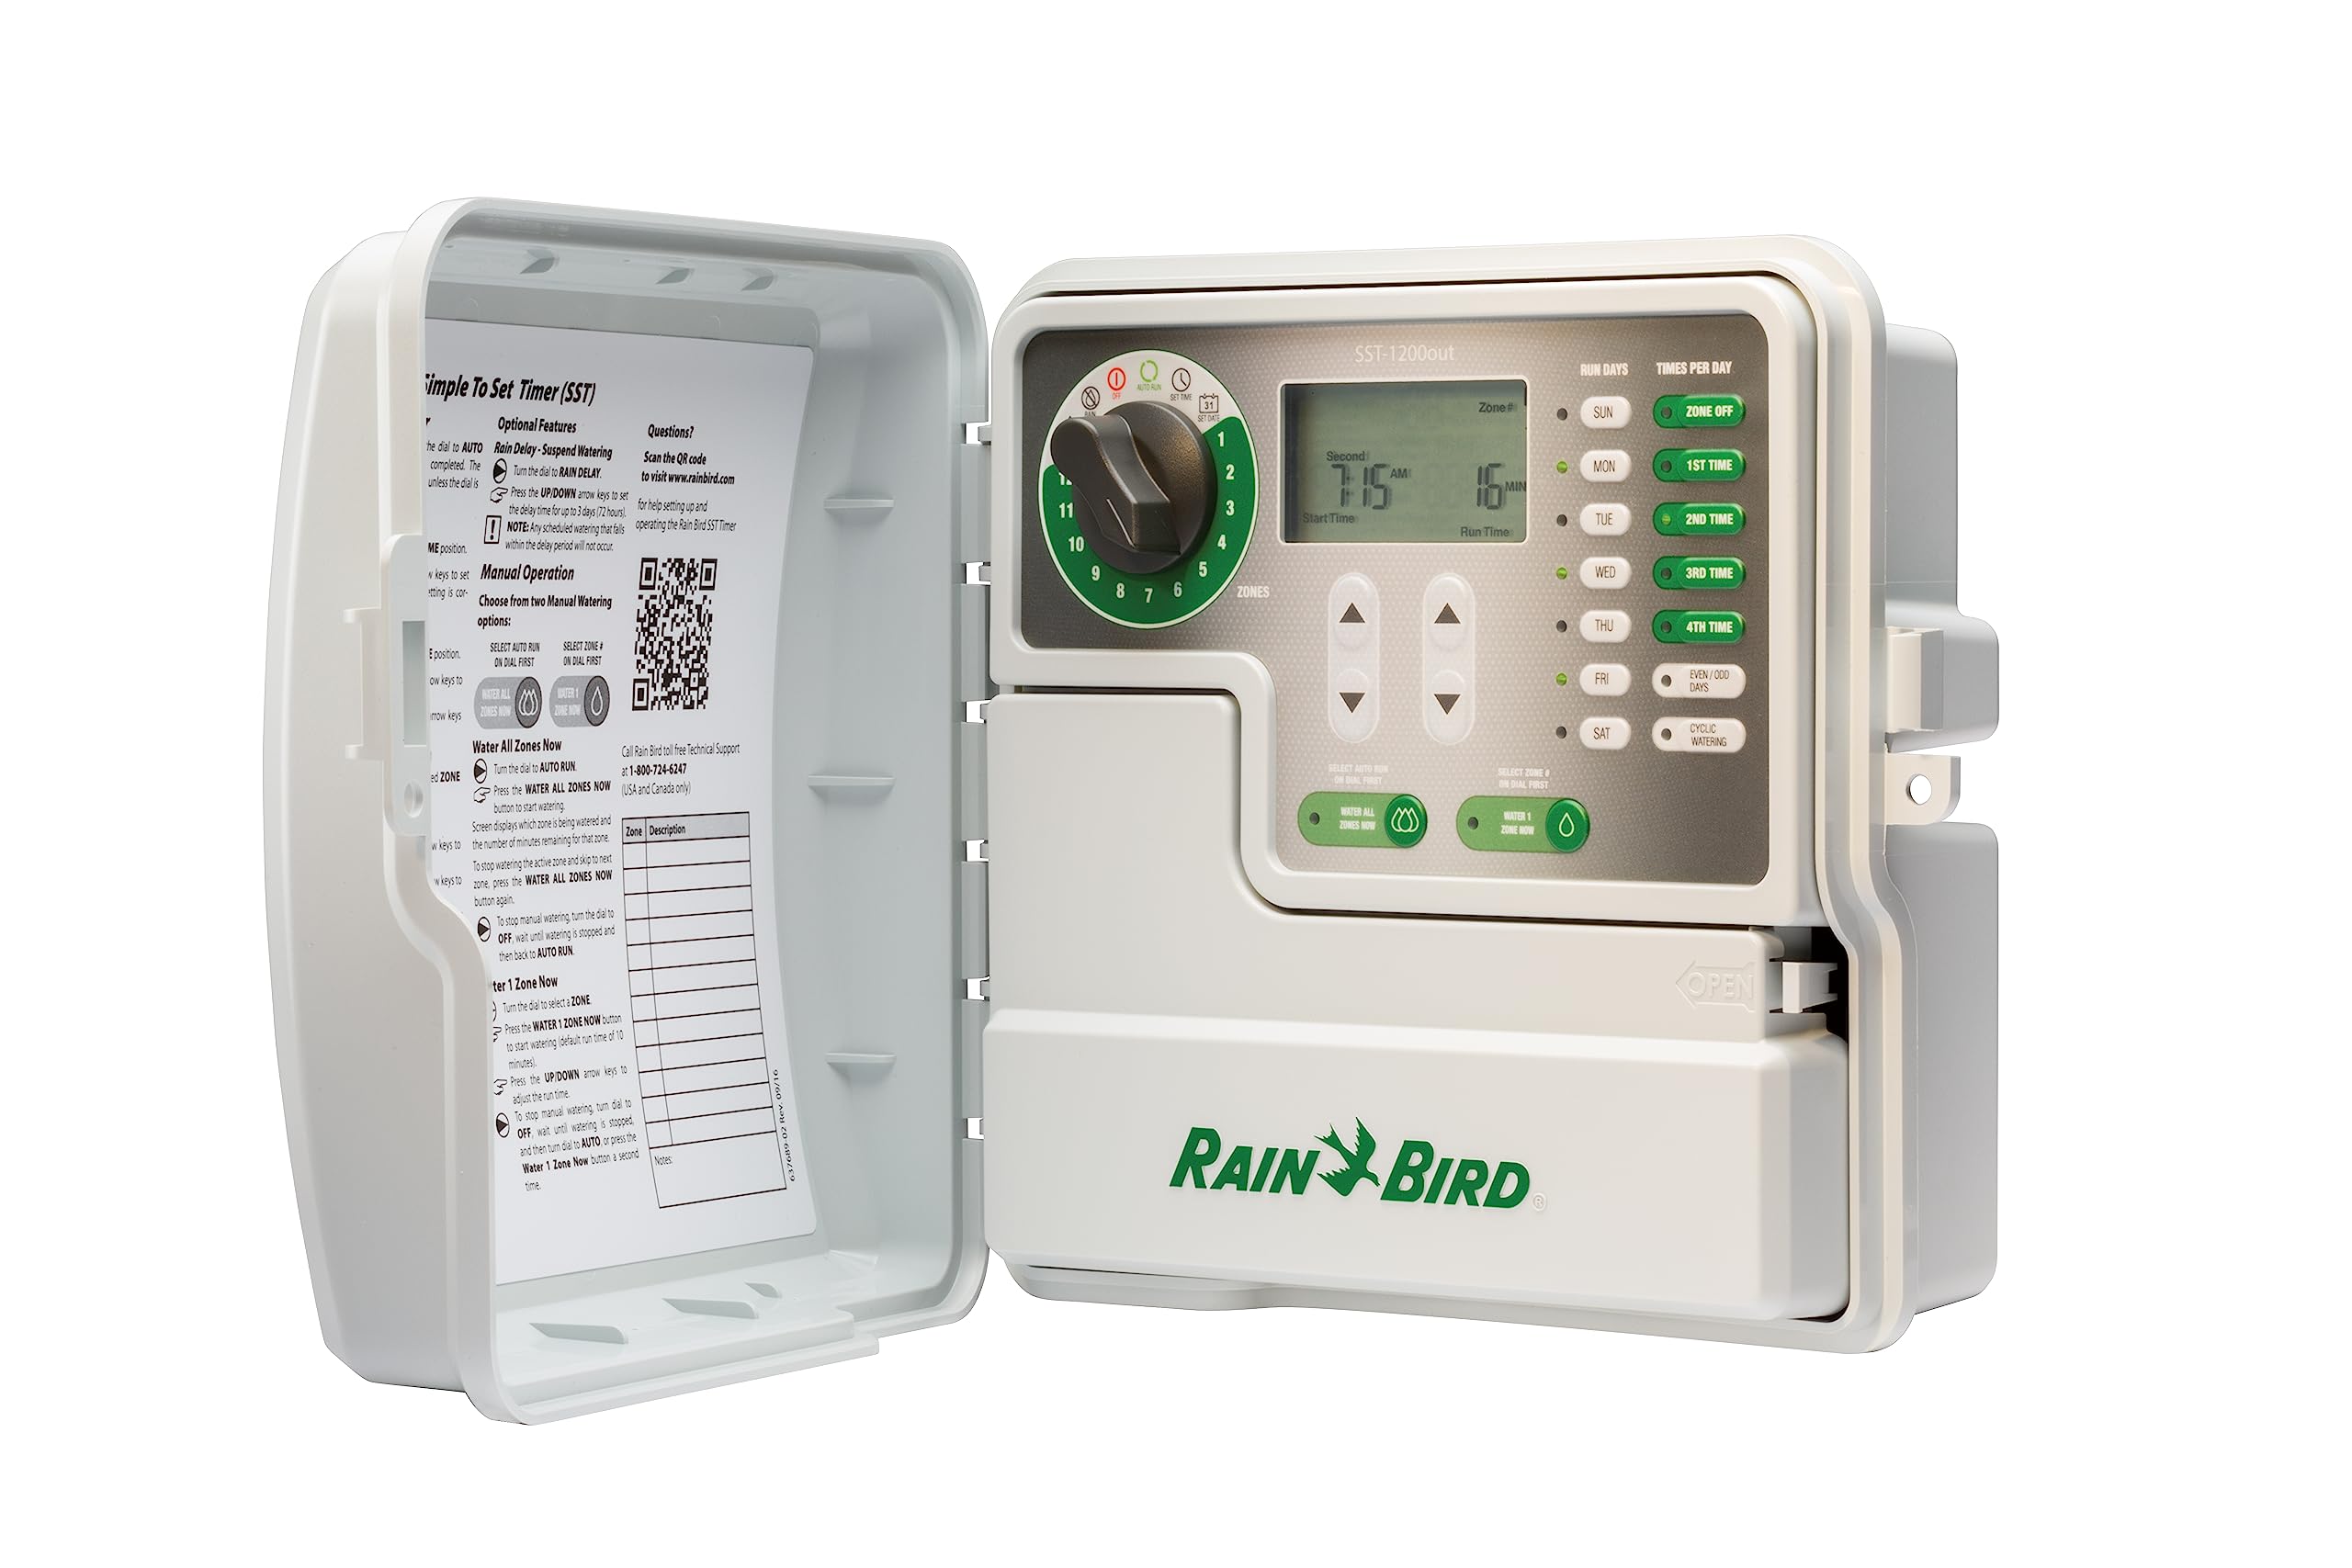
- Automate the system (optional): To make your irrigation system more convenient, consider adding a timer or controller to automate the watering schedule. This allows you to set specific watering times and durations, ensuring that your plants receive consistent and appropriate irrigation.
Connecting your drip irrigation system to a water source is a crucial step in ensuring proper irrigation for your plants. Take the time to check for any leaks or issues and make any necessary adjustments before fully relying on the system for your plant’s water needs.
Step 8: Test and adjust the system
After connecting your rain bird drip irrigation system to a water source, it’s important to test and adjust the system to ensure proper operation and optimal water distribution. By conducting thorough testing and making necessary adjustments, you can fine-tune the system to meet the specific needs of your garden. Follow these steps to test and adjust your drip irrigation system:
- Run a test cycle: Start by running a test cycle to observe the water distribution and coverage. Turn on the water source and allow the system to operate for a few minutes.
- Check for leaks or drips: During the test cycle, inspect all connections and emitters for any leaks or drips. Address any issues by tightening the connections or replacing faulty emitters.
- Observe water distribution: Assess the overall water distribution and coverage to ensure that all plants are receiving adequate irrigation. Look for any dry spots or areas with excessive water. Adjust the positioning of emitters or drippers if needed.
- Inspect for clogged emitters: Examine the emitters or drippers for any signs of clogging. Clean or replace any clogged emitters to ensure optimal water flow and avoid uneven irrigation.
- Adjust flow rate: If certain plants require more or less water, adjust the flow rate of the emitters accordingly. This can be done by either adjusting the individual emitters or using emitters with different flow rate settings.
- Check for water pressure: Ensure that the water pressure from the source is appropriate for your drip irrigation system. Use a pressure gauge to measure the pressure and make adjustments if needed using a pressure regulator valve.
- Monitor and make adjustments: Continuously monitor the performance of your drip irrigation system and make any necessary adjustments as your garden evolves. Consider factors such as plant growth, changing weather conditions, and the water needs of different plant varieties.
Regular testing and adjustment of your drip irrigation system will help ensure that your plants receive the ideal amount of water and promote their overall health and growth. By making necessary tweaks and addressing any issues promptly, you can achieve efficient water usage and maximize the effectiveness of your rain bird drip irrigation system.
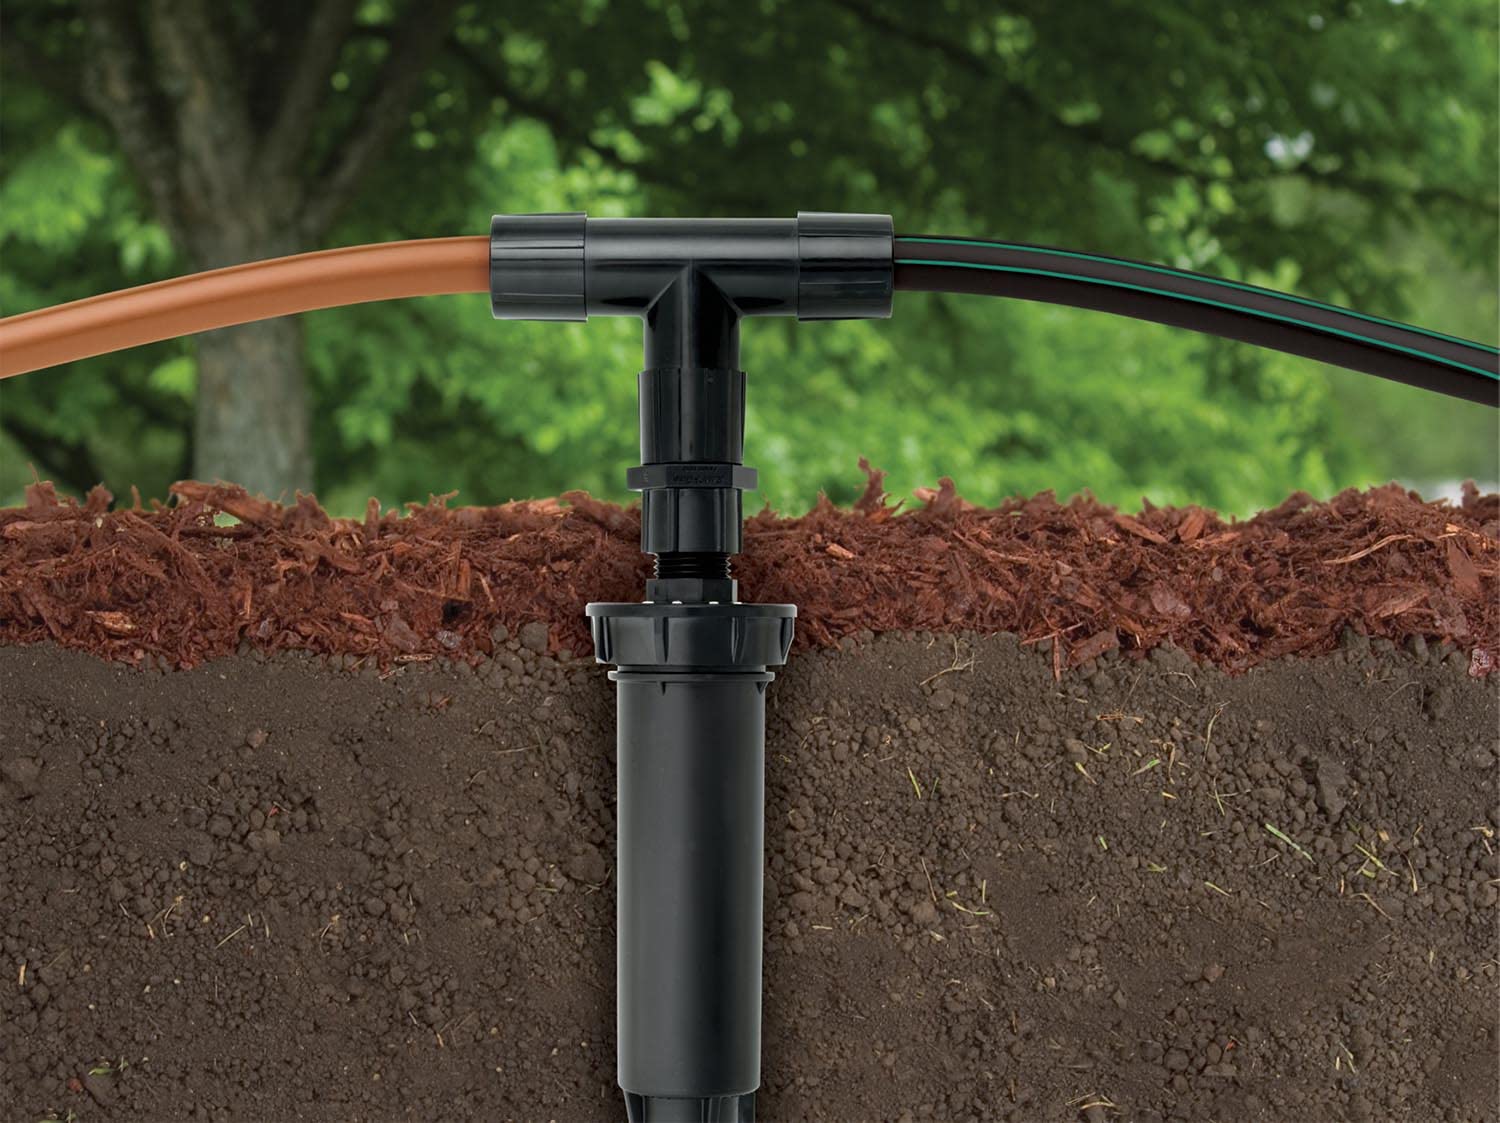
Step 9: Cover the tubing with mulch or soil
After installing and testing your rain bird drip irrigation system, it’s important to protect the tubing and emitters by covering them with mulch or soil. This step helps to maintain the integrity of the system, prevent damage, and improve the overall aesthetics of your garden. Follow these steps to properly cover the tubing:
- Choose the right mulch: Select a suitable mulch material such as wood chips, straw, or compost. Ensure that the mulch is organic and free from any contaminants that may clog the emitters or degrade the tubing.
- Prepare the area: Clear any debris, weeds, or rocks from the area where the tubing is installed. Smooth out the soil surface to create an even bed for the mulch.
- Place the mulch: Spread a layer of mulch evenly over the tubing, making sure to cover it completely. The depth of the mulch layer should be around 2-3 inches to provide sufficient insulation and moisture retention.
- Avoid direct contact: Ensure that the mulch does not come into direct contact with the emitters or tubing. Create a small gap or trench around the tubing to prevent blockages or damage to the emitters.
- Water after mulching: Once the mulch is in place, water the area gently to help settle the mulch and encourage the absorption of moisture into the soil.
- Maintain the mulch layer: Regularly monitor the mulch layer and replenish it as needed. Over time, the mulch may decompose or be displaced, so ensuring a consistent layer will provide ongoing protection to the tubing and emitters.
By covering the tubing with mulch or soil, you provide insulation, reduce evaporation, and improve the visual appearance of your garden. This layer of protection will also help to regulate soil temperature, suppress weed growth, and maintain moisture levels, enhancing the overall efficiency and longevity of your rain bird drip irrigation system.
Conclusion
Congratulations! You have successfully installed your rain bird drip irrigation system. By following the steps outlined in this guide, you’ve taken the necessary steps to efficiently water your plants while conserving water resources. Here’s a quick recap of the key steps:
- Gather the necessary tools and materials
- Plan your drip irrigation system layout
- Measure and cut the irrigation tubing
- Attach fittings to the tubing
- Lay out the tubing in the desired area
- Install emitters or drippers
- Connect the system to a water source
- Test and adjust the system
- Cover the tubing with mulch or soil
By installing a rain bird drip irrigation system, you’ve equipped your garden with a reliable and efficient watering solution. Drip irrigation allows for precise water delivery, minimizing water waste, preventing diseases caused by wet foliage, and promoting healthier plant growth overall. Additionally, the use of a rain bird drip irrigation system helps conserve water, making it an environmentally-friendly choice for your garden.
Remember to regularly monitor and maintain your drip irrigation system. Check for leaks, clogged emitters, and any adjustments needed as your plants grow and the weather changes. Fine-tuning the system will ensure optimal performance and water efficiency for your garden.
With the installation of your rain bird drip irrigation system, you can now enjoy the benefits of convenient and effective watering. Your plants will thrive, and you’ll have more time to sit back, relax, and enjoy the beauty of your flourishing garden.