Home>Gardening Techniques>DIY Projects>What To Do With A Steep Backyard
DIY Projects
What To Do With A Steep Backyard
Modified: February 8, 2024
Looking for DIY projects to tackle in your steep backyard? Check out our top tips and ideas for transforming your slope into a functional and beautiful outdoor space.
(Many of the links in this article redirect to a specific reviewed product. Your purchase of these products through affiliate links helps to generate commission for Chicagolandgardening.com, at no extra cost. Learn more)
Table of Contents
- Introduction
- Assess the Slope
- Create Terraced Levels
- Build Retaining Walls
- Install a Staircase or Steps
- Create a Slide or Ramp
- Construct a Raised Deck or Patio
- Design and Install a Water Feature
- Plant a Garden with Terracing
- Install a Playset or Outdoor Gym
- Build a Fire Pit or Outdoor Seating Area
- Consider Professional Landscaping Assistance
- Conclusion
Introduction
Welcome to the wonderful world of DIY projects! If you’re fortunate enough to have a backyard, you’ve probably spent countless hours enjoying its beauty and tranquility. However, what do you do if your backyard has a steep slope? It can be a challenge to make the most of the space and create a functional outdoor area. But fear not, because in this article, we will explore a variety of DIY projects that will transform your steep backyard into a stunning oasis.
Having a steep backyard can actually be a blessing in disguise. The slope provides a unique opportunity to create terraced levels, which not only add visual interest but also make the space more usable. By breaking up the steep slope into smaller, leveled sections, you can create different zones for various activities and maximize the potential of your backyard.
In this article, we will guide you through various DIY projects that can help you transform your steep backyard. Whether your goal is to create a functional garden oasis, a play area for your children, or a serene retreat for relaxation, we have you covered. From building retaining walls and installing staircases to designing water features and constructing raised decks, there are plenty of options to suit your preferences and budget.
It’s important to note that while these DIY projects provide great opportunities for creativity and personalization, it’s crucial to assess your own skill level and consider safety precautions. If you’re unsure about any aspect of the project, it’s always a good idea to consult with a professional or seek guidance from experienced DIYers.
Without further ado, let’s dive into the world of DIY projects for steep backyards and discover the endless possibilities that await you. So grab your tools, put on your creative hat, and let’s get started on transforming your steep backyard into a stunning space that you can truly enjoy!
Assess the Slope
Before diving into any DIY projects for your steep backyard, it’s essential to assess the slope and understand its characteristics. This will help you make informed decisions and choose the most suitable projects for your specific situation.
Start by visually examining the slope and measuring the angle of incline. Steep slopes are generally classified as anything with a gradient of 30 degrees or more. This will give you an idea of the severity of the slope and the challenges you may face when working on your projects.
Consider the soil condition as well. Steep slopes can be prone to erosion, so it’s important to evaluate the stability of the soil. If you notice signs of erosion or loose soil, additional measures may be needed to prevent further erosion and ensure the longevity of your projects.
Next, think about the water drainage on your slope. Does water flow smoothly, or does it pool in certain areas? Proper water drainage is crucial for maintaining the health of your plants and preventing erosion. You may need to incorporate drainage solutions, such as French drains or swales, into your projects to redirect water away from your backyard.
Assessing the amount of sunlight your steep backyard receives is also important. Take note of the areas that are in full sun, partial shade, or full shade throughout the day. This will help you choose the right plants for your garden projects and determine the ideal locations for your seating areas or outdoor structures.
Finally, consider any potential safety hazards that may arise from the steep slope. Are there any unstable areas or loose rocks that could pose a danger? Identifying these hazards will allow you to address them before starting your DIY projects and ensure the safety of you and your family.
By thoroughly assessing the slope of your backyard, you’ll be equipped with a better understanding of its unique characteristics and challenges. This will enable you to plan and execute your DIY projects more effectively, resulting in a transformed backyard that is both functional and visually appealing.
Create Terraced Levels
One of the most effective ways to optimize a steep backyard is by creating terraced levels. Terracing involves dividing the slope into multiple flat or gently sloping areas, which not only adds visual appeal but also makes the space more functional and accessible. Here are some DIY ideas to help you create terraced levels in your steep backyard:
1. Retaining Walls: Build retaining walls to hold back the soil and create leveled platforms. Use materials such as stone, bricks, or timber to construct sturdy and aesthetically pleasing walls. Make sure to follow proper construction techniques and consider the height and weight of the soil behind the walls to ensure stability.
2. Tiered Planters: Create tiered planters along the slope using materials like concrete blocks, wooden pallets, or repurposed containers. Fill each planter with suitable soil and plant cascading flowers, herbs, or vegetables. This not only adds greenery but also helps with soil erosion control.
3. Rock Gardens: Incorporate a rock garden into your terraced levels by strategically placing rocks and boulders along the slope. Use different sizes and shapes to create interest and variation. Plant drought-tolerant plants, succulents, and alpine species within the rock garden for a low-maintenance and visually appealing display.
4. Stepping Stones: Install stepping stones along the slope to create a path that connects different terraced levels. Use natural stone or concrete pavers for a sturdy and visually appealing pathway. This not only serves as a functional element but also adds a touch of charm to your backyard.
5. Garden Stairs: For larger slopes, consider building garden stairs that lead from one level to another. Use materials like stone, timber, or concrete to construct sturdy and slip-resistant steps. Make sure to incorporate handrails for safety, especially if you have children or elderly individuals using the stairs.
Creating terraced levels in your steep backyard not only enhances the visual appeal but also provides valuable space for various activities such as gardening, seating areas, or outdoor dining. The different levels can be designated for different purposes, allowing you to fully utilize the area. Be sure to consider the overall design and practicality of each level while maintaining a cohesive and seamless transition between them.
Build Retaining Walls
When it comes to managing a steep backyard, building retaining walls can be a game-changer. Retaining walls are essential for holding back the soil on slopes, preventing erosion, and creating leveled areas for various purposes. Here’s a breakdown of the steps involved in building retaining walls:
1. Plan and Design: Start by assessing the slope and determining the height and length of the retaining walls you need. Consider the materials you will use, such as concrete blocks, bricks, or timber, and their aesthetic appeal. Sketch out a design, taking into account any curves or terracing you want to incorporate into your wall layout.
2. Prepare the Area: Clear the area where the retaining walls will be built. Remove any vegetation, rocks, or debris that may hinder the construction process. Ensure that the ground is level and compacted, providing a stable foundation for the retaining walls.
3. Excavate and Lay the Foundation: Dig a trench along the slope where the first row of the retaining wall will be placed. The depth of the trench should be determined by the height of the retaining wall. Make sure the trench is level and use a compacting tool to ensure stability. Lay a layer of crushed stone or gravel as a base for the retaining wall.
4. Construct the Retaining Wall: Begin laying the first row of your chosen material, following the design you sketched. Use a level to ensure the blocks or bricks are evenly placed. As you build upward, make sure each layer is properly aligned and leveled. Use adhesive or mortar to secure the blocks or bricks together for added strength.
5. Add Drainage: To prevent water buildup behind the retaining wall, consider adding drainage pipes or gravel-filled weep holes at regular intervals. This will allow water to flow freely and relieve hydrostatic pressure that can damage the wall over time.
6. Finish and Backfill: Once the retaining wall is constructed, backfill the space between the wall and the slope with a suitable material like gravel or crushed stone. Compact the backfill as you go to create a stable foundation. Finish the top of the retaining wall with capstones or a suitable material to provide a polished look.
Building retaining walls in your steep backyard not only creates leveled areas for various activities but also adds aesthetic appeal and prevents soil erosion. The process requires careful planning, proper construction techniques, and attention to detail. If you’re not confident in your DIY skills, consider hiring a professional to ensure the retaining walls are built safely and effectively.
Install a Staircase or Steps
When dealing with a steep backyard, installing a staircase or steps can greatly improve accessibility and safety. Whether you need to navigate from one level to another or simply make it easier to move around the space, here are some steps to consider:
1. Determine the Location: Assess the slope of your backyard and identify the areas where a staircase or steps would be most beneficial. Consider the natural flow and pathways you want to create, as well as the proximity to other outdoor features or structures.
2. Plan and Design: Create a detailed plan for the staircase or steps, taking into account the dimensions, materials, and overall design. Consider factors such as the overall aesthetics, the number of steps needed based on the slope’s incline, and any safety features you may want to incorporate.
3. Measure and Prepare: Measure the designated location for the staircase or steps and mark the precise points where each step will be placed. Ensure that the ground is level and stable to provide a solid foundation for the construction process.
4. Choose the Materials: Select the appropriate materials for your staircase or steps, considering both functionality and aesthetics. Common options include natural stone, concrete, pavers, or timber. Be sure to choose materials that are durable, slip-resistant, and suitable for the outdoor environment.
5. Construct the Staircase or Steps: Start by excavating the marked area for the steps, ensuring that each step is level and properly aligned. Depending on the materials chosen, follow the manufacturer’s instructions for installation. Secure the steps in place, ensuring they are stable and able to support the weight of individuals using them.
6. Incorporate Safety Features: Consider adding handrails or railings alongside the staircase or steps to enhance safety, especially for children, elderly individuals, or those with limited mobility. Make sure the handrails are sturdy and securely installed, providing support and stability.
7. Enhance with Lighting: To improve visibility and safety during nighttime, consider installing outdoor lighting along the staircase or steps. This will not only provide illumination but also add an element of ambiance to your backyard.
By installing a staircase or steps in your steep backyard, you’ll create a safer and more accessible space. This will not only make it easier to navigate the different levels, but also open up new opportunities for landscaping, gardening, and enjoying outdoor activities. Ensure that your staircase or steps are built with proper construction techniques and materials to ensure durability and longevity.
Create a Slide or Ramp
If you’re looking to bring a sense of fun and excitement to your steep backyard, consider incorporating a slide or ramp into your outdoor space. These features not only provide entertainment for children and adults alike but also make use of the natural slope of your yard. Here’s how you can create a slide or ramp in your backyard:
1. Choose the Location: Determine the best location for your slide or ramp, considering factors such as safety, accessibility, and the natural flow of the slope. Look for areas with enough space for the slide or ramp to extend without obstacles in its path.
2. Plan and Design: Create a plan for your slide or ramp, considering the dimensions, materials, and overall design. Determine the height and length of the slide or ramp based on the slope of your backyard and the age group it will cater to. Take into account safety features such as barriers or soft landing zones.
3. Consider Materials: Select suitable materials for your slide or ramp, making sure they are sturdy, weather-resistant, and able to withstand the weight and usage. Common options include durable plastic for slides, wooden decking, or composite materials for ramps. Be mindful of the safety aspects, such as choosing materials that provide sufficient grip and smooth transitions.
4. Construction: Build the structure of the slide or ramp according to your plan. If building a slide, ensure that it is anchored securely and at the right angle. If constructing a ramp, make sure it has proper supports and a gradual incline for safe use. Follow all manufacturer instructions and consider consulting with a professional if needed.
5. Safety Measures: Incorporate safety measures such as handrails or barriers to prevent accidents and ensure a safe experience for users. Consider adding a soft landing surface at the end of the slide or ramp to cushion any potential falls.
6. Regular Maintenance: Keep your slide or ramp in good condition by conducting regular maintenance. Inspect all components, such as fasteners and supports, for any signs of wear or damage. Clean the surface regularly and ensure that it remains free from debris or hazards.
Creating a slide or ramp in your steep backyard adds an element of excitement and adventure. Whether it’s a slide for children to enjoy or a ramp for skateboarding enthusiasts, these features can transform your backyard into a fun-filled space for everyone. Just make sure to prioritize safety and maintain the structure to ensure years of enjoyment and laughter.
Construct a Raised Deck or Patio
Creating a raised deck or patio in your steep backyard is an excellent way to transform the space into a functional and inviting outdoor living area. Whether you envision a tranquil oasis or an entertainment zone, a raised deck or patio can provide you with the perfect space to relax, entertain, and enjoy the outdoors. Here’s how you can go about constructing a raised deck or patio:
1. Plan and Design: Start by determining the size and shape of your raised deck or patio. Consider factors such as the existing slope, access points, and the desired purpose of the space. Sketch out a design and take measurements to ensure accuracy.
2. Choose Materials: Select the materials for your deck or patio that best suit your style and needs. Options include wood decking, composite materials, stone pavers, or concrete. Take into account factors such as durability, maintenance requirements, and aesthetic appeal.
3. Prepare the Area: Clear the area where the raised deck or patio will be constructed. Remove any grass, vegetation, or debris. Ensure the ground is level, stable, and properly graded to provide a solid foundation for your project.
4. Build a Foundation: Depending on the size and height of your raised deck or patio, you may need to build a foundation. This can involve pouring concrete footings or installing helical piles to provide stability and prevent sinking or shifting over time.
5. Construct the Framework: Build the framework for your raised deck or patio using pressure-treated lumber or other suitable materials. Follow building codes and regulations to ensure structural integrity and safety. Install support posts, beams, and joists according to your design plan.
6. Install the Decking or Patio Surface: Lay your chosen decking or patio surface material over the framework. Secure it properly, ensuring even spacing and alignment. If using wood, apply a weather-resistant sealant to protect it from the elements.
7. Add Finishing Touches: Enhance the aesthetics and functionality of your raised deck or patio with additional features. Consider incorporating built-in seating, outdoor lighting, a pergola, or a fire pit. These elements can add comfort, ambiance, and versatility to your outdoor living space.
8. Maintain and Enjoy: Regularly inspect and maintain your raised deck or patio to ensure its longevity. Perform routine cleaning, staining (if applicable), and repairs as needed. Arrange outdoor furniture, potted plants, and accessories to create a welcoming and inviting atmosphere.
Constructing a raised deck or patio in your steep backyard provides you with a versatile and enjoyable outdoor space. From hosting gatherings to relaxing with a book, a raised deck or patio allows you to fully utilize your backyard and create lasting memories. Ensure proper construction techniques and materials for a sturdy and beautiful addition to your home.
Design and Install a Water Feature
Adding a water feature to your steep backyard can create a soothing and tranquil ambiance, turning it into a serene oasis. The sound and visual beauty of water can provide a calming effect and enhance the overall aesthetic appeal of the outdoor space. Here are steps to help you design and install a water feature:
1. Choose the Water Feature: Consider the different types of water features available, such as a fountain, pond, waterfall, or stream. Think about the style, size, and maintenance requirements of each option, keeping in mind the available space and your personal preferences.
2. Plan and Design: Determine where the water feature will be located in your steep backyard. Take into account the natural slope and the desired visual focal point. Sketch out a design, considering elements such as the flow of water, the placement of rocks or plants, and any additional features you want to incorporate.
3. Prepare the Area: Clear the area where the water feature will be installed, removing any vegetation or debris. Ensure that the ground is level and stable, providing a suitable foundation for the water feature. If necessary, make any necessary adjustments, such as adding retaining walls or adjusting the slope to accommodate the water feature.
4. Install the Water Feature: Follow the manufacturer’s instructions to install the water feature. This may involve digging a pond, setting up a fountain or waterfall, or connecting pre-made components. Ensure that all connections are secure and that the water feature is properly positioned and leveled.
5. Incorporate Pond Liner and Filtration: If you’re installing a pond, line it with a pond liner to prevent leaks and maintain water levels. Incorporate a suitable filtration system to keep the water clean and clear. This helps in maintaining a healthy environment for any fish or plants you may want to add to the pond.
6. Enhance with Plants and Rocks: Bring your water feature to life by adding aquatic plants and strategically placing rocks and stones. This creates a more natural and visually appealing setting. Choose plants that thrive in both water and shade, and place rocks of various sizes and shapes to give a sense of depth and texture.
7. Add Lighting: Consider adding lighting to your water feature to enhance its beauty, especially during the evening hours. Use spotlights or underwater lighting to highlight different elements of the water feature, creating a captivating and enchanting effect.
A well-designed water feature can be the focal point of your steep backyard, creating a calming and peaceful environment. Ensure that your water feature is maintained regularly to keep the water clean and prevent any issues with the pump or filtration system. With proper care, you can enjoy the soothing sounds and captivating visual effects of your water feature for years to come.
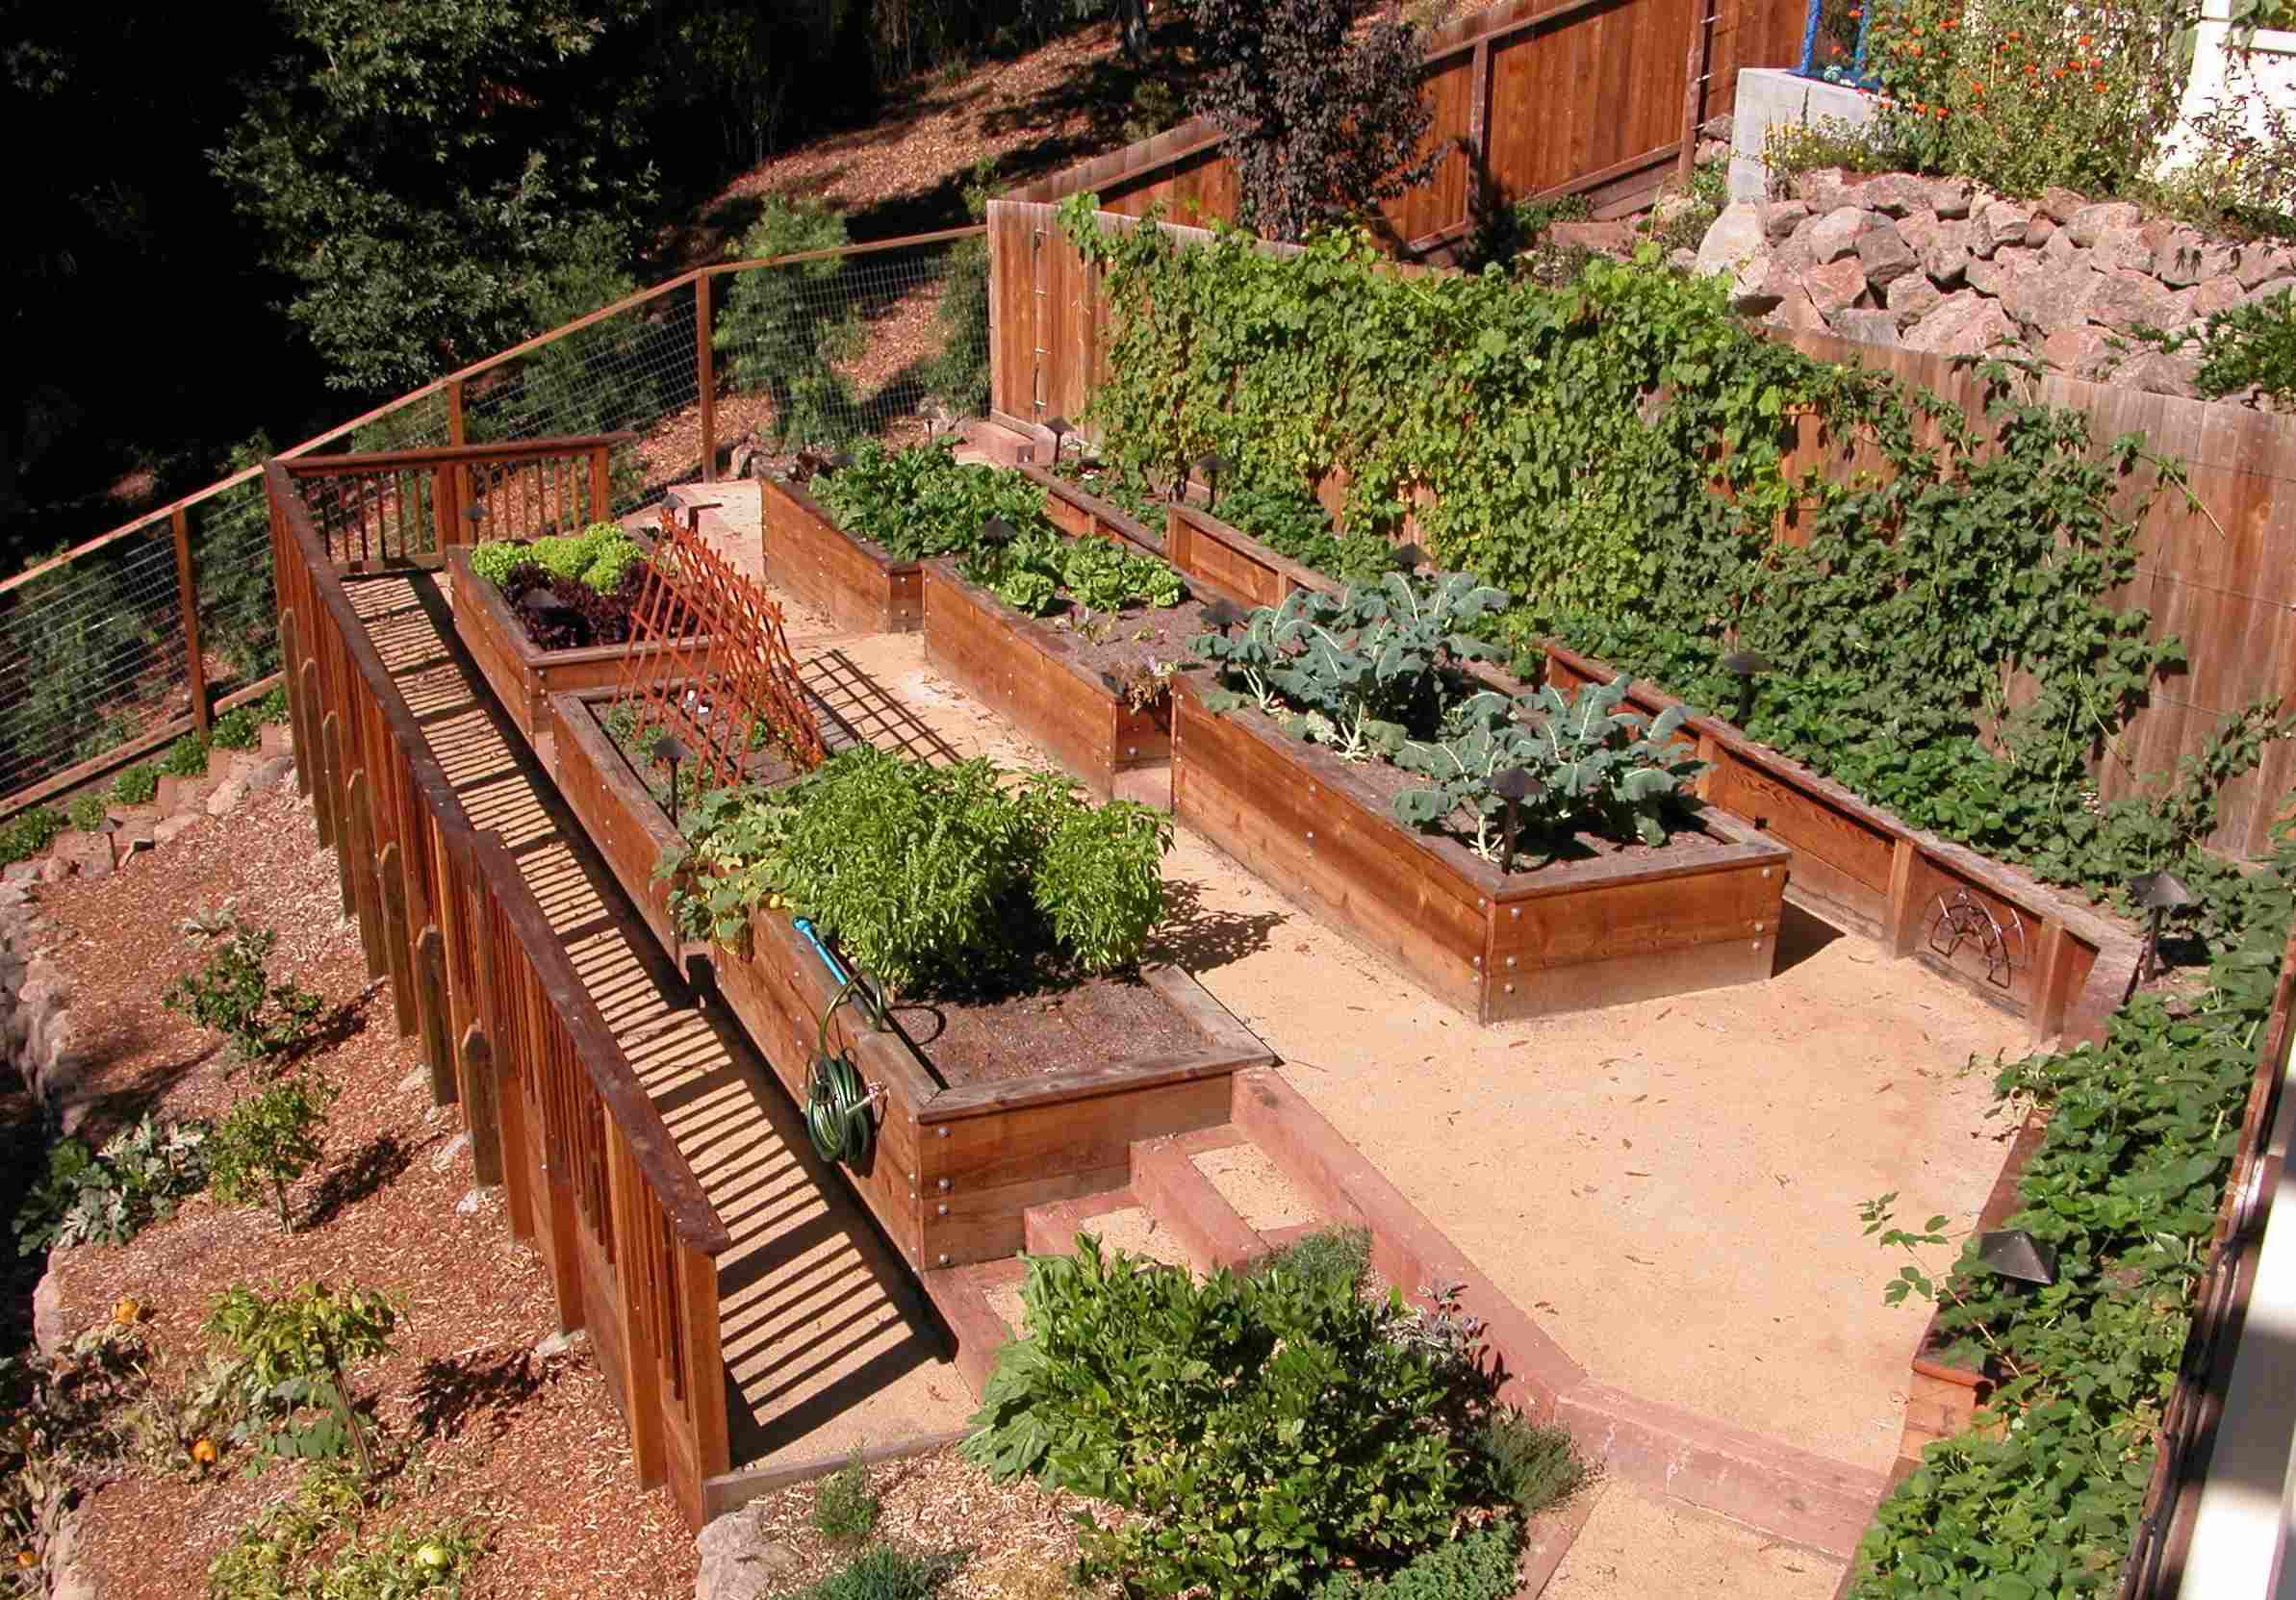
Plant a Garden with Terracing
Planting a garden with terracing is an excellent way to utilize the space in your steep backyard and create a vibrant and visually appealing landscape. Terracing not only adds beauty but also helps prevent soil erosion and provides a suitable environment for a variety of plants. Here’s how you can plant a garden with terracing:
1. Plan and Design: Assess the space available and sketch out a garden design based on your preferences and the layout of your steep backyard. Consider factors like the amount of sunlight, water drainage, and the types of plants you want to incorporate into the garden.
2. Create Terraced Levels: Build retaining walls or use existing natural features to create leveled areas for planting. Depending on the size and slope of your backyard, you may need multiple levels. Ensure that the terraced levels are properly constructed, stable, and capable of holding the soil in place.
3. Choose the Right Plants: Select plants that thrive in the specific conditions of your garden, such as the amount of sunlight, soil type, and moisture levels. Consider incorporating a variety of plants, including flowers, shrubs, herbs, and vegetables, for a diverse and aesthetically pleasing garden.
4. Consider Soil and Mulching: Pay attention to the soil quality in each terraced level to maximize plant growth and health. Amend the soil with organic matter, compost, or other appropriate soil additives to create a fertile environment. Apply mulch to help retain moisture, suppress weeds, and regulate soil temperature.
5. Plant and Maintain: Follow proper planting techniques for each type of plant and space them appropriately based on their growth requirements. Regularly water, fertilize, and weed the garden to ensure the health and growth of the plants. Prune and trim when necessary to maintain the desired shape and size.
6. Enhance with Pathways and Borders: Install pathways or stepping stones between the terraced levels to allow easy access for maintenance and enjoyment. Add borders, such as decorative rocks or low-growing plants, to define the garden space and create a polished look.
7. Consider Watering System: Depending on the size of your garden, installing an irrigation system or using soaker hoses can help ensure consistent and efficient watering. This is especially beneficial for steep backyards where watering manually may pose logistical challenges.
Planting a garden with terracing in your steep backyard not only adds beauty and color but also maximizes the use of space. By incorporating terraced levels, selecting the right plants, and maintaining proper care, you can create a stunning garden that thrives in the unique conditions of your backyard. Enjoy its beauty and reap the rewards of the plants as they grow and flourish in this inviting outdoor oasis.
Install a Playset or Outdoor Gym
If you have children or enjoy staying active, installing a playset or outdoor gym in your steep backyard can provide endless entertainment and promote a healthy lifestyle. Both playsets and outdoor gyms can be customized to fit your available space and preferences. Here’s how you can install a playset or outdoor gym:
1. Evaluate the Space: Assess the size and slope of your backyard to determine the best location for your playset or outdoor gym. Consider factors like accessibility, visibility, and safety.
2. Choose the Right Equipment: Select age-appropriate play equipment or gym equipment that suits your needs and interests. Consider options like swings, slides, climbing walls, monkey bars, or outdoor exercise stations.
3. Install Safety Measures: Prioritize safety by installing impact-absorbing surfaces like rubber mulch or synthetic turf beneath play equipment. Make sure all equipment is installed correctly and meets safety guidelines. Consider adding safety netting or fencing around the area to prevent accidents and keep children and pets secure.
4. Plan for Accessibility: Ensure that the playset or outdoor gym is accessible for all users. Incorporate ramps or pathways for wheelchair access if needed. Consider the layout and spacing of equipment to provide ample room for movement and activities.
5. Consider Shade and Seating: If your steep backyard lacks natural shade, add a shade structure or install a canopy over the playset or outdoor gym. This will provide protection from the sun during hot summer months. Consider adding benches or seating areas nearby for parents or caregivers to relax and watch over children.
6. Maintain and Inspect Regularly: Regularly check and maintain the playset or outdoor gym to ensure its safety and longevity. Inspect the equipment, tighten bolts and screws, and repair any damages promptly. Keep the area clean and free of debris to minimize risks.
7. Encourage Outdoor Play and Fitness: Promote active and imaginative play by encouraging children to use the playset or outdoor gym regularly. Organize games, set challenges, or create a workout routine for yourself or family members. Emphasize the importance of staying active and enjoying the outdoors.
Installing a playset or outdoor gym in your steep backyard offers a multitude of benefits, from providing a fun and engaging space for children to promoting fitness and well-being for the whole family. Ensure that the equipment is properly installed, regularly maintained, and the area is safe and secure for everyone to enjoy. Watch as your backyard becomes a hub of excitement and physical activity for all ages.
Build a Fire Pit or Outdoor Seating Area
Creating a fire pit or outdoor seating area in your steep backyard can provide a cozy and inviting space for relaxation, gatherings, and enjoying the beauty of nature. Whether you prefer the warmth and ambiance of a fire pit or the comfort of a seating area, here are the steps to help you bring this outdoor haven to life:
1. Choose the Location: Select a suitable location for your fire pit or seating area, considering factors such as the slope, proximity to your home, and any regulations or guidelines in your area. Ensure there is enough space to accommodate the seating area and the safety requirements for a fire pit.
2. Plan and Design: Determine the size and shape of your fire pit and seating area. Decide whether you want a built-in fire pit or a portable option. Sketch a design that complements the overall aesthetic of your backyard and aligns with your vision.
3. Prepare the Area: Clear the area where the fire pit or seating area will be constructed. Remove any vegetation, rocks, or debris. Level the ground and consider adding a layer of gravel or pavers to create a stable foundation.
4. Build the Fire Pit: If you’ve chosen to build a fire pit, begin by excavating the area and creating a circular or square shape. Construct the fire pit using fire-resistant materials such as concrete blocks, bricks, or stone. Follow safety guidelines and consider incorporating drainage at the base.
5. Create the Seating Area: Install seating options such as benches, chairs, or outdoor lounge furniture around the fire pit or in a designated area nearby. Make sure the seating is comfortable, weather-resistant, and suitable for the intended use.
6. Add Ambiance and Comfort: Enhance the ambiance of the outdoor space by incorporating soft lighting, such as string lights or solar-powered lanterns. Consider adding cozy elements like cushions, blankets, or outdoor rugs to create a warm and inviting atmosphere.
7. Consider Safety Measures: Install safety features such as a fire pit screen or a fire extinguisher nearby to ensure the safety of your fire pit area. Follow all local fire regulations and guidelines to prevent accidents and minimize fire hazards.
8. Landscaping and Finishing Touches: Surround the fire pit or seating area with landscaping elements like plants, shrubs, or decorative rocks to create a harmonious blend between nature and the built environment. Add personal touches such as outdoor decor or artwork to make the space uniquely yours.
Building a fire pit or outdoor seating area in your steep backyard provides a tranquil retreat where you can gather with friends and family, share stories, and create lasting memories. Ensure that the fire pit is operated safely and responsibly, and always follow proper fire safety guidelines. With a well-designed seating area, you’ll have the perfect spot to relax and unwind in the comfort of your own backyard.
Consider Professional Landscaping Assistance
While DIY projects can be fulfilling and cost-effective, sometimes it’s best to seek professional landscaping assistance, especially when dealing with a steep backyard. Professional landscapers have the knowledge, skills, and experience to transform your outdoor space into a stunning and functional paradise. Here are some reasons why you should consider professional landscaping assistance:
1. Expertise and Experience: Professional landscapers have extensive knowledge of plants, materials, and construction techniques. They understand the unique challenges posed by a steep backyard and can provide valuable insights and solutions that you may not have considered.
2. Design and Planning: Landscaping professionals have an eye for design and can create a cohesive and beautifully designed outdoor space. They will work with you to understand your vision, budget, and preferences, and then develop a customized plan to bring that vision to life.
3. Access to Resources: Professional landscapers have access to a wide range of resources, including specialized equipment, high-quality materials, and a network of suppliers. This ensures that your project is completed efficiently and with the best possible materials.
4. Time and Effort Savings: Landscaping projects can be time-consuming and physically demanding, especially in a steep backyard. Hiring professionals allows you to save time and effort while ensuring that the project is completed efficiently and to the highest standards.
5. Knowledge of Local Regulations: Professional landscapers are familiar with local regulations, permits, and restrictions. They will ensure that your project complies with all necessary codes and guidelines, giving you peace of mind and avoiding potential issues in the future.
6. Maintenance and Long-Term Care: Professional landscapers can provide ongoing maintenance services to keep your outdoor space looking its best year-round. They can offer advice on plant care, watering schedules, and general upkeep to ensure the longevity and health of your landscape.
7. Enhanced Property Value: A professionally landscaped backyard can significantly increase the value of your property. Whether you plan to sell in the future or simply want to enjoy the benefits of a beautiful outdoor space, professional landscaping can be a worthwhile investment.
While DIY projects can be rewarding, tackling a steep backyard on your own can present unique challenges. By enlisting the help of professional landscapers, you can save time, ensure high-quality work, and enjoy the many benefits of a thoughtfully designed and well-maintained outdoor oasis. Consider professional landscaping assistance to transform your steep backyard into the outdoor paradise you’ve always dreamed of.
Conclusion
Transforming a steep backyard into a functional and visually appealing space may seem like a challenge, but with the right DIY projects and professional assistance, it’s possible to create a stunning oasis that you can enjoy for years to come. Whether you choose to create terraced levels, build retaining walls, install a staircase or steps, construct a raised deck or patio, design a water feature, or add a playset or outdoor gym, these projects offer endless possibilities for maximizing the potential of your steep backyard.
Through careful planning, proper execution, and creativity, you can overcome the unique challenges that a steep slope presents and create a unique outdoor paradise that suits your preferences and lifestyle. Assessing the slope, choosing the right materials, incorporating safety measures, and considering factors such as water drainage and access are crucial steps in ensuring the success of your projects.
Remember, always prioritize safety and consult with professionals if you’re unsure about any aspect of the project. They have the expertise and experience to guide you and ensure that your DIY projects are done correctly and safely. Additionally, professional landscaping assistance can provide you with expert design, access to resources, and ongoing maintenance to create a truly remarkable outdoor space.
So, whether you choose to tackle these projects on your own or seek professional help, embrace the creativity, enjoy the process, and watch as your steep backyard transforms into a beautiful, functional, and inviting haven. With determination, attention to detail, and a touch of DIY spirit, you can turn your steep backyard into a breathtaking space that you, your family, and your guests will cherish for years to come.