Home>Gardening Techniques>DIY Projects>How To Level Out Backyard

DIY Projects
How To Level Out Backyard
Modified: February 6, 2024
Learn how to level out your backyard with these easy DIY projects. Transform your uneven outdoor space into a beautiful and functional area for relaxing and entertaining.
(Many of the links in this article redirect to a specific reviewed product. Your purchase of these products through affiliate links helps to generate commission for Chicagolandgardening.com, at no extra cost. Learn more)
Table of Contents
Introduction
Welcome to this comprehensive guide on how to level out your backyard. Having a level backyard not only enhances the visual appeal of your outdoor space, but it also creates a more functional and safe environment for various activities such as gardening, playing sports, or simply relaxing. Whether you want to fix uneven ground or address drainage issues, leveling your backyard can be a fulfilling and rewarding DIY project.
Before diving into the steps of leveling your backyard, it’s important to assess the current state of the area and determine the extent of the leveling required. Depending on the size of your backyard and the severity of the unevenness, the time and effort needed for the project may vary.
In this guide, we will walk you through the process of leveling your backyard, from assessing the area to maintaining the levelness once the project is complete. By following these steps, you’ll be well on your way to creating a smooth and inviting outdoor space that you can enjoy for years to come.
In the next section, we will explore the process of assessing your backyard to identify any issues that may need attention before starting the leveling project. This will help you determine the best course of action and ensure that you have all the necessary tools and materials for the job.
Assessing the Backyard
Before embarking on your backyard leveling project, it’s crucial to assess the current state of your outdoor space. This will help you identify any potential issues and determine the most effective approach to achieving a level ground. Here are the key steps to assess your backyard:
1. Survey the Area: Start by visually inspecting your backyard and taking note of any noticeable slopes, depressions, or areas with standing water. These can indicate drainage issues that need to be addressed during the leveling process.
2. Use a Leveling Tool: To get a more accurate assessment, use a leveling tool, such as a laser level or a builder’s level. Place the tool at various spots across the yard to measure the slope and determine the degree of unevenness.
3. Check for Stability: Assess the stability of the ground by walking around the backyard. Look for areas that feel spongy or unstable underfoot, as these might require additional attention before proceeding with the leveling project.
4. Consider the Soil Type: Take note of the soil type in your backyard, as this can affect the levelness and overall success of the project. Clay soil, for example, tends to hold water and can lead to uneven ground, while sandy soil may require additional amendments for better stability.
5. Identify Obstacles: Look for any obstacles such as tree roots, rocks, or underground utilities that may interfere with the leveling process. It’s important to address or work around these obstacles to ensure a smooth and even surface.
6. Assess Drainage: Evaluate the drainage system in your backyard. Make sure that water is properly directed away from the foundation of your home and that there are no low-lying areas where water tends to collect. Adjustments may need to be made to ensure effective drainage during the leveling process.
By carefully assessing your backyard, you’ll gain valuable insights into the challenges you may face and the appropriate steps to take for a successful leveling project. In the next section, we’ll discuss the necessary preparations and clearing techniques to get your backyard ready for leveling.
Clearing the Area
Once you have assessed your backyard and have a clear understanding of its current state, the next step in leveling your backyard is to clear the area of any obstacles that may impede the leveling process. Here are the key steps to clearing the area:
1. Remove vegetation: Start by removing any plants, shrubs, or weeds from the area that will be leveled. Use a shovel, garden rake, or a weed trimmer to clear the vegetation. Be sure to dispose of the plants properly, either by composting or discarding them.
2. Take care of tree roots: If there are any small trees or large shrubs whose roots may interfere with the leveling process, consider transplanting them to another location in your yard. For larger trees, consult with a professional arborist to determine the best course of action.
3. Clear rocks and debris: Remove any rocks, stones, or debris from the area. Use a wheelbarrow or a garden cart to collect and transport the materials away from the leveling site. This will ensure a smooth and even surface for the next steps of the project.
4. Address underground utilities: Before digging or excavating, it’s essential to locate and mark any underground utilities such as electrical wires, gas lines, or irrigation systems. Contact your local utility companies to assist with identifying the locations of these utilities to prevent any accidental damage during the leveling process.
5. Consider drainage: As you clear the area, pay attention to the existing drainage patterns in your yard. If there are areas where water tends to pool or flow poorly, it may be necessary to make adjustments to the terrain to ensure proper drainage once the leveling is complete.
Clearing the area is a vital step in preparing your backyard for the leveling process. By removing vegetation, rocks, and debris, and addressing potential obstacles, you’ll create a clean and accessible space to proceed with the next steps of the project. In the following section, we’ll discuss the necessary preparations for the ground before leveling.
Preparing the Ground
After clearing the area of any obstacles, the next step in leveling your backyard is to prepare the ground for the leveling process. Proper preparation ensures a stable and long-lasting foundation for your leveled yard. Here are the key steps to preparing the ground:
1. Mark the boundaries: Use stakes and string to mark the boundaries of the area that will be leveled. This will provide a clear framework and guide during the preparation and leveling process.
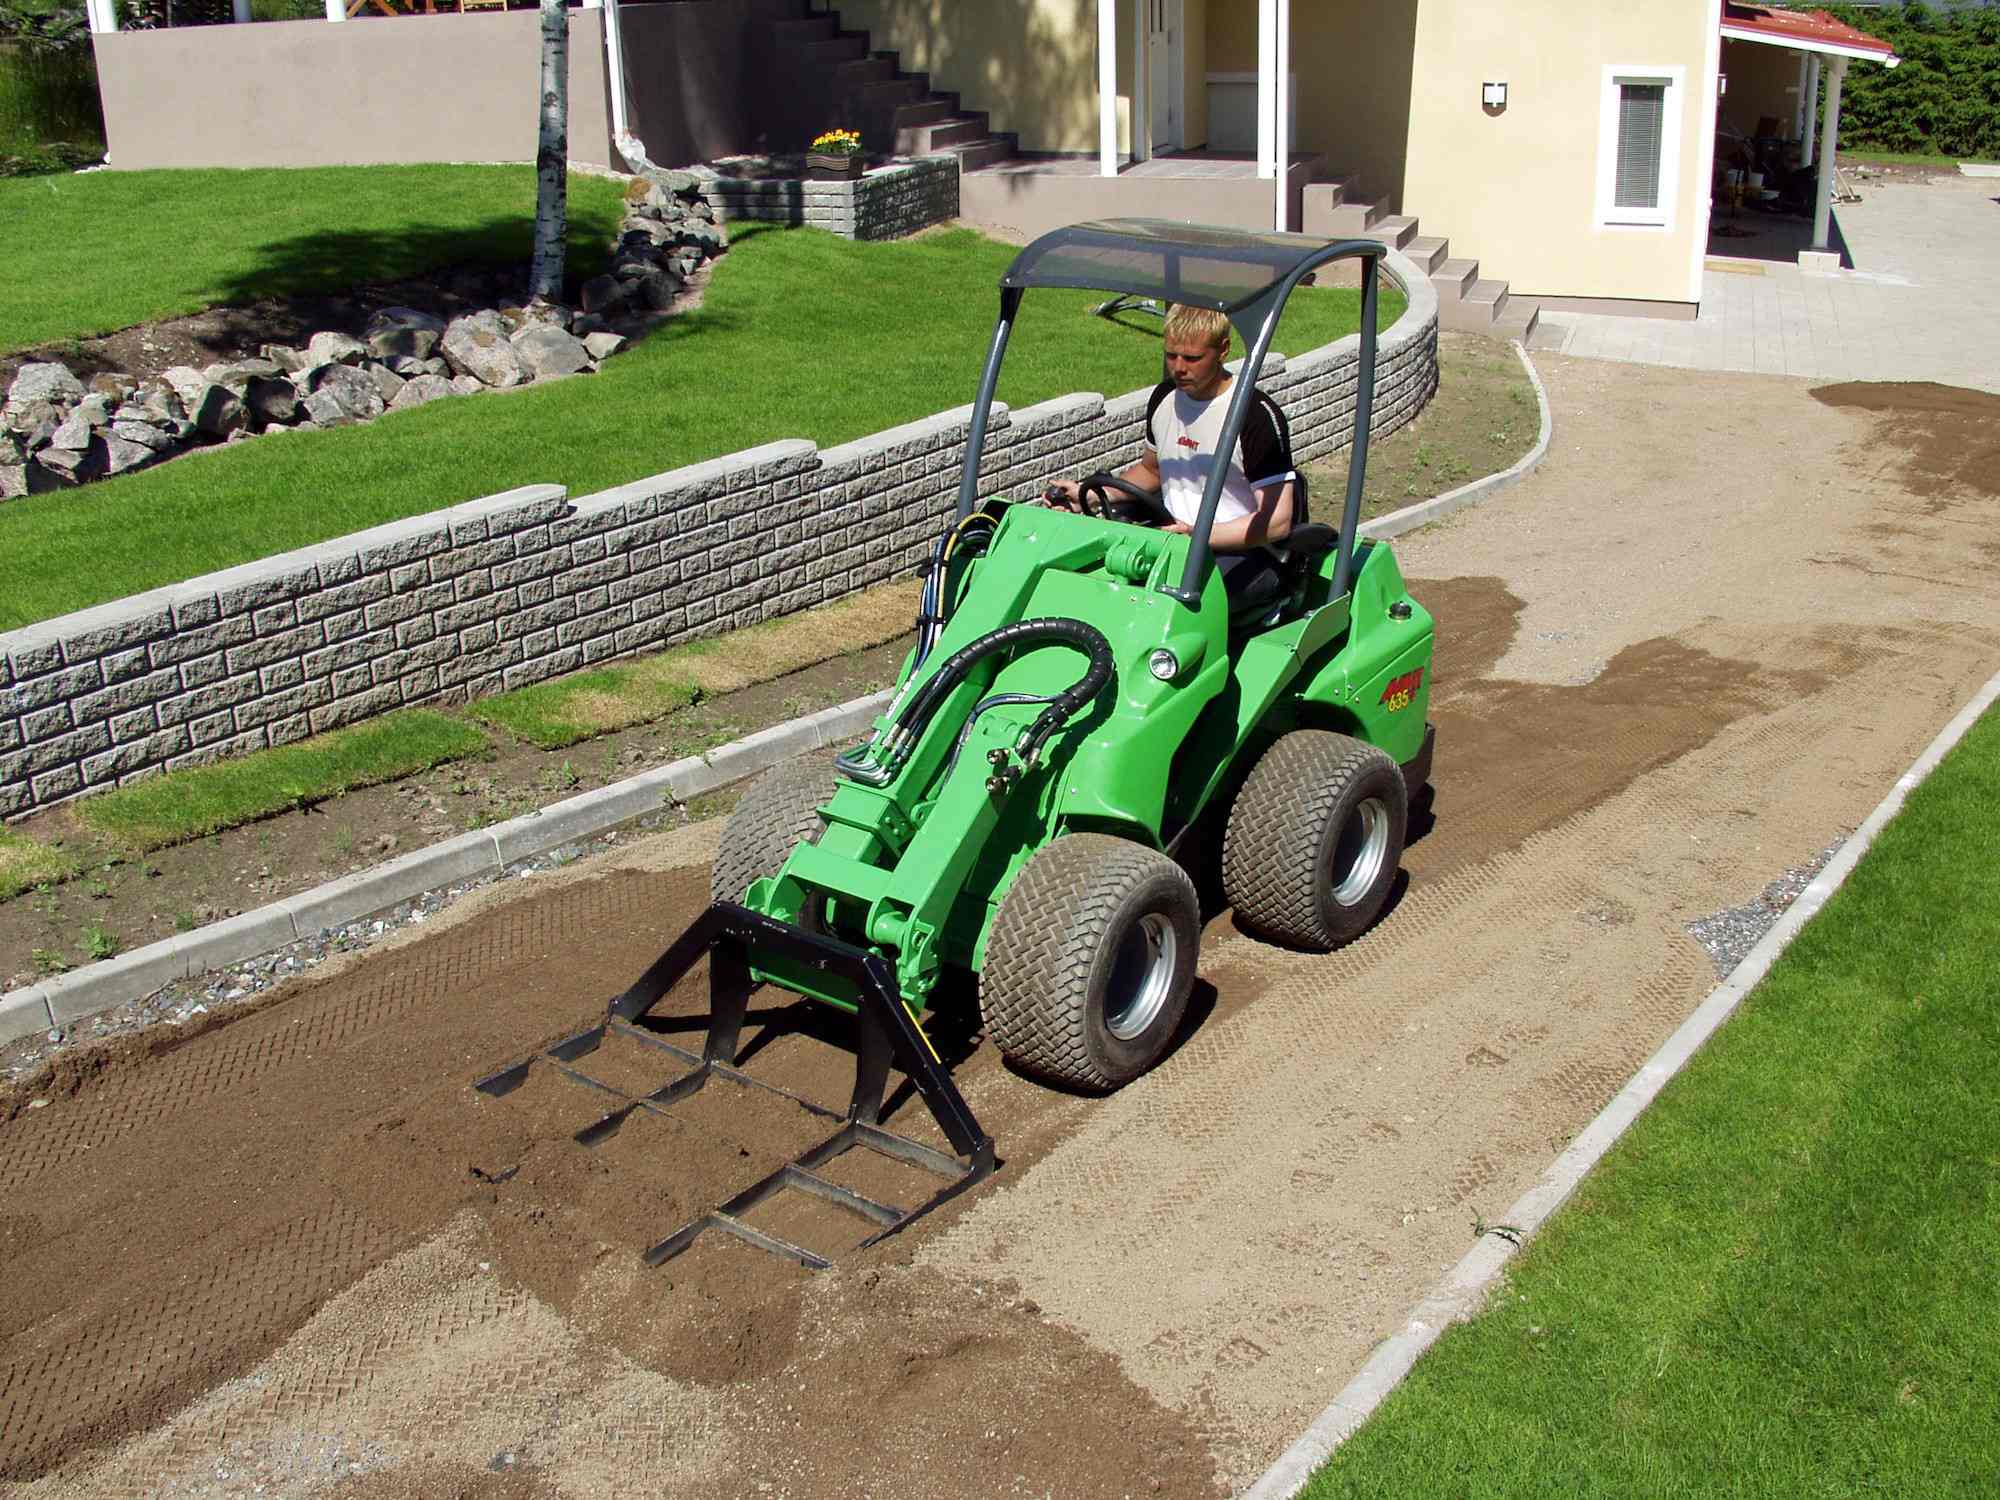
2. Excavate: If the area requires significant leveling, you may need to excavate the top layer of soil. Use a shovel, garden hoe, or a skid steer loader to remove the excess soil and create a more even surface. Be cautious not to dig too deep, as it may affect the stability of the ground.
3. Fill low spots: Identify any low spots or depressions in the ground and fill them with topsoil. Use a rake or a shovel to spread the soil evenly and level it with the surrounding area. This will help achieve a more uniform surface.
4. Compact the soil: Once the low spots are filled, use a hand tamper or a plate compactor to compact the soil. This will help improve stability and prevent settling over time. Compact the soil in layers, working your way across the entire area.
5. Address drainage: If you’ve identified any drainage issues during the assessment phase, take this opportunity to make adjustments. Add slopes or create swales to redirect water away from your home or areas where pooling occurs. This will help prevent future water accumulation and ensure proper drainage.
6. Amend the soil: Depending on the quality of your soil, you may need to amend it with organic matter such as compost or well-rotted manure. This will help improve its structure, drainage, and nutrient content, creating an ideal environment for plants.
Properly preparing the ground sets the stage for a successful leveling project and ensures a solid foundation for your backyard. By following these steps, you’ll be one step closer to achieving a level and functional outdoor space. In the next section, we’ll discuss how to check for levelness before proceeding with the leveling process.
Checking for Levelness
Before moving forward with leveling your backyard, it’s crucial to check for levelness to ensure an even and uniform surface. This step is essential for creating a safe and pleasing outdoor space. Here are the key steps to checking for levelness:
1. Use a level: Grab a long, straight board or a level tool and lay it across different areas of your backyard. Check for any gaps or unevenness. If you notice any significant differences, mark those areas for further attention during the leveling process.
2. Measure slope: Place a measuring tape or a leveling tool against the ground and measure the slope. This will help you identify areas that need to be adjusted to achieve a level surface. Keep in mind that a slight slope away from your home is desirable for proper drainage.
3. Check for water pooling: After heavy rainfall or irrigation, observe your backyard for areas where water tends to pool. These spots may need additional attention or adjustments to ensure proper drainage and prevent future issues.
4. Use visual cues: Your eyes can also be a great tool for checking levelness. Walk around your backyard and observe any noticeable differences in elevation or unevenness. Look for any visible slopes or high spots that need correction.
5. Double-check: Once you have performed the initial levelness check, go back and re-evaluate any areas that might have seemed problematic. Sometimes, a second look can reveal subtle variations that were initially overlooked.
Checking for levelness is a crucial step before proceeding with the leveling process. By identifying and addressing any uneven areas or slopes, you’ll ensure a more aesthetically pleasing and functional backyard. In the next section, we’ll delve into the steps involved in leveling the backyard.
Leveling the Backyard
Once you have assessed the area, cleared the obstacles, prepared the ground, and checked for levelness, you are ready to start leveling your backyard. This step is where you’ll make the necessary adjustments to create a smooth and even surface. Here’s how to level your backyard:
1. Distribute topsoil: If there are areas that need to be raised, spread topsoil evenly over those spots using a rake or shovel. Make sure to distribute the soil in thin, even layers, using the previously marked boundaries as a guide.
2. Compact the soil: After spreading topsoil, use a hand tamper or a plate compactor to gently compact the soil. This will help settle the soil and ensure stability. Compact the soil in small sections, working your way across the entire leveled area.
3. Check for levelness: As you work, continually check for levelness using a board or a level tool. Make adjustments as needed, adding or removing soil to achieve a flat and even surface. Take your time during this process, making sure to maintain a consistent level throughout the area.
4. Rake and smooth the surface: Once the soil is compacted and level, use a rake to smooth out any rough patches or bumps. This will help create a more aesthetically pleasing surface and ensure a seamless transition between the different areas of your backyard.
5. Water and settle: After leveling the backyard, water the area lightly. This will help the soil settle and fill in any small gaps or depressions. Pay attention to areas where water tends to collect, as this may indicate the need for further adjustments in the leveling process.
Leveling your backyard requires patience, attention to detail, and a methodical approach. By following these steps, you’ll be able to achieve a level surface that provides a solid foundation for various outdoor activities. In the next section, we’ll discuss the options for seeding or laying sod to establish a lush and inviting lawn.
Seeding or Laying Sod
Once you have successfully leveled your backyard, it’s time to establish a lush and vibrant lawn. There are two main options to consider: seeding or laying sod. Each method has its advantages and considerations. Here’s what you need to know:
Seeding:
If you have the patience to wait for the grass to grow and establish itself, seeding is a cost-effective option. Follow these steps for successful seeding:
1. Choose the right seed: Select a grass seed that is suitable for your climate and the amount of sunlight your backyard receives. Consider factors like durability, maintenance requirements, and desired appearance.
2. Prepare the soil: Before seeding, ensure the soil is loosened and level. Remove any debris and gently rake the surface to create a soil-seed contact.
3. Sow the seeds: Evenly distribute the seeds across the area, following the manufacturer’s instructions for seeding rate. Use a spreader or your hands for smaller areas.
4. Water and care: Water the seeded area regularly to keep the soil moist but not waterlogged. Follow a proper watering schedule and provide essential nutrients by applying a starter fertilizer. Be patient as the seeds germinate and the grass gradually grows.
5. Maintain the lawn: Once the grass reaches a suitable height, begin regular mowing, watering, and fertilizing to promote healthy growth. Follow proper lawn care practices to ensure a lush and thriving lawn.
Laying Sod:
If you desire an instant and mature lawn, laying sod is the preferred option. Here’s how to properly lay sod:
1. Prepare the soil: Ensure the soil is level, free of debris, and adequately moist. Remove any rocks or large clumps to provide a smooth surface for the sod.
2. Start from an edge: Begin laying the sod along one edge of your lawn, working your way towards the opposite end. Stagger the seams, similar to how bricks are laid, to create a stronger bond and a more natural look.
3. Trim and shape: Use a sharp utility knife or sod cutter to trim the edges and shape the sod to fit irregular areas or curves in your backyard.
4. Water and compact: Immediately after laying the sod, water it thoroughly to help it settle and establish roots. Use a roller or hand tamp to ensure good contact between the sod and the soil.
5. Maintain the lawn: Follow a regular watering schedule to keep the sod moist as it establishes. Avoid heavy use of the lawn until the sod has fully rooted. Once rooted, follow a proper lawn care routine, including regular mowing, watering, and fertilizing.
Both seeding and laying sod have their benefits, so consider your preferences, budget, and timeline before making a decision. Regardless of which method you choose, a healthy and well-maintained lawn will add beauty and functionality to your newly leveled backyard.
Maintaining the Levelness
After successfully leveling your backyard, it’s important to maintain the levelness to ensure a long-lasting and enjoyable outdoor space. Proper maintenance will help prevent the reoccurrence of unevenness and ensure the stability of your yard. Here are some key tips for maintaining the levelness:
1. Regularly monitor the ground: Keep an eye on the ground to detect any signs of settling or unevenness. After heavy rain or use of heavy equipment on the lawn, inspect the area for any changes and address them promptly to maintain a level surface.
2. Fill in low spots: If you notice any low spots or depressions forming, promptly fill them in with topsoil. Use a rake or shovel to level the area and compact the soil to prevent further sinking.
3. Address drainage issues: Proper drainage is crucial for the long-term levelness of your backyard. Ensure that downspouts and gutters are directing water away from the yard and make necessary adjustments if water is pooling or causing erosion.
4. Topdress with soil: Periodically topdress the lawn with a thin layer of topsoil or compost. This can help fill in minor imperfections and promote healthy grass growth. Use a rake to spread the soil evenly across the lawn.
5. Regularly mow and maintain the lawn: Proper and regular lawn maintenance, including frequent mowing, watering, and fertilizing, can help promote a healthy and even lawn surface. Be sure to follow best practices for the type of grass you have in your yard.
6. Control weed growth: Weeds can create unevenness and disrupt the levelness of your backyard. Implement a weed control program to prevent weeds from taking root and crowding out your grass.
7. Perform periodic soil inspections: Over time, the soil may compact or shift, impacting the levelness of your backyard. Periodically inspect the soil and consider aerating or loosening compacted areas to maintain a stable foundation.
By actively maintaining the levelness of your backyard, you’ll ensure that it remains a functional and appealing space for years to come. Regular inspections, prompt actions, and proper lawn care practices will contribute to the overall stability and attractiveness of your leveled yard.
Conclusion
Congratulations on successfully completing the process of leveling your backyard! By following the steps outlined in this guide, you have transformed your outdoor space into a more functional, visually appealing, and enjoyable area. A level backyard provides a solid foundation for various activities, from gardening and playing sports to hosting gatherings with family and friends.
Remember, the key to maintaining the levelness of your backyard is regular monitoring and proactive maintenance. Keep an eye out for any signs of settling or unevenness, promptly address any drainage issues, and follow proper lawn care practices. By taking these steps, you’ll prolong the stability of your leveled yard and prevent the need for significant repairs or re-leveling in the future.
Whether you chose to seed or lay sod, nurturing your lawn and ensuring proper growth will contribute to the overall levelness and beauty of your backyard. Dedicate time to regular mowing, watering, fertilizing, and weed control to maintain a healthy and thriving lawn.
Remember, leveling your backyard is an ongoing process. As your landscape evolves and changes, adjustments may be needed to maintain the level surface. By staying attentive and implementing proper maintenance practices, you’ll continue to enjoy the benefits of a level and functional outdoor space for years to come.
We hope this guide has provided you with the knowledge and confidence to successfully level your backyard. Enjoy your newfound level outdoor oasis!

