Home>Gardening Techniques>Plant Care>How To Care For Orchids After Blooming

Plant Care
How To Care For Orchids After Blooming
Modified: January 22, 2024
Learn the essential steps of plant care for orchids after blooming to ensure their continued health and vibrant displays. Discover expert tips and techniques for maintaining these delicate and beautiful plants.
(Many of the links in this article redirect to a specific reviewed product. Your purchase of these products through affiliate links helps to generate commission for Chicagolandgardening.com, at no extra cost. Learn more)
Table of Contents
- Introduction
- Understanding the Blooming Cycle of Orchids
- Post-Blooming Care: Removing the Spent Flowers
- Post-Blooming Care: Trimming the Orchid Stem
- Post-Blooming Care: Pruning the Orchid Roots
- Post-Blooming Care: Repotting the Orchid
- Post-Blooming Care: Providing Optimal Lighting Conditions
- Post-Blooming Care: Adjusting Watering and Fertilizing Routine
- Post-Blooming Care: Monitoring Temperature and Humidity Levels
- Post-Blooming Care: Preventing Pests and Diseases
- Conclusion
Introduction
Welcome to the wonderful world of orchids! These exquisite flowers are known for their beauty and elegance, capturing the hearts of plant enthusiasts around the globe. If you’re a proud orchid owner or considering adding one to your collection, it’s important to understand the proper care required to keep these delicate plants thriving.
Orchids are fascinating plants that go through natural cycles of blooming and dormancy. Just like any living organism, they require specific care during each stage to ensure their health and longevity. In this article, we will focus on the post-blooming care of orchids – the crucial steps you need to take to ensure your orchid thrives after it has finished blooming.
After the initial excitement of seeing your orchid in full bloom, it is important to transition into a care routine that meets the plant’s needs once its flowers begin to fade. By understanding the post-blooming care process, you can continue to enjoy the beauty of your orchid and help it prepare for the next blooming cycle.
In the following sections, we will guide you through the various steps of caring for orchids after blooming. From removing spent flowers to adjusting lighting conditions, watering routines, and preventing pests, we will cover everything you need to know to give your orchid the best chance at thriving.
So, grab your gardening gloves and let’s dive into the world of post-blooming care for orchids. With the right knowledge and a little bit of TLC, your orchids will continue to bring joy and beauty to your home for years to come.
Understanding the Blooming Cycle of Orchids
Before we delve into the post-blooming care of orchids, it’s essential to understand the natural blooming cycle of these magnificent plants. This knowledge will give you insight into their growth patterns and help you better care for your orchid.
Orchids typically go through a blooming cycle that consists of a period of growth, followed by a period of rest. The exact duration of each stage can vary depending on the species and environmental conditions, but the basic cycle remains the same.
The blooming cycle starts with the growth phase, also known as the vegetative stage. During this period, the orchid focuses on developing its foliage, roots, and stems. It absorbs nutrients and sunlight to build up energy reserves, preparing itself for the upcoming flowering stage.
As the orchid enters the flowering stage, it produces beautiful blooms in a wide variety of colors and shapes. This is the stage that most orchid enthusiasts eagerly anticipate, as it showcases the plant’s unique and stunning flowers. The blooming stage can last anywhere from a few weeks to a couple of months, depending on the orchid species.
Once the blooms have faded and fallen off, the orchid enters a period of dormancy, commonly referred to as the resting stage. During this time, the plant conserves energy and focuses on regenerating its resources for future growth and blooming. It is crucial to provide the appropriate care during this phase to ensure the health and vitality of your orchid.
Understanding the blooming cycle of orchids is essential because it determines the timing and type of care required for your plant. By being aware of these natural growth patterns, you can better anticipate your orchid’s needs and provide it with the necessary care during the post-blooming period.
In the next sections, we will delve into the specific steps involved in caring for orchids after blooming, ensuring that your plant receives the appropriate care and remains healthy throughout its blooming cycle.
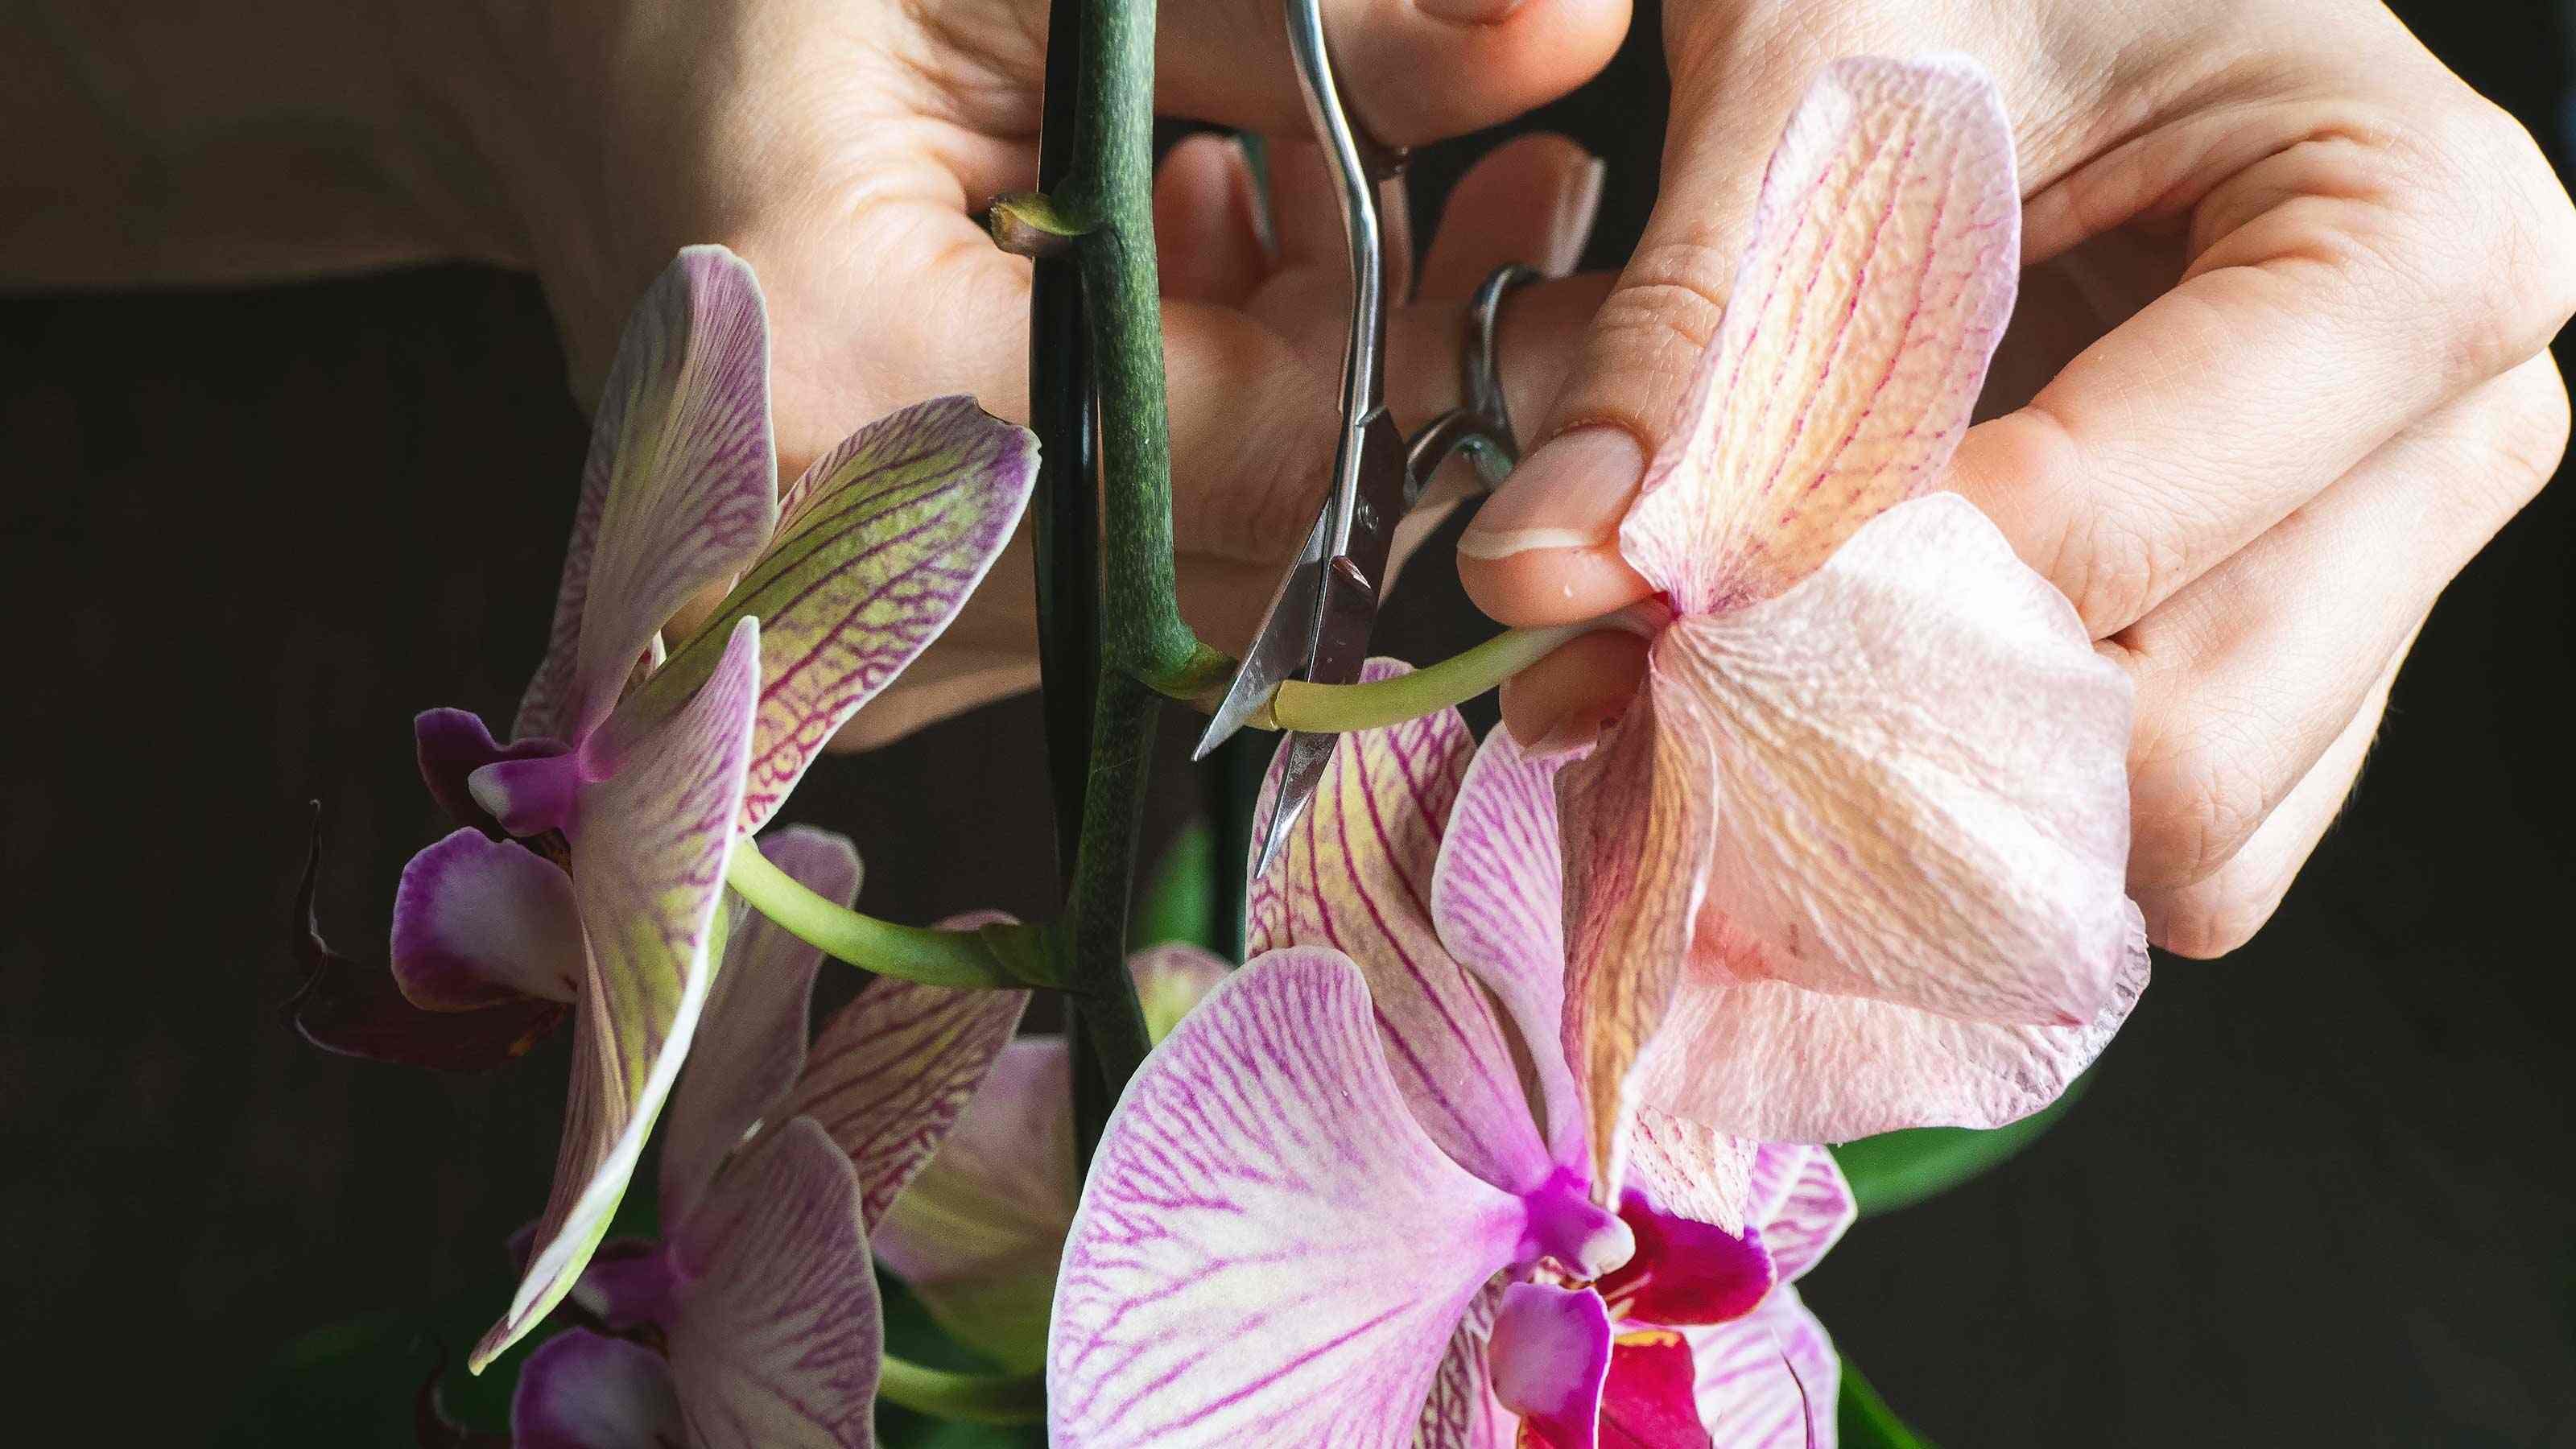
Post-Blooming Care: Removing the Spent Flowers
After your orchid has finished blooming, it’s important to remove the spent flowers to promote new growth and prevent the plant from expending energy on producing seeds. This process, known as deadheading, is a straightforward yet vital step in post-blooming care.
To remove the spent flowers, follow these simple steps:
- Inspect the orchid stems and locate the faded or wilted blooms. These are the flowers that have reached the end of their lifespan and no longer contribute to the overall beauty of the plant.
- Hold the stem just below the faded bloom and gently twist it or make a clean cut using sterilized pruning shears or a sharp knife. It’s essential to ensure that your cutting tool is sanitized to prevent the spread of diseases or infections between plants.
- Continue removing all the spent flowers along the stem until you reach the base. If there are any buds that have not yet bloomed, leave them intact to allow them to develop and produce new flowers in the future.
- Dispose of the removed flowers properly by placing them in compost or the organic waste bin. This helps prevent the accumulation of decaying plant material that could attract pests or cause diseases.
By removing the spent flowers, you not only improve the overall appearance of your orchid, but you also redirect the plant’s energy towards other essential processes, such as root and foliage growth. This allows your orchid to channel its energy into producing new stems and flower spikes for future blooming cycles.
It’s important to note that some orchid varieties, such as Phalaenopsis, have the ability to rebloom from old spikes. If you notice new growth emerging from a spent flower spike, avoid cutting it back entirely. Instead, trim the spike just above the last node where the new growth is appearing. This will encourage the orchid to produce new buds and potentially bloom again.
Regularly removing spent flowers from your orchids not only keeps them looking tidy, but it also stimulates healthier and more robust growth. By properly deadheading your orchids, you set the stage for a successful post-blooming phase and ensure that your plant stays in optimal condition for future blooms.
Post-Blooming Care: Trimming the Orchid Stem
As part of the post-blooming care for your orchid, it’s essential to trim the orchid stem. Trimming the stem helps promote new growth and keeps the plant looking neat and tidy. Additionally, it allows the orchid to redirect its energy towards developing healthy roots and foliage.
Follow these steps to trim the orchid stem effectively:
- Examine the orchid stem after the flowers have bloomed. Look for any brown or yellow sections, as these typically indicate that the stem has died back and no longer supports active growth.
- Using sterilized pruning shears or a sharp knife, make a clean cut just above a node or bud on the stem. A node is a swelling on the stem where new growth can emerge. Cutting above a healthy node encourages the orchid to produce new branches or flower spikes.
- If you notice any green or healthy sections on the stem, leave them intact. These portions can potentially produce new buds and contribute to future blooms.
- Dispose of the trimmed sections properly to prevent the spread of diseases. Place them in compost or organic waste bins.
When trimming the stem, it’s important to avoid cutting too close to the base of the plant. Leaving a small portion of the stem intact provides a surface for new growth to emerge and helps maintain the overall health of the orchid.
Trimming the orchid stem after blooming not only improves the plant’s appearance but also encourages the development of new shoots and enhances its overall vitality. By directing the plant’s energy towards new growth, you ensure that your orchid continues to thrive and prepares for future blooming cycles.
It’s worth noting that not all orchid varieties require stem trimming. Some orchids, like Phalaenopsis, produce new branches from the base of the existing stem. In these cases, it is best to leave the stem untouched unless it has become completely brown and dry.
By following proper trimming techniques, you maintain the health and aesthetics of your orchid, creating the ideal conditions for it to flourish and reward you with beautiful blooms in the future.
Post-Blooming Care: Pruning the Orchid Roots
Pruning the orchid roots is an essential step in the post-blooming care of your orchid. Root pruning helps maintain the root system’s health, encourages new root growth, and prevents the buildup of rot or decay. By giving proper attention to the roots, you set the stage for the orchid to thrive and prepare for future blooming cycles.
Follow these steps to prune the orchid roots effectively:
- Gently remove the orchid from its container, taking care not to damage the fragile roots.
- Inspect the roots carefully, looking for any signs of disease, rot, or decay. Healthy orchid roots are typically green or silver-gray and firm to the touch. In contrast, unhealthy roots may be mushy, discolored, or shriveled.
- Using sterilized pruning shears or a sharp knife, trim away any unhealthy roots. Make clean cuts a few centimeters above the damaged or diseased area, ensuring that you are cutting into healthy tissue.
- Continue checking the remaining roots and removing any dead or unhealthy sections. It’s important to create a healthy foundation for the orchid to develop new roots and absorb nutrients effectively.
- Once you have finished pruning the roots, prepare a clean container with fresh orchid potting mix. Place the orchid back into the container, spreading its roots evenly and making sure it is positioned securely.
- Water the orchid thoroughly to help settle the potting mix and provide hydration to the newly pruned roots. However, be cautious not to overwater, as excessive moisture can lead to root rot.
Remember, orchids have unique root systems and require a well-draining potting mix to prevent waterlogged conditions. Proper root pruning helps create an optimal environment for your orchid to flourish, supporting its growth and future blooming cycles.
It’s important to note that not all orchids require root pruning after blooming. Some orchids, like Phalaenopsis, have aerial roots that perform essential functions for the plant. In these cases, it is best to leave the roots untouched, focusing instead on the overall health of the plant.
By paying attention to the root system of your orchid and providing proper pruning when necessary, you enable the plant to absorb nutrients efficiently, establish robust growth, and prepare for the next blooming cycle.
Post-Blooming Care: Repotting the Orchid
Repotting your orchid is an essential part of its post-blooming care. Over time, orchids can outgrow their pots, and the potting medium may break down, leading to poor drainage and root health. Repotting provides an opportunity to refresh the growing medium, examine the roots, and give the orchid a fresh start.
Follow these steps to repot your orchid effectively:
- Choose the right time to repot, ideally when the orchid is in its active growth phase, after blooming. This allows the plant to recover quickly from the repotting process.
- Gently remove the orchid from its current pot, taking care not to damage the roots. You can tap the sides of the pot or use a clean, blunt instrument to loosen the roots from the container.
- Inspect the roots. Healthy orchid roots are usually green or silvery-gray and firm to the touch. If you see any mushy, blackened, or decaying roots, remove them using sterilized pruning shears or a sharp knife.
- Select a new pot that is slightly larger than the previous one. Ensure that the pot has drainage holes at the bottom to prevent waterlogged conditions.
- Prepare a fresh batch of orchid potting mix, specifically formulated for orchids. This mix provides good drainage while retaining some moisture. You can also add materials such as bark, perlite, or coconut husk chips to improve aeration and drainage.
- Place a layer of potting mix at the bottom of the new pot and position the orchid in the center. Carefully spread the roots over the potting mix, adding more mix as needed to secure the plant. The base of the orchid should sit at or slightly above the pot’s rim.
- Gently firm the potting mix around the roots, taking care not to compact it too tightly. This allows for adequate airflow and water absorption.
- Water the repotted orchid thoroughly, allowing the excess water to drain out through the holes at the bottom of the pot.
After repotting, it’s important to place your orchid in a suitable location with the right environmental conditions. Provide adequate light, ensure proper temperature and humidity levels, and adjust your watering and fertilizing routine to accommodate the plant’s needs in its new pot.
Repotting your orchid every one to two years, or when you notice overcrowding or declining plant health, promotes optimal root growth and allows your orchid to continue flourishing in its new pot. It also presents an opportunity to assess the overall health of the orchid and address any potential issues early on.
By providing the proper care and attention during the repotting process, you give your orchid a fresh start and set the stage for continued growth and future blooming.
Post-Blooming Care: Providing Optimal Lighting Conditions
Proper lighting conditions are crucial for the post-blooming care of your orchid. Orchids have varying light requirements depending on the species, and providing the right amount of light is essential for healthy growth and future blooming.
Here are some key considerations to ensure your orchid receives optimal lighting:
- Understand your orchid’s light requirements. Some orchids, such as Phalaenopsis, prefer bright indirect light, while others, like Cattleyas, thrive in bright, direct sunlight. Research your specific orchid species to determine its light needs.
- Place your orchid in an appropriate location. Ideally, find a spot that receives sufficient light for the orchid’s requirements. East or west-facing windows are often good options as they offer moderate morning or afternoon sunlight. Alternatively, you can use artificial grow lights specifically designed for orchids.
- Monitor the intensity of the light. Orchids can experience leaf burn if exposed to direct, intense sunlight for extended periods. If you notice signs of scorching or yellowing leaves, consider moving the orchid slightly further from the light source or provide shading during the hottest parts of the day.
- Pay attention to light duration. Orchids typically require 10-12 hours of light per day. Ensure they receive enough darkness at night, as uninterrupted periods of darkness are vital for orchids to initiate blooming.
- Adjust lighting conditions based on the season. As the intensity and duration of natural sunlight change throughout the year, you may need to make adjustments. In winter months with shorter daylight hours, consider using artificial grow lights to supplement the natural light.
By providing the right lighting conditions for your orchid, you contribute to its overall health and encourage the development of strong, vibrant foliage and potential flower spikes for future blooming. Monitoring the light levels and making adjustments when necessary will help ensure your orchid receives the optimal amount of light for its specific needs.
Remember to observe your orchid for signs of light stress or inadequate lighting, such as weak growth or lack of blooming. Adjusting the lighting conditions accordingly will help your orchid thrive and prepare for its next blooming cycle.
Post-Blooming Care: Adjusting Watering and Fertilizing Routine
As your orchid transitions from blooming to the post-blooming phase, it’s important to make adjustments to its watering and fertilizing routine. Adapting these practices ensures that your orchid receives the appropriate nutrients and hydration to support overall health and future blooming.
Here are some guidelines for adjusting the watering and fertilizing routine for your orchid:
- Assess the moisture levels in the growing medium. Orchids generally prefer a slightly drying period between waterings. Stick your finger about an inch into the potting mix – if it feels dry to the touch, it’s time to water. Avoid overwatering, as this can lead to root rot and other issues.
- Use the “soak and dry” method. When watering your orchid, thoroughly saturate the potting mix until water drains out of the bottom of the pot. Allow the excess water to completely drain away. Avoid letting the orchid sit in standing water, as this can also contribute to root rot.
- Adjust watering frequency. As your orchid enters the post-blooming phase, it may need less frequent watering compared to when it was in bloom. Monitor the drying period between waterings and adapt accordingly to prevent over- or underwatering.
- Modify fertilizing frequency. During the post-blooming period, your orchid may not require as much fertilization as during active growth or blooming. Reduce the frequency of fertilizing to once every two to four weeks, using a balanced orchid fertilizer diluted to half the recommended strength.
- Observe your orchid’s response. Pay attention to your orchid’s foliage and overall health. If you notice signs of over-fertilization, such as burned or discolored leaves, reduce the fertilizing frequency or strength even further.
It’s important to note that different orchid species and growing conditions may require slightly different watering and fertilizing routines. It’s always best to research the specific requirements of your orchid to provide the most appropriate care.
By adjusting the watering and fertilizing routine for your orchid during the post-blooming phase, you promote optimal root health, prevent nutrient imbalances, and ensure that the plant receives the necessary resources to thrive and prepare for future blooming cycles.
Regularly monitoring your orchid’s response to watering and fertilizing adjustments allows you to fine-tune the care routine and maintain the health and vitality of your orchid over the long term.
Post-Blooming Care: Monitoring Temperature and Humidity Levels
Temperature and humidity are critical factors to consider when caring for your orchid, especially during the post-blooming phase. Orchids have specific temperature and humidity requirements that influence their growth, overall health, and ability to produce future blooms.
Here are some guidelines for monitoring temperature and humidity levels for your orchid:
- Understand your orchid’s temperature preferences. Different orchid species have varying temperature requirements. Some orchids prefer cooler temperatures, while others thrive in warmer conditions. Research the specific temperature range that is suitable for your orchid to ensure it receives optimal care.
- Provide appropriate temperature conditions. Place your orchid in an area of your home that matches its temperature preferences. Avoid exposing the plant to extreme temperature fluctuations, drafts, or direct heat sources such as heaters or air conditioning vents.
- Monitor humidity levels. Orchids generally prefer higher humidity levels to mimic their natural tropical habitats. Aim for humidity levels of around 50-70%. You can increase humidity around your orchid by using a pebble tray filled with water, placing a humidifier nearby, or grouping orchids together.
- Take seasonal changes into account. Be aware that temperature and humidity levels can fluctuate with the changing seasons. Adjust your orchid’s care by providing supplemental humidity during drier winter months or avoiding excessive heat during hot summers.
- Observe your orchid’s response. Pay attention to how your orchid’s foliage and overall health are affected by temperature and humidity levels. If you notice wilting, yellowing, or drying leaves, it may indicate that the conditions are not optimal. Adjust temperature and humidity as needed to create a suitable environment.
Monitoring temperature and humidity levels is crucial for maintaining the well-being of your orchid and ensuring its readiness for future blooming cycles. By providing the right conditions, you create an environment that supports healthy growth and enhances the chances of future beautiful blooms.
Remember that different orchid species may have specific temperature and humidity preferences, so it’s important to research the needs of your particular orchid to provide the most suitable care.
By regularly monitoring and adjusting temperature and humidity levels, you can create a conducive environment for your orchid’s post-blooming phase and help it thrive in its new growth cycle.
Post-Blooming Care: Preventing Pests and Diseases
Preventing pests and diseases is a crucial aspect of post-blooming care for your orchid. These pests and diseases can not only damage the plant’s foliage and roots but also hinder its ability to produce future blooms. By implementing proactive measures, you can ensure the health and vitality of your orchid.
Here are some strategies to prevent pests and diseases from affecting your orchid:
- Inspect your orchid regularly. Take the time to thoroughly examine your orchid, including the leaves, stems, and roots. Look for any abnormalities, discoloration, or signs of pests, such as webs, spots, or holes.
- Isolate new plants. If you recently acquired a new orchid, it’s important to keep it separate from your existing plants for a few weeks. This isolation period allows you to monitor the new plant for any signs of pests or diseases before introducing it to the rest of your collection.
- Maintain cleanliness. Keep your growing area clean and free from plant debris, fallen leaves, or dead foliage. These can serve as breeding grounds for pests and provide a favorable environment for diseases to thrive.
- Ensure proper airflow. Good air circulation around your orchid helps prevent the buildup of moisture and minimizes the risk of fungal or bacterial diseases. Avoid overcrowding your plants and ensure they are adequately spaced.
- Practice proper watering techniques. Overwatering can lead to root rot and create a favorable environment for pests and diseases. Water your orchid according to its needs, allowing the potting mix to partially dry out between waterings.
- Use natural pest control methods. If you notice pests on your orchid, try natural remedies like insecticidal soap, neem oil, or introducing beneficial insects. Avoid using harsh chemical pesticides that could harm your orchid and the environment.
- Quarantine affected plants. If you notice any signs of pests or diseases on one of your orchids, promptly isolate and quarantine the affected plant to prevent the spread to other healthy plants.
Vigilance and regular monitoring are crucial in preventing and addressing pests and diseases. By promptly identifying and addressing any issues, you can take the necessary steps to protect your orchid and maintain its overall health and beauty.
Remember to research specific pests and diseases that commonly affect orchids in your area to better understand how to prevent and treat them. Consulting with local orchid experts or joining orchid societies can provide valuable insights and resources.
By implementing preventative measures and maintaining a proactive approach, you can safeguard your orchids from pests and diseases, ensuring their longevity and continued blooming success.
Conclusion
Caring for your orchids after they have finished blooming is crucial to their continued health and future blooming cycles. By following the post-blooming care practices outlined in this article, you can provide your orchids with the best conditions for growth and ensure their longevity.
From removing spent flowers and trimming the orchid stems to pruning the roots, repotting, and adjusting watering and fertilizing routines, each step plays a vital role in maintaining the health and vitality of your orchids.
Additionally, monitoring temperature and humidity levels, providing optimal lighting conditions, and preventing pests and diseases are critical measures to support the overall well-being of your orchids.
Remember, each orchid may have specific care requirements based on its species, so it’s essential to research and understand the unique needs of your particular plants.
By dedicating the time and effort to properly care for your orchids after blooming, you can ensure their continued growth, develop strong roots and foliage, and provide the necessary conditions for future blooming cycles. The beauty and joy these stunning flowers bring to your home will be well worth the extra care you give them.
So, roll up your sleeves, put your knowledge into practice, and enjoy the rewarding journey of caring for your orchids. Your efforts will be rewarded with healthy, vibrant, and breathtaking blooms that will captivate your senses time and time again.