Home>Types of Gardening>Ornamental Gardening>Where To Cut Orchid Stem After Flowers Fall Off
Ornamental Gardening
Where To Cut Orchid Stem After Flowers Fall Off
Modified: January 22, 2024
Discover the best tips for ornamental gardening and learn where to cut orchid stems after the flowers fall off. Enhance your gardening skills and keep your orchids thriving.
(Many of the links in this article redirect to a specific reviewed product. Your purchase of these products through affiliate links helps to generate commission for Chicagolandgardening.com, at no extra cost. Learn more)
Table of Contents
Introduction
Welcome to the world of ornamental gardening, where beauty flourishes and nature’s wonders come to life. One of the most fascinating aspects of this realm is the art of cultivating orchids. With their stunning blooms in a myriad of colors and shapes, orchids have captivated the hearts of gardeners and enthusiasts for centuries.
However, as with any living organism, orchids follow a natural life cycle. Once their flowers have bloomed and begun to fade, it’s time to consider what steps to take next. Cutting the orchid stem is an important part of maintaining the health and vitality of your plant, and knowing when and how to do it properly will ensure its continued growth and future blooms.
In this article, we will explore the different stages of the orchid life cycle and delve into the precise timing for cutting the orchid stem after the flowers fall off. We will also provide you with a step-by-step guide, recommend the necessary tools and materials, and highlight some tips for success in your ornamental gardening endeavors.
Whether you are a seasoned gardener or a novice, this article will equip you with the knowledge and confidence to navigate the intricate world of orchid care. So, let’s embark on this journey together and discover the secrets to keeping your orchids thriving and blooming year after year.
Understanding the Orchid Life Cycle
Before we dive into the specifics of cutting the orchid stem, it’s essential to understand the natural life cycle of these remarkable plants. Like many other flowering plants, orchids go through distinct stages of growth, bloom, and dormancy.
1. Vegetative Stage: This stage is characterized by the growth of leaves and roots. The orchid is focused on establishing a strong foundation and absorbing nutrients from the environment. During this phase, the plant may not produce any flowers.
2. Budding Stage: As the orchid matures, it enters the budding stage. Here, you’ll notice small bumps, called buds, forming along the stem. These buds hold the promise of future blooms, and it’s an exciting time for orchid enthusiasts.
3. Blooming Stage: Ah, the moment we’ve all been waiting for! The blooming stage is when those buds open up and reveal the magnificent orchid flowers. This stage can last anywhere from a few weeks to a couple of months, depending on the species and growing conditions.
4. Fading Stage: Sadly, all good things must come to an end. Once the flowering stage concludes, the flowers gradually start to fade and wither away. This is a natural part of the orchid’s life cycle, and it signals the beginning of a new phase.
5. Dormancy Stage: After the flowers fall off, the orchid enters a period of rest known as dormancy. During this time, the plant conserves energy and redirects its focus towards growth and preparing for the next blooming cycle. This stage can last several weeks or even months, depending on the orchid species.
Understanding the different stages of the orchid life cycle is crucial for effective care and maintenance. By recognizing which stage your orchid is in, you’ll be able to provide the appropriate conditions and make informed decisions about when to cut the orchid stem.
Now that we have a solid foundation of knowledge, let’s move on to the next section and explore the optimal timing for cutting the orchid stem after the flowers fall off.
When to Cut Orchid Stem After Flowers Fall Off
Knowing the right time to cut the orchid stem after the flowers have fallen off is crucial for the overall health and vitality of the plant. Cutting the stem too early or too late can impact future blooming cycles and may even lead to diseases or infections.
The ideal time to cut the orchid stem depends on the specific orchid species and its growth patterns. In general, it is best to wait until the stem turns brown or starts to dry out before making any cuts. This indicates that the orchid has completed its flowering cycle and has entered the dormancy stage.
Before you reach for your pruning shears, it’s essential to closely examine the stem for any signs of new growth. If you notice the emergence of new buds or fresh green shoots, it is best to hold off on cutting the stem. These new growths indicate that the orchid is still actively growing and preparing for its next round of blooms.
On the other hand, if you observe that the stem remains dormant, with no signs of new growth, it is safe to proceed with the cutting process. Removing the old, spent stem will stimulate the orchid to focus its energy on developing new shoots and buds, ultimately leading to robust blooms in the future.
Remember, precision and patience are key when deciding when to cut the orchid stem. Avoid the temptation to rush the process or make hasty decisions. Take the time to observe and assess the condition of the stem and the overall health of the plant. By doing so, you’ll ensure that your orchid thrives and continues to bring joy and beauty to your ornamental garden.
Now that we have covered the optimal timing for cutting the orchid stem, let’s move on to the next section and explore the tools and materials you’ll need for this task.
Tools and Materials Needed
Before you embark on cutting the orchid stem, it’s important to gather the right tools and materials to ensure a successful and smooth process. Here are the essentials you’ll need:
- Pruning shears: Invest in a high-quality pair of pruning shears with sharp blades. This tool will allow you to make clean and precise cuts, minimizing damage to the plant.
- Disinfectant: Prepare a disinfectant solution, such as rubbing alcohol or hydrogen peroxide, to sterilize your pruning shears before and after each use. This helps prevent the spread of diseases or pathogens.
- Clean cloth or paper towels: Keep a clean cloth or paper towels handy to wipe down the pruning shears and remove any sap or debris during the cutting process.
- Container with clean water: Prepare a container with clean water to place the cut orchid stem after removal. This will help the stem retain moisture and prevent it from drying out too quickly.
- Rooting hormone (optional): While not necessary, some orchid enthusiasts choose to apply rooting hormone on the cut end of the stem. This can stimulate root growth and increase the chances of successful propagation.
Remember, using clean and sterilized tools is essential to prevent the spread of diseases and ensure the health of your orchids. Regularly clean and disinfect your pruning shears to keep them in optimal condition.
Now that you have gathered the necessary tools and materials, let’s proceed to the next section and learn the step-by-step guide for cutting the orchid stem.
Step-by-Step Guide to Cutting Orchid Stem
Now that you have all the tools and materials ready, let’s walk through the step-by-step process of cutting the orchid stem:
- Prepare the workstation: Find a clean and well-lit area to work on your orchid. Lay down a clean cloth or paper towel to catch any debris or sap that may be generated during the cutting process.
- Sterilize your pruning shears: Before starting, sterilize your pruning shears by wiping the blades with a disinfectant solution. This helps prevent the spread of diseases and ensures a clean cut.
- Assess the stem: Carefully examine the orchid stem and locate the point where it has turned brown or started to dry out. This is the area where you will make the cut.
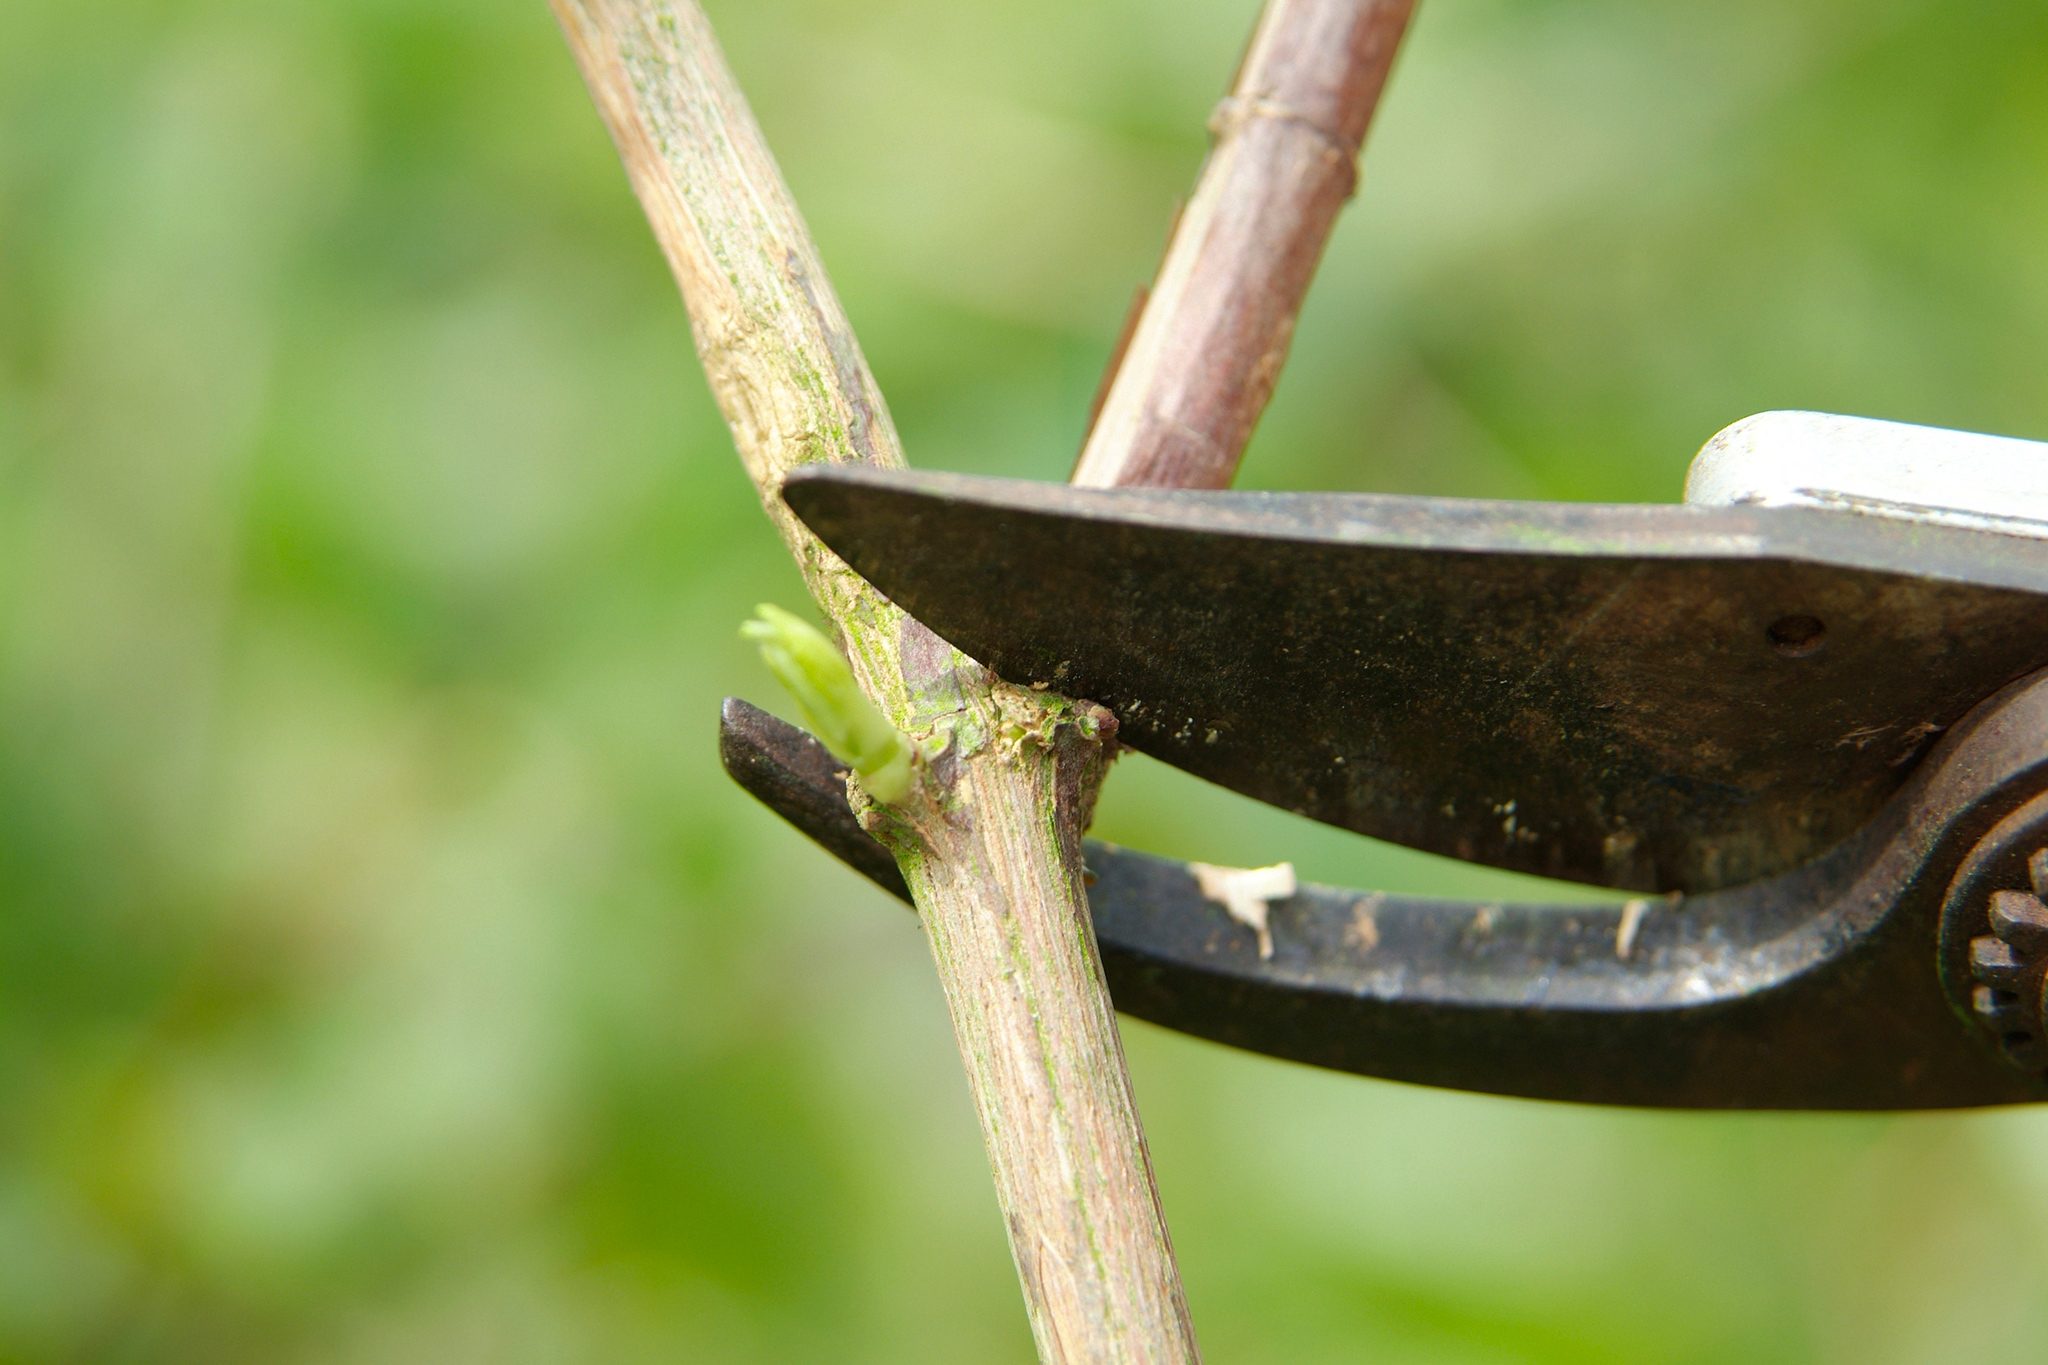
- Position the shears: Hold the orchid stem firmly with one hand and position the pruning shears just above the identified cutting point. Ensure the blades are aligned for a clean and precise cut.
- Make the cut: With a swift and decisive motion, make a clean cut just above the identified point on the stem. Avoid cutting too close to the base of the plant to prevent damage.
- Inspect and clean: After making the cut, carefully inspect the stem for any signs of disease or damage. If needed, clean the pruning shears with a clean cloth or paper towel to remove any sap or debris.
- Place the stem in water: Immediately after cutting, place the orchid stem in a container with clean water. This helps retain moisture and prevents the cut end from drying out too quickly.
- Optional: Apply rooting hormone: If you have chosen to use rooting hormone, carefully dip the cut end of the stem into the hormone to stimulate root growth. Follow the instructions on the product for best results.
By following these steps, you can effectively cut the orchid stem and promote healthy growth and future blooms. Remember to exercise caution and take your time to ensure a clean and accurate cut.
Now that you have mastered the process of cutting the orchid stem, let’s move on to the next section and explore some helpful tips for successful orchid stem cutting.
Tips for Successful Orchid Stem Cutting
Cutting the orchid stem requires precision and care to ensure the best possible outcome. Here are some tips to help you achieve successful orchid stem cutting:
- Choose the right time: As mentioned earlier, wait until the orchid stem has turned brown or started to dry out before making any cuts. This indicates that the plant has completed its flowering cycle.
- Make clean cuts: Always use sharp and sterilized pruning shears to make clean cuts on the orchid stem. This minimizes damage to the plant and reduces the risk of introducing diseases.
- Observe new growth: Before cutting the stem, check for any signs of new growth, such as emerging buds or fresh green shoots. If you see new growth, hold off on cutting and allow the orchid to continue its growth cycle.
- Keep tools clean: Regularly clean and sterilize your pruning shears before and after each use. This helps prevent the spread of diseases and ensures the health of your orchids.
- Properly dispose of cut stems: Once you have cut the orchid stem, dispose of it properly. Do not leave the cut stems lying around, as they can attract pests or introduce pathogens to your garden.
- Monitor and care for the plant: After cutting the orchid stem, continue to provide your orchid with the proper care and environmental conditions it needs. This includes appropriate watering, light exposure, and fertilization.
- Patience is key: Orchids are slow-growing plants, and it may take some time for new shoots and buds to develop after cutting the stem. Be patient and continue to care for your orchid diligently.
By following these tips, you can ensure a successful orchid stem cutting experience and promote the health and vitality of your plant. Enjoy the process and marvel at the beauty that your well-cared-for orchids will bring to your ornamental garden.
Now that we have explored the tips for successful orchid stem cutting, let’s move on to the next section and discuss some common mistakes to avoid in order to maintain the health of your orchid plants.
Common Mistakes to Avoid
When it comes to cutting the orchid stem, there are some common mistakes that novice gardeners often make. By being aware of these pitfalls, you can avoid potential problems and ensure the health and longevity of your orchids. Here are some common mistakes to avoid:
- Cutting the stem too early: Cutting the orchid stem before it has fully completed its blooming cycle can disrupt the plant’s natural growth patterns. Be patient and wait until the stem has turned brown or started to dry out.
- Cutting too close to the base: When making the cut, avoid cutting too close to the base of the plant. This can result in damage to the root system and hinder the orchid’s ability to produce future blooms.
- Using dull or dirty tools: Using dull or dirty pruning shears can lead to jagged cuts and introduce diseases or infections to the plant. Always ensure your tools are sharp and properly sterilized before making any cuts.
- Disposing of cut stems improperly: Properly dispose of the cut orchid stems to prevent the spread of diseases or pests. Do not leave them lying around in your garden, as they can attract unwanted visitors or introduce pathogens to other plants.
- Overlooking signs of new growth: Before cutting the stem, carefully inspect the plant for any signs of new growth, such as emerging buds or green shoots. If you see these signs, it’s best to wait before making any cuts.
- Not providing proper ongoing care: Cutting the orchid stem is just one aspect of orchid care. Remember to continue providing your plant with the appropriate watering, light, and fertilizer to support its growth and future blooming cycles.
- Being impatient: Orchids are known for their slow growth, and it may take some time for new shoots and buds to develop after cutting the stem. Avoid becoming impatient and allow the plant the time it needs to regenerate and thrive.
By avoiding these common mistakes, you can maintain the health of your orchid plants and ensure their continued beauty and vibrancy in your ornamental garden. Now that we’ve covered the common mistakes to avoid, let’s move on to the next section and address some frequently asked questions about cutting orchid stems.
Frequently Asked Questions (FAQs)
Here are some frequently asked questions about cutting orchid stems:
1. When is the best time to cut an orchid stem?
The best time to cut an orchid stem is when it has turned brown or started to dry out after the flowers have fallen off. This indicates that the plant has completed its flowering cycle and entered a dormant phase.
2. Should I cut the orchid stem if there are new buds?
No, if you see new buds or green shoots emerging from the stem, it is best to hold off on cutting. These new growths indicate that the orchid is still actively growing and preparing for its next blooming cycle.
3. What tools should I use to cut the orchid stem?
Use a sharp pair of pruning shears to make clean and precise cuts on the orchid stem. It is important to sterilize the shears before and after each use to prevent the spread of diseases.
4. Can I use rooting hormone on the cut end of the orchid stem?
Using rooting hormone on the cut end of the orchid stem is optional. While it can stimulate root growth and increase the chances of successful propagation, it is not necessary for all orchids.
5. How long will it take for new shoots and buds to appear after cutting the orchid stem?
The time it takes for new shoots and buds to appear after cutting the orchid stem can vary depending on the orchid species and growing conditions. Generally, it may take several weeks to a few months for new growth to emerge.
6. Should I water the orchid immediately after cutting the stem?
It is not necessary to water the orchid immediately after cutting the stem. However, you should place the cut end in a container with clean water to prevent it from drying out too quickly.
7. Can I propagate orchids from the cut stem?
Yes, some orchids can be propagated from the cut stem. By placing the cut end in a suitable growing medium and providing the right conditions, you may be able to encourage the development of new roots and grow a new orchid plant.
These are just a few of the common questions about cutting orchid stems. Remember, every orchid is unique, and it’s essential to consider the specific needs of your plant when making decisions about pruning and care.
Now that we have addressed some frequently asked questions, let’s conclude our journey through the world of orchid stem cutting.
Conclusion
Cutting the orchid stem after the flowers have fallen off is a critical step in maintaining the health and vitality of your orchid plants. By understanding the orchid life cycle and knowing when to make the cut, you can promote new growth and ensure future blooms in your ornamental garden.
Throughout this article, we have explored the various stages of the orchid life cycle, from vegetative growth to flowering and eventual dormancy. We have learned the optimal timing for cutting the orchid stem, ensuring that the plant has completed its cycle and entered a period of rest.
Equipped with the right tools and materials, you can confidently make clean cuts on the orchid stem, promoting new shoots and buds. Remember to sterilize your pruning shears, properly dispose of the cut stems, and provide ongoing care to your orchids to support their growth and development.
Avoiding common mistakes such as cutting too early or overlooking signs of new growth will help you maintain the health of your orchids. And should you have any questions, the frequently asked questions section provides valuable insights to guide you along the way.
So, whether you are a seasoned gardener or just starting your journey in ornamental gardening, cutting the orchid stem is a skill worth mastering. By following the steps outlined in this article and embracing the beauty and intrigue of orchids, you can cultivate a flourishing garden that showcases nature’s wonders.
Now, armed with knowledge and a passion for orchids, go forth and enjoy the rewarding experience of caring for these gorgeous plants. Happy orchid gardening!