Home>Gardening Tips and Tricks>Maximizing Yield>Where To Cut For Propagation

Maximizing Yield
Where To Cut For Propagation
Modified: February 9, 2024
Learn how to maximize your yield by knowing exactly where to cut for propagation. Get expert tips and techniques for optimizing your plant propagation efforts.
(Many of the links in this article redirect to a specific reviewed product. Your purchase of these products through affiliate links helps to generate commission for Chicagolandgardening.com, at no extra cost. Learn more)
Table of Contents
Introduction
When it comes to expanding your garden or indoor plant collection, propagation is an excellent option. Instead of purchasing new plants, you can multiply your existing ones by taking cuttings and encouraging new root growth. This not only saves you money but also allows you to create a sense of continuity in your garden or around your home by producing identical copies of your favorite plants.
Propagation is a technique that has been used for centuries, and it can be done in various ways depending on the type of plant and your preferences. By understanding the principles behind propagation and learning the right techniques, you can successfully propagate your plants and maximize your yield.
In this article, we will guide you through the process of plant propagation and explore different methods you can use to achieve success. From choosing the right plants to caring for newly propagated ones, we will cover all the essential aspects you need to know.
So whether you’re a seasoned gardener looking to expand your collection or a beginner wanting to try your hand at propagation for the first time, this article will provide you with all the information you need to get started.
Before we dive into the techniques, it’s important to understand that not all plants can be propagated in the same way. Some plants are best suited for stem cuttings, while others thrive when propagated from leaf cuttings. We will discuss the different methods in detail and provide guidance on which plants are suitable for each technique.
In addition, there are certain tools and materials you will need to have on hand to ensure successful propagation. By gathering these supplies ahead of time, you can simplify the process and increase your chances of successful root growth.
Are you ready to become a propagation expert and expand your plant collection? Let’s get started on this exciting journey!
Choosing the Right Plant
When it comes to propagation, not all plants are created equal. Some plants are naturally more inclined to propagate successfully, making them ideal candidates for this process. It’s important to choose the right plants to maximize your chances of success and yield.
First, consider the type of plant you want to propagate. Generally, plants that have soft stems and fleshy leaves are easier to propagate. These include popular houseplants like pothos, spider plants, and succulents. These plants tend to have high success rates and are a great starting point for beginners.
Next, pay attention to the health of the plant you want to propagate. Select plants that are disease-free, free from pests, and show robust growth. Healthy plants are more likely to produce viable cuttings that will thrive and develop into new, strong plants.
Consider the time of year as well. Some plant species have specific propagation periods that yield better results. For example, many plants propagate best during the spring and early summer when they are actively growing. Research the specific requirements of the plant you want to propagate to ensure optimal timing.
In addition, consider the size of the plant. It’s best to choose a plant that is mature but not too large. A plant with multiple stems or branches will provide more cutting opportunities, increasing your chances of successful propagation. However, avoid plants that are old and woody, as they may be harder to propagate.
Finally, consider the cultural requirements of the plant. Different plants have specific light, temperature, and humidity needs. Choose plants that are well-suited to your environment to ensure they thrive after propagation. Understanding the plant’s natural habitat and providing similar conditions will greatly increase your chances of success.
By carefully selecting the right plants for propagation, you set yourself up for success right from the start. With a little research and consideration, you can choose plants that are not only easy to propagate but also align with your personal preferences and gardening goals.
Tools and Materials Needed
Before you begin the process of plant propagation, it’s important to gather the necessary tools and materials. Having these items on hand will make the process smoother and more efficient. Here are the essential tools and materials you’ll need:
- Pruning Shears: A pair of sharp pruning shears or a clean, sterilized knife is essential for taking cuttings. Make sure the blades are clean and sharp to ensure clean cuts that promote healthy root growth.
- Rooting Hormone: Rooting hormone is a substance that stimulates the development of roots in cuttings. It’s available in powder, gel, or liquid form. Using a rooting hormone can significantly increase the success rate of your propagations.
- Pots or Containers: Prepare small pots or containers with drainage holes to plant your cuttings. These containers should be clean and disinfected to prevent the spread of disease or pests.
- Propagation Medium: Depending on the propagation method you choose, you’ll need a suitable medium. This can be a mixture of peat moss, perlite, vermiculite, or a specialized seed starting mix. Ensure the medium is well-draining and sterile.
- Misting Spray Bottle: A misting spray bottle filled with water will allow you to keep the cuttings moist during the propagation process.
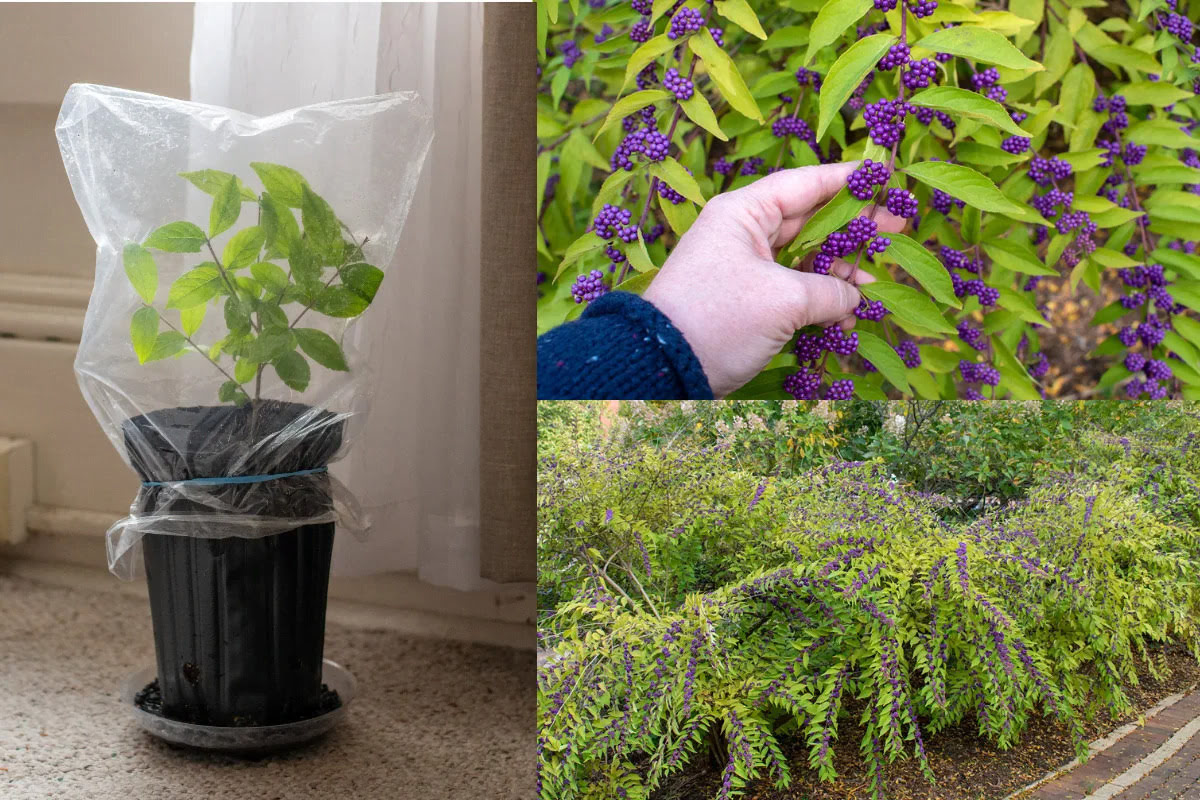
- Plastic Bag or Dome: A clear plastic bag or a dome can create a humid environment that promotes root development. This is particularly useful for water propagation or if you’re using a propagation tray or container with a clear plastic cover.
- Labels: It’s important to label each propagated cutting to keep track of the plant species, propagation date, and any other relevant information.
- Clean Cloth or Paper Towels: Keep a clean cloth or paper towels nearby to wipe your tools and clean up any spills during the propagation process.
These are the basic tools and materials you’ll need to get started with plant propagation. Depending on the specific method you choose and the plants you’re propagating, you may require additional items. It’s always a good idea to do some research and gather all the necessary tools and materials before you begin.
By having everything ready and within reach, you can focus on the propagation process without any interruptions or delays. With the right tools and materials, you’ll be well-equipped to successfully propagate your plants and maximize your yield.
Basic Cutting Techniques
When it comes to propagation, understanding the basic cutting techniques is crucial. Properly taking and preparing plant cuttings increases the chances of successful root growth and ultimately, the establishment of new plants. Here are the fundamental cutting techniques to keep in mind:
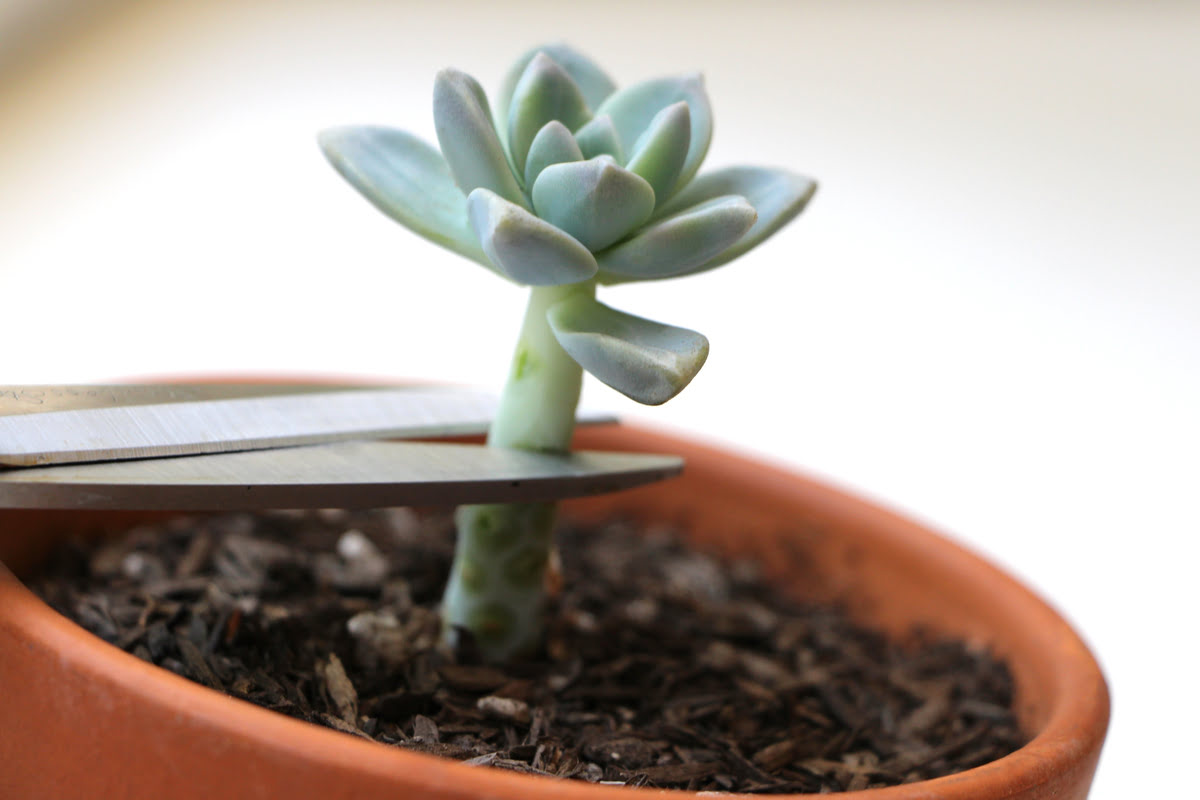
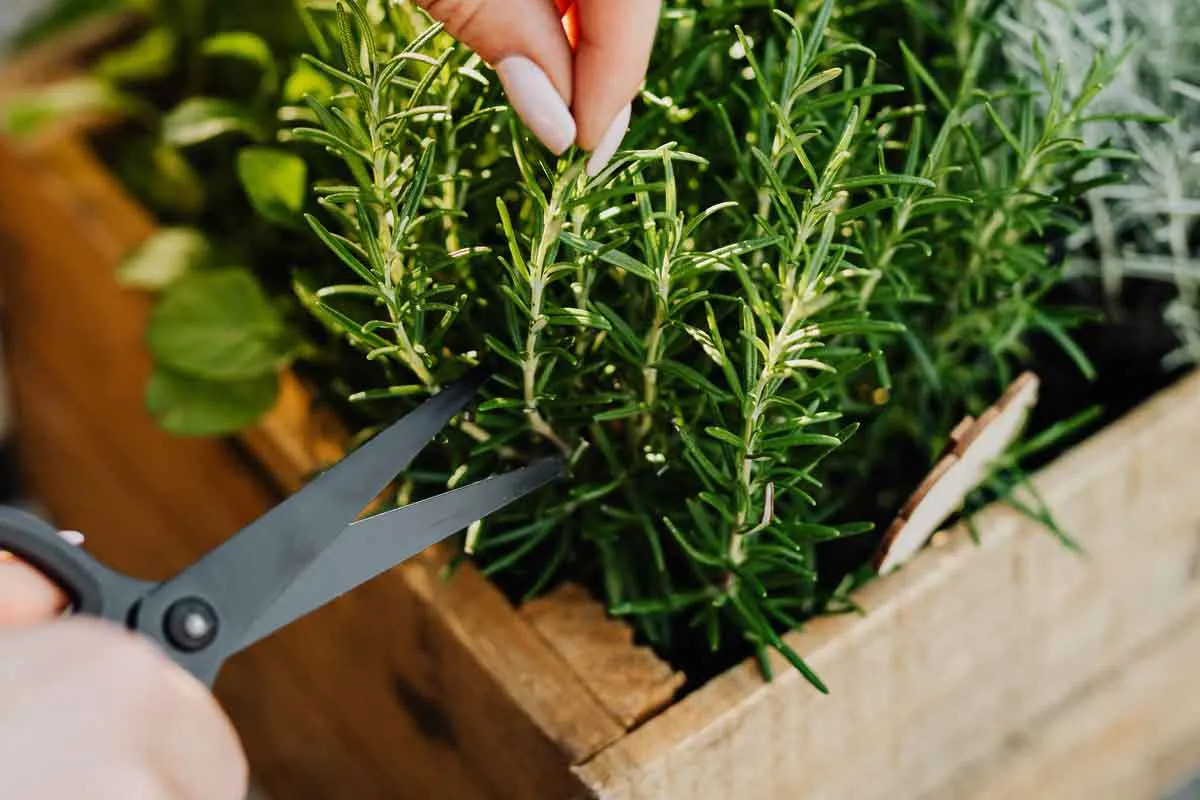
1. Selecting the Right Stem: Look for healthy and vigorous stems that are free from disease or damage. Choose stems that are about 4-6 inches long with several nodes, as these are the areas where roots will develop.
2. Making Clean Cuts: Using sharp pruning shears or a clean knife, make a clean-cut just below a leaf node. A diagonal cut is preferred as it increases the surface area for rooting and allows water absorption.
3. Removing Leaves: Remove the lower leaves from the stem, leaving only a few leaves at the top. This reduces water loss through transpiration and focuses the plant’s energy on root development.
4. Pinching or Trimming: In some cases, pinching or trimming the tip of the cutting can promote branching and encourage more growth. This technique is commonly used for herbs and bushy plants.
5. Applying Rooting Hormone: If desired, dip the cut end of the stem into a rooting hormone powder or gel to stimulate root growth. Be careful not to contaminate the rooting hormone container to prevent the spread of diseases.
6. Planting the Cuttings: Place the prepared cuttings into a pot or container filled with a well-draining propagation medium. Gently press the medium around the base of the cutting to secure it in place.
7. Providing Adequate Moisture: Keep the cuttings consistently moist but not overly saturated. If using a plastic bag or dome, mist the cuttings and the inside of the bag or dome regularly to maintain high humidity.
8. Patience and Monitoring: Place the cuttings in a warm, bright location but away from direct sunlight. Monitor the moisture levels, temperature, and growth of the cuttings regularly. Be patient, as it may take several weeks to see visible signs of root growth.
By following these basic cutting techniques, you will greatly increase the chances of successful plant propagation. Each step is important in creating the optimal conditions for root development and ensuring the growth of healthy new plants.
Utilizing Stem Cuttings
Stem cuttings are one of the most common and effective methods of plant propagation. This technique involves taking a section of a stem from a parent plant and encouraging it to produce new roots and grow into an individual plant. Here’s how you can utilize stem cuttings for successful propagation:
1. Selecting the Stem: Choose a healthy stem that is free from diseases or pests. Look for a stem that is relatively young, green, and flexible. Avoid using stems that are woody or too mature, as they are less likely to root successfully.
2. Preparing the Stem Cutting: Using clean pruning shears, make a clean cut just below a node. Remove any flowers or buds from the stem, as they can divert energy from root development. If the stem is long, you can make multiple cuttings to maximize your yield.
3. Removing Lower Leaves: Strip off the lower leaves of the cutting, leaving only a few leaves at the top. This reduces the risk of excessive transpiration and allows the cutting to focus on root development.
4. Applying Rooting Hormone: If desired, you can dip the cut end of the stem into a rooting hormone powder or gel. This helps stimulate root growth and increases the chances of successful rooting. Shake off any excess rooting hormone before planting the cutting.
5. Planting the Cutting: Prepare a small pot or container with a well-draining propagation medium. Make a hole in the medium with a pencil or your finger and insert the cut end of the stem into the hole. Gently press the medium around the base of the cutting to hold it in place.
6. Providing the Optimal Environment: Place the potted stem cutting in a warm and bright location that receives indirect sunlight. Avoid direct sunlight, as it can cause the cutting to dry out. Maintain a consistent level of moisture in the soil, ensuring it is damp but not waterlogged.
7. Patiently Waiting for Root Development: It may take several weeks for roots to develop, so be patient. During this time, monitor the moisture levels of the soil, mist the cutting if necessary, and keep an eye out for any signs of growth. Once the cutting has established roots, you can gradually acclimate it to normal growing conditions.
Stem cuttings are an effective and efficient method of propagation for a wide range of plants. By following these steps and providing the right care, you can successfully propagate new plants from stem cuttings and expand your garden or indoor plant collection.
Propagation from Leaf Cuttings
Propagation from leaf cuttings is a popular method, particularly for plants with succulent leaves or those that naturally produce offsets. This technique allows you to propagate multiple new plants from a single leaf, making it an efficient way to expand your collection. Here’s how you can propagate plants from leaf cuttings:
1. Selecting a Healthy Leaf: Choose a healthy leaf that is free from diseases or damage. Look for leaves that are plump, mature, and free from blemishes. Some plants produce specialized leaves called “offsets,” which can be detached and used for propagation.
2. Detaching the Leaf: Gently detach the leaf from the parent plant, ensuring a clean break. If the plant produces offsets, you can carefully remove them from the base of the mother plant. Handle the leaf or offset with care to avoid any damage.
3. Allowing the Leaf to Callus: Place the detached leaf or offset in a shaded area and allow it to dry for a few days. This allows the cut end of the leaf to form a callus, which helps prevent rotting and promotes the development of new roots.
4. Planting the Leaf: Prepare a small pot or container filled with a well-draining propagation medium. Place the callused end of the leaf onto the surface of the medium, ensuring it makes good contact. You can use stakes or toothpicks to hold the leaf in place if necessary.
5. Providing the Right Environment: Place the potted leaf cutting in a location with bright, indirect light and moderate humidity. Protect it from direct sunlight, as it can cause the leaf to dry out and inhibit root growth. Maintain a slightly moist but not overly wet soil to prevent rotting.
6. Roots and Baby Plant Development: Over time, the leaf cutting will produce new roots and eventually develop tiny baby plants known as “plantlets” or “pups.” This process can take several weeks or even months, depending on the plant species. Be patient and provide the necessary care to support their growth.
7. Separating the New Plants: Once the plantlets have grown to a suitable size, you can carefully separate them from the original leaf or offset. Gently remove the plantlets and pot them individually, providing proper care as you would for mature plants.
Propagation from leaf cuttings can be a rewarding and exciting way to multiply your plant collection. With patience and proper care, you can successfully propagate new plants from individual leaves or offsets and watch them grow into beautiful specimens.
Water Propagation Methods
Water propagation is a popular and relatively easy method of plant propagation. It involves placing plant cuttings or leaf sections in water, allowing them to develop roots before being transferred to soil. Here are some common water propagation methods you can try:
1. Stem Cuttings in Water: This method involves placing stem cuttings directly into a container filled with water. Choose a clean glass or jar, fill it with water, and submerge the cut end of the stem in the water. Ensure that at least one or two nodes are submerged. Keep the water level consistent and change it regularly to prevent rotting.
2. Leaf Cuttings in Water: For certain plants, you can propagate new plants by placing individual leaves in water. Snip a few healthy leaves, ensuring the base of the leaf is intact. Place the leaf in a container filled with water, ensuring that the base of the leaf is submerged. Mist the leaf occasionally to maintain humidity and prevent drying out.
3. Leaf Petiole in Water: This method is suitable for plants with petioles, the stalk that connects the leaf to the stem. Cut a leaf with a portion of the petiole and place the petiole in water, making sure it is partially submerged. The cutting will develop roots from the cut end of the petiole.
4. Water Propagation Station: A dedicated water propagation station can be set up for multiple cuttings. It typically consists of a container with compartments or individual containers with water. Each cutting or leaf section is placed in its own compartment, ensuring that only the base or node is submerged in the water.
5. Rooting Hormone and Water: To enhance root growth during water propagation, you can dip the cut end of the stem or leaf in a rooting hormone before placing it in water. This can help stimulate root development and increase the success rate of propagation.
6. Transitioning to Soil: Once the cuttings have developed sufficient roots, they can be transferred to soil. Gently remove them from the water, taking care not to damage the fragile roots. Plant them in a well-draining propagation medium, ensuring that the roots are covered, and provide the necessary care for the specific plant species.
Water propagation is a visual and satisfying process, allowing you to observe the development of roots before transitioning the cuttings to soil. It’s important to monitor the water level, change it regularly, and provide a suitable environment to promote healthy root growth. With time and proper care, you can successfully propagate new plants using water propagation methods.
Using Soil for Propagation
When it comes to plant propagation, using soil as a medium is a traditional and reliable method. This technique involves planting cuttings or other plant parts directly into a well-prepared soil mixture, providing the necessary nutrients and support for root growth. Here’s how you can utilize soil for propagation:
1. Prepare the Soil: Start by preparing a well-draining propagation soil mixture. You can use a combination of potting soil, perlite, vermiculite, or sand to create a loose and well-aerated medium. Ensure that the soil is moist but not overly saturated.
2. Planting Stem Cuttings: For stem cuttings, make a small hole in the soil mixture using your finger or a pencil. Insert the cut end of the stem into the hole, making sure the node (where roots are likely to develop) is covered by the soil. Gently press the soil around the base of the cutting to secure it in place.
3. Planting Leaf Cuttings: For leaf cuttings, create a small indentation in the soil using a pencil or your fingertip. Place the base of the leaf, or the callused end for dry leaf propagation, into the indentation and gently press the soil around it to hold it in place. It’s important to keep the leaf in contact with the soil without burying it completely.
4. Providing Adequate Care: Place the potted cuttings in a warm and well-lit location, avoiding direct sunlight. Monitor the moisture level of the soil, ensuring it remains consistently damp but not waterlogged. Mist the leaves or the soil surface if necessary to maintain a slightly humid environment.
5. Supporting Root Development: The soil provides the necessary nutrients and support for root development. As the cuttings establish roots, the soil will provide anchorage and access to essential minerals and moisture. It’s important to provide proper care and maintain the optimal growing conditions to encourage strong root growth.
6. Transitioning to Larger Containers: Once the cuttings have developed a healthy root system, they can be transplanted into larger pots or containers filled with a suitable growing medium. This allows the plants to continue growing and establish themselves as independent specimens.
Using soil for propagation provides a natural environment for cuttings to develop roots and grow into new plants. With the right soil mixture, proper care, and suitable growing conditions, you can successfully propagate a wide variety of plants using this method. Give your cuttings the support they need and watch them thrive!
Caring for Newly Propagated Plants
Once you have successfully propagated new plants, it’s important to provide them with the proper care to ensure their healthy growth and establishment. Newly propagated plants are delicate and require specific attention to ensure their success. Here are some essential care tips for newly propagated plants:
1. Watering: Proper watering is crucial for newly propagated plants. Keep the soil consistently moist but not waterlogged. Avoid overwatering, as it can lead to root rot. Monitor the moisture level regularly and adjust the watering accordingly based on the specific needs of the plant species.
2. Light and Temperature: Provide the newly propagated plants with appropriate light and temperature conditions. Most plants thrive in bright, indirect light, while others may require more shade. Maintain a suitable temperature range based on the plant’s requirements to ensure optimal growth.
3. Humidity: Some plants, especially those propagated from tropical or humidity-loving species, may benefit from increased humidity. Consider using a humidity tray, a room humidifier, or mist the plants regularly to create a more humid environment. This will help prevent excessive moisture loss and aid in root development.
4. Fertilization: While newly propagated plants may not require fertilizer immediately, once they have established a strong root system, you can begin to provide gentle fertilization. Use a diluted liquid fertilizer or a slow-release granular fertilizer to supply the plants with essential nutrients. Follow the recommended dosage and frequency for the specific plant species.
5. Pruning: As the newly propagated plants grow, monitor their growth and shape. Prune any damaged or unhealthy leaves or stems. This will allow the plants to focus their energy on healthy growth and prevent the spread of diseases or pests.
6. Transplanting: If the newly propagated plants outgrow their small pots or containers, it may be necessary to transplant them into larger ones. Use a suitable potting mix and ensure proper drainage to avoid waterlogged soil. Handle the plants gently during the transplanting process to avoid damage to the roots or stem.
7. Patience and Observation: Finally, be patient and observe your newly propagated plants closely. Each plant has its own growth rate, and some may take longer to establish than others. Monitor their progress, watch for signs of pests or diseases, and make adjustments to their care as needed.
By providing the appropriate care, you give your newly propagated plants the best chance of thriving. Remember to be attentive, patient, and responsive to the specific needs of each plant. With time, your new plants will grow and flourish, rewarding your efforts and expanding your green space.
Conclusion
Plant propagation is a rewarding and fulfilling practice that allows you to multiply your plant collection while saving money and creating a sense of continuity in your garden or indoor space. Whether you choose to utilize stem cuttings, leaf cuttings, or water propagation methods, understanding the principles and techniques involved is key to achieving successful propagation and maximizing your yield.
In this article, we have explored the different aspects of plant propagation, from choosing the right plants for propagation to the tools and materials needed for the process. We have discussed basic cutting techniques, as well as the specific methods of utilizing stem cuttings, leaf cuttings, and water propagation.
By following the proper care guidelines for newly propagated plants, you can ensure their healthy growth and establishment. Providing adequate watering, light, temperature, and humidity, along with pruning and fertilization when appropriate, will help your newly propagated plants thrive and become beautiful specimens.
Remember to be patient and observant throughout the propagation journey. Each plant is unique and may require slight adjustments in care. As you gain experience, you will become more in tune with the specific needs of the plants you propagate.
Propagation is not only a practical way to expand your plant collection but also a fascinating process that allows you to witness the miracle of new growth and the resilience of plants. Embrace the joy of propagating and enjoy the satisfaction of nurturing new life.
So, whether you’re a seasoned gardener looking to propagate your favorite plants or a beginner eager to try your hand at plant propagation, we hope this article has provided you with valuable insights and guidance to embark on your propagation journey successfully. Happy propagating!