Home>Types of Gardening>Ornamental Gardening>How To Propagate Flapjack Succulents
Ornamental Gardening
How To Propagate Flapjack Succulents
Modified: February 9, 2024
Learn how to propagate flapjack succulents and transform your garden with this comprehensive guide to ornamental gardening.
(Many of the links in this article redirect to a specific reviewed product. Your purchase of these products through affiliate links helps to generate commission for Chicagolandgardening.com, at no extra cost. Learn more)
Table of Contents
- Introduction
- Understanding Flapjack Succulents
- Choosing the Right Propagation Method
- Propagating Flapjack Succulents through Leaf Cuttings
- Propagating Flapjack Succulents through Stem Cuttings
- Propagating Flapjack Succulents through Offsets
- Caring for Flapjack Succulent Cuttings
- Troubleshooting Common Propagation Issues
- Conclusion
Introduction
Welcome to the world of ornamental gardening, where beauty and nature come together to create stunning landscapes. One popular plant that has taken the gardening community by storm is the Flapjack Succulent. With its striking, paddle-shaped leaves and vibrant colors, the Flapjack Succulent has become a favorite among gardening enthusiasts.
In this article, we will delve into the art of propagating Flapjack Succulents, a process that allows you to create new plants from existing ones. Whether you are an experienced gardener or a beginner looking to try your hand at plant propagation, this guide will provide you with the necessary knowledge and techniques to successfully propagate Flapjack Succulents.
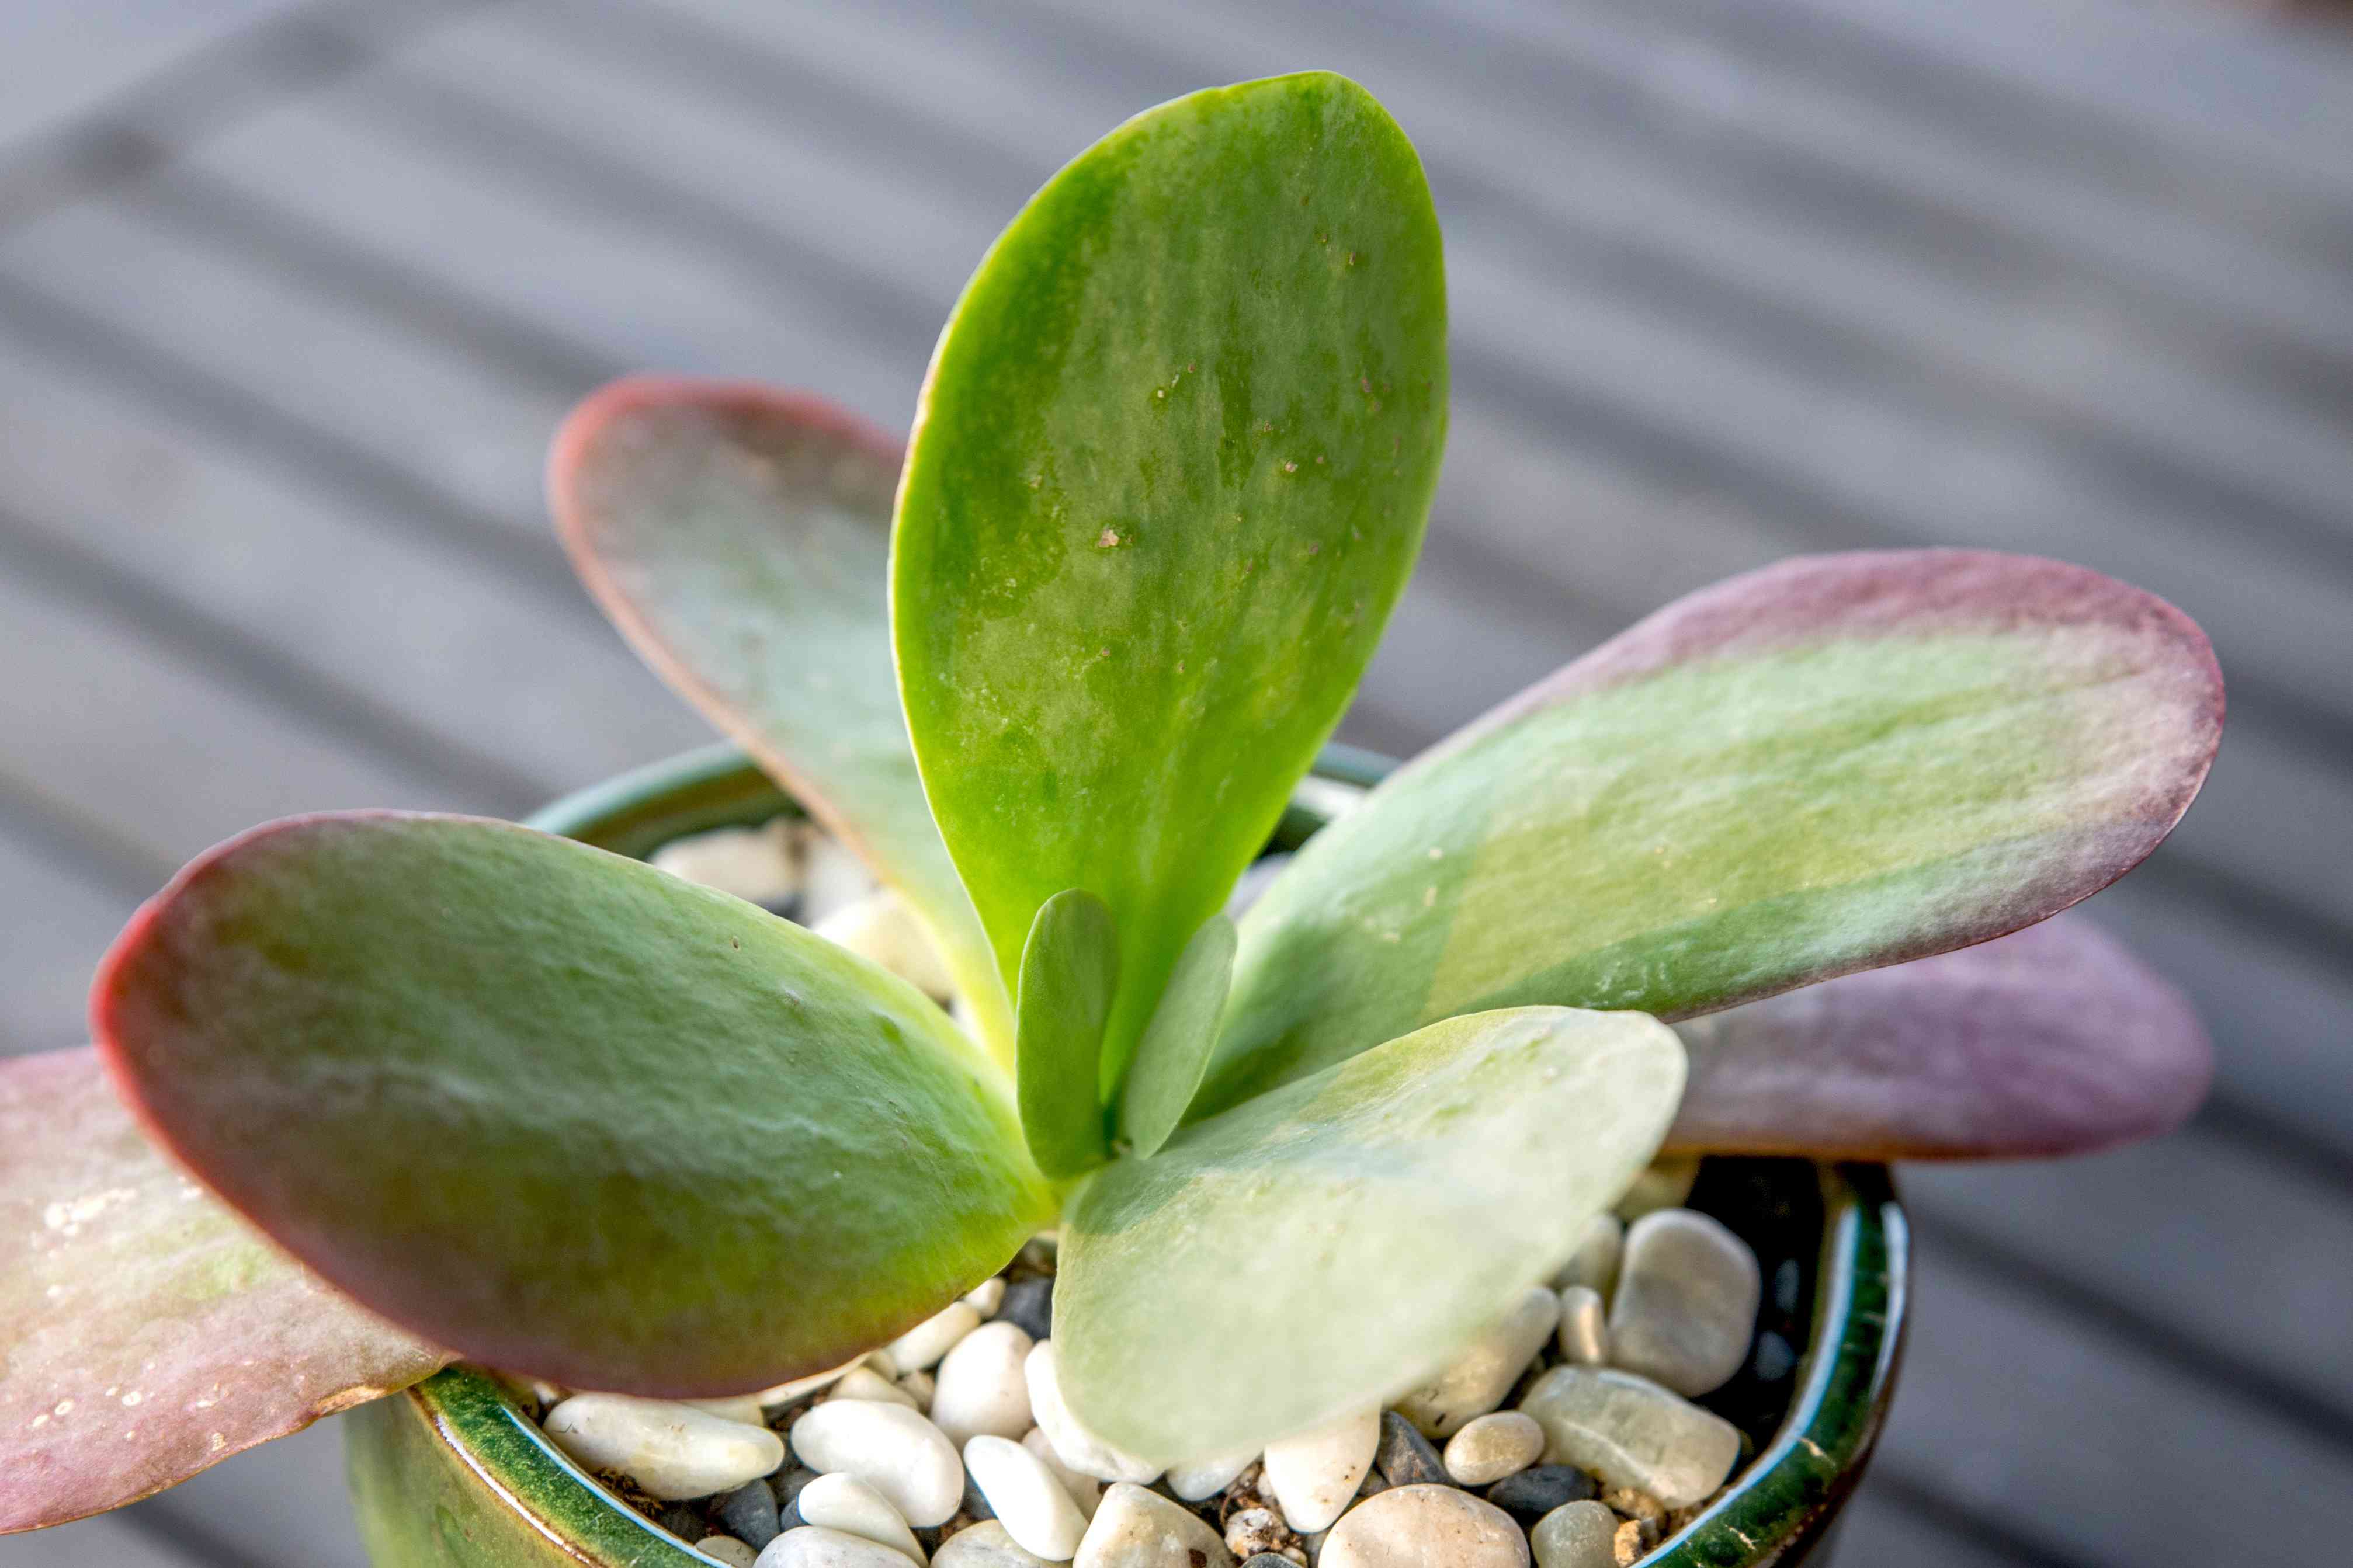
So, what exactly is a Flapjack Succulent? Also known as Kalanchoe luciae or Paddle Plant, this succulent is native to South Africa. It gets its name from its unique leaves, which resemble a stack of pancakes or “flapjacks.” The leaves are fleshy, triangular-shaped, and have vibrant hues of red, pink, orange, or green. Flapjack Succulents are known for their ability to store water in their leaves, making them drought-tolerant and low-maintenance.
Propagating Flapjack Succulents is not only a rewarding experience but also an economical way to expand your plant collection. Knowing the right propagation methods and techniques is crucial for ensuring the success and health of the new Flapjack plants.
Throughout this article, we will explore various propagation methods, including leaf cuttings, stem cuttings, and offsets. We will discuss the step-by-step process for each method and offer valuable tips and tricks to increase your chances of success. Additionally, we will provide guidance on caring for the newly propagated Flapjack plants and troubleshooting common propagation issues.
Now that you have a solid overview of what lies ahead, let’s dive into the fascinating world of propagating Flapjack Succulents and discover the joy of creating new plants from scratch.
Understanding Flapjack Succulents
Before we jump into the propagation techniques, it’s important to understand the Flapjack Succulent and its unique characteristics. By having a deeper understanding of this plant, you will be better equipped to care for and propagate it successfully.
The Flapjack Succulent, or Kalanchoe luciae, is a member of the Crassulaceae family. It is native to the rocky, arid regions of South Africa but has gained popularity worldwide for its striking appearance and resilience. The leaves of the Flapjack Succulent are thick and fleshy, shaped like elongated paddles. They grow in a rosette formation, with each leaf overlapping the other, creating a visually stunning display.
One of the most distinctive features of Flapjack Succulents is their ability to change color depending on the amount of sunlight and temperature they receive. In full sun or hot weather, the leaves take on vibrant shades of red, while in partial shade or cooler temperatures, they tend to be pale green or pink. This color-changing ability adds to the appeal of this succulent and makes it a favorite among gardeners.
Flapjack Succulents are generally low-maintenance and can thrive in a variety of environments. They prefer well-draining soil and can tolerate drought conditions, making them suitable for arid landscapes and xeriscaping. However, they can also adapt to indoor conditions, as long as they receive adequate sunlight and proper care.
It’s important to note that Flapjack Succulents are not frost-tolerant, so they should be protected from freezing temperatures. If you live in a colder climate, it’s best to grow them indoors or provide them with protection during the winter months.
As with any succulent, Flapjack Succulents are susceptible to overwatering, which can lead to root rot and other issues. It’s crucial to allow the soil to dry out completely between waterings and avoid waterlogging the plant. Additionally, regular fertilization is not necessary for Flapjack Succulents, as they can derive nutrients from the soil and their stored reserves.
Now that you have a better understanding of the Flapjack Succulent and its unique characteristics, let’s explore the different propagation methods that will allow you to expand your collection and share the beauty of this plant with others.
Choosing the Right Propagation Method
When it comes to propagating Flapjack Succulents, there are several methods you can choose from. Each method has its own advantages and suitability, depending on your preferences and the resources available to you. Let’s explore the different propagation methods and their characteristics to help you make an informed decision.
1. Leaf Cuttings: This method involves taking a healthy leaf from a mature Flapjack Succulent and allowing it to develop roots and grow into a new plant. Leaf cuttings are relatively easy and have a high success rate. They are an excellent option for beginners or those looking to propagate a large number of plants. Leaf cuttings can be done at any time of the year, but spring and summer are generally the best seasons for success.
2. Stem Cuttings: Stem cuttings involve taking a section of stem from a mature Flapjack Succulent and allowing it to root and grow into a new plant. This method allows you to propagate multiple plants from a single stem, making it a great option if you have limited space or want to create a larger number of plants. Stem cuttings are typically done in spring when the plant is actively growing.
3. Offsets: Flapjack Succulents produce offsets, also known as “pups,” which are smaller plantlets that grow from the base of the parent plant. These offsets can be separated from the parent plant and planted individually to establish new independent plants. This propagation method allows for the quick and easy multiplication of Flapjack Succulents. Offsets can be removed and planted at any time of the year, but it’s generally best to do so in spring or summer.
When choosing the right propagation method, consider your skill level, the time you can dedicate to the process, and the resources you have available. If you are just starting with plant propagation, leaf cuttings may be the easiest option. If you want to propagate a larger number of plants, stem cuttings or offsets might be more suitable.
Regardless of the method you choose, it’s important to select healthy, disease-free parent plants for propagation. This will increase the chances of success and ensure the quality of the new plants.
Now that you are familiar with the different propagation methods, let’s delve into the step-by-step process of propagating Flapjack Succulents through leaf cuttings, stem cuttings, and offsets.
Propagating Flapjack Succulents through Leaf Cuttings
Propagating Flapjack Succulents through leaf cuttings is a popular and effective method that allows you to create new plants from healthy and mature leaves. This propagation method is relatively easy and has a high success rate, making it a great option for beginners or anyone looking to expand their collection of Flapjack Succulents. Follow these step-by-step instructions to propagate Flapjack Succulents through leaf cuttings:
1. Choose a healthy leaf: Select a mature leaf from a fully grown Flapjack Succulent. Make sure the leaf is plump, without any signs of damage or disease.
2. Remove the leaf: Gently twist or cut the leaf from the base of the plant, ensuring that you have a clean break. Be careful not to damage the leaf or the stem of the parent plant.
3. Allow the leaf to callus: Place the leaf in a warm and dry location, away from direct sunlight. Let it sit undisturbed for a few days to allow the cut end to callus over. This will help prevent rotting and increase the success rate of rooting.
4. Prepare a well-draining growing medium: Fill a small container or tray with a well-draining soil mix suitable for succulents. A mixture of potting soil, perlite, and coarse sand works well. Moisten the soil slightly to provide the right environment for rooting, but avoid overwatering.
5. Plant the leaf cutting: Once the callus has formed, gently place the cut end of the leaf into the soil, ensuring that it makes good contact with the soil. You can bury the lower portion of the leaf, leaving the upper part exposed.
6. Provide the right conditions: Place the container in a bright location with indirect sunlight. Avoid placing it in direct sunlight, as this can scorch the delicate leaf. Maintain a warm temperature between 65-75°F (18-24°C). Flapjack Succulents prefer slightly warmer conditions for successful propagation.
7. Mist the cutting occasionally: To keep the leaf cutting hydrated during the rooting process, mist it with water every few days. Be careful not to overwater, as this can lead to root rot.
8. Be patient and monitor progress: It may take several weeks or even months for the leaf cutting to develop roots and start growing. During this time, be patient and monitor the moisture level of the soil. Avoid overwatering, as succulents are prone to rot in moist conditions.
9. Transplant the rooted cutting: Once the leaf cutting has developed a sufficient root system and has started producing new growth, it is ready to be transplanted into its permanent container or garden bed. Handle the rooted cutting gently to avoid damaging the fragile roots.
By following these steps, you can successfully propagate Flapjack Succulents through leaf cuttings. This method is not only a rewarding experience but also a meaningful way to create new plants and share the beauty of these stunning succulents with others.
Propagating Flapjack Succulents through Stem Cuttings
Another effective method for propagating Flapjack Succulents is through stem cuttings. This method allows you to create multiple plants from a single stem, making it a great option if you want to expand your collection or share plants with others. Follow these step-by-step instructions to propagate Flapjack Succulents through stem cuttings:
1. Choose a healthy stem: Select a healthy stem from a mature Flapjack Succulent. Look for a stem that is free from damage or signs of disease. The stem should be firm and plump, indicating active growth.
2. Prepare the cutting: Using a clean and sharp pair of gardening shears, cut a section of the stem that is around 3-4 inches long. Make sure to cut just below a leaf node, which is the area where the leaves attach to the stem. This will give the cutting the best chance of developing roots.
3. Remove the lower leaves: Carefully remove the lower leaves from the cutting, leaving a few intact towards the top. This will allow the cutting to focus its energy on root development rather than sustaining excessive foliage.
4. Allow the cutting to callus: Place the cutting in a warm and dry location for a few days to allow the cut end to callus over. This step is crucial to prevent rotting and promote successful rooting.
5. Prepare the rooting medium: Fill a small container or tray with a well-draining soil mix suitable for succulents. Use a mixture of potting soil and perlite or sand. Moisten the soil slightly to create a conducive environment for rooting.
6. Plant the stem cutting: Insert the bottom end of the stem cutting into the soil, ensuring that it is firmly planted. Make sure that the bottom nodes are in contact with the soil. You can plant multiple cuttings in the same container, spacing them a few inches apart.
7. Provide the right conditions: Place the container in a bright location with indirect sunlight. Avoid placing it in direct sunlight, as this can cause the delicate cuttings to scorch. Maintain a warm temperature between 65-75°F (18-24°C) to encourage rooting.
8. Mist the cuttings and maintain moisture: Mist the cuttings with water to keep them hydrated, but avoid overwatering. The soil should be moderately moist but not waterlogged. Be careful not to let the cuttings sit in standing water, as this can lead to rot.
9. Monitor progress and transplant: Over the next few weeks, monitor the progress of the cuttings. It may take some time for roots to develop, but you should start seeing signs of growth. Once the cuttings have developed a strong root system and new growth, they can be transplanted into their own individual containers or garden beds.
By following these steps, you can successfully propagate Flapjack Succulents through stem cuttings. This method is a fantastic way to create multiple plants and expand your collection of these beautiful succulents.
Propagating Flapjack Succulents through Offsets
Propagating Flapjack Succulents through offsets, also known as “pups,” is a simple and efficient method that allows you to create new plants directly from the parent plant. Offsets are smaller plantlets that grow at the base of the Flapjack Succulent. This method is especially convenient because the offsets are genetically identical to the parent plant. Follow these step-by-step instructions to propagate Flapjack Succulents through offsets:
1. Identify the offsets: Examine the base of the Flapjack Succulent for any smaller plantlets that have sprouted. These offsets can be easily identified as they emerge from the side of the main stem near the soil line. Wait until the offsets have developed their own set of roots before separating them from the parent plant.
2. Prepare the new pots: Fill small pots or containers with a well-draining succulent potting mix. The mix should consist of equal parts potting soil, perlite, and sand to provide the proper drainage that Flapjack Succulents require.
3. Gently separate the offsets: Carefully remove the offsets from the parent plant by gently tugging them away from the base. Ensure that you do not damage the roots or the main stem of either the parent plant or the offsets during this process.
4. Plant the offsets: Place each offset in its own individual pot, gently pressing the soil around the base to secure it. The soil should be well-moistened, but not saturated, to support healthy root development. Position the offset so that the base is slightly below the soil surface.
5. Provide optimal conditions: Place the newly potted offsets in a bright location with indirect sunlight. Avoid exposing them to intense, direct sunlight, as this can cause sunburn. Maintain a temperature between 65-75°F (18-24°C) to facilitate root establishment.
6. Water and care for the offsets: Water the offsets sparingly, allowing the soil to dry out slightly between waterings. Overwatering can lead to root rot, so it’s crucial to find the right balance. Provide occasional misting to maintain humidity around the young plants. Avoid fertilizing Flapjack Succulent offsets until they are established.
7. Monitor growth and transplant if needed: Over time, the offsets will begin to establish themselves in their individual pots and develop their own root systems. Monitor their growth, looking for new leaves and signs of expansion. As the young plants grow, you may need to transplant them into larger containers or garden beds.
Propagating Flapjack Succulents through offsets is an excellent way to create new plants that are genetically identical to the parent plant. This method is not only straightforward but also allows you to quickly increase your Flapjack Succulent collection or share the joy of these vibrant plants with others.
Caring for Flapjack Succulent Cuttings
Once you have successfully propagated Flapjack Succulent cuttings through leaf cuttings, stem cuttings, or offsets, it’s essential to provide proper care to ensure their survival and growth. Flapjack Succulent cuttings require specific conditions and attention to thrive and establish themselves as new plants. Here are some essential care tips for Flapjack Succulent cuttings:
1. Placement and Lighting: Place the cuttings in a bright location with indirect sunlight. Flapjack Succulents thrive in bright light conditions, but intense direct sunlight can scorch the delicate leaves. A south-facing window or a spot with filtered sunlight is ideal. Rotate the pots occasionally to ensure even growth.
2. Temperature and Humidity: Flapjack Succulent cuttings prefer warm temperatures between 65-75°F (18-24°C). Avoid exposing them to drafts or extreme temperature fluctuations. These plants are adapted to arid conditions, so they can tolerate low humidity. However, maintaining moderate humidity around the cuttings can promote healthy growth.
3. Watering: Water the cuttings sparingly and allow the soil to dry out partially between waterings. Overwatering can lead to root rot, which is especially detrimental to succulents. Water the cuttings from the base, avoiding getting water on the leaves. It is better to underwater than to overwater, as Flapjack Succulents can tolerate drought conditions.
4. Soil and Drainage: Use a well-draining potting mix suitable for succulents. A mixture of potting soil, perlite, and sand works well. Good drainage is crucial for preventing waterlogged soil, which can cause root rot. Ensure that the pots or containers have drainage holes to allow excess water to escape.
5. Fertilizing: Flapjack Succulent cuttings do not require regular fertilization immediately after propagation. The cuttings already contain stored nutrients in their leaves to support initial growth. Wait at least a few months before considering feeding with a diluted, balanced succulent fertilizer. Follow the instructions on the fertilizer packaging for application guidelines.
6. Pests and Diseases: Monitor the cuttings regularly for signs of pests, such as mealybugs or aphids. If you notice any infestations, promptly address them using organic insecticidal soaps or other appropriate treatments. Flapjack Succulents are generally resistant to diseases, but overwatering or poor airflow can lead to fungal issues. Keep the cuttings in a well-ventilated area to prevent the development of fungal infections.
7. Growth and Transplantation: As the Flapjack Succulent cuttings establish themselves and grow new leaves, you may need to transplant them into larger pots or outdoor garden beds. Choose containers with proper drainage and gradually acclimate the plants to their new environment by exposing them to increasing amounts of sunlight over several days.
By following these care tips, you can promote the healthy growth and establishment of Flapjack Succulent cuttings. Remember that each cutting may have slightly different needs, so closely monitor their progress and adjust the care accordingly. With patience and proper care, your Flapjack Succulent cuttings will develop into mature plants, bringing their unique beauty to your home or garden.
Troubleshooting Common Propagation Issues
Propagation can sometimes present challenges, and Flapjack Succulent propagation is no exception. However, with a little knowledge and troubleshooting, you can overcome common issues and ensure the success of your propagation efforts. Here are some common propagation issues and how to troubleshoot them:
1. Root Rot: Root rot is a significant concern for succulents, including Flapjack Succulents. It occurs when the roots are consistently exposed to excess moisture. To prevent root rot, ensure that your propagation medium has good drainage. Avoid overwatering the cuttings and allow the soil to dry out partially between waterings. If you notice signs of root rot, such as yellowing or mushy roots, remove affected parts, let the cuttings dry out, and replant in fresh, well-draining soil.
2. Lack of Root Development: If you find that your Flapjack Succulent cuttings are not developing roots within a reasonable timeframe, there may be several factors at play. Insufficient warmth and humidity can slow down root development. Ensure that the cuttings are kept in a warm and moderately humid environment. You can also try using a rooting hormone to encourage root growth. Additionally, be patient, as some plants may take longer than others to root.
3. Fungal Infections: Flapjack Succulent cuttings are generally resistant to diseases, but overwatering or high humidity can create a favorable environment for fungal infections. To prevent fungal issues, ensure proper airflow around the plants by placing them in a well-ventilated area. Avoid overcrowding the pots or containers, as this can increase humidity levels. If you notice signs of fungal infection, such as rotting or discoloration, promptly remove affected parts and treat the cuttings with a fungicide suitable for succulents.
4. Lack of New Growth: If your Flapjack Succulent cuttings are not showing signs of new growth after a considerable amount of time, it could be due to various factors. Insufficient light is a common culprit. Ensure that the cuttings are placed in a bright location with indirect sunlight. Adjust the light exposure if needed. Additionally, reassess your watering routine. Too much or too little water can impact the growth of succulents. Finally, check the overall health of the cuttings. If they appear shriveled or unhealthy, there may be underlying issues such as nutrient deficiencies or pests. Address any problems accordingly to promote growth.
5. Pests: Flapjack Succulents are generally resistant to pests, but they can occasionally be affected by common succulent pests like mealybugs or aphids. Monitor the cuttings regularly for signs of infestation, such as small white cotton-like clusters or tiny insects. If you notice pests, remove them manually or use organic insecticidal soaps to control the infestation. Avoid using harsh chemical pesticides, as they can harm not only the pests but also the plants.
By being proactive and addressing these common propagation issues, you can overcome challenges and increase the success rate of propagating Flapjack Succulents. Remember to carefully observe your cuttings, adjust care accordingly, and seek advice or assistance from experienced gardeners or specialists if needed. With perseverance and proper troubleshooting, you can enjoy the rewarding journey of propagating and growing these stunning succulents.
Conclusion
Propagating Flapjack Succulents can be an incredibly rewarding and fulfilling experience for any ornamental gardening enthusiast. Whether you choose to propagate through leaf cuttings, stem cuttings, or offsets, each method offers its unique advantages and allows you to create new plants that showcase the striking beauty of Flapjack Succulents.
By understanding the characteristics of Flapjack Succulents and selecting the right propagation method, you can increase your chances of success and enjoy watching your cuttings grow into thriving plants. Remember to provide the appropriate care, including proper lighting, well-draining soil, careful watering, and attention to potential issues like root rot or pests. With patience, observation, and troubleshooting, you can overcome common propagation challenges and foster healthy growth in your Flapjack Succulent cuttings.
As you expand your collection and share the joy of these vibrant succulents with others, take the time to appreciate the unique beauty and resilience of Flapjack Succulents. These stunning plants, with their paddle-shaped leaves and vibrant colors, not only add visual interest to any garden but also demonstrate the wonders of nature’s adaptability.
So, go ahead and embark on your Flapjack Succulent propagation journey. Explore the different propagation methods, experiment, and learn from the experience. Witness the magic of nature as you create new life from existing plants and continue to foster a love for ornamental gardening.
With the knowledge and techniques provided in this article, you are well-equipped to start propagating Flapjack Succulents with confidence and success. Enjoy the journey and the beauty that these remarkable plants bring to your gardening endeavors.