Home>Types of Gardening>Ornamental Gardening>When Should You Plant Bulbs

Ornamental Gardening
When Should You Plant Bulbs
Modified: February 7, 2024
Discover the best time to plant bulbs for your ornamental gardening. Expert tips and advice to ensure a beautiful and thriving garden.
(Many of the links in this article redirect to a specific reviewed product. Your purchase of these products through affiliate links helps to generate commission for Chicagolandgardening.com, at no extra cost. Learn more)
Table of Contents
- Introduction
- Factors to Consider Before Planting Bulbs
- Time of Year to Plant Bulbs
- Temperature and Climate Considerations
- Soil Conditions and Preparation
- Choosing the Right Bulbs for Your Garden
- Planting Techniques for Different Types of Bulbs
- Maintenance and Care Instructions for Planted Bulbs
- Potential Pest and Disease Issues
- Harvesting and Storing Bulbs
- Conclusion
Introduction
Welcome to the world of ornamental gardening! If you have a passion for beautiful flowers and lush greenery, then planting bulbs is the perfect way to enhance the aesthetics of your garden. Bulbs are an incredibly versatile and low-maintenance option for adding color and texture to your outdoor space.
In this article, we will explore the art of planting bulbs and delve into the various factors you need to consider before getting your hands dirty. From the ideal time to plant bulbs to the importance of soil preparation, we will cover everything you need to know to create a stunning floral display.
Bulbs come in a wide range of varieties, each with its own unique requirements. We will discuss the different types of bulbs and how to select the right ones for your garden, considering factors such as sunlight exposure and climate conditions. Whether you prefer cheerful tulips, fragrant lilies, or vibrant daffodils, you’ll find practical tips and advice to help you make the best choice.
Once you have chosen your bulbs, we will guide you through the planting process, offering techniques tailored to different bulb types. You’ll learn how to plant bulbs in beds, borders, containers, and even naturalize them in grassy areas. With our step-by-step instructions, you’ll be able to confidently cultivate a flourishing bulb garden.
Maintaining and caring for planted bulbs is crucial to ensure their longevity and continued beauty. We will provide you with valuable insights on how to properly care for your bulbs, including watering, fertilizing, and dealing with potential pest and disease issues. Additionally, we’ll share tips on harvesting and storing bulbs, so you can enjoy their beauty year after year.
Ready to embark on your gardening journey? Let’s dive into the fascinating world of planting bulbs and unlock the secrets to creating a stunning ornamental garden!
Factors to Consider Before Planting Bulbs
Before you start planting bulbs in your garden, there are several important factors you need to consider. These factors will help ensure that your bulbs thrive and produce stunning blooms. Let’s take a closer look at what you should keep in mind:
1. Sunlight Exposure: Different bulb varieties have varying sunlight requirements. Some bulbs, such as tulips and daffodils, prefer full sun, while others, like certain types of lilies, thrive in partial shade. Before planting bulbs, assess the sunlight conditions in your garden to determine the best locations for each type of bulb.
2. Soil Type and Drainage: Bulbs prefer well-draining soil with good fertility. Ensure that your soil is loose, well-amended, and has good drainage to prevent waterlogged conditions that can rot the bulbs. If you have heavy clay or sandy soil, consider adding organic matter like compost to improve its structure and fertility.
3. Hardiness Zone: Every region is assigned a hardiness zone based on its climate. Different bulbs have specific hardiness zone requirements for optimal growth and survival. Check your hardiness zone and choose bulbs that are suitable for your specific climate. This will significantly increase their chances of success.
4. Planting Depth: The depth at which you plant bulbs is crucial for their development. Bulbs should generally be planted at a depth that is two to three times their own height. This means bigger bulbs like daffodils will need to be planted deeper than smaller ones like crocus. Consult the planting instructions for each type of bulb to ensure correct planting depth.
5. Bloom Time: Consider the bloom time of different bulbs when planning your garden. Some bulbs bloom early in spring, while others bloom in late spring or even summer. By selecting bulbs with staggered bloom times, you can create a continuous display of color throughout the seasons.
6. Companion Planting: Certain plants complement bulbs and can enhance their visual appeal. Consider companion planting with perennials or annuals that provide contrasting colors, textures, or foliage. This can create a beautiful and dynamic garden design.
7. Maintenance Requirements: Different types of bulbs have varying maintenance requirements. Some bulbs may require regular deadheading, while others may need to be lifted and stored over the winter. Understand the specific care needs of the bulbs you choose and ensure you can meet those requirements.
By considering these factors before planting bulbs, you can set the stage for a successful and visually captivating garden. Take the time to plan and prepare, and you’ll be rewarded with a vibrant and stunning display of blooms.
Time of Year to Plant Bulbs
The timing of when you plant bulbs plays a critical role in their growth and development. Different bulbs have specific planting seasons that coincide with their natural growth cycles. Understanding the appropriate time to plant bulbs will help ensure successful establishment and vibrant blooms. Let’s take a closer look at the ideal times to plant bulbs:
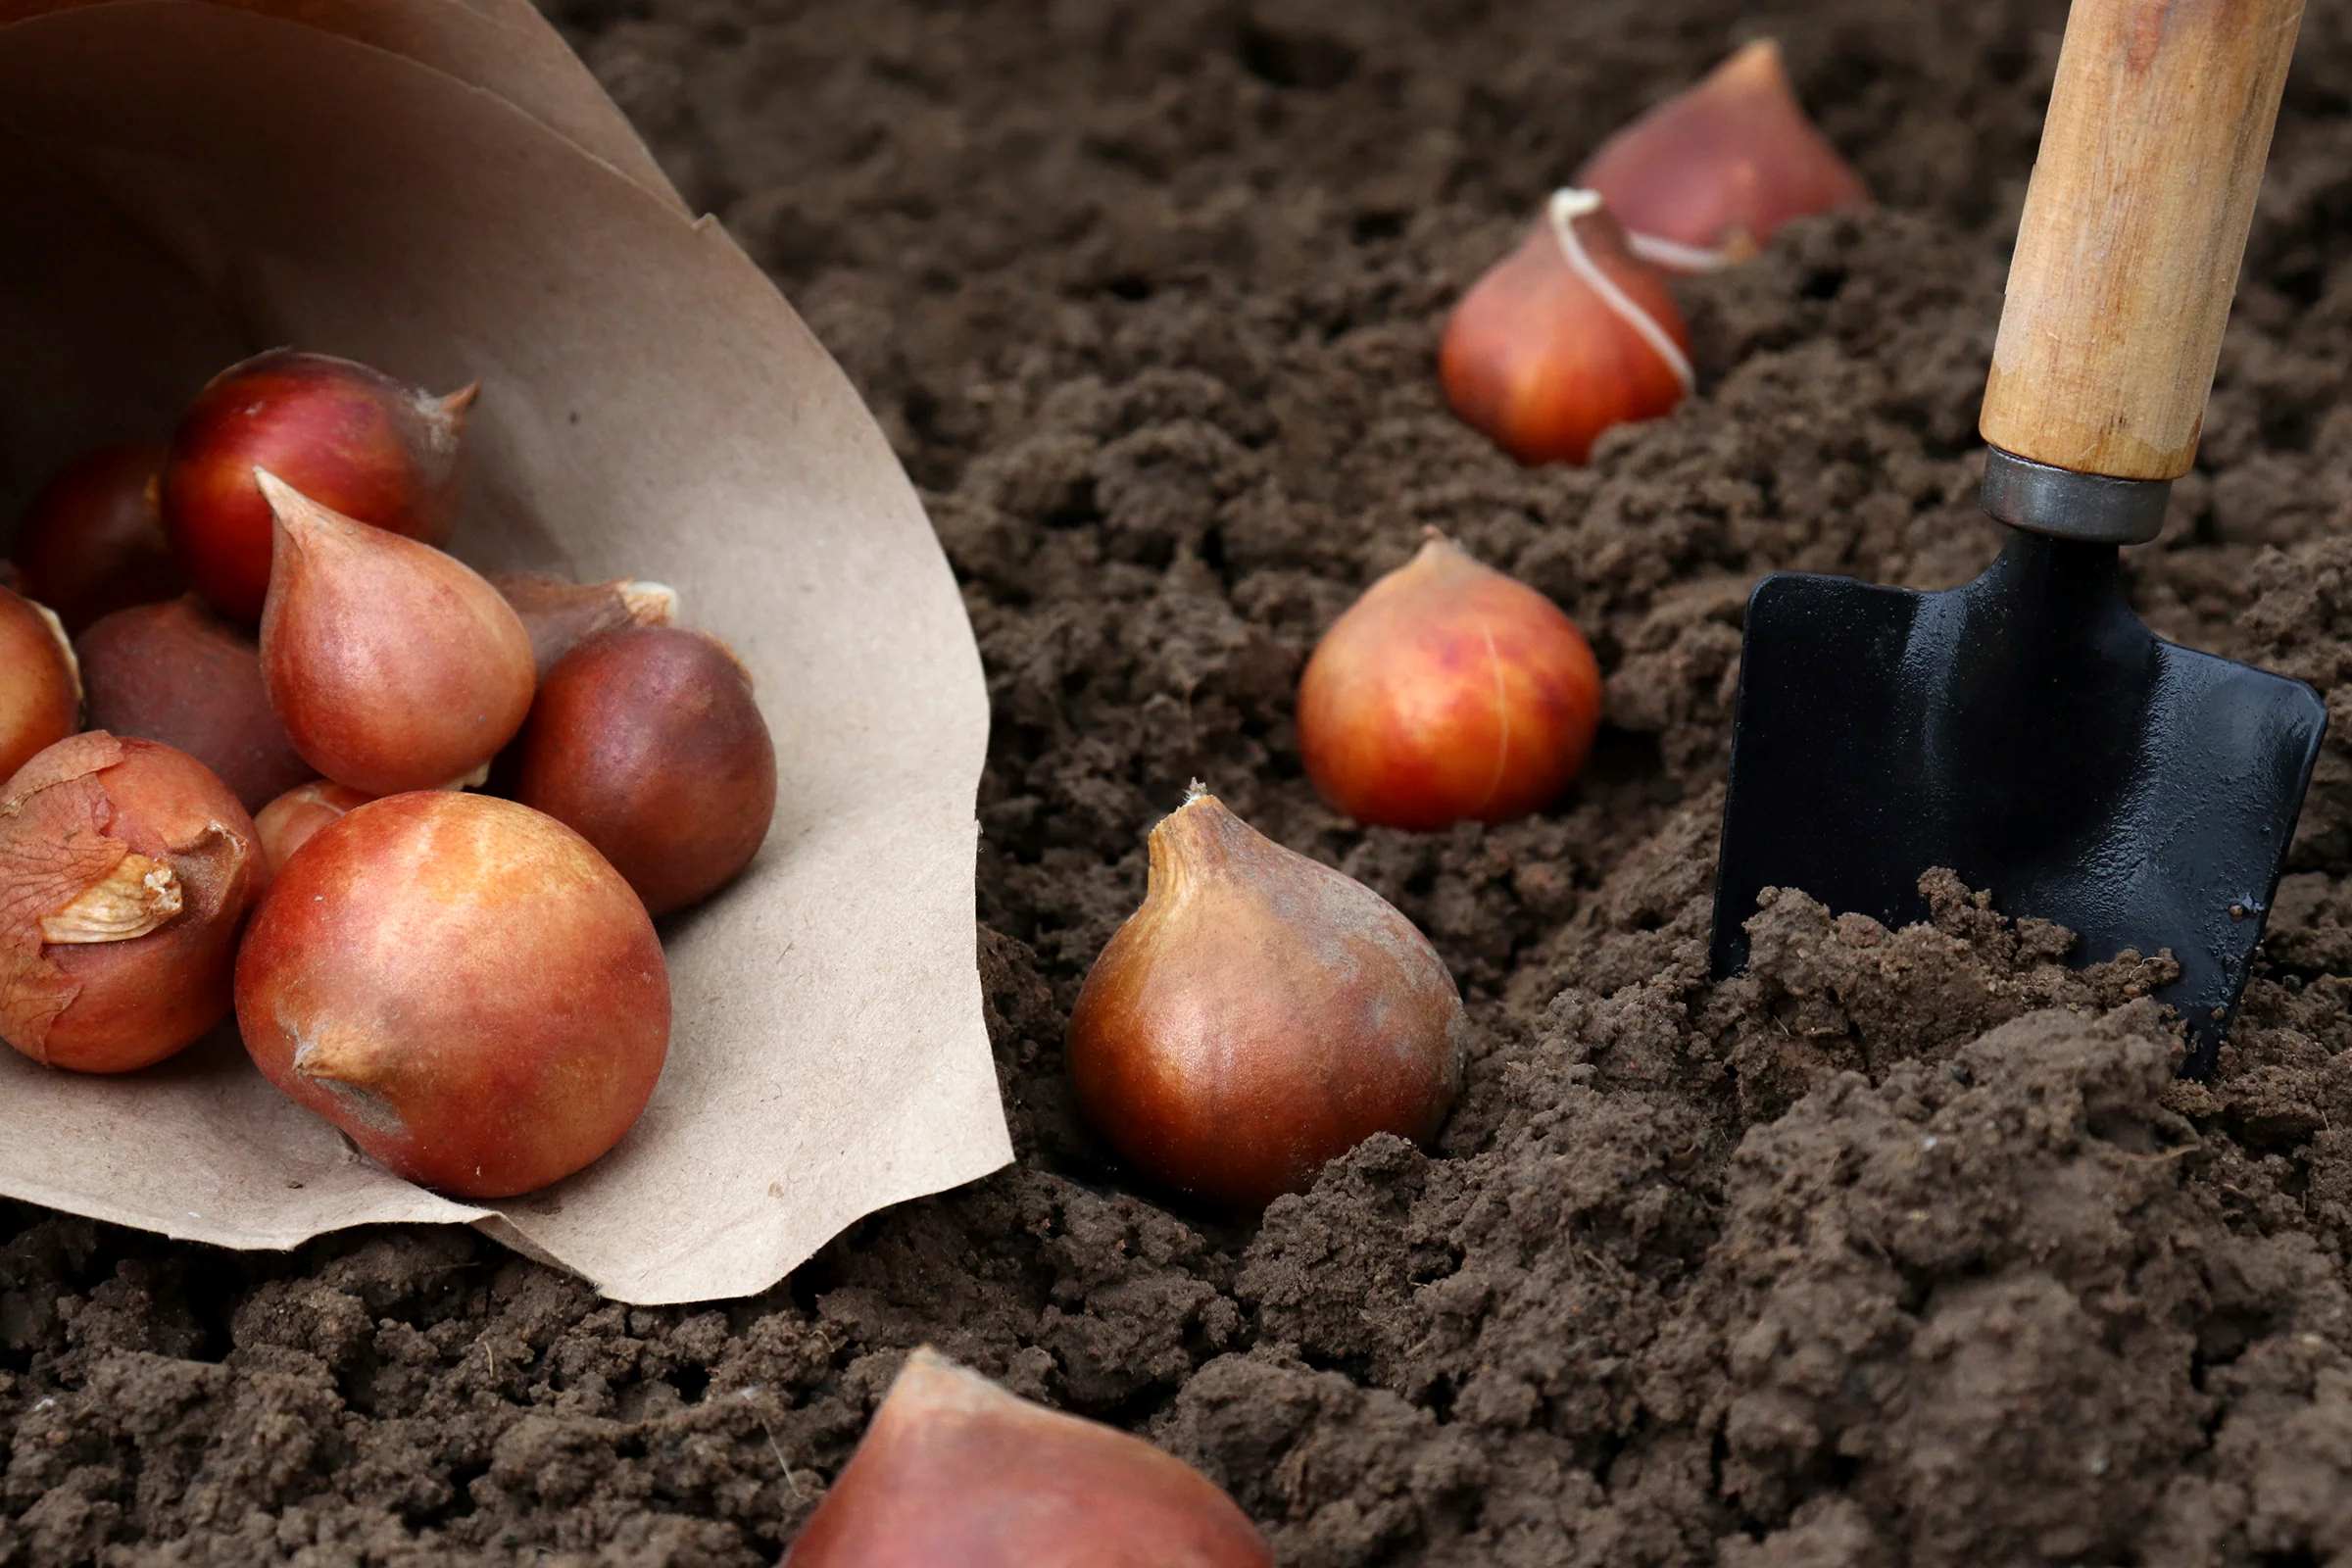
Fall Planting: The most common time to plant bulbs is in the fall, typically between September and November, before the ground freezes. Fall planting allows bulbs to establish their root systems before winter dormancy. This is especially important for bulbs that require a cold period, such as tulips and daffodils, as it helps trigger their blooming process in spring. Make sure to plant fall bulbs at least six weeks before the ground freezes to allow sufficient root development.
Spring Planting: While fall planting is the preferred method for most bulbs, certain varieties can also be planted in the spring. Spring planting is ideal for bulbs that are more tender and susceptible to frost damage, like gladiolus and dahlias. These bulbs need warmer soil temperatures to thrive. Wait until the soil has warmed up in early spring before planting these bulbs. Keep in mind that spring-planted bulbs may have a shorter blooming period compared to their fall-planted counterparts.
Summer Planting: Some bulbs can also be planted during the summer months, although it is less common. Examples of bulbs suitable for summer planting include certain types of lilies and alliums. These bulbs are typically dormant during the summer, making it a good time to divide and replant them. Ensure that the soil is well-drained and adequately watered during the hot summer months to promote healthy root development.
It is important to note that the planting time may vary depending on your specific climate and hardiness zone. Always refer to the guidelines provided by the bulb supplier or consult a local gardening expert to determine the most appropriate planting window for your area.
By timing your bulb planting correctly, you provide these underground wonders with the best opportunity to establish strong root systems and produce magnificent blooms. Whether you plant in the fall, spring, or summer, be sure to follow proper planting techniques and provide adequate care to ensure the success of your bulbs.
Temperature and Climate Considerations
Temperature and climate are vital factors to consider when planting bulbs. Different bulb varieties have specific temperature requirements for optimal growth and flowering. Understanding your local climate and its impact on bulb growth will help you choose the right bulbs and provide them with the necessary care. Let’s explore some temperature and climate considerations when planting bulbs:
Hardiness Zone: The hardiness zone of your region provides valuable information about its climate. Bulbs are often categorized into different hardiness zones, indicating the temperatures they can tolerate. Check your hardiness zone and choose bulbs that are suitable for your specific climate. Planting bulbs that are not recommended for your zone may result in poor growth or failure to flower.
Chilling Requirements: Some bulbs, like tulips and hyacinths, require a period of cold temperatures to break their dormancy and promote blooming. This chilling period mimics their natural environment and helps trigger their growth cycle. If you live in a warm climate where winter temperatures are mild, consider pre-chilling these bulbs in the refrigerator before planting to meet their chilling requirements.
Heat and Sun Tolerance: While most bulbs prefer full sun, some varieties can tolerate partial shade or dappled sunlight. If you live in a region with hot summers, pay attention to the heat tolerance of the bulbs you choose. Some bulbs, such as lilies and alliums, can withstand higher temperatures, while others may need protection from intense heat. Consider planting heat-tolerant bulbs in areas with afternoon shade or using mulch to keep the soil cool.
Frost and Cold Protection: Early spring frosts can damage tender new growth or flower buds of some bulbs. Be aware of your local frost dates and take precautions to protect vulnerable bulbs, especially those planted in early spring. Covering the plants with a layer of mulch or using frost blankets can shield them from freezing temperatures and minimize damage.
Microclimates: Your garden may have microclimates – small areas with slightly different temperature and climate conditions. Factors such as sun exposure, wind patterns, and proximity to buildings or bodies of water can create microclimates within your garden. Consider these variations when choosing planting locations for different bulbs. Some bulbs may thrive in a warmer, sunnier microclimate, while others may prefer a cooler, more sheltered spot.
By taking temperature and climate considerations into account, you can select bulbs that are well-suited for your specific environment. Understanding the needs of your bulbs and providing them with proper temperature and climate conditions will promote healthy growth, blooming, and overall success in your garden.
Soil Conditions and Preparation
Creating the right soil conditions is crucial for the successful growth of bulbs. Healthy, well-prepared soil provides the essential nutrients, proper drainage, and the right pH level for bulbs to thrive. Before planting bulbs, it is important to assess your soil and take steps to improve its quality. Let’s explore some soil conditions and preparation techniques:
Drainage: Bulbs dislike soggy soil, as it can lead to rot and other problems. Ensure that your soil has good drainage to prevent excess water from accumulating around the bulbs. If you have heavy clay soil that tends to retain moisture, incorporate organic matter like compost or well-rotted manure to improve drainage. Growing bulbs on a slight slope or in raised beds can also help ensure proper drainage.
Soil Fertility: Bulbs thrive in fertile soil that is rich in organic matter. Prior to planting, amend your soil with compost or well-rotted organic matter to improve its fertility. This will provide the necessary nutrients for healthy bulb growth and blooming. Avoid using fresh manure, as it can burn the bulbs; instead, opt for compost or aged manure that has fully decomposed.
pH Level: Most bulbs prefer a slightly acidic to neutral pH level ranging from 6.0 to 7.0. Test your soil’s pH level using a soil testing kit and make adjustments accordingly. If your soil is too acidic, you can add agricultural lime to raise the pH. For soils that are too alkaline, sulfur or peat moss can be used to lower the pH. Maintaining the right pH level will ensure the availability of essential nutrients for the bulbs.
Soil Texture: Bulbs appreciate a soil texture that is loose and well-draining. Sandy soil tends to drain quickly, while clay soil has poor drainage. If you have sandy soil, adding organic matter can improve its water-holding capacity. If you have clay soil, incorporate organic matter to enhance its drainage and improve its structure. Aim for a loamy soil texture that is rich in organic matter and provides a balance between drainage and water retention.
Weed Control: Before planting bulbs, ensure that the planting area is free of weeds. Weeds can compete with bulbs for nutrients and water, hindering their growth. Clear the planting area of weeds and provide a weed-free environment to give your bulbs a healthy start.
Prioritizing soil conditions and preparing the soil accordingly will create an optimal environment for bulb growth. By ensuring good drainage, fertility, pH level, and soil texture, you set the stage for healthy root development and stunning flower production. Take the time to prepare your soil, and you’ll be rewarded with a garden that blooms with vibrancy and beauty.
Choosing the Right Bulbs for Your Garden
When it comes to choosing bulbs for your garden, you have a wide array of options to consider. From vibrant tulips to fragrant lilies, the choices can be overwhelming. To make the process easier, it’s important to take several factors into account before making your selection. Let’s explore some key considerations when choosing the right bulbs for your garden:
Climate and Hardiness: Bulbs have specific climate requirements, so it’s crucial to choose varieties that are suitable for your region’s hardiness zone. Consider the average temperatures, frost dates, and the length of your growing season. Select bulbs that are known to thrive in your climate to ensure their success.
Sunlight Exposure: Evaluate the amount of sunlight your garden receives throughout the day. Some bulbs, like tulips and daffodils, prefer full sun, while others, like certain varieties of lilies, can tolerate partial shade. Choose bulbs that match the sunlight conditions in your garden to maximize their blooming potential.
Bloom Time: Consider the desired bloom time for your garden. Bulbs have different flowering periods, ranging from early spring to late summer. Select a variety of bulbs with staggered bloom times to ensure a continuous display of color throughout the seasons.
Color Palette: Determine the color scheme you envision for your garden. Bulbs come in a wide range of colors, from bold and vibrant hues to soft pastels. Consider the overall aesthetic and design of your garden and select bulbs that will complement or add a pop of color to the existing plants and foliage.
Height and Size: Take into account the height and size of the bulbs when making your selection. Different bulbs have varying growth habits, ranging from small and delicate to tall and commanding. Think about the placement and scale in your garden beds and borders, and choose bulbs that will provide the desired visual impact.
Fragrance: Consider adding bulbs with fragrant blooms to enhance the sensory experience in your garden. Bulbs such as hyacinths, lilies, and freesias offer captivating scents that can greatly enhance your outdoor space.
Longevity: Some bulbs are perennial, meaning they will come back year after year, while others are annuals, blooming only once. Determine whether you want to invest in bulbs that will provide a long-lasting presence in your garden or prefer to experiment with different varieties each year.
By considering these factors, you can choose bulbs that are well-suited to your garden’s unique conditions and your personal preferences. Plan and curate your bulb selection carefully, and you’ll be rewarded with a garden that bursts with color, fragrance, and beauty.
Planting Techniques for Different Types of Bulbs
When it comes to planting bulbs, different varieties have specific planting techniques to ensure their successful growth and development. Understanding the proper planting methods for different types of bulbs will help set them up for thriving in your garden. Let’s explore some planting techniques for various bulb types:
Tulips, Daffodils, and Hyacinths: These popular spring bulbs are typically planted in the fall. Dig a hole that is two to three times the depth of the bulb, ensuring proper spacing between bulbs. Place the bulb in the hole with the pointed side facing up. Backfill the hole, gently firming the soil around the bulb. Water the area thoroughly to settle the soil and provide moisture for the bulb’s roots.
Crocuses and Snowdrops: These early bloomers are also best planted in the fall. Dig a shallow hole that is about two times the depth of the bulb. Place the bulb in the hole with the pointed side up and gently cover it with soil. Crocuses and snowdrops can be planted in clusters or scattered around your garden for a naturalized look.
Lilies: Lilies are typically planted in the spring or fall, depending on the variety. Dig a hole that is two to three times the depth of the bulb and space multiple bulbs several inches apart. Place the bulb in the hole with the roots facing downwards and the pointed side up. Fill the hole with soil and firm it gently. Water thoroughly after planting to settle the soil.
Gladiolus: Gladiolus bulbs are typically planted in the spring once the soil has warmed up. Dig a hole that is about twice the depth of the bulb. Place the bulb in the hole with the pointed side up. Backfill the hole with soil and firm it gently. Depending on the variety, you may need to provide stakes or supports for the tall flower spikes as they grow.
Dahlias: Dahlias are planted in the spring once the soil has warmed up and all danger of frost has passed. Dig a hole that is twice the depth and width of the bulb. Place the bulb in the hole with the tubers facing down. Fill the hole with soil, leaving a slight depression to capture water. As the plant grows, provide support with stakes to prevent it from toppling over.
Irises: Irises are best planted in the late summer or early fall. Dig a shallow hole that is wide enough to accommodate the rhizomes without bending them. Place the rhizome on a small mound of soil, spreading the roots down the sides. Cover the roots with soil, leaving the top of the rhizome exposed. Water the area thoroughly after planting.
Remember to follow the specific planting instructions provided with each bulb variety to ensure the best results. Proper planting techniques will contribute to the successful establishment of bulbs and their gorgeous blooms.
Maintenance and Care Instructions for Planted Bulbs
Maintaining and caring for your planted bulbs is essential to ensure their continued growth and beautiful blooms. With proper care, you can help your bulbs thrive and enhance the overall health and appearance of your garden. Here are some maintenance and care instructions to keep in mind:
Watering: Adequate and consistent watering is crucial for bulb growth and development. During the growing season, water the bulbs regularly, keeping the soil moist but not waterlogged. Be mindful of rainfall and adjust watering accordingly. Avoid overwatering, as it can lead to rot and other issues. In periods of prolonged drought, provide extra water to prevent dehydration.
Fertilizing: Bulbs benefit from regular fertilization to replenish nutrients in the soil. Prior to planting, amend the soil with a balanced bulb fertilizer or organic compost. During the growing season, you can apply a slow-release bulb fertilizer according to the package instructions. Avoid over-fertilizing, as this can lead to excessive foliage growth at the expense of flower production.
Deadheading: To encourage continued blooming and prevent energy expenditure on seed production, it is recommended to deadhead faded flowers. Snip off spent blooms, taking care not to damage the bulb or emerging foliage. Deadheading redirects the plant’s energy back into bulb growth, ensuring a healthier and more vigorous display the following year.
Weed Control: Keep the area around your planted bulbs free from weeds to minimize competition for nutrients and water. Regularly remove weeds by hand, taking care not to disturb the bulbs or their roots. Mulching the area with a layer of organic material can help suppress weed growth and retain soil moisture.
Pest and Disease Control: Bulbs can be susceptible to pests like slugs, snails, and rodents. Monitor your garden regularly and take necessary steps to control these pests. Use physical barriers, organic insecticides, or natural predator control methods to protect your bulbs. Be vigilant for signs of diseases like bulb rot or fungal infections. If you notice any issues, remove and discard affected bulbs to prevent further spread.
Winter Care: Some bulbs, like tulips and daffodils, may need special care during the winter months. Once the foliage turns yellow and dies back, it is important to resist the temptation to remove it immediately. The dying foliage helps nourish the bulb for next year’s growth. To maintain a tidy appearance, you can gently tie up the foliage or plant bulbs amongst other perennials that will hide the dying foliage.
By following these maintenance and care instructions, you can create an optimal environment for the long-term success of your planted bulbs. With love and attention, your bulbs will reward you with stunning displays of color and beauty year after year.
Potential Pest and Disease Issues
While bulbs are generally resilient and low-maintenance plants, they can still be susceptible to certain pests and diseases. Being aware of potential issues and taking proactive measures can help prevent or mitigate any damage. Here are some common pests and diseases that can affect bulb plants:
Pest Infestations:
- Slugs and Snails: These common garden pests can feed on the tender leaves and flowers of bulbs. Deter them by creating barriers like copper tape or using organic slug and snail control methods.
- Rodents: Squirrels, mice, and voles may dig up and feed on bulbs. Use physical barriers like wire mesh or consider planting bulbs in containers to protect them.
- Bulb Mites and Aphids: These tiny insects can infest bulbs, causing stunted growth and distorted leaves. Apply an appropriate insecticidal soap or organic insecticide to control the infestation.
Disease Problems:
- Bulb Rot: Excessive moisture and poor drainage can lead to bulb rot, causing bulbs to become mushy and decay. Ensure proper soil drainage and avoid overwatering.
- Fungal Diseases: Diseases like Botrytis (gray mold) and Fusarium can infect bulbs and cause wilting, spotting, or rotting. Practice good sanitation and ensure proper air circulation to minimize the risk of fungal infections.
- Virus Diseases: Bulbs can be infected with various viruses, resulting in stunted growth, yellowing leaves, and distorted flowers. Prevent the spread of viruses by removing and destroying infected plants. Avoid planting bulbs from questionable sources.
Preventive Measures:
- Plant Healthy Bulbs: Start with high-quality, disease-free bulbs from reputable sources to minimize the risk of introducing pests or diseases to your garden.
- Proper Sanitation: Keep your garden and tools clean to prevent the spread of diseases. Remove and dispose of any infected plant material promptly.
- Good Garden Hygiene: Maintain proper plant spacing and provide adequate air circulation to discourage the development of humid and damp conditions that favor disease outbreaks.
- Natural Predators: Encourage beneficial insects and birds, like ladybugs and birds that eat slugs, to naturally control pest populations in your garden.
- Rotation and Diversity: Avoid planting bulbs in the same location year after year. Rotating bulb crops and incorporating a diverse range of plants can help disrupt pest and disease cycles.
By staying vigilant and taking proactive measures, you can minimize the impact of pests and diseases on your bulb plants. Regular monitoring, timely intervention, and fostering a healthy garden environment are key to the long-term success of your bulb garden.
Harvesting and Storing Bulbs
Once your bulb plants have finished flowering and the foliage starts to yellow and wither, it’s time to consider harvesting and storing the bulbs. Proper harvesting and storage techniques ensure the bulbs remain healthy and viable for planting in the future. Here are some guidelines for harvesting and storing bulbs:
Timing: It is important to harvest bulbs at the right time to allow for proper maturation. Wait until the foliage has completely yellowed and died back naturally. This allows the bulb to accumulate energy reserves for future growth.
Harvesting: Carefully dig up the bulbs using a garden fork or shovel, taking care not to damage them. Gently lift the bulbs from the soil, being cautious of any attached stems or foliage. Brush off excess soil but avoid washing the bulbs, as moisture can promote rot.
Culling and Sorting: Inspect the harvested bulbs and discard any that appear damaged, diseased, or moldy. Sort the bulbs by size, as larger ones tend to produce bigger and more robust plants in the next growing season.
Drying: Before storing, it is crucial to dry the bulbs thoroughly to prevent rot during storage. Place the bulbs in a well-ventilated area out of direct sunlight for a week or two. This allows the outer layers to dry completely.
Storage Containers: Choose a storage container that provides good airflow and prevents excessive moisture buildup. Options include mesh bags, wooden crates, or paper bags. Avoid using plastic bags, as they can trap moisture and promote rot.
Labeling: Label each storage container with the bulb variety and the date of harvest. This helps you keep track of the bulbs and ensures proper rotation in the coming years.
Storage Conditions: Store the bulbs in a cool, dark, and dry location. Ideal storage temperatures range from 50°F to 60°F (10°C to 15.5°C). It is important to maintain proper airflow and avoid extreme temperature fluctuations.
Periodic Inspection: Periodically check the stored bulbs throughout the storage period. Remove any bulbs that show signs of rot, disease, or deterioration to prevent further damage to the other bulbs.
Replanting: When it’s time to replant the stored bulbs, inspect them again and discard any that appear damaged or shriveled. Prepare the planting site as usual, ensuring proper soil conditions and planting depths. Plant the bulbs following the recommended guidelines for that specific bulb variety.
By following these harvesting and storage techniques, you can preserve the health and vitality of your bulbs for future seasons. With proper care, your stored bulbs will reward you with beautiful blooms year after year.
Conclusion
Ornamental gardening with bulbs can bring a burst of color, fragrance, and beauty to your outdoor space. By considering factors such as planting time, soil conditions, and bulb variety, you can create a garden that delights the senses and showcases nature’s wonders. Proper care and maintenance, including watering, fertilizing, and pest control, ensure the health and longevity of your bulbs.
Remember to tailor your planting techniques to the specific bulb types, whether they be tulips, daffodils, lilies, or other varieties. By following planting guidelines, your bulbs will establish strong root systems and reward you with stunning blooms year after year.
Stay vigilant against potential pests and diseases that can hinder bulb growth. Through preventive measures, good garden hygiene, and natural predator control, you can protect your bulbs and keep them thriving.
When it’s time to harvest and store your bulbs, follow the proper techniques to ensure their viability for future seasons. By providing the right conditions and periodically inspecting stored bulbs, you can guarantee healthy plants when it’s time for replanting.
Ornamental gardening with bulbs is a rewarding endeavor that allows you to create a breathtaking garden filled with color, fragrance, and life. With patience, care, and a touch of creativity, your bulb garden will become a sanctuary of beauty and joy, connecting you to the wonders of nature.