Home>Types of Gardening>Ornamental Gardening>Which End Is Up When You Plant Bulbs
Ornamental Gardening
Which End Is Up When You Plant Bulbs
Modified: January 22, 2024
Learn the expert tips on ornamental gardening! Find out which end of bulbs should be planted up and how to get beautiful blooms in your garden.
(Many of the links in this article redirect to a specific reviewed product. Your purchase of these products through affiliate links helps to generate commission for Chicagolandgardening.com, at no extra cost. Learn more)
Table of Contents
Introduction
Welcome to the world of ornamental gardening, where the beauty of nature takes center stage. Ornamental gardening is a wonderful way to add color, texture, and elegance to your outdoor space. One of the key elements of a successful ornamental garden is the proper planting of bulbs.
When it comes to planting bulbs, there is one crucial question that often arises: which end is up? It may seem like a simple query, but getting it wrong can result in disappointment when your bulbs fail to bloom. To avoid any confusion and ensure the best results, it is important to understand the correct way to plant bulbs.
Planting bulbs correctly is vital for their growth and development. By following the proper planting techniques, you provide bulbs with the best chance to produce beautiful flowers and thrive in your garden. This article will guide you through the process of identifying the correct end of the bulb and provide a step-by-step guide to planting bulbs correctly.
Before we delve into the details, let’s take a moment to appreciate the importance of planting bulbs properly. When bulbs are planted upside down or sideways, it can hinder their ability to sprout and grow. The shoot, which contains the stem and leaves, needs to emerge from the top of the bulb, while the roots should grow from the bottom. If the bulb is positioned incorrectly, the shoot may struggle to break through the soil, resulting in stunted growth or even failure to bloom.
So, how can you determine which end is up when planting bulbs? The answer lies in understanding the anatomy of the bulb and considering a few key factors before you get your hands dirty. By taking these factors into account and following the proper planting technique, you can ensure a successful and vibrant ornamental garden.
Importance of planting bulbs correctly
The importance of planting bulbs correctly cannot be overstated. By taking the time and care to position bulbs in the right direction, you set the stage for their successful growth and stunning displays of color in your garden.
Properly planted bulbs have a higher chance of sprouting, developing strong roots, and producing healthy foliage and vibrant flowers. When bulbs are positioned upside down or sideways, they face numerous challenges that can hinder their growth and ultimately lead to disappointment.
When bulbs are planted upside down, the shoot, which contains the stem and leaves, has to work twice as hard to break through the soil and reach for sunlight. This can result in stunted growth and weakened plants that struggle to thrive. In some cases, the shoot may not be able to emerge at all, leading to the complete failure of the bulb to bloom.
On the other hand, when bulbs are planted sideways, the same challenges arise. The shoot must navigate a longer and more arduous path to reach the surface, resulting in weakened growth and potentially deformed or distorted foliage. Additionally, planting bulbs sideways increases the risk of fungal diseases and rot, as moisture can gather around the exposed side, causing damage to the bulb.
By planting bulbs correctly, you provide them with the best possible start. The shoot can easily penetrate the soil from the top of the bulb, allowing it to reach sunlight easily. The roots, which develop from the bottom of the bulb, can establish a strong foundation in the soil, ensuring efficient nutrient uptake and stability. This strong root system supports the plant’s overall health and resilience.
Properly planted bulbs also have a better chance of withstanding adverse weather conditions. When bulbs are positioned correctly, they can withstand strong winds, heavy rain, or frost better than those planted incorrectly. This is because the roots are securely anchored in the soil, providing stability and protection against external elements.
In addition to the physical benefits, planting bulbs correctly also enhances the aesthetic appeal of your garden. Properly positioned bulbs produce symmetrical growth and uniform flower displays, showcasing the beauty of each variety. This creates a visually pleasing and harmonious landscape that will be the envy of your neighbors and a source of pride for you.
Now that we understand the importance of planting bulbs correctly, let’s explore how to identify the correct end of the bulb and the factors to consider before planting.
Identifying the correct end of the bulb
Before you can plant bulbs correctly, you need to be able to identify the correct end of the bulb. While it may seem like a challenging task, there are a few key indicators that can help you determine which end of the bulb should face up.
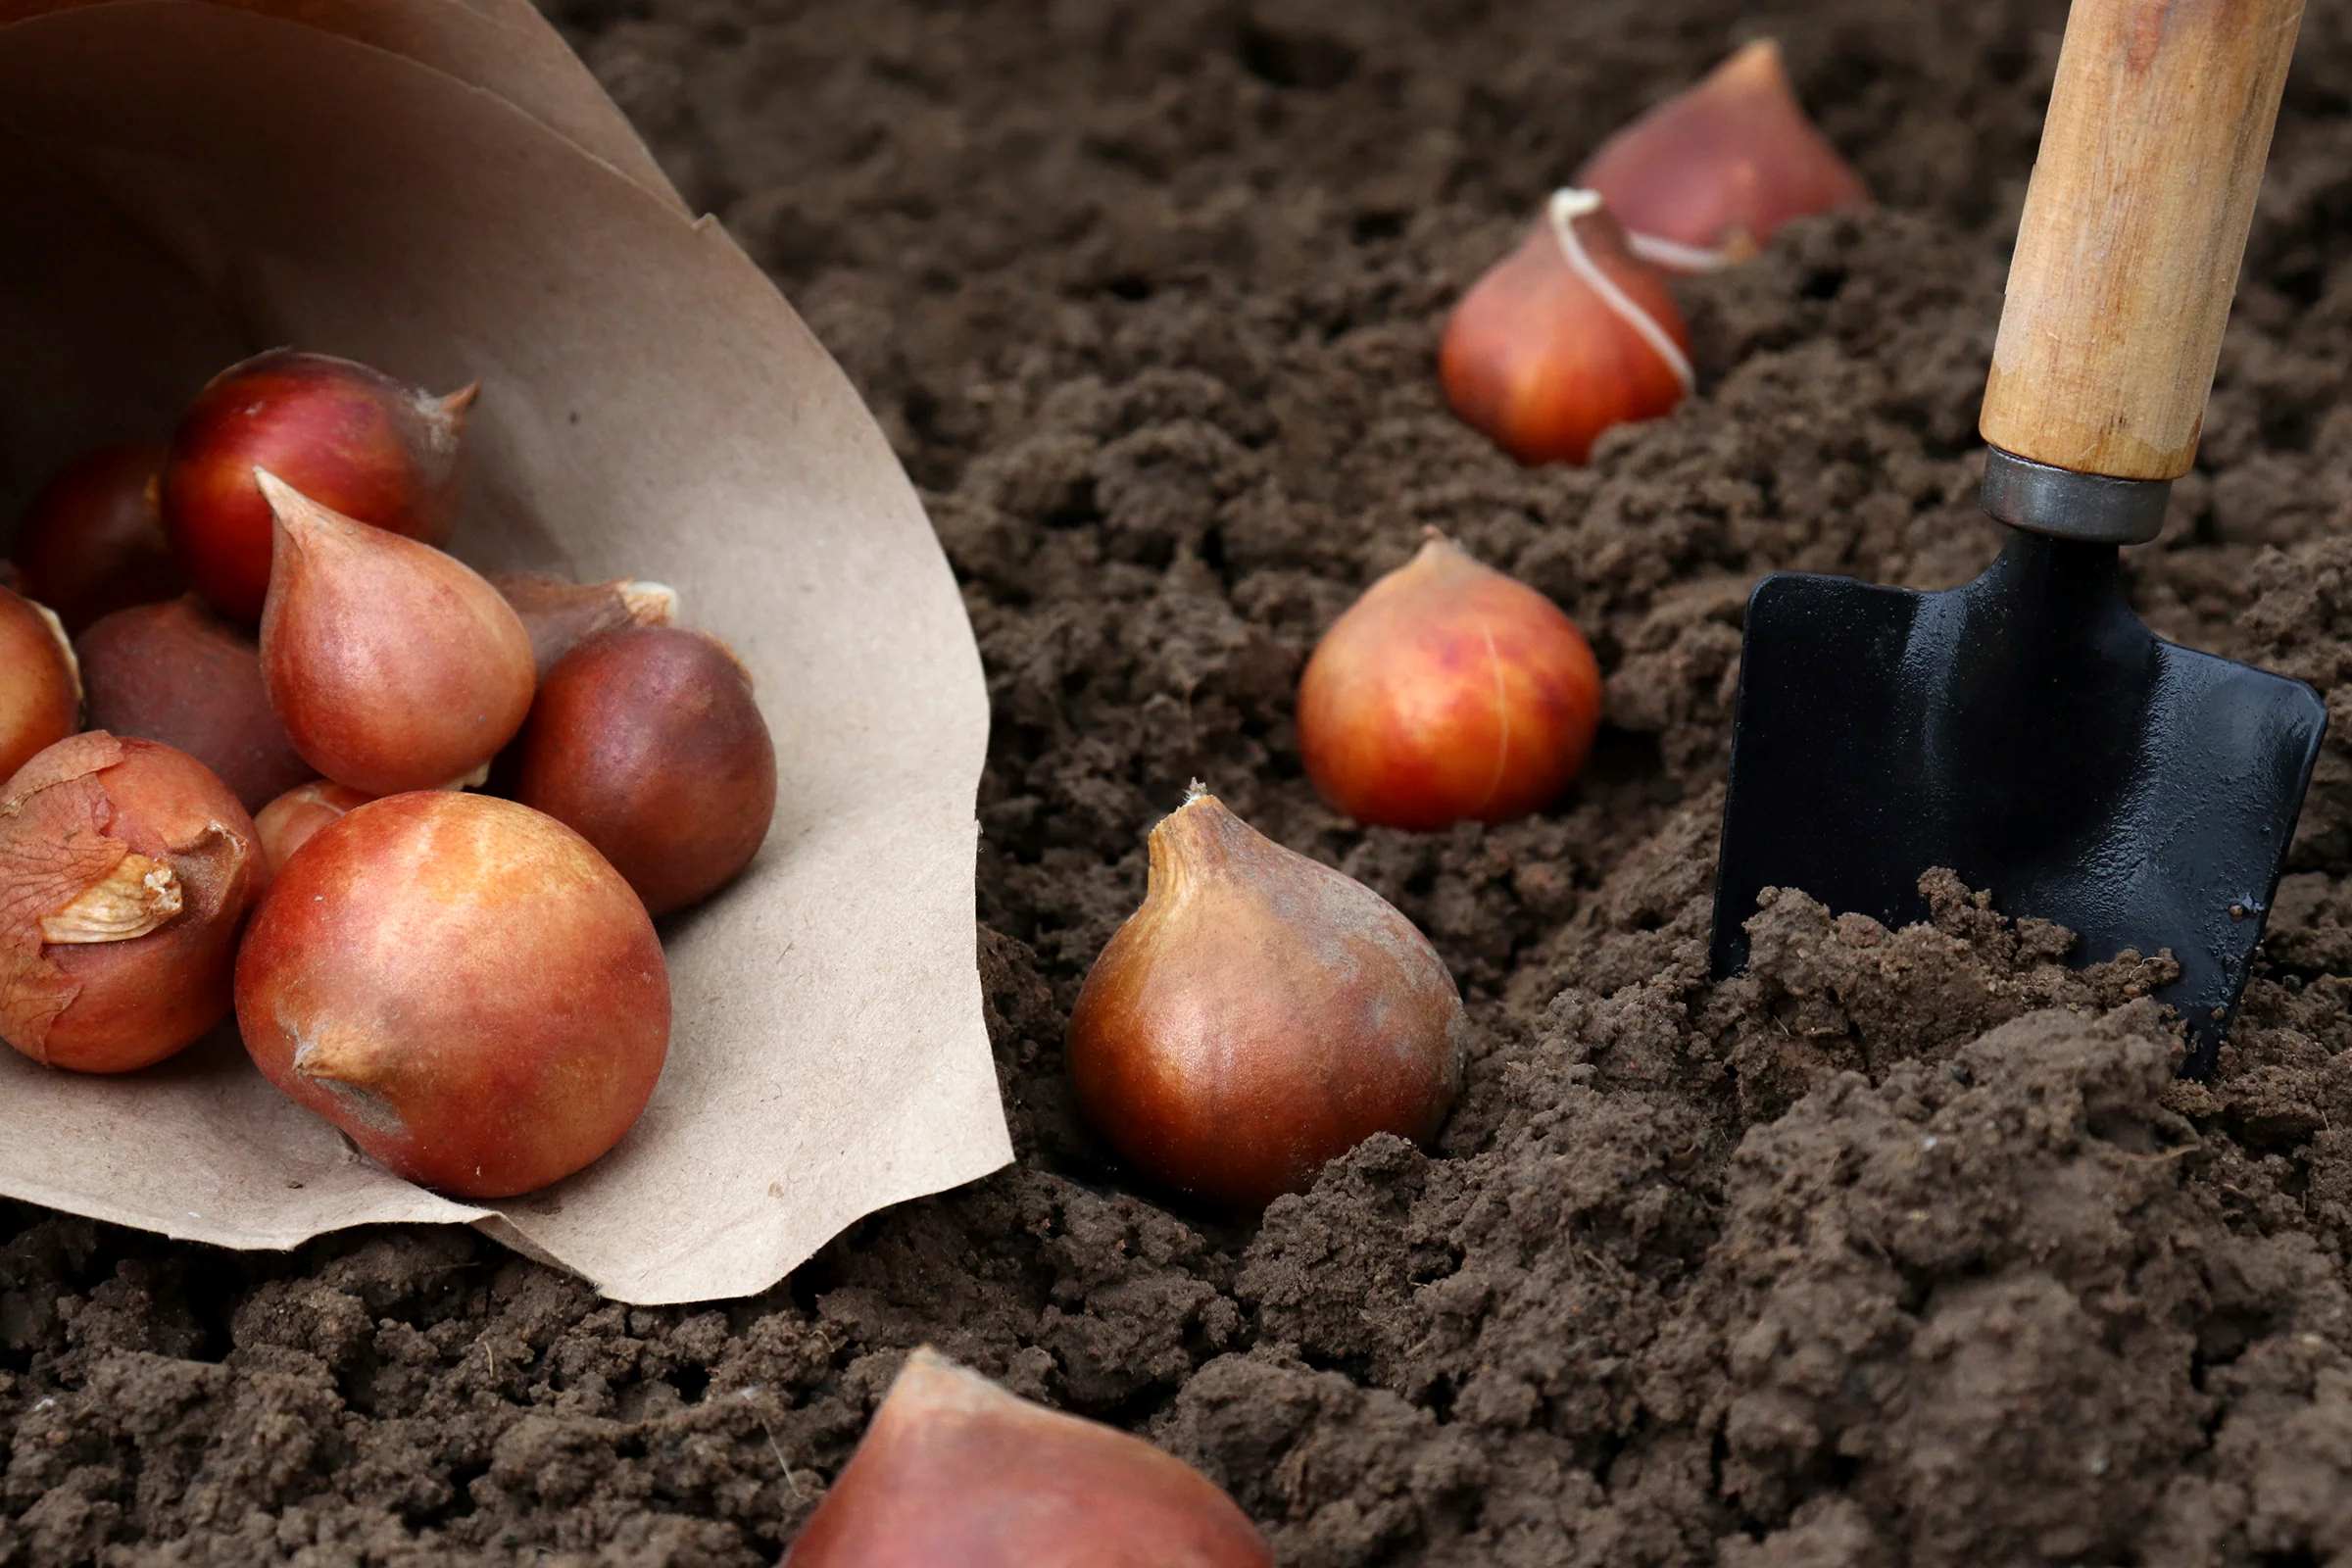
One of the most reliable ways to identify the correct end of the bulb is by looking for the presence of a pointed tip or a remnant of a stem. This pointed end is known as the “top” or “shoot” end and is where the stem and leaves will emerge from. It is usually more tapered and pointed compared to the bottom of the bulb.
Another clue to look for is the presence of roots or root remnants at the bottom of the bulb. These roots are responsible for absorbing water and nutrients from the soil. They are typically more fibrous in texture and may be more clustered or concentrated at the base of the bulb.
Color can also provide a hint. Often, the top or shoot end of the bulb is slightly lighter in color compared to the bottom, which is usually darker or denser. This color difference is due to the concentration of essential nutrients and growth factors that contribute to the growth of the shoot.
If you’re still unsure about which end is up, don’t fret! Some bulbs, such as tulips and daffodils, have a more symmetrical and round shape, making it challenging to determine the top and bottom. In these cases, it is generally safe to plant them on their side. The shoot will naturally find its way to the surface, and the roots will grow downward.
It’s worth noting that not all bulbs have a clearly defined top and bottom. Some bulbs, like lilies, may not have an obvious pointed tip or roots at one end. In such cases, it is best to refer to gardening references or consult with a knowledgeable gardener or horticulturist for guidance on planting.
Now that you can confidently identify the correct end of the bulb, let’s move on to the factors you should consider before planting.
Factors to consider before planting bulbs
Before you start planting bulbs, it’s essential to take a few key factors into consideration to ensure their successful growth and development. By considering these factors, you can make informed decisions about the ideal planting location and conditions for your bulbs.
1. Hardiness Zone: Different bulbs have different temperature requirements. It’s crucial to know your hardiness zone, which is based on your region’s average minimum winter temperatures. This information will help you choose bulbs that are suitable for your climate and ensure their long-term survival.
2. Sunlight: Most flowering bulbs thrive in full sunlight. However, there are some exceptions that tolerate or even prefer partial shade. Take note of the sunlight conditions in your garden to select bulbs that will do well in that specific spot.
3. Soil Type: Bulbs generally prefer well-draining soil. Consider the soil type in your garden, whether it’s sandy, loamy, or clayey. Amendments like organic matter or sand can improve drainage if needed.
4. Moisture: Bulbs have different moisture requirements. Some prefer well-drained soil with moderate moisture, while others can tolerate wetter conditions. Understanding the moisture needs of the bulbs you’re planting will help you choose suitable locations and watering routines.
5. Planting Depth: Each bulb type has specific planting depth requirements. Planting bulbs too shallow can result in exposure to harsh weather elements, while planting them too deep may hinder their ability to emerge. Check the recommended planting depth for each type of bulb and adjust accordingly.
6. Time of Planting: Bulbs have specific planting seasons. Some bulbs are best planted in the fall for spring bloom, while others may be planted in the spring for summer or fall flowering. Be sure to plant bulbs at the appropriate time to promote optimal growth and flowering.
7. Companion Plants: Consider the surrounding plants when selecting bulb varieties. Some bulbs work well with other perennials or annuals, creating beautiful color combinations and attracting beneficial insects.
8. Pest and Disease Resistance: Some bulbs are more resistant to pests and diseases than others. Research the specific bulbs you’re interested in and choose varieties that are less prone to common problems in your area.
By considering these factors before planting bulbs, you can create an optimal environment for their growth and ensure a spectacular floral display in your garden.
Step-by-step guide to planting bulbs correctly
Now that you understand the importance of planting bulbs correctly and have considered the factors for successful planting, let’s dive into the step-by-step process of planting bulbs:
- Start by selecting high-quality bulbs that are firm and free from mold, blemishes, or soft spots. Choose bulbs that are appropriate for your hardiness zone and that suit your garden’s sunlight and soil conditions.
- Choose a location in your garden that receives the recommended amount of sunlight for the specific bulb variety. Prepare the soil by removing any weeds or debris and loosening it to a depth of about 6-8 inches (15-20 cm).
- Dig a hole that is approximately three times the height of the bulb. For example, if the bulb is 2 inches (5 cm) tall, dig a hole that is 6 inches (15 cm) deep.
- If your soil tends to be heavy or poorly drained, adding some compost or well-rotted organic matter can improve drainage and provide nutrients for the bulb.
- Place the bulb in the hole with the pointed end facing up. If you’re planting multiple bulbs, space them according to the recommended spacing guidelines for the specific variety.
- Backfill the hole with soil, gently firming it around the bulb to remove any air pockets. Avoid compacting the soil too tightly, as this can hinder the bulb’s growth.
- Water the newly planted bulbs thoroughly to settle the soil and provide initial moisture. Be careful not to overwater, as excessive moisture can lead to bulb rot.
- Mulch the area around the planted bulbs with a layer of organic mulch, such as shredded bark or straw. This will help conserve moisture, suppress weeds, and regulate soil temperature.
- Continue to water the bulbs regularly, especially during dry spells, to keep the soil slightly moist. However, be cautious not to overwater, as bulbs can rot in overly saturated soil.
- Monitor the growth of your bulbs and provide support, such as staking, for taller-growing varieties if needed.
By following these steps, you can ensure that your bulbs are planted correctly and have the best possible start for optimal growth and beautiful blooms in your garden.
Common mistakes to avoid when planting bulbs
While planting bulbs can be a rewarding and straightforward task, there are some common mistakes that gardeners make. By being aware of these mistakes, you can avoid them and set your bulbs up for success:
- Planting bulbs upside down: This is perhaps one of the most common mistakes. Always remember to plant bulbs with the pointed end facing up, as this is where the shoot will emerge from. Planting bulbs upside down can lead to failure to sprout or stunted growth.
- Planting bulbs too shallow or too deep: Each type of bulb has specific planting depth requirements. Planting bulbs too shallow may expose them to harsh weather conditions, while planting them too deep can prevent the shoot from reaching the surface. Follow the recommended planting depth for each bulb variety.
- Planting bulbs in poor soil: Bulbs require well-draining soil rich in nutrients. Avoid planting bulbs in heavy clay or compacted soil, which can hinder root development and drainage. Improve the soil by adding organic matter or compost to create a favorable growing environment for the bulbs.
- Overwatering or underwatering: Proper moisture levels are crucial for bulb health. Overwatering can lead to bulb rot, while underwatering can cause stunted growth and drying out. Find the right balance by keeping the soil slightly moist, but not saturated. Adjust watering based on weather conditions and the bulb’s moisture requirements.
- Not protecting bulbs from pests: Some critters, such as squirrels, rabbits, or deer, may find bulbs to be an irresistible treat. Protect your bulbs by using deterrents, such as wire mesh or scent repellents, to prevent them from being eaten. Alternatively, consider planting bulbs that are less appealing to pests.
- Disrupting bulb foliage after blooming: After bulbs have finished blooming, it’s important to let the foliage die back naturally. The leaves collect energy that is stored in the bulb for future growth. Cutting back the foliage too early can weaken the bulb and reduce the number of flowers in the following season.
- Not providing sufficient winter protection: Some bulbs may need additional winter protection, especially in colder climates. Mulching over the planting area can help insulate the bulbs and protect them from freezing temperatures.
By avoiding these common mistakes, you can maximize the chances of your bulbs thriving and producing beautiful blooms year after year.
Tips for successful bulb planting
To ensure successful bulb planting and a vibrant garden filled with blooms, consider the following tips:
- Choose high-quality bulbs: Select bulbs that are firm, plump, and free from any signs of damage or disease. High-quality bulbs are more likely to produce healthy plants and beautiful flowers.
- Plant at the right time: Different bulbs have different planting seasons. Follow the recommended planting times for each bulb variety to ensure optimal growth and blooming.
- Group bulbs together: Planting bulbs in clusters or drifts rather than individual scattered plants creates more impact and provides a stunning display of color in your garden.
- Consider varying bloom times: To extend the flowering season, choose bulbs with different bloom times. This way, you can enjoy continuous blooms throughout the spring, summer, or fall.
- Provide adequate spacing: Follow the recommended spacing guidelines for each bulb variety. Proper spacing allows bulbs to grow and spread without crowding, ensuring better air circulation and reducing the risk of diseases.
- Add organic matter: Incorporate compost or well-rotted organic matter into the soil before planting bulbs. This improves soil structure, enhances drainage, and provides essential nutrients for healthy bulb growth.
- Feed bulbs during the growing season: Apply a balanced, slow-release fertilizer or bulb-specific fertilizer during the growing season to provide additional nutrients for robust growth and abundant blooms.
- Protect bulbs from pests: Use deterrents such as netting or wire mesh to prevent pests from digging up or eating your bulbs. Consider planting pest-resistant bulb varieties.
- Label bulb locations: To avoid accidentally disturbing bulbs during other gardening activities, mark the planting locations with labels or temporary markers. This will help you track their growth and prevent accidental damage.
- Monitor watering: Check the moisture level of the soil regularly and adjust watering accordingly. Bulbs generally prefer slightly moist soil, so be careful not to overwater.
- Enjoy the process: Bulb planting is a labor of love and a rewarding activity. Take time to appreciate the beauty and excitement of watching your bulbs grow and bloom into magnificent flowers.
By following these tips, you can ensure the success of your bulb planting endeavors and create a stunning garden that bursts with color and beauty.
Conclusion
Planting bulbs correctly is a fundamental step in creating a vibrant and breathtaking ornamental garden. By understanding the importance of planting bulbs with the correct orientation and considering the factors that contribute to successful growth, you can ensure that your bulbs thrive and produce an abundance of beautiful flowers.
Remember to identify the correct end of the bulb, whether it’s the pointed tip or the presence of roots at the base, before planting. Take into account factors such as sunlight, soil type, moisture levels, and planting depth to provide the best growing conditions for your bulbs.
Following a step-by-step guide, avoid common mistakes, and incorporate tips for successful bulb planting will greatly increase the chances of a stunning garden display. Ensure that you choose high-quality bulbs, plant them at the right time, and provide adequate spacing and proper nutrition for optimal growth.
By implementing strategies to protect bulbs from pests and providing seasonal care, you can safeguard their health and longevity. Regular monitoring of watering needs and appreciation of the process will further contribute to the success and enjoyment of your bulb planting endeavors.
Embrace the beauty and diversity that ornamental gardening can bring to your outdoor space. Planting bulbs correctly is the foundation for creating a captivating landscape that will delight you and anyone who sets eyes on it. So, roll up your sleeves, get your hands dirty, and embark on the journey of creating a breathtaking bulb-filled garden.
