Home>Garden Design>How To Make Backyard Ice Rink
Garden Design
How To Make Backyard Ice Rink
Published: August 5, 2023
Learn how to create a stunning backyard ice rink with our expert landscape design tips. Transform your outdoor space into a winter wonderland for endless hours of skating fun.
(Many of the links in this article redirect to a specific reviewed product. Your purchase of these products through affiliate links helps to generate commission for Chicagolandgardening.com, at no extra cost. Learn more)
Table of Contents
Introduction
Welcome to the world of backyard ice rinks! There’s something truly magical about being able to lace up your skates and glide effortlessly across your very own frozen oasis. Whether you’re a hockey enthusiast, a figure skater, or just a casual ice skater, having a backyard ice rink is a dream come true.
Creating a backyard ice rink is the perfect way to enjoy the winter season and make lasting memories with family and friends. Not only does it provide endless entertainment, but it also encourages outdoor activities and promotes physical fitness.
Building your own ice rink might seem like a daunting task, but with the right guidance and a little bit of effort, you can turn your backyard into a winter wonderland. This comprehensive guide will walk you through the step-by-step process of building and maintaining your very own backyard ice rink.
From selecting the perfect location to filling the rink with water, we will cover everything you need to know to ensure success. So, grab your warmest winter gear and get ready to embark on this exciting journey!
Step 1: Selecting the Right Location
The first and most crucial step in creating a backyard ice rink is selecting the right location. The ideal spot should have a flat surface and ample space to accommodate the size of the rink you desire. Here are a few tips to help you choose the perfect location:
- Evaluate the space: Take a close look at your backyard and determine the area that is best suited for an ice rink. Avoid areas with slopes or uneven ground, as this can make it difficult to create a level surface for your rink. Additionally, ensure that the space is large enough to accommodate the size of the rink you plan to build.
- Consider sun exposure: Take note of how the sun moves across your yard during the winter months. It’s important to choose a location that receives a good amount of sunlight to help with the ice-making process. Ideally, the rink should be positioned in an area that gets several hours of direct sunlight each day.
- Check for nearby trees and obstacles: Take a look at the surrounding landscape and make sure there are no large trees or obstacles that could interfere with the construction of your rink. Overhanging branches can drop leaves and debris onto the ice, making maintenance more challenging. It’s also important to ensure that the location is easily accessible for water supply and maintenance equipment.
- Consider drainage: Pay attention to the natural drainage patterns of your yard. You want to avoid areas prone to pooling water or areas where water will run directly towards your rink, as this can lead to uneven ice surfaces and potential flooding. Choose a location where water can easily drain away from the rink.
Taking the time to carefully assess your backyard and choose the right location will set the foundation for a successful backyard ice rink. Once you’ve found the perfect spot, you can move on to the next steps of preparing the ground and creating your ice rink.
Step 2: Clearing and Leveling the Ground
Now that you’ve chosen the right location for your backyard ice rink, it’s time to prepare the ground. Clearing and leveling the area is crucial for creating a smooth and even ice surface. Follow these steps to ensure proper ground preparation:
- Remove any obstacles: Begin by removing any debris, rocks, or large objects from the area. This includes branches, toys, or anything else that could potentially damage the liner or interfere with the ice-making process.
- Clear away vegetation: Trim or remove any grass, weeds, or vegetation that is present in the area where the ice rink will be located. This will prevent plants from growing through the ice and causing unevenness in the surface.
- Level the ground: Use a shovel, rake, or a leveling tool to even out the ground and remove any bumps or uneven areas. This is essential for creating a smooth and safe skating surface. Pay extra attention to areas where the boards will be installed to ensure a proper fit.
- Compact the soil: After leveling the ground, use a hand tamper or a plate compactor to compact the soil. This will help create a stable and solid base for your ice rink. The more compact the soil, the less likely it is to shift or settle over time.
By clearing and leveling the ground, you are setting the stage for a successful ice rink construction. Taking the time to properly prepare the ground will result in a more enjoyable and long-lasting skating experience for you and your family.
Step 3: Preparing the Base
Once you have cleared and leveled the ground for your backyard ice rink, it’s time to focus on preparing the base. This step is essential for creating a stable foundation that will support the weight of the water and ensure a solid ice surface. Follow these steps to prepare the base:
- Add a layer of gravel: Start by adding a layer of gravel to the entire area where the ice rink will be. This will help with drainage and prevent any water from pooling on the surface. Spread the gravel evenly and use a rake or compactor to ensure a compact and level base.
- Install a vapor barrier: Next, lay down a vapor barrier over the gravel. A vapor barrier, usually a heavy-duty plastic liner, will help prevent moisture from seeping up into the ice and causing potential problems. Make sure to overlap the edges of the liner and secure it in place using stakes or weights.
- Add an insulating layer: To further protect the ice from fluctuating temperatures, consider adding an insulating layer over the vapor barrier. This can be done by using thick foam sheets or insulation boards. The insulation will help retain the cold and prevent the ice from melting too quickly.
- Secure the insulation: If you have chosen to use insulation boards, secure them in place by using stakes or anchors. This will ensure that the insulation remains in position throughout the ice-making process and prevents shifting.
- Double-check the level: Before moving on to the next steps, take a moment to double-check the levelness of the base. Use a level or a straightedge to ensure that the base is even and free from any slopes or dips. This will contribute to a smooth and balanced ice surface.
By properly preparing the base, you are creating a solid foundation for your backyard ice rink. This step is crucial for maintaining the integrity of the ice surface and ensuring a successful ice-making process. With the base prepared, you can now move on to installing the boards and creating the perimeter for your ice rink.
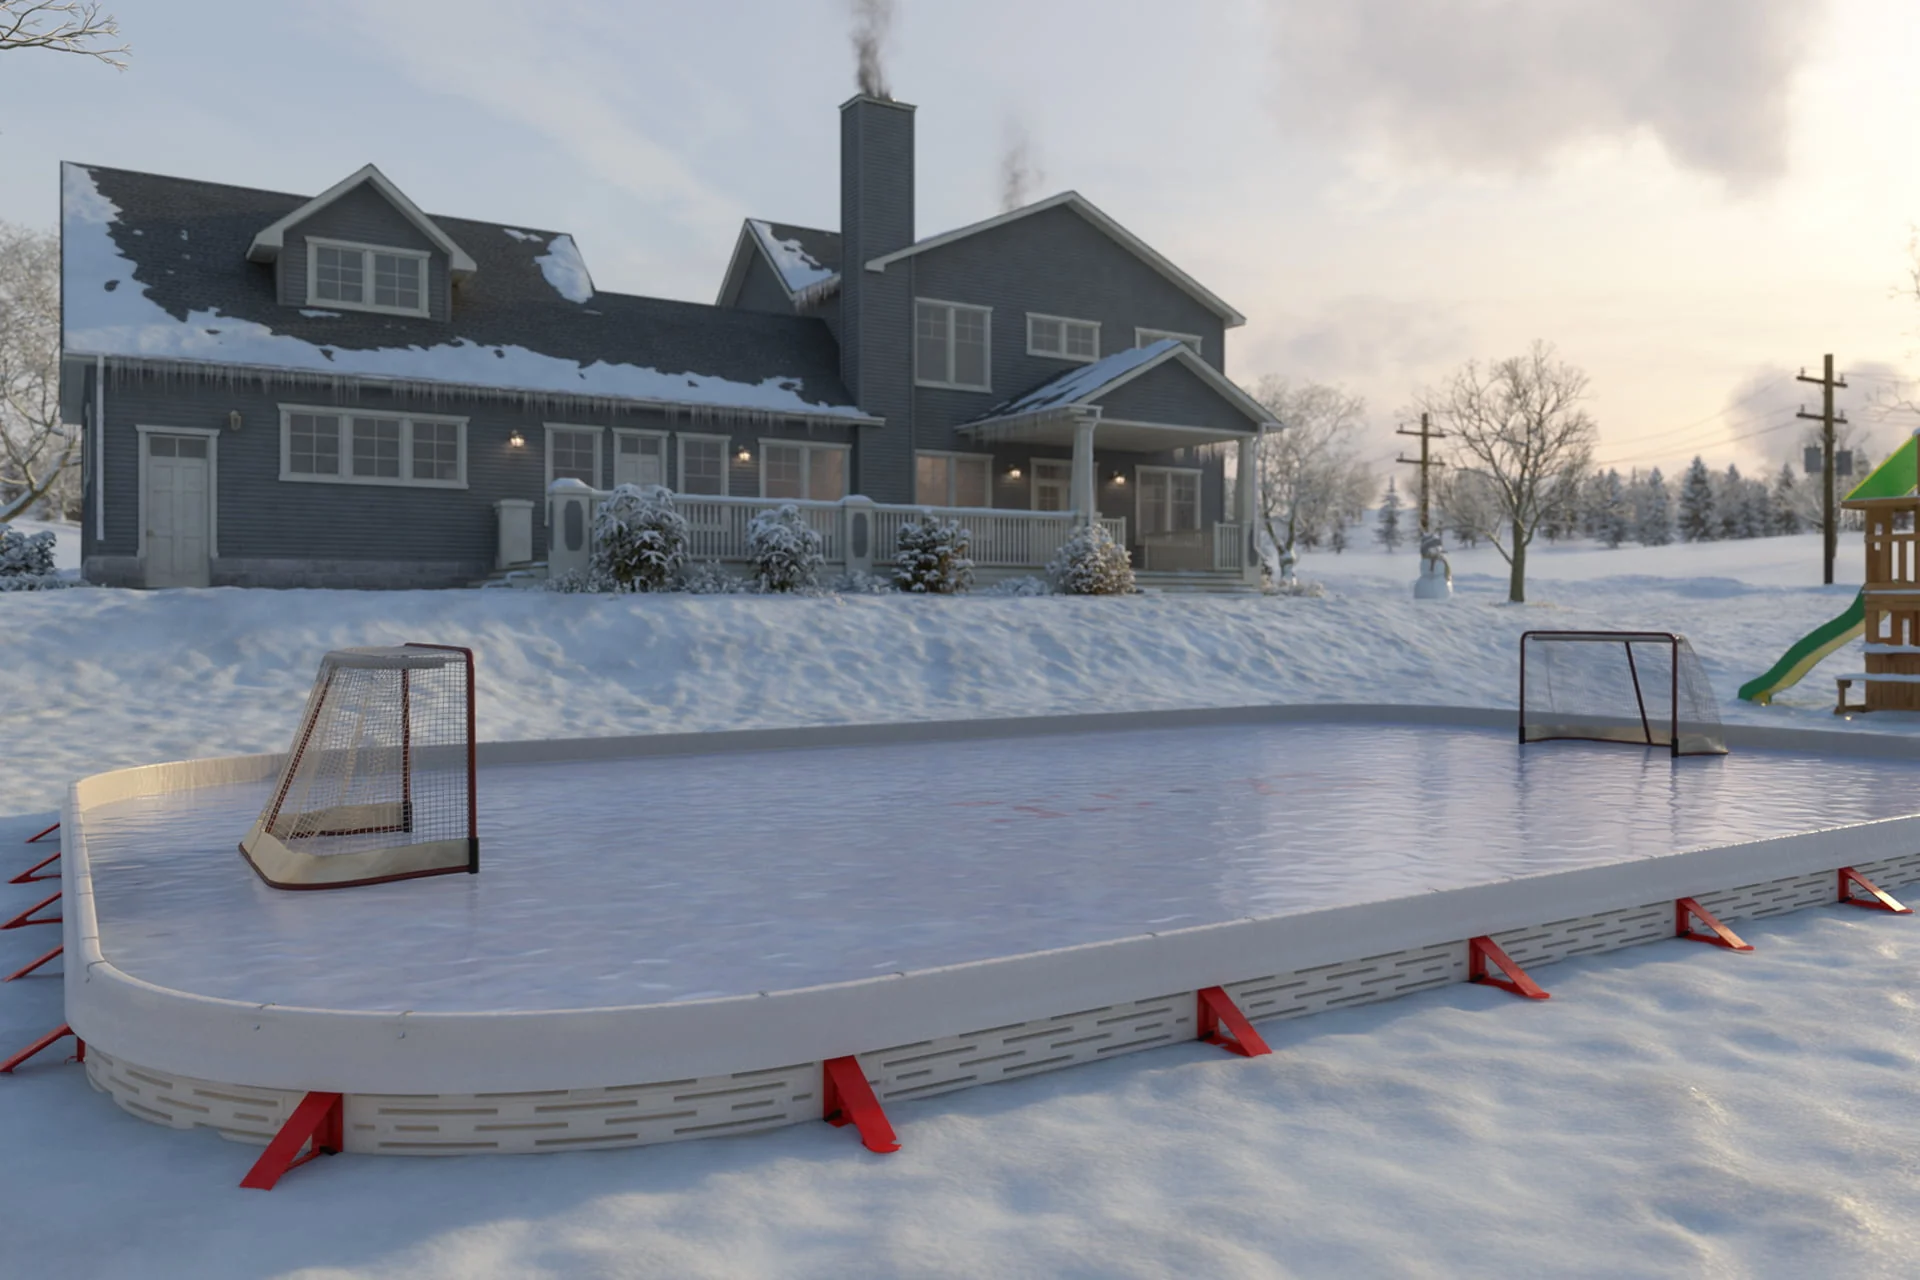
Step 4: Installing the Boards
With the base prepared, it’s time to move on to the next step of building your backyard ice rink: installing the boards. The boards will not only create the perimeter of your rink but also serve as a barrier to contain the ice and prevent it from spilling out. Here’s how you can install the boards:
- Select the right boards: Choose boards that are specifically designed for outdoor ice rinks. These boards are typically made of durable materials like plastic or wood and are designed to withstand freezing temperatures and heavy use.
- Measure and mark the layout: Use a measuring tape to determine the dimensions of your rink and mark the layout on the ground. Make sure to account for the width of the boards when marking the perimeter.
- Install corner anchors: Begin by installing the corner anchors at each corner of the rink. These anchors will hold the boards securely in place. Use a mallet or a hammer to drive the anchors into the ground until they are firmly seated.
- Connect the boards: Connect the boards together using the interlocking mechanism or fastening system provided with the boards. Ensure that they fit tightly and securely to create a solid perimeter. Trim or cut the boards, if necessary, to achieve the desired size and shape of the rink.
- Secure the boards: Once the boards are connected, use additional anchors or stakes to secure them to the ground. This will provide extra stability and prevent them from shifting or coming loose during use.
Installing the boards is an important step in building your backyard ice rink. They not only define the boundaries of your rink but also provide support for the ice and help maintain its shape. Once the boards are securely in place, you can move on to the next step of creating a liner to hold the water in the rink.
Step 5: Creating a Liner
Now that the boards are installed, it’s time to create a liner for your backyard ice rink. The liner will hold the water and prevent it from seeping into the ground. Here’s how you can create a liner:
- Choose the right liner: Select a liner that is specifically designed for use in ice rinks. A high-quality liner will be durable, tear-resistant, and able to withstand freezing temperatures.
- Measure and cut the liner: Measure the dimensions of your rink and cut the liner accordingly, leaving enough material to extend up along the sides of the boards. It’s better to have a slightly larger liner that can be trimmed later than one that is too small.
- Spread the liner: Lay the liner inside the rink, ensuring that it covers the entire area and extends up along the sides of the boards. Smooth out any wrinkles or air pockets to create a flat surface. It can be helpful to use weights or stakes around the perimeter of the liner to hold it in place.
- Secure the liner: Use clips or bungee cords to secure the liner to the boards. This will help keep it in place and prevent it from shifting or tearing when the rink is filled with water. Make sure the liner is taut but not overly stretched.
- Trim excess liner: If there is any excess liner protruding beyond the boards, trim it with scissors or a utility knife. This will give your rink a neater appearance and reduce the risk of tripping or tearing.
Creating a proper liner is crucial for the success of your backyard ice rink. It ensures that the water is contained, minimizes leakage, and helps maintain the integrity of the ice. With the liner in place, you’re ready for the next step: filling the rink with water.
Step 6: Filling the Rink with Water
Now that you have the liner in place, it’s time to fill your backyard ice rink with water. The process of filling the rink requires some careful planning and attention to detail to ensure maximum ice quality. Here’s how you can fill the rink with water:
- Check the weather: Before filling the rink, check the weather forecast for the next few days. It’s best to fill the rink when temperatures are consistently below freezing to promote optimal ice formation.
- Connect the hose: Connect a garden hose to a nearby water source. Make sure the hose is long enough to reach the rink comfortably.
- Begin filling the rink: Start filling the rink with a thin layer of water. This will help create a solid foundation of ice. Avoid adding too much water at once, as it may take longer to freeze and could result in uneven ice.
- Use a sprinkler or nozzle: As the ice layer begins to form, switch to using a sprinkler or nozzle attachment to distribute the water evenly across the surface. This will help prevent weak spots and promote a smoother skating experience.
- Build up the ice layers: Continue adding thin layers of water to gradually build up the ice thickness. Allow each layer to freeze completely before adding the next. This will help create a stronger and more reliable ice surface.
- Monitor the water level: Keep an eye on the water level, making sure it does not exceed the height of the boards. Adjust the water flow as needed to maintain the desired depth. Be cautious not to overfill the rink, as it can lead to flooding or cracking of the ice.
Filling the rink with water is an exciting step in the process of creating your backyard ice rink. By following these steps, you can ensure proper ice formation and enjoy a solid and smooth surface for skating. Once the rink is filled, it’s time for the next step: maintaining the ice rink.
Step 7: Maintaining the Ice Rink
Once your backyard ice rink is filled with water and frozen, it’s important to maintain it properly to ensure optimal ice conditions. Regular maintenance will help keep the ice smooth, safe, and enjoyable for skating. Here are some essential steps to maintain your ice rink:
- Clear snow and debris: After each snowfall, remove any snow from the surface of the ice using a shovel, broom, or snow blower. Clearing the snow will prevent it from accumulating and weighing down the ice, which can cause it to become uneven or weaken.
- Fix minor cracks and holes: Inspect the ice regularly for any minor cracks or holes. Fill these areas with snow or slush and smooth them out to ensure a seamless skating surface. This will help prevent accidents and maintain the integrity of the ice.
- Maintain the ice thickness: Monitor the thickness of the ice regularly. In colder climates, aim for a minimum thickness of 4-6 inches to ensure it can support the weight of skaters. If the ice starts to melt or becomes too thin, add additional layers of water to build it up again.
- Monitor temperature and freeze times: Keep an eye on the weather and the temperature. Freezing times may vary depending on the temperature and conditions. Adjust the frequency of adding water accordingly to maintain a consistent and solid ice surface.
- Properly maintain the boards and liner: Inspect the boards and liner regularly for any damage or wear. Repair or replace any damaged sections promptly. Ensure that the liner remains securely attached to the boards and that there are no tears or leaks that could compromise the ice.
- Practice good ice hygiene: Encourage skaters to clean off their skates before stepping onto the ice to prevent debris and dirt from being brought onto the rink. Avoid using chemicals or salt on the ice, as they can damage the surface and affect ice quality.
- Provide proper lighting: If you plan to use the ice rink during the evening, ensure there is adequate lighting to provide safe and enjoyable skating conditions. Install outdoor lights or use portable lighting options to illuminate the rink area.
Maintaining your ice rink is an ongoing process throughout the winter season. By following these maintenance steps, you can enjoy a smooth and safe skating experience and prolong the lifespan of your backyard ice rink.
Step 8: Enjoying Your Backyard Ice Rink
After all the hard work and careful maintenance, it’s time to reap the rewards and enjoy your backyard ice rink to the fullest. Here are some tips to help you make the most of your ice rink:
- Organize skating activities: Invite family and friends over for some memorable skating sessions. Organize fun activities like hockey games, figure skating routines, or simply enjoying a leisurely skate together. Encourage everyone to bring their skates and create wonderful memories on the ice.
- Host themed events: Spice up your ice rink experience by hosting themed events. Consider hosting a winter wonderland party, a skating under the stars night, or even a mini ice show. Get creative and make it an unforgettable experience for everyone involved.
- Create a cozy ambiance: Set up some benches, chairs, or even a small fire pit near the rink to create a cozy and inviting atmosphere. Provide warm blankets, hot beverages, and snacks to keep everyone comfortable and cozy during breaks from skating.
- Document the moments: Capture the beautiful moments on the ice rink by taking photos and videos. Create a scrapbook or share them on social media to cherish the memories for years to come. Documenting the fun will help remind you of the joys the ice rink brings.
- Continue maintenance: Even as you enjoy your ice rink, remember to continue with regular maintenance. Clear snow, repair any damages promptly, and monitor the ice thickness to ensure a safe and well-maintained skating surface.
- Stay safe: Safety is paramount when using the ice rink. Remind all skaters to wear appropriate safety gear, such as helmets and elbow pads, and to skate responsibly. Establish rules for usage and ensure supervision for younger skaters.
- Invite neighbors and community: Spread the joy of your backyard ice rink by inviting neighbors and members of your community to enjoy it as well. Consider hosting a skating day for your neighborhood or offering skating lessons to beginners. Sharing your rink with others will bring a sense of community spirit and enjoyment.
Now, it’s time to embrace the excitement and joy of having your very own ice rink in your backyard. Celebrate the hard work you put into building and maintaining it by creating wonderful memories and enjoying countless hours of skating and laughter with loved ones.
Conclusion
Congratulations! You have successfully learned how to create and maintain your own backyard ice rink. By following the step-by-step guide, you have transformed your outdoor space into a winter paradise for skating and fun. Building a backyard ice rink requires careful planning, preparation, and regular maintenance, but the rewards are well worth the effort.
Remember to select the right location, clear and level the ground, prepare a solid base, install the boards, create a liner, fill the rink with water, maintain the ice, and, most importantly, enjoy the fruits of your labor. Your backyard ice rink will provide countless hours of enjoyment, laughter, and memories for you, your family, and friends.
As you skate under the winter sky, surrounded by the glistening ice, take a moment to appreciate the beauty and wonder of your creation. Embrace the joy of gliding effortlessly on your very own ice rink, whether it’s playing a game of hockey, practicing figure skating skills, or simply enjoying the freedom of ice skating.
Remember to continue monitoring and maintaining your ice rink throughout the season, ensuring its longevity and safety. Share the joy with others by inviting neighbors and members of your community to experience the magic of your backyard ice rink.
Creating a backyard ice rink is not only a fun and exhilarating project, but it also brings people together and encourages outdoor activities during the winter season. So, grab your skates, bundle up in warm winter gear, and embrace the adventure of having your own backyard ice rink.
Get ready to make lifelong memories, enjoy quality time with loved ones, and experience the thrill of skating right in your own backyard. Happy skating!