Home>Gardening Techniques>DIY Projects>How To Make A Putting Green In The Backyard
DIY Projects
How To Make A Putting Green In The Backyard
Published: August 5, 2023
Learn how to create your own DIY putting green in your backyard with our step-by-step guide. Enhance your golfing skills and enjoy the convenience of practicing at home.
(Many of the links in this article redirect to a specific reviewed product. Your purchase of these products through affiliate links helps to generate commission for Chicagolandgardening.com, at no extra cost. Learn more)
Table of Contents
- Introduction
- Step 1: Choosing the Right Location
- Step 2: Clearing and Preparing the Area
- Step 3: Installing the Base Layers
- Step 4: Laying the Putting Green Turf
- Step 5: Securing the Turf in Place
- Step 6: Adding Sand and Infill Material
- Step 7: Creating the Putting Holes
- Step 8: Finishing Touches and Maintenance Tips
- Conclusion
Introduction
Creating a putting green in your backyard can be a rewarding and enjoyable DIY project. Whether you’re an avid golfer looking to practice your short game or simply want to add a unique and functional element to your outdoor space, a backyard putting green is a fantastic addition to any home.
Not only does a putting green provide a convenient way to work on your golf skills without having to leave the comfort of your own property, but it also adds value to your home and creates a beautiful focal point in your backyard.
While it may seem like a daunting task at first, building a putting green in your backyard is actually quite achievable with the right planning, tools, and materials. In this comprehensive guide, we’ll take you through the step-by-step process of creating your very own backyard putting green, from choosing the right location to adding the finishing touches.
So, whether you’re a seasoned DIY enthusiast or a beginner looking to tackle your first major project, get ready to transform your backyard into your own personal golfing oasis. Let’s dive in and learn how to make a putting green in the backyard!
Step 1: Choosing the Right Location
Before you start building your backyard putting green, it’s crucial to choose the right location. Consider the following factors:
- Sunlight: Find an area in your backyard that receives ample sunlight throughout the day. Most putting greens require at least 4-6 hours of direct sunlight to maintain their health and appearance.
- Space: Measure the available space in your yard to determine the size of your putting green. Ideally, you should have a minimum of 15×20 feet for a smaller green and up to 30×40 feet for a larger one. Ensure there is enough space for other features like fringe areas, chipping areas, and walking paths.
- Surface: Choose a flat and level area for your putting green. Avoid slopes or areas with excessive drainage issues as they can negatively affect the performance of the green.
- Aesthetics: Consider the overall aesthetics of your backyard and how the putting green will fit in with the surrounding landscape. You want a location that enhances the visual appeal of your outdoor space.
- Accessibility: Keep in mind the accessibility of the putting green. You want it to be easily accessible from your house and other areas of your yard.
Once you’ve taken these factors into account, mark the chosen location using stakes and string to outline the perimeter of your putting green. This will give you a clear idea of the space you have to work with and serve as a guide as you move on to the next steps in the process.
Step 2: Clearing and Preparing the Area
With your location selected, it’s time to clear and prepare the area for your backyard putting green. Follow these steps:
- Remove any existing grass, weeds, or debris from the designated area. Use a shovel or a sod cutter to strip away the top layer of grass.
- Once the area is cleared, inspect the soil. Ensure it is free from rocks, roots, and any other obstacles that may interfere with the installation process.
- Grade the area to ensure proper drainage. Use a rake to level the soil and create a slight slope away from the center of the putting green to prevent water from pooling.
- Compact the soil using a tamper or plate compactor. This will help create a firm and stable base for your putting green.
- Finally, install landscape fabric over the entire area. This will act as a weed barrier and prevent any unwanted growth from penetrating the putting green.
By clearing and preparing the area properly, you are setting the foundation for a successful installation and ensuring the long-term durability and performance of your backyard putting green.
Step 3: Installing the Base Layers
Once the area is cleared and prepared, it’s time to install the base layers for your backyard putting green. Follow these steps:
- Start by adding a layer of crushed gravel to the area. This will provide stability and improve drainage. Spread the gravel evenly and compact it using a tamper or plate compactor.
- Next, add a layer of finely crushed limestone on top of the gravel. This layer will further enhance drainage and provide a solid base for the putting green turf.
- Using a rake or leveling board, ensure that the surface is smooth and level. Take your time during this step as it’s essential to achieve a flat and even base for optimal putting performance.
- Water the base layers lightly to settle them and make them more compact.
- Allow the base layers to settle and dry completely before moving on to the next step. This may take a few days, so be patient.
The installation of the base layers is a critical step in creating a stable and level surface for your putting green. Taking the time to properly install and compact these layers will ensure the longevity and performance of your backyard putting green.
Step 4: Laying the Putting Green Turf
Now that the base layers are fully settled and dry, it’s time to lay the putting green turf. Here’s how to do it:
- Measure the dimensions of your putting green area and order the appropriate amount of putting green turf. Make sure to select a high-quality synthetic turf specifically designed for putting greens.
- Roll out the putting green turf over the prepared base layers. Start from one end and work your way to the other, ensuring that the turf is stretched and fitted properly along the way.
- Using a utility knife, carefully trim off any excess turf along the edges to achieve a clean and seamless look.
- Overlap the edges of each turf section by a few inches and secure them together using turf adhesive or tape. This will ensure a secure and durable installation.
- Smooth out the turf surface using a broom or power brush to get rid of any wrinkles or uneven areas. This will help create a smooth and consistent putting surface.
As you lay the putting green turf, pay attention to any patterns or grain directions specified by the manufacturer. Following these instructions will ensure optimal playing conditions and minimize any potential challenges when using the putting green.
With the putting green turf laid out and secured, your backyard project is starting to take shape. The inviting green surface sets the stage for endless hours of enjoyment and practice sessions right in the comfort of your own home.
Step 5: Securing the Turf in Place
Once the putting green turf is laid out, it’s important to secure it in place to ensure it stays in position and maintains its integrity over time. Follow these steps to properly secure the turf:
- Use landscape spikes or turf nails to secure the edges of the putting green turf to the ground. Space the spikes or nails approximately 6-8 inches apart along the perimeter.
- Drive the spikes or nails into the ground at an angle, ensuring they go through both the turf and the base layers beneath for maximum stability.
- Avoid overdriving the spikes or nails, as this can cause damage to the turf. Simply drive them in enough to secure the turf firmly in place.
- Check for any loose spots or areas where the turf may have shifted. Use additional spikes or nails to secure these areas as needed.
By securing the putting green turf properly, you’ll prevent any potential movement or wrinkles that may affect the playability and aesthetics of your backyard putting green. Take your time during this step to achieve a secure and stable installation.
Once the turf is securely in place, take a moment to step back and admire the progress you’ve made. Your backyard is transforming into a functional and beautiful space where you can practice your golf skills and enjoy leisurely moments outdoors.
Step 6: Adding Sand and Infill Material
To further enhance the performance and aesthetics of your backyard putting green, it’s time to add sand and infill material. Follow these steps:
- Spread a thin layer of silica sand across the surface of the putting green. Use a push broom or a power brush to evenly distribute the sand and brush it into the fibers of the turf.
- The sand helps to stabilize the fibers, prevent matting, and provide a more natural ball roll. Use enough sand to fill in any remaining gaps between the fibers without overdoing it.
- Once the sand is evenly distributed, use a power broom or a stiff-bristled brush to brush the turf in different directions. This will help the sand settle into the fibers and create a consistent playing surface.
- Add infill material on top of the sand. Infill material can be made of rubber pellets, crumb rubber, or a combination of materials. This layer adds cushioning, mimics the feel of real grass, and helps control the speed of the ball.
- Spread the infill material evenly using a drop spreader or a shovel. Then, use a power broom or a stiff-bristled brush to work the infill material into the turf fibers. This will ensure proper distribution and integration.
Adding sand and infill material is crucial for creating a realistic and functional playing surface on your backyard putting green. The combination of sand and infill enhances the overall experience and makes the green more enjoyable to play on.
Take your time during this step to ensure the sand and infill material are evenly distributed and properly applied. This attention to detail will result in a professional-looking putting green that performs exceptionally well.
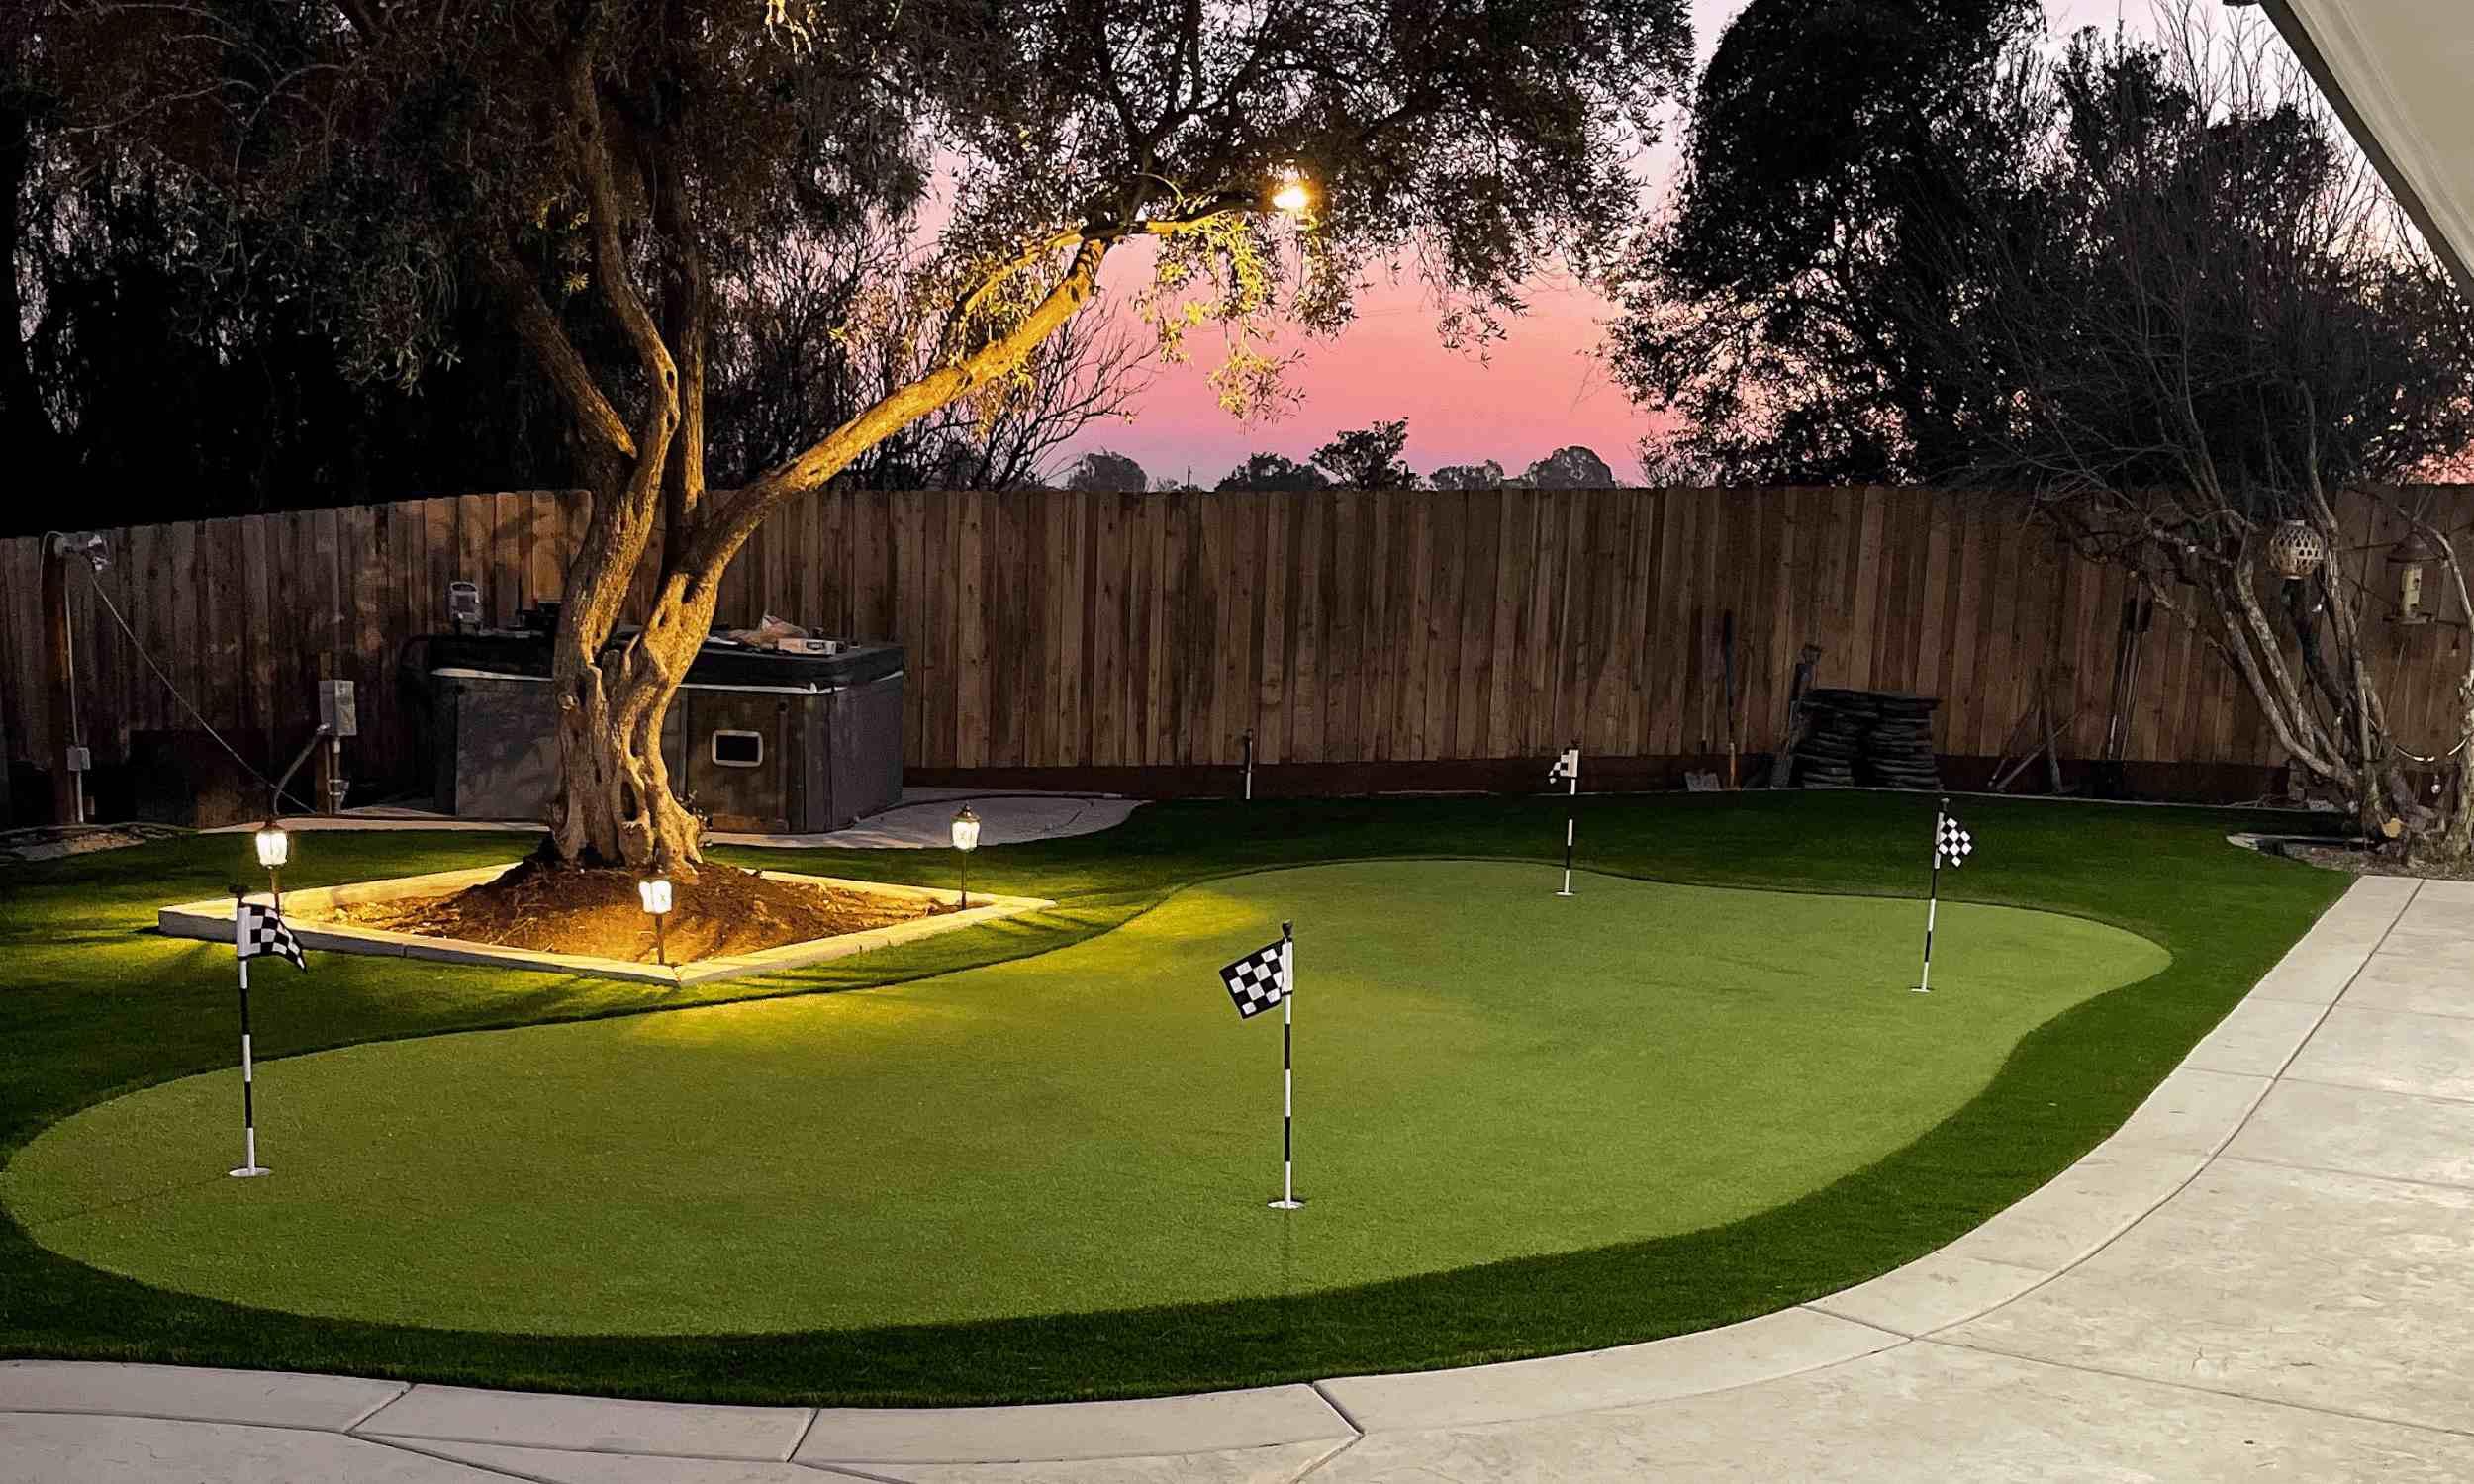
Step 7: Creating the Putting Holes
Now that your backyard putting green is almost complete, it’s time to create the putting holes. This step adds the finishing touch and brings the true essence of a putting green to life. Follow these steps:
- Select the location for your putting holes. Ideally, you should have multiple holes to add variety and challenge to your practice sessions. Place the holes in strategic positions across the putting green.
- Use a cup cutter or a hole saw to create the holes. These tools cut through the turf and base layers, leaving a perfectly round hole.
- Remove the excess material from the hole and clean up any debris or loose pieces.
- Insert a putting cup into each hole. The cups should fit snugly into the holes and be level with the surface of the putting green.
- Secure the putting cups in place using adhesive or turf nails, ensuring they are firmly anchored.
- Smooth out the edges of the holes to ensure a seamless transition between the turf and the cups.
Creating the putting holes is an exciting step as it’s the point where your backyard putting green truly resembles a professional course. Customize the hole locations to challenge yourself and add variety to your practice sessions.
Once the putting holes are in place, take a moment to step back and admire your handiwork. Your backyard has been transformed into a mini-golf oasis, ready to provide endless fun and improvement to your golf game.
Step 8: Finishing Touches and Maintenance Tips
With your backyard putting green complete, there are a few finishing touches that can further enhance its appearance and longevity. Here are some key finishing touches and maintenance tips to keep in mind:
- Add fringe areas around the perimeter of your putting green to create a more natural and realistic look. Use artificial turf or real grass to mimic the transition areas found on professional golf courses.
- Consider adding chipping areas or bunkers to practice your short game skills. These features can be created using additional turf or sand, providing a versatile practice space right in your backyard.
- Regularly brush the turf using a power broom or a stiff-bristled brush to keep it looking fresh and upright. This will help prevent matting and maintain optimal ball roll.
- Remove any debris, leaves, or twigs from the putting green using a leaf blower or a rake. Keeping the surface clean will ensure an uninterrupted gameplay experience.
- Periodically inspect the putting green for any signs of wear or damage. Fix any loose edges, repair damaged sections, or replace any worn-out turf as needed.
- Keep the putting green well-watered, especially during hot and dry periods. This will help maintain the vibrancy and softness of the turf.
- Consider using a golf hole cover when the putting green is not in use. This will protect the cups from debris and maintain their integrity over time.
Regular maintenance and care are essential for preserving the beauty and functionality of your backyard putting green. By following these tips, you can ensure that your putting green will provide years of enjoyment and improvement to your golf game.
Conclusion
Congratulations! You have completed the process of creating your very own backyard putting green. By following the step-by-step guide outlined in this article, you have transformed your outdoor space into a personal golfing oasis.
Building a putting green in your backyard not only provides a convenient and enjoyable way to practice your golf skills but also adds value to your home and creates a beautiful focal point in your outdoor area.
Remember to choose the right location, clear and prepare the area, install the base layers, lay the putting green turf, secure it in place, add sand and infill material, create the putting holes, and finish off with the necessary touches and maintenance tips.
With your backyard putting green complete, you can enjoy endless hours of practice, hone your short game, and impress your friends and family with your golfing skills. Plus, the convenience of having a putting green at home means you can practice anytime without having to travel to a golf course.
So, go ahead and invite your golf buddies over for a friendly competition or enjoy some relaxing putting practice on your own. Embrace the enjoyment and benefits that come with having a backyard putting green right at your doorstep.
Remember to take care of your putting green by following the recommended maintenance tips to ensure its durability and longevity. With proper care, your backyard putting green will continue to provide years of enjoyment for you and your loved ones.
Now, get ready to enhance your golf skills, have fun, and make lasting memories in your own backyard putting green!