Home>Gardening Techniques>DIY Projects>How To Compost Indoors Without Worms
DIY Projects
How To Compost Indoors Without Worms
Modified: January 22, 2024
Learn how to compost indoors without worms in this easy DIY project. Start reducing waste and creating nutrient-rich soil for your plants.
(Many of the links in this article redirect to a specific reviewed product. Your purchase of these products through affiliate links helps to generate commission for Chicagolandgardening.com, at no extra cost. Learn more)
Table of Contents
- Introduction
- Why Compost Indoors?
- Materials Needed
- Selecting a Composting Container
- Choosing the Right Location
- Preparing the Composting Container
- Composting without Worms: The Basics
- What to Compost Indoors
- Maintaining Moisture Level
- Turning the Compost
- Controlling Odor
- Troubleshooting Common Issues
- Harvesting Compost
- Using the Compost
- Conclusion
Introduction
Composting is a simple and effective way to reduce waste and create nutrient-rich soil for your plants. While traditional composting methods often involve outdoor bins and the use of worms, it is also possible to compost indoors without worms. This alternative method is perfect for those who live in apartments, have limited outdoor space, or simply prefer to keep their composting activities contained.
Composting indoors offers numerous benefits. Not only does it allow you to take advantage of kitchen scraps and other organic waste, but it also helps to decrease the amount of waste that ends up in landfills. Additionally, indoor composting provides you with a convenient source of compost that can be used to nourish potted plants, herb gardens, or even seedlings.
In this article, we will explore how to compost indoors without the use of worms. We will provide you with step-by-step guidance on setting up your composting container, selecting the right location, and maintaining the composting process. Whether you are new to composting or have prior experience, this guide will help you successfully compost indoors and reap the benefits of nutrient-rich soil.
Why Compost Indoors?
Composting indoors offers several advantages that make it an attractive option for many individuals. Here are some compelling reasons to consider composting indoors:
1. Limited Outdoor Space: One of the main reasons people choose to compost indoors is the lack of outdoor space. If you live in an apartment or condominium without access to a backyard, indoor composting allows you to participate in this eco-friendly practice without the need for a dedicated outdoor compost pile.
2. Convenience: Indoor composting is incredibly convenient, especially for those who frequently cook or generate kitchen scraps. With an indoor composting system, you can easily collect and compost organic waste right in your kitchen, eliminating the need for trips to an outdoor compost bin. This convenience encourages consistency and reduces the chances of waste ending up in the landfill.
3. Year-round Composting: Indoor composting allows you to compost all year round, regardless of the weather conditions outside. Traditional outdoor composting can be challenging during colder months or in areas with harsh winters. By composting indoors, you can maintain a steady composting process and continue to produce nutrient-rich soil for your plants, regardless of the season.
4. Odor Control: Indoor composting systems are designed to control odors effectively. With proper maintenance and adherence to best practices, you can minimize unpleasant smells that are often associated with outdoor compost piles. This makes indoor composting a more viable option for individuals who live in close proximity to neighbors or have sensitivity to odors.
5. Composting with Limited Resources: Indoor composting can be achieved with minimal resources. Although outdoor composting typically requires a larger compost bin or pile, indoor composting can be done in compact containers that can fit on a kitchen countertop or in a cabinet. This makes it a feasible option for individuals with limited space or resources.
By composting indoors, you not only reduce your carbon footprint but also transform kitchen scraps and other organic waste into nutrient-rich soil. This process not only benefits the environment but also provides you with a sustainable source of compost that can improve the health and productivity of your plants.
Materials Needed
To successfully compost indoors without worms, you’ll need a few essential materials. Here’s a list of what you’ll need to get started:
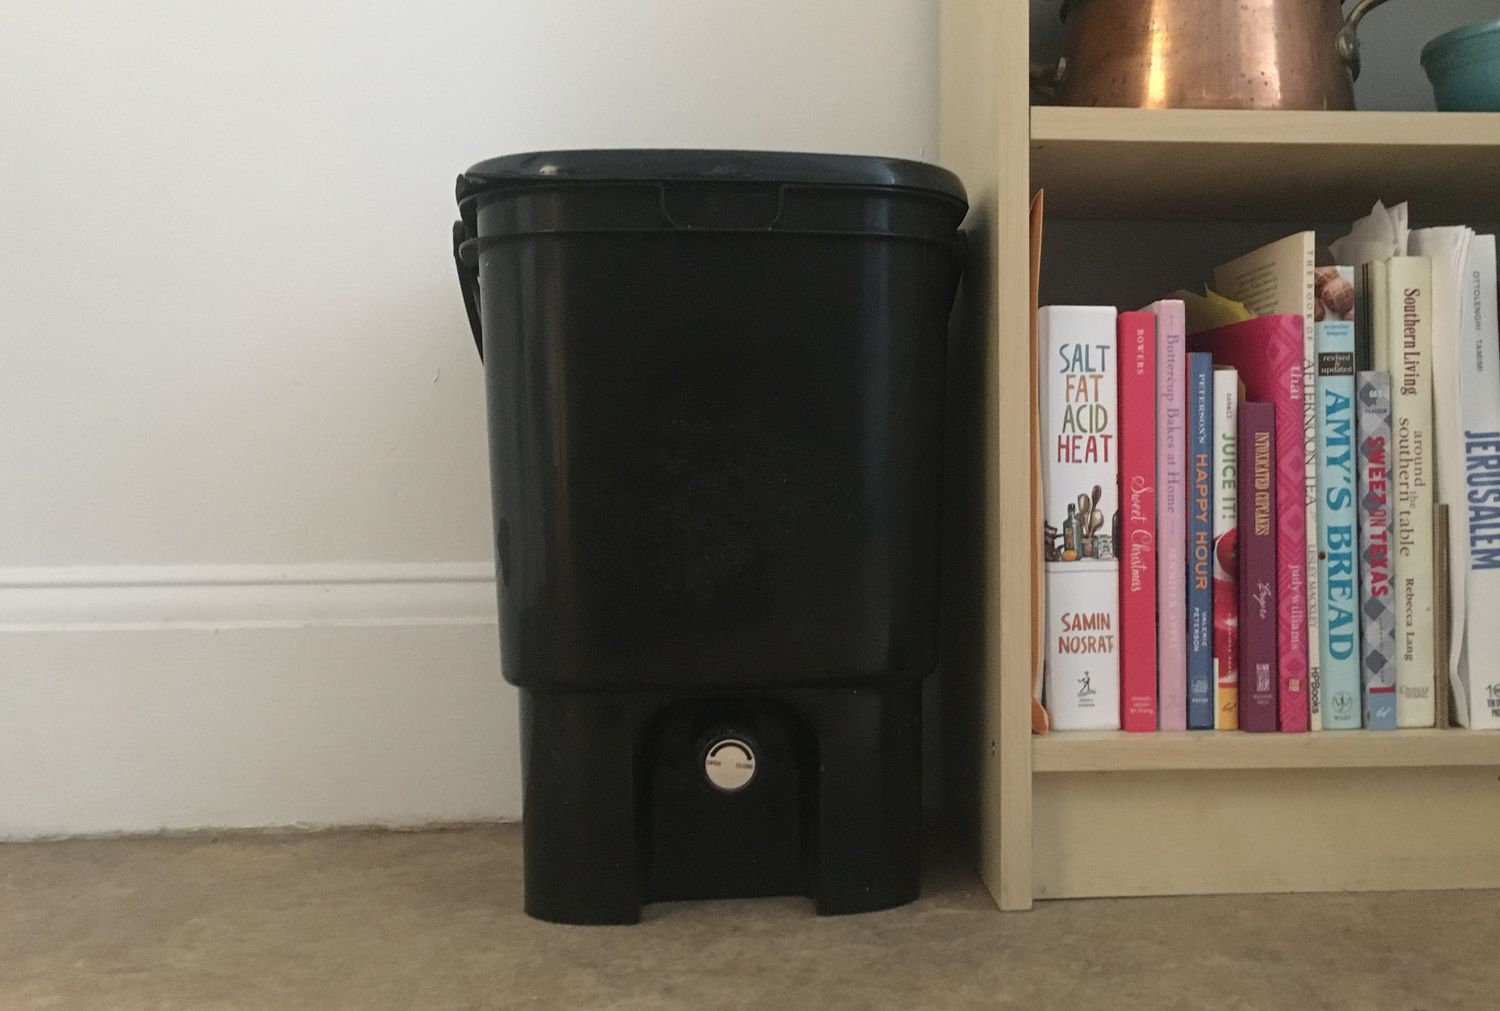
- Composting Container: Choose a container that is suitable for indoor composting. It should be made of a non-porous material, such as plastic or ceramic, and have a lid to help control odors. The size of the container will depend on the amount of waste you generate and the available space in your home.
- Brown and Green Materials: For a successful composting process, you’ll need a balance of brown and green materials. Brown materials include dry leaves, shredded newspaper, and cardboard, while green materials consist of fruit and vegetable scraps, coffee grounds, and tea leaves. Aim for a ratio of roughly 3 parts brown to 1 part green.
- Compost Starter: While not essential, a compost starter can help speed up the composting process by introducing beneficial microorganisms. You can purchase a compost starter from a garden center, or simply use a handful of finished compost or soil from your garden to add beneficial microbes to your indoor compost.
- Aeration Tool: To ensure proper airflow and compost decomposition, you’ll need an aeration tool. This can be a small garden fork, a compost turner, or even a long-handled spoon. It’s essential to regularly turn or mix the compost to facilitate decomposition and prevent any foul odors.
- Water Spray Bottle: Maintaining the right level of moisture is crucial for successful composting. A water spray bottle will allow you to add small amounts of water as needed to keep the compost moist, but not overly saturated.
- Labels and Marker: It’s a good idea to label your compost container to avoid confusion and keep track of when the compost was started. Use a marker to clearly write the start date and any additional notes or reminders on the container.
These materials will provide you with the basics to begin composting indoors without worms. Once you have gathered all the necessary materials, you can proceed to select a suitable composting container and prepare it for the composting process.
Selecting a Composting Container
Choosing the right composting container is crucial for successful indoor composting. While there are many options available, consider the following factors when selecting your container:
Size: The size of the composting container will depend on the amount of waste you expect to generate and the available space in your home. If you have a small kitchen, opt for a compact container that can fit on the countertop or under the sink. Alternatively, if you have more space, you can choose a larger container that can accommodate a larger volume of compostable materials.
Material: Select a composting container made of a non-porous material, such as plastic, ceramic, or metal. These materials are easy to clean and won’t absorb moisture or odors. Plastic containers are lightweight and affordable, making them a popular choice for indoor composting.
Lid: Make sure that the composting container has a lid. A lid helps to control odors and prevent pests from accessing the compost. It also helps maintain a consistent temperature and moisture level within the container.
Ventilation: Good ventilation is necessary to allow airflow and prevent anaerobic conditions. Look for a composting container with ventilation holes or slots to ensure proper oxygen flow. This will help promote decomposition and prevent foul odors from developing.
Drainage: Some composting containers have a built-in drainage system or a removable tray at the bottom to collect excess moisture. While this feature is not essential, it can help prevent the compost from becoming too wet and promoting the growth of mold or fungi.
Accessibility: Consider how easily you can access the compost when it’s time to add or remove materials. Look for a container with a wide opening or a removable top to facilitate easy access. This will make the process of adding and maintaining the compost more convenient.
Remember, the composting container you choose should align with your specific needs and preferences. It should be functional, easy to clean, and fit within the available space in your home. Once you’ve selected the appropriate container, you can move on to preparing it for the composting process.
Choosing the Right Location
Finding the right location for your indoor composting setup is essential for maintaining an effective and odor-free composting process. Consider the following factors when selecting the location:
Proximity to the Kitchen: Choose a location that is conveniently close to your kitchen. This will make it easier to collect and add kitchen scraps to the composting container. A nearby location reduces the chances of forgetting to compost and encourages regular participation.
Adequate Airflow: Ensure that the chosen location provides adequate airflow for proper composting. Good airflow helps promote decomposition and prevents the development of unpleasant odors. Avoid placing the composting container in a completely enclosed or poorly ventilated area.
Temperature: Composting microorganisms thrive in a temperature range of 50 to 70 degrees Fahrenheit (10 to 20 degrees Celsius). Select a location where the temperature stays within this range, either naturally or through climate control. Avoid extremely cold or hot areas, as they can disrupt the composting process.
Access to Water: Make sure the chosen location has easy access to water. You may need to add small amounts of water to maintain the moisture level in the compost. Having water nearby will make this task more convenient and help ensure the compost remains sufficiently moist.
Stability and Protection: Place the composting container on a stable surface to prevent it from being easily knocked over. Ensure that the location offers protection against accidental spills or leaks, as compost can become messy if not properly contained.
Indoor or Outdoor: While we focus on indoor composting without worms, some individuals may prefer to have their composting container outdoors. If you have a balcony, patio, or outdoor space, you can explore the option of placing the composting container outside, as long as it meets the necessary requirements for successful composting.
Consider these factors when selecting the location for your indoor composting setup. Finding the right location will contribute to the overall success of your composting process by providing optimal conditions for decomposition, odor control, and accessibility. With the right location in place, you can move on to preparing the composting container for use.
Preparing the Composting Container
Before you begin composting indoors without worms, it’s important to properly prepare your composting container. Follow these steps to ensure your container is ready for the composting process:
1. Clean the Container: Start by thoroughly cleaning your composting container with warm soapy water. This will help remove any dirt, residue, or odors that may be present. Rinse the container well and allow it to air dry completely before proceeding.
2. Add a Drainage Layer: If your composting container doesn’t have built-in drainage holes, create a drainage layer at the bottom. This layer can be made of gravel, pebbles, or small stones. It will help prevent excess moisture buildup and promote proper drainage.
3. Add Carbon-Rich Material: Begin by adding a layer of carbon-rich material, also known as brown material, to the composting container. This can include dry leaves, shredded newspaper, or cardboard. Aim for a layer that is about 2 to 3 inches thick. The carbon-rich material will help create aeration and balance the nitrogen-rich materials that will be added later.
4. Moisture Check: Before proceeding further, ensure that the composting container and the added materials are slightly moist but not excessively wet. If needed, lightly mist the materials with water using a spray bottle. It’s important to maintain a moisture level similar to that of a damp sponge throughout the composting process.
5. Add Nitrogen-Rich Material: Layer on top of the carbon-rich material with nitrogen-rich materials, also known as green material. These can include fruit and vegetable scraps, tea leaves, coffee grounds, or fresh grass clippings. Add a layer that is approximately 1 to 2 inches thick.
6. Mix and Repeat: Use an aeration tool, such as a garden fork or a compost turner, to lightly mix and blend the added materials. This promotes air circulation and helps kick-start the decomposition process. Repeat the layering process by alternating between carbon-rich and nitrogen-rich materials until the composting container is nearly full.
7. Cover and Settle: Once your composting container is nearly full, cover the top with a layer of carbon-rich material. This helps to control odors and keep pests away. Gently tap or press down on the materials to settle them and create a uniform surface.
By following these steps, you will effectively prepare your composting container to begin the composting process. With a properly prepared container, you are now ready to start composting without worms. In the next sections, we will explore the basics of composting, the materials suitable for indoor composting, and how to maintain the composting process.
Composting without Worms: The Basics
Composting without worms involves harnessing the power of beneficial microorganisms to break down organic waste into nutrient-rich soil. Here are the basic steps to composting without worms:
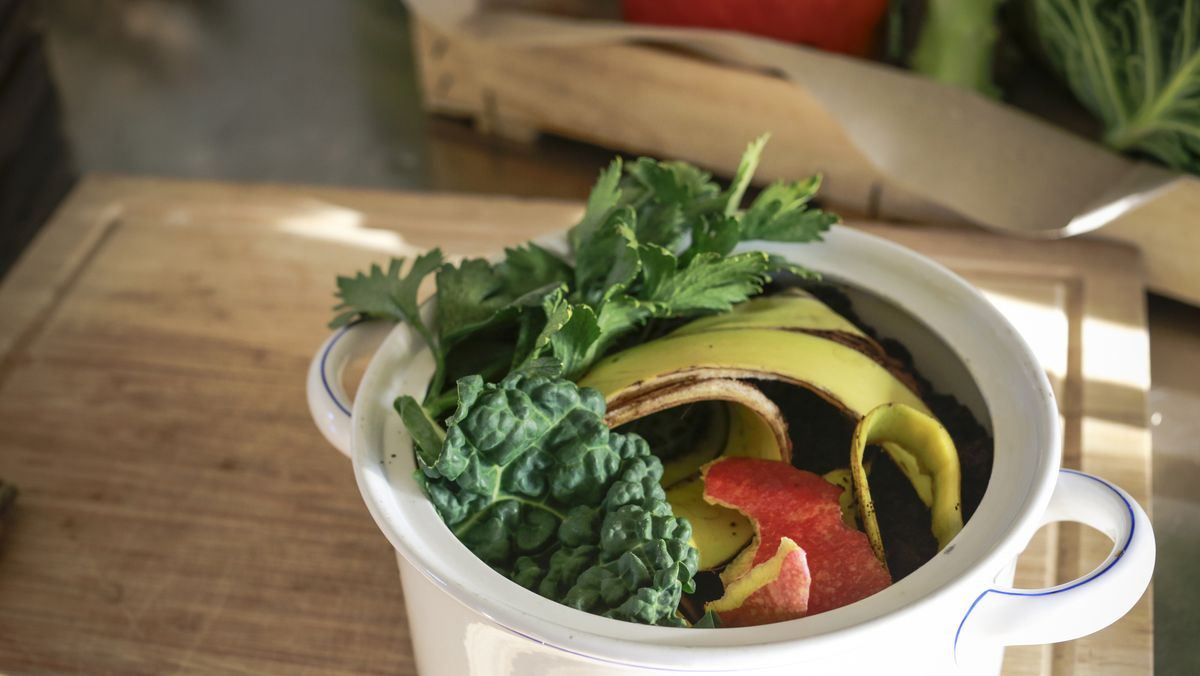
- Add Organic Matter: Start by adding organic matter to the composting container. This includes fruit and vegetable scraps, coffee grounds, tea leaves, and yard waste like grass clippings or dry leaves. Avoid adding meat, dairy products, oily foods, or anything that may attract pests.
- Layer in Carbon-Rich and Nitrogen-Rich Materials: Create layers of carbon-rich (brown) and nitrogen-rich (green) materials. The carbon-rich materials, such as shredded newspaper or cardboard, provide aeration and balance the moisture. The nitrogen-rich materials, like fruit scraps or grass clippings, have nutrients that aid in decomposition.
- Maintain Moisture: It’s crucial to maintain the right moisture level in the compost. Check the moisture regularly and adjust as needed. If it’s too dry, lightly mist with water. If it’s too wet, add more carbon-rich materials to absorb excess moisture.
- Turn the Compost: Turning the compost regularly helps with aeration and promotes the breakdown of organic matter. Use an aeration tool to gently mix the materials, redistributing the moisture and speeding up decomposition. Aim to turn the compost every 1-2 weeks.
- Monitor Temperature: Composting generates heat as the organic matter breaks down. Use a compost thermometer to monitor the temperature. Ideally, the compost should reach temperatures between 120-150°F (49-66°C). If it gets too hot or cold, adjust the moisture level or the carbon-to-nitrogen ratio to regulate the temperature.
- Optimize Carbon-to-Nitrogen Ratio: A proper carbon-to-nitrogen (C/N) ratio is essential for efficient composting. Aim for a ratio of around 25-30 parts carbon to 1 part nitrogen. Too much nitrogen can result in a smelly compost, while too much carbon can slow down decomposition. Adjust the ratio by adding more carbon-rich or nitrogen-rich materials as needed.
- Patience and Time: Composting is a natural process that takes time. It can take several weeks to several months for compost to fully mature. Be patient and let the microorganisms do their work. Monitor the compost for progress and adjust if necessary.
Remember to regularly turn the compost, maintain the moisture level, monitor the temperature, and periodically check the carbon-to-nitrogen ratio. This will help create a well-balanced and productive composting environment without the need for worms.
Composting without worms is a simple and effective way to transform organic waste into nutrient-rich soil. By following these basic steps and understanding the key elements of composting, you can successfully create your own compost indoors without relying on worms.
What to Compost Indoors
When composting indoors, it’s important to know what materials are suitable for the composting process. Here are some common items that can be composted indoors:
- Fruit and Vegetable Scraps: These include peels, cores, seeds, coffee grounds, and tea leaves. These organic materials are rich in nitrogen and add valuable nutrients to the compost.
- Eggshells: Crushed eggshells are a great source of calcium and can add necessary minerals to the compost. Rinse the eggshells before adding them to the compost to prevent attracting pests.
- Grass Clippings: If you have access to fresh grass clippings, they can be used as a nitrogen-rich material in your compost. Be sure to mix them in with the other materials to maintain a proper carbon-to-nitrogen balance.
- Shredded Newspaper and Cardboard: These carbon-rich materials provide a good source of aeration in the compost. Tear them into small pieces or run them through a shredder before adding them to the compost bin.
- Fallen Leaves: Dry, fallen leaves from trees can be used as an excellent source of carbon in the compost. Shred or crumble the leaves before adding them to the pile to speed up the decomposition process.
- Plant Trimmings: Trimmed stems, leaves, and small plant debris from indoor plants can be added to the compost. Make sure to break or chop them into smaller pieces for quicker decomposition.
- Paper Towels and Napkins: Used paper towels and napkins that are free from any chemical cleaners or non-compostable substances can be composted. Wet them slightly before adding to the compost bin to aid in decomposition.
- Wood Ash: Wood ash from the fireplace or wood-burning stove can be added sparingly to the compost as a source of potassium. Use it in small amounts, as excessive wood ash can raise the pH level of the compost.
- Straw or Hay: Straw or hay can be used as a carbon-rich material in the compost. Be sure to use straw or hay that is free from chemicals or herbicides.
Avoid composting materials such as meat, dairy products, oily foods, and pet waste as they can attract pests or lead to unpleasant odors. Also, avoid adding weeds or plants with diseases or seeds, as they can potentially spread in the compost.
Remember to cut or chop larger materials into smaller pieces for faster decomposition and to maintain a balanced carbon-to-nitrogen ratio. By composting a variety of kitchen and garden waste, you will create nutrient-rich soil that can be used to nourish your plants and gardens.
Maintaining Moisture Level
Maintaining the proper moisture level is crucial for successful indoor composting. The right amount of moisture ensures that the microorganisms responsible for decomposition can thrive and break down the organic matter efficiently. Here are some tips for maintaining the moisture level in your compost:
1. Monitor Moisture Regularly: Keep an eye on the moisture level in your composting container. Check it every few days by inserting your hand or a small trowel into the compost. The material should feel damp, similar to a wrung-out sponge. If it’s too dry, it may slow down the decomposition process, and if it’s too wet, it can lead to a smelly, anaerobic environment.
2. Add Water or Dry Materials: If the compost is too dry, lightly spray it with water using a spray bottle. Start by adding small amounts of water and gradually increase if needed. Be careful not to add too much water at once, as it can lead to excessive moisture. Alternatively, you can add dry carbon-rich materials like shredded newspaper or dry leaves to absorb excess moisture.
3. Mix the Compost: Turning or mixing the compost helps distribute moisture evenly. When you turn the compost with an aeration tool, it allows the drier outer layers to mix with the moister interior layers. This ensures that the moisture is evenly distributed and prevents any pockets of excessive wetness or dryness.
4. Cover the Compost: Use a lid or cover on your composting container to help retain moisture. This helps prevent excessive evaporation and keeps the compost from drying out too quickly. Also, covering the compost helps control odors and keeps pests away.
5. Use Compostable Materials with Moisture: Include moisture-rich materials in your compost, such as fruit and vegetable scraps. These materials contribute water to the composting process and help maintain moisture levels naturally. Be mindful of adding too much moisture-rich material, as it can lead to excessive wetness.
6. Adjust Based on Environmental Conditions: Environmental factors such as temperature and humidity can affect the moisture level in your compost. In hot and dry climates, you may need to water your compost more frequently. In colder climates, you may need to add less water since the composting process may naturally slow down.
By regularly monitoring and maintaining the moisture level in your compost, you will create a favorable environment for the microorganisms to thrive and effectively decompose the organic matter. Remember that finding the right balance is key – not too wet and not too dry – to ensure optimal composting results.
Turning the Compost
Turning or mixing the compost is a vital step in the indoor composting process. It helps to aerate the compost, distribute moisture and nutrients, and accelerate the decomposition process. Here’s how to turn your compost effectively:
1. Frequency: Aim to turn your compost every 1-2 weeks. Regular turning ensures that all parts of the compost receive adequate airflow and helps prevent the development of unpleasant odors. Adjust the frequency based on the size of your compost container and the rate of decomposition.
2. Using an Aeration Tool: To turn the compost, use an aeration tool such as a garden fork, a compost turner, or a long-handled spoon. Insert the tool into the compost and gently lift and mix the materials. Avoid forcefully stirring, as this can disrupt the beneficial microorganisms that are breaking down the organic matter.
3. Mixing the Layers: When turning the compost, mix the layers of materials thoroughly. This helps blend the carbon-rich (brown) and nitrogen-rich (green) materials and ensures even distribution of moisture and nutrients. Pay particular attention to any areas that appear dry or overly moist and incorporate them into the rest of the compost.
4. Temperature Monitoring: While turning the compost, take the opportunity to check the temperature. Insert a compost thermometer into the pile and note the temperature. High temperatures within the range of 120-150°F (49-66°C) indicate that the compost is actively decomposing. If the temperature is too low, mix the compost more thoroughly to activate the decomposition process.
5. Adjusting Moisture Levels: While turning the compost, observe the moisture content. If the compost appears too dry, add small amounts of water using a spray bottle to increase the moisture level. If the compost seems overly wet or soggy, add more carbon-rich materials like shredded newspaper or dry leaves to absorb excess moisture.
6. Noting the Appearance: As you turn the compost, take note of its appearance and consistency. Well-mixed compost should have a crumbly texture and a rich, earthy smell. If you notice any foul odors or signs of mold growth, it may indicate that the compost is too wet or lacks sufficient airflow. Adjust the moisture level and turning frequency accordingly.
Regularly turning the compost helps maintain a well-balanced and productive composting environment. It ensures that the organic matter decomposes efficiently and produces nutrient-rich compost. While turning the compost, take the opportunity to observe and adjust any factors that may affect the composting process, such as moisture, temperature, and aeration. With proper turning, you’ll be on your way to creating high-quality compost for your plants and gardens.
Controlling Odor
Odor control is an important aspect of indoor composting to ensure a pleasant environment in your home. While some level of odor is natural in the composting process, there are several steps you can take to minimize and control it effectively:
1. Appropriate Balance of Green and Brown Materials: Achieving the right balance of nitrogen-rich (green) and carbon-rich (brown) materials in your compost helps prevent odor issues. Too much nitrogen-rich material can result in a strong, unpleasant smell. Ensure you have a proper carbon-to-nitrogen ratio by adding enough brown materials to keep the compost well-balanced.
2. Proper Moisture Management: Excess moisture in the compost can lead to foul odors. Ensure your compost has the right moisture level by regularly monitoring and adjusting it as needed. Avoid overwatering or allowing the compost to become too dry. The materials should feel slightly damp, similar to a wrung-out sponge.
3. Aeration and Turning: Regularly turning or mixing the compost promotes airflow and helps prevent odors. Aerating the compost allows oxygen to reach the microorganisms responsible for breaking down the organic matter, reducing the risk of anaerobic conditions and unpleasant odors. Turn the compost every 1-2 weeks to maintain proper aeration.
4. Cover or Seal the Composting Container: Covering or sealing the composting container helps contain odors and prevents pests from being attracted to the compost. Ensure that your composting container has a lid that fits securely and seals any gaps or openings to minimize odor leakage.
5. Avoid Adding Strongly Odorous Materials: Some food items, such as onions, garlic, or certain types of fruit peels, can contribute to stronger odors in the compost. While these materials are generally compostable, consider chopping them into smaller pieces or burying them deeper in the compost to reduce the intensity of the smell.
6. Incorporate Dry, Absorbent Materials: Adding dry, absorbent materials like shredded newspaper, dry leaves, or sawdust can help absorb excess moisture and control odors. These materials act as a natural deodorizer and can be mixed into the compost to mitigate unpleasant smells.
7. Use Odor-Absorbing Agents: Certain odor-absorbing agents, such as activated charcoal or baking soda, can be added to the composting container to help neutralize odors. Sprinkle a small amount of the chosen agent on top of the compost to absorb and minimize any unwanted smells.
8. Properly Store and Dispose of Finished Compost: When you harvest your finished compost, store it in a sealed container or bag until it’s ready to be used. Proper storage prevents any lingering odors from spreading. If you’re unable to use the compost immediately, consider storing it outdoors or in a well-ventilated area to avoid any potential odors indoors.
By following these techniques, you can effectively control odors in your indoor composting system. Remember that a slight earthy smell is normal, but it should not be overpowering or offensive. With proper management and odor control measures, you can enjoy the benefits of composting without introducing unpleasant odors to your living space.
Troubleshooting Common Issues
While indoor composting without worms is a relatively simple and straightforward process, you may encounter some common issues. Here are a few troubleshooting tips for addressing these challenges:
1. Foul Odors: If your compost has a strong, unpleasant odor, it may be a sign of inadequate aeration or excessive moisture. Ensure you are regularly turning the compost to promote airflow and check the moisture level. Adjust the carbon-to-nitrogen ratio by adding more brown materials if needed. Incorporating dry, absorbent materials like shredded newspaper or sawdust can help control odors.
2. Pests in the Compost: If you notice pests like fruit flies or gnats in your compost, it may indicate that the compost is too wet or that you are adding attractant materials such as meat or dairy. To address this issue, adjust the moisture level by adding more carbon-rich materials to absorb excess moisture. Avoid adding materials that may attract pests, and ensure your composting container is securely covered to prevent their entry.
3. Slow Decomposition: If your compost is taking longer to decompose, it may mean that the carbon-to-nitrogen ratio is not optimal or that the compost lacks sufficient aeration. Check the moisture level and adjust as needed. Ensure you have a proper balance of carbon-rich (brown) and nitrogen-rich (green) materials. Turning the compost more frequently can also help accelerate the decomposition process.
4. Excessive Moisture: If your compost is too wet and appears soggy, it can result in anaerobic conditions and unpleasant odors. Add dry carbon-rich materials like shredded newspaper or dry leaves to absorb excess moisture. Mix the compost thoroughly to distribute the moisture more evenly. Additionally, ensure proper drainage in your composting container by adding a layer of gravel or stones at the bottom.
5. Unwanted Materials or Weeds: Occasionally, you may find unwanted materials or weed seeds in your compost. To address this issue, consider implementing a hot composting method. Hot composting involves maintaining higher temperatures that can kill weed seeds and pathogens. Avoid adding weed plants or any materials that may be contaminated with seeds.
6. Mold or Fungal Growth: Mold or fungal growth can occur in compost that is too moist or lacks proper aeration. To manage this issue, adjust the moisture level by adding more dry carbon-rich materials. Increase aeration by turning the compost more frequently to improve airflow. If the mold growth persists or appears to be harmful, it may be best to dispose of the affected compost and start fresh.
7. Unbalanced Carbon-to-Nitrogen Ratio: A compost pile with an imbalanced carbon-to-nitrogen ratio may result in slow decomposition or unpleasant odors. Ensure you have a proper balance by adding more carbon-rich materials if the compost appears too wet or nitrogen-rich. If the compost is too dry or carbon-rich, add more nitrogen-rich materials like fruit scraps or fresh grass clippings.
By troubleshooting these common issues and making the necessary adjustments, you can maintain a healthy and productive indoor composting system. Remember that composting is a dynamic process, and it may require some experimentation and adjustments to find the optimal conditions for your specific situation.
Harvesting Compost
Harvesting compost is the exciting culmination of your indoor composting journey. It’s the process of collecting the finished compost that has broken down into rich, dark, crumbly soil-like material. Here are the steps to successfully harvest your compost:
1. Timeframe: Composting can take several weeks to several months depending on various factors such as temperature, moisture, and the materials used. The compost is ready to be harvested once it has transformed into a dark, earthy, and uniform consistency.
2. Stop Adding Materials: Before you begin the harvesting process, stop adding new materials to the composting container. This allows the remaining materials to complete the decomposition process without any interruptions.
3. Emptying the Compost: Depending on the type of composting container you are using, you may need to transfer the compost to another container or directly to your garden or potted plants. Carefully empty the compost, being mindful not to disturb any uncomposted materials that may have settled on the bottom.
4. Separating Uncomposted Materials: As you transfer the compost, you may come across some uncomposted materials like large chunks or recognizable scraps. Set these aside and return them to the composting container for further decomposition. This way, you can ensure that all the organic matter has a chance to fully break down.
5. Sifting (Optional): If you prefer a finer texture for your compost, you can sift it during the harvesting process. Sifting removes any remaining debris, twigs, or larger chunks from the compost, leaving you with a more refined end product. Use a mesh screen or a compost sifter to separate the fine compost from the larger particles.
6. Storing the Compost: Once harvested, store the compost in a covered container or bag until you are ready to use it. Keep it in a cool, dry location, such as a shed or garage, to preserve its quality. Avoid storing large quantities of compost indoors, as it may produce some residual earthy odors.
7. Using the Compost: Your harvested compost is now ready to be used! Incorporate it into your garden soil, mix it with potting soil for containers, or spread it as a top dressing around your plants. The nutrient-rich compost will enhance soil fertility, improve water retention, and promote healthy plant growth.
Remember, composting is an ongoing process. As you harvest the finished compost, you can start the process again with a fresh batch of organic materials. By continually composting, you can reduce waste, enrich your soil, and contribute to a more sustainable and eco-friendly lifestyle.
Using the Compost
Using the compost you have harvested is a rewarding and beneficial step in the indoor composting process. Here are several ways you can put your nutrient-rich compost to use:
1. Garden Soil Amendment: Incorporate the compost into your garden soil to improve its overall fertility and structure. Spread a layer of compost over your garden beds and gently mix it into the existing soil. This will enrich the soil with essential nutrients, improve its water-holding capacity, and enhance the overall health of your plants.
2. Potting Mix Enrichment: Mix the compost into potting soil to create a nutrient-dense mix for your indoor and outdoor potted plants. Use a ratio of about 1 part compost to 2-3 parts potting soil. The compost will supply your plants with beneficial microorganisms, minerals, and organic matter, promoting healthy growth and vibrant foliage.
3. Seed Starting: Use the compost as a component in your seed-starting mix. Combine it with other ingredients like vermiculite or coconut coir to create a light and well-draining mix. The compost will provide a nutritious environment for seedlings, promoting strong root development and healthy growth.
4. Compost Tea: Create a compost tea by soaking a small amount of the compost in water for a period of time. Use a cloth or mesh bag to contain the compost while it infuses the water. The resulting liquid can be used as a natural fertilizer to nourish your plants. Dilute the compost tea with water before applying it to avoid over-fertilization.
5. Top Dressing: Sprinkle a layer of compost around the base of established plants as a top dressing. This provides a slow-release source of nutrients as the compost breaks down gradually. Avoid placing the compost directly in contact with the stems or foliage of the plants to prevent any potential risk of disease or rot.
6. Compost Mulch: Spread a layer of compost as a mulch around your plants, shrubs, or trees. The compost mulch helps retain moisture, suppress weeds, regulate soil temperature, and provide a continuous supply of nutrients as it decomposes. Apply the compost mulch at a depth of a few inches, taking care to leave a small space around the base of the plant stem.
7. Lawn Dressing: For a healthy and lush lawn, spread a thin layer of compost over the grass. Rake it gently into the existing grass, allowing the compost to filter down into the soil. The compost will improve the soil structure, enhance water retention, and promote healthier turf growth.
These are just a few examples of how you can use your harvested compost. Experiment with different applications to discover what works best for your specific plants and gardening needs. The rich, organic matter will provide lasting benefits and contribute to the overall health and vitality of your garden.
Conclusion
Composting indoors without worms is a practical and rewarding way to reduce waste, create nutrient-rich soil, and contribute to a more sustainable lifestyle. With the right materials, a suitable composting container, and a few simple steps, you can successfully compost indoors, even without access to outdoor space.
By composting kitchen scraps, yard waste, and other organic materials, you can divert these materials from landfills and instead transform them into a valuable resource for your plants and gardens. Indoor composting allows you to take advantage of nutrient-rich compost year-round, regardless of outdoor weather conditions.
Remember to select a composting container that suits your space and needs, and ensure it has proper ventilation, drainage, and cover. Monitor and maintain the moisture level, turn the compost regularly to promote aeration, and adjust the carbon-to-nitrogen ratio as needed to keep the composting process balanced and efficient.
As you troubleshoot common issues such as odor control or slow decomposition, make adjustments based on temperature, moisture, and aeration. Harvest your compost when it reaches a dark, crumbly consistency and use it to enrich your garden soil, boost your potted plants, or create compost teas and mulches.
Composting indoors without worms is a continuous process that allows you to reduce waste, create a valuable resource, and nurture the health and productivity of your plants. Embrace the joy of composting and enjoy the benefits of a more sustainable and eco-friendly approach to gardening and waste management.