Home>Gardening Basics>Tools and Equipment>How Do You Sharpen A Pruning Saw
Tools and Equipment
How Do You Sharpen A Pruning Saw
Published: August 20, 2023
Learn how to sharpen a pruning saw with our easy-to-follow guide. Get the best tools and equipment for the job and keep your saw performing at its peak.
(Many of the links in this article redirect to a specific reviewed product. Your purchase of these products through affiliate links helps to generate commission for Chicagolandgardening.com, at no extra cost. Learn more)
Table of Contents
Introduction
A pruning saw is a vital tool for anyone looking to maintain their garden or tree line. However, over time, the teeth of a pruning saw can become dull or damaged, making it less effective and efficient. That’s why it’s crucial to regularly sharpen your pruning saw to ensure optimal performance. Sharpening a pruning saw not only restores its cutting ability but also extends its lifespan.
Sharpening a pruning saw may seem like a daunting task, but with the right tools, materials, and techniques, it can be a straightforward process. In this article, we will guide you through the step-by-step process of sharpening a pruning saw, providing you with the knowledge and skills to tackle this essential maintenance task confidently.
Not only will sharpening your pruning saw improve its cutting performance, but it will also bring several additional benefits. A sharpened saw cuts through branches and limbs more smoothly and efficiently, reducing strain on your hands and arms. This, in turn, can help prevent fatigue and the risk of injury, making pruning tasks easier and safer to accomplish.
Moreover, a sharp pruning saw promotes cleaner cuts, reducing the chances of damaging the tree or plant. Clean cuts heal faster and are less prone to disease or insect infestation. By sharpening your pruning saw, you can ensure that every cut you make is precise and promotes the overall health and vitality of your plants.
Now that we’ve highlighted the importance and benefits of sharpening a pruning saw, let’s move on to the tools and materials needed to get started.
Benefits of Sharpening a Pruning Saw
Sharpening a pruning saw offers a variety of benefits that go beyond just improving its cutting ability. Let’s explore some of the key advantages:
Enhanced Cutting Performance: A sharpened pruning saw cuts through branches and limbs more efficiently, reducing the effort required to complete pruning tasks. This not only saves time but also minimizes fatigue and strain on your hands and arms.
Promotes Plant Health: A sharp pruning saw creates clean cuts, which are less likely to cause damage or stress to the tree or plant. Clean cuts heal faster, reducing the risk of disease or insect infestation. By sharpening your pruning saw, you can ensure that each cut promotes the overall health and vitality of your plants.
Improved Precision: Dull or damaged teeth can result in jagged or uneven cuts, making it challenging to achieve the desired shape or size when pruning. A sharpened pruning saw provides precise and accurate cuts, allowing you to shape your plants more effectively and achieve the desired aesthetic appeal.
Extended Lifespan: Regularly sharpening your pruning saw can help extend its lifespan. By removing blunt edges and maintaining proper tooth geometry, sharpening prevents premature wear and tear, ensuring that your saw serves you well for years to come.
Cost Saving: Instead of purchasing a new saw every time the old one becomes dull, sharpening allows you to prolong the lifespan and usefulness of your existing pruning saw. This can save you money in the long run, as sharpening is a more cost-effective option compared to buying a brand-new tool.
Safe and Effortless Pruning: A sharp pruning saw ensures a smooth cutting action, reducing the risk of slipping or getting stuck in the wood. This enhances safety during pruning tasks and makes the overall process more efficient and effortless.
By understanding and appreciating the benefits of sharpening a pruning saw, you can see how this simple maintenance task can greatly enhance your gardening experience. Now, let’s move on to the tools and materials needed to sharpen your pruning saw effectively.
Tools and Materials Needed
Before you begin sharpening your pruning saw, it’s important to gather the necessary tools and materials. Here’s a list of what you’ll need:
- Pruning saw – the one you want to sharpen
- Flat file – for sharpening the teeth
- Triangular file – for setting the raker teeth
- Vise or clamp – to securely hold the saw in place during sharpening
- File guide – to maintain the proper filing angle
- Protective gloves – to protect your hands from sharp edges
- Brush or cloth – for cleaning the saw after sharpening
- Sharpening lubricant or oil – to prevent rust and promote smooth sharpening
- Safety goggles – to protect your eyes from flying debris
It’s important to invest in high-quality tools, as they will ensure efficient and effective sharpening. Additionally, wearing protective gloves and goggles is essential to keep yourself safe during the sharpening process.
Once you have gathered all the necessary tools and materials, you’re ready to begin sharpening your pruning saw. In the next sections, we will guide you step-by-step through the sharpening process, ensuring that your pruning saw is restored to its optimal cutting performance.
Step 1: Cleaning the Saw
Before you start sharpening your pruning saw, it’s important to clean it thoroughly. This will remove any dirt, sap, or debris that may have accumulated on the blade, allowing you to have a clear view of the teeth and ensuring a more effective sharpening process.
To clean your pruning saw, follow these steps:
- Inspect the saw for any large debris or dirt particles. Use a brush or cloth to remove these materials.
- Fill a bucket or basin with warm soapy water.
- Immerse the saw blade in the soapy water and scrub it gently with a soft brush or sponge. Pay attention to the areas between the teeth and along the blade.
- Rinse the saw blade with clean water to remove any soap residue.
- Inspect the saw again to ensure it is clean and free from debris. If there are still stubborn sap or resin deposits, you can use a solvent specifically designed for cutting tool cleaning.
- Dry the saw blade thoroughly using a clean cloth or allow it to air dry.
By cleaning your pruning saw before sharpening, you will have a clearer view of the teeth, making it easier to identify any damage or dullness that requires attention. Additionally, a clean saw blade will prevent any dirt or debris from interfering with the sharpening process.
Once the saw is clean and dry, you’re ready to move on to the next step: inspecting and replacing damaged teeth, which we will cover in the following section.
Step 2: Inspecting and Replacing Damaged Teeth
After cleaning your pruning saw, it’s crucial to inspect the teeth for any damage or signs of wear. Damaged or missing teeth can hinder the cutting performance of your saw and should be addressed before proceeding with the sharpening process.
Follow these steps to inspect and replace damaged teeth:
- Carefully examine each tooth of the saw blade. Look for signs of chips, cracks, or missing teeth.
- If you notice any damaged or missing teeth, mark them with a marker or tape for replacement.
- To replace a damaged tooth, identify the correct replacement tooth that matches the size and shape of the original teeth. Replacement teeth can be purchased at your local hardware or gardening store.
- Using pliers or a tooth extractor tool, carefully remove the damaged tooth from the saw blade.
- Insert the replacement tooth into the empty space, ensuring that it aligns with the surrounding teeth. Gently tap it into place with a hammer if necessary.
- Once the replacement tooth is secure, inspect the entire blade again to ensure all teeth are intact and in proper alignment.
Replacing damaged teeth is important to maintain the overall performance and effectiveness of your pruning saw. It ensures that the cutting action remains smooth and the saw is able to efficiently remove branches and limbs without any obstructions or uneven cutting.
If you have inspected the teeth and determined that they are all in good condition, you can proceed to the next step: setting the raker teeth. We will cover this step in detail in the following section.
Step 3: Setting the Raker Teeth
In addition to sharpening the cutting teeth of your pruning saw, it’s essential to set the raker teeth. The raker teeth are the slightly shorter teeth located between the cutting teeth, and they help regulate the depth of the cut. Setting the raker teeth properly ensures a smooth and consistent cutting experience.
Follow these steps to set the raker teeth of your pruning saw:
- Secure the saw blade in a vise or clamp to hold it steady during the raker tooth setting process.
- Identify the raker teeth by their shorter size in comparison to the cutting teeth.
- Take a triangular file and position it perpendicular to the saw blade between the cutting teeth and the raker teeth.
- Hold the file at an approximate 45-degree angle and push it forward across the top of each raker tooth. Apply consistent pressure and make an even stroke to avoid uneven filing.
- Check the height of the raker teeth periodically with a depth gauge or a specialized raker gauge. The height of the raker teeth should be slightly lower than the cutting teeth to ensure efficient cutting and prevent the saw from binding.
- Continue filing the raker teeth until they are all set to the appropriate height.
Setting the raker teeth of your pruning saw is crucial for maintaining the proper cutting depth. If the raker teeth are not set at the correct height, the saw may bind or struggle to make clean cuts. Setting the raker teeth ensures that the saw glides smoothly through branches and limbs, allowing for efficient and effective pruning.
With the raker teeth properly set, you are now ready to move on to the next step: sharpening the cutting teeth. We will discuss this step in detail in the following section.
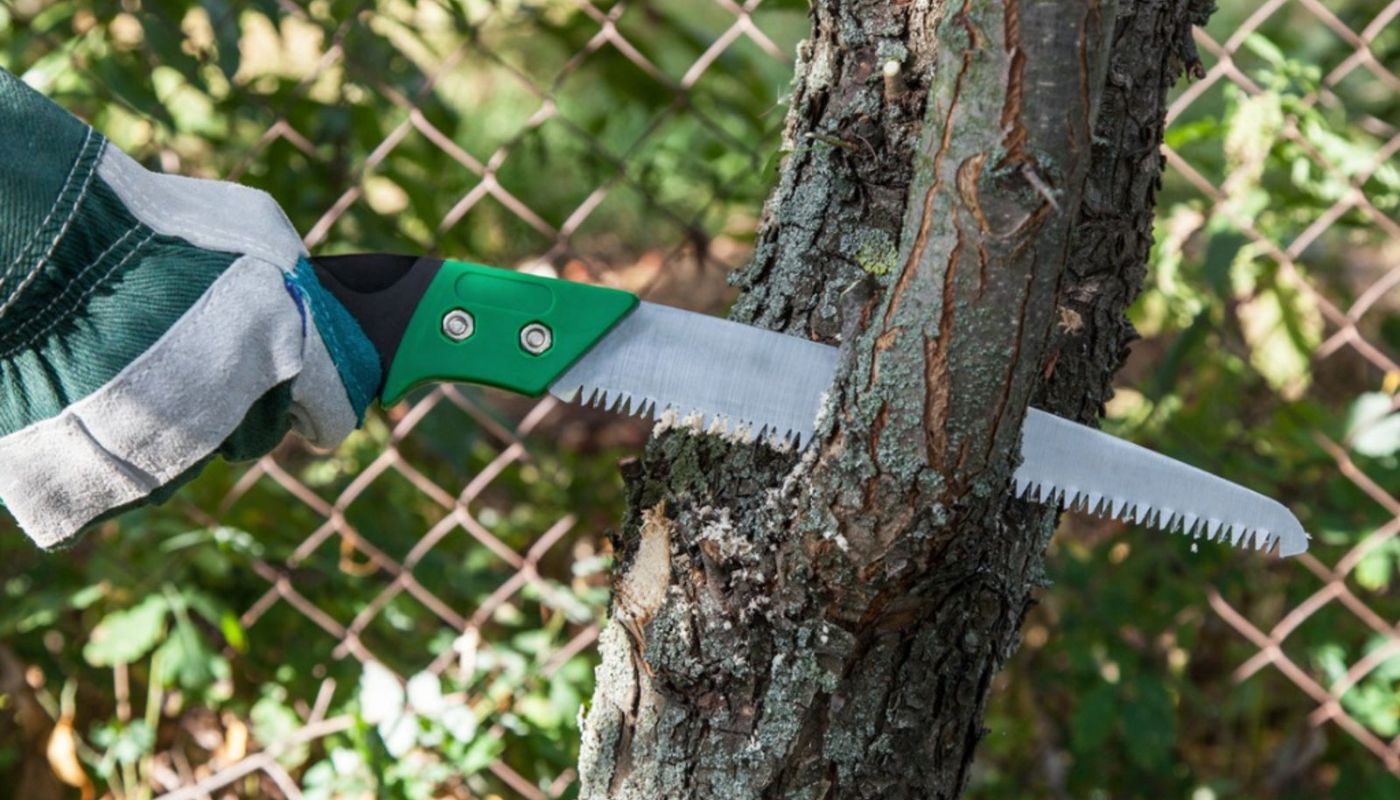
Step 4: Sharpening the Teeth
Sharpening the cutting teeth of your pruning saw is a crucial step to restore its sharpness and cutting efficiency. Here’s a step-by-step guide on how to sharpen the teeth of your pruning saw:
- Secure the saw blade in a vise or clamp to hold it firmly and safely during sharpening.
- Identify the cutting teeth, which are usually larger and have a curved shape, located between the raker teeth.
- Select a flat file appropriate for the size of the teeth. Ensure that the file matches the angle of the cutting teeth, which is typically around 0-10 degrees.
- Hold the file firmly and position it at the base of the first tooth. File each tooth in a forward motion, following the existing angle of the tooth. Apply light pressure and maintain a smooth, consistent motion.
- File each cutting tooth until you have removed any burrs or nicks, and restored a sharp edge to the tooth. Take care to file evenly, maintaining the same number of strokes on each tooth to ensure uniform sharpness.
- Periodically check the sharpness of the teeth by running your finger gently across them. They should feel smooth and sharp to the touch.
- Continue filing all the cutting teeth until they are all sharpened.
Remember, sharpening the teeth of your pruning saw requires patience and precision. Take your time to ensure that each tooth is properly filed and sharpened. Avoid placing excessive pressure on the file, as this can lead to uneven sharpening or the removal of too much material.
Once you have sharpened all the teeth of your pruning saw, it’s time to test their sharpness, which we will cover in the next step.
Step 5: Testing the Sharpness
After sharpening the teeth of your pruning saw, it’s important to test their sharpness before putting the saw back into regular use. Testing the sharpness ensures that your pruning saw is ready to deliver clean and efficient cuts. Here’s how you can test the sharpness:
- Choose a small branch or twig to test the sharpness of the saw.
- Position the branch securely and safely, ensuring that it will not move during the test.
- Using gentle and controlled strokes, make a cut through the branch with the newly sharpened pruning saw.
- Observe the cut. If the saw glides through the branch smoothly and leaves a clean and precise cut, the teeth are sharpened and ready for use.
- If the cut is not clean or requires excessive effort, the teeth may require further sharpening.
By testing the sharpness of the saw on a small branch or twig, you can ensure that the teeth are sharp enough to tackle larger branches and limbs effectively. If you find that the saw is not cutting to your satisfaction, it may be necessary to go back and sharpen any remaining dull teeth to achieve optimal sharpness.
Once you are satisfied with the sharpness of the saw, proceed to the final step: lubricating the saw, which we will cover in the following section.
Step 6: Lubricating the Saw
After sharpening and testing the sharpness of your pruning saw, it is essential to lubricate the saw to prevent rust and ensure smooth operation. Lubricating the saw will help maintain its cutting performance and prolong its lifespan. Follow these steps to effectively lubricate your pruning saw:
- Clean the saw blade one final time to remove any sawdust or debris from the sharpening process.
- Apply a thin layer of lubricating oil or a specifically designed saw lubricant onto the blade. Ensure that you cover the entire surface of the blade, including the teeth and the space between them.
- Use a clean cloth or brush to spread the lubricant evenly along the saw blade.
- Allow the lubricant to penetrate and protect the blade for a few minutes.
- Wipe off any excess lubricant with a clean cloth, ensuring that the surface is smooth and free from excess oil.
Lubricating your pruning saw not only helps to prevent rust but also reduces friction between the blade and the wood, allowing for smoother and more efficient cutting. Regular lubrication can also help prolong the life of the saw by reducing wear and tear on the blade.
With your pruning saw properly lubricated, it is now ready to be stored or used for your next pruning tasks.
To summarize, sharpening a pruning saw is a straightforward process that can greatly enhance its cutting performance and extend its lifespan. By following these step-by-step instructions, you can confidently sharpen your pruning saw and enjoy the benefits of smoother, more precise cuts in your garden or tree line.
Conclusion
Sharpening a pruning saw is an essential task that every gardener or homeowner with trees should know how to do. Not only does it restore the cutting ability of the saw, but it also offers several benefits such as enhanced cutting performance, improved precision, and promotion of plant health. By regularly sharpening your pruning saw, you can ensure efficient and effortless pruning while maintaining the overall health and vitality of your plants.
In this article, we provided a comprehensive guide to sharpening a pruning saw, taking you through the step-by-step process. We discussed the importance of cleaning the saw before sharpening and inspecting and replacing any damaged teeth. We also covered setting the raker teeth, sharpening the cutting teeth, testing the sharpness, and finally, lubricating the saw to protect it from rust and maintain its smooth operation.
Remember, investing in high-quality tools, wearing protective gear, and taking your time during sharpening are crucial factors for achieving optimal results. By following these guidelines, you can ensure that your pruning saw is in top condition and ready to tackle any pruning tasks that come your way.
So next time you notice your pruning saw becoming dull or less effective, don’t hesitate to bring out your sharpening tools and give it the attention it deserves. A sharp pruning saw will not only make your gardening tasks easier and more efficient but will also contribute to the health and beauty of your landscape.
Now, armed with this knowledge, go out and sharpen your pruning saw to experience the difference it can make in your gardening endeavors!