Home>Gardening Techniques>DIY Projects>How To Setup Drip Irrigation For Vegetable Garden

DIY Projects
How To Setup Drip Irrigation For Vegetable Garden
Published: November 18, 2023
Learn how to setup drip irrigation for your vegetable garden with this DIY project. Save water and keep your plants healthy with this step-by-step guide.
(Many of the links in this article redirect to a specific reviewed product. Your purchase of these products through affiliate links helps to generate commission for Chicagolandgardening.com, at no extra cost. Learn more)
Table of Contents
- Introduction
- Benefits of Drip Irrigation for Vegetable Gardens
- Planning and Designing Your Drip Irrigation System
- Gathering Supplies and Tools
- Site Preparation for Drip Irrigation Installation
- Installing the Main Water Line
- Installing the Drip Lines and Emitters
- Setting Up a Controller or Timer
- Testing and Adjusting the System
- Maintaining Your Drip Irrigation System
- Troubleshooting Common Issues
- Conclusion
Introduction
When it comes to maintaining a flourishing vegetable garden, proper irrigation is crucial. Ensuring that your plants receive the right amount of water can make a significant difference in their growth and yield. One effective method of irrigation that can help you achieve this is drip irrigation.
Drip irrigation is a system that delivers water directly to the roots of your plants in controlled amounts. Unlike traditional sprinkler systems that spray water over a wide area, drip irrigation provides a more targeted and efficient method of watering. By delivering water directly to the root zone, it minimizes wastage due to evaporation and runoff.
The benefits of using drip irrigation for your vegetable garden are numerous. First and foremost, it helps conserve water by delivering it directly to the plants’ roots. This not only reduces water wastage but also ensures that the water is used more efficiently, allowing you to grow your vegetables while being mindful of water conservation.
The controlled and precise delivery of water also helps prevent weed growth. By keeping the areas around the plants dry, drip irrigation deprives the weeds of the moisture they need to thrive. This reduces the need for manual weeding, saving you time and effort in the long run.
Furthermore, drip irrigation promotes healthier plants by avoiding common issues associated with traditional watering methods. Overhead sprinklers, for example, can lead to fungal diseases when leaves remain wet for prolonged periods. By delivering water directly to the roots, drip irrigation minimizes the risk of foliar diseases and promotes better overall plant health.
In addition, using a drip irrigation system allows you to customize the watering schedule according to the specific needs of your plants. Different vegetables have different water requirements, and with drip irrigation, you can easily adjust the flow and frequency of water to accommodate these needs. This level of control helps prevent overwatering or underwatering, leading to healthier and more productive plants.
In this article, we will guide you through the process of setting up a drip irrigation system for your vegetable garden. We will cover the planning and design, as well as the installation and maintenance of the system. By the end, you will have all the knowledge and tools necessary to create a customized irrigation system that will keep your vegetable garden thriving.
Benefits of Drip Irrigation for Vegetable Gardens
Drip irrigation offers several unique benefits for vegetable gardens, making it an excellent choice for sustainable and efficient irrigation. Let’s explore some of the key advantages of using drip irrigation in your vegetable garden:
- Water Efficiency: Drip irrigation is highly efficient in water usage. By delivering water directly to the root zone, it reduces evaporation and minimizes water loss due to runoff. Compared to traditional sprinkler systems, drip irrigation can save up to 50% of water, helping you conserve this precious resource.
- Improved Plant Health: By supplying water directly to the root zone, drip irrigation helps prevent foliage diseases. Overhead watering methods can often leave leaves wet for extended periods, creating a favorable environment for fungal growth. Drip irrigation reduces the risk of foliar diseases, resulting in healthier plants with fewer symptoms of stress or disease.
- Weed Management: Drip irrigation can also contribute to effective weed control. By delivering water only to the desired plant roots, it keeps the areas between plants dry, discouraging weed growth. This reduces the need for manual weeding and minimizes competition for nutrients and water, ensuring that your vegetable plants receive the maximum benefit.
- Precise Nutrient Delivery: In addition to water, drip irrigation systems allow for precise delivery of nutrients directly to the root zone. This targeted approach ensures that your plants receive the necessary nutrients without wastage. By customizing your fertilizer mix, you can optimize the nutrient balance for different vegetable crops and maximize their growth potential.
- Flexibility and Customization: Drip irrigation systems are highly flexible, allowing you to customize the watering schedule according to the specific needs of each plant. Different vegetables have varying water requirements, and with drip irrigation, you can easily adjust the flow and frequency of water delivery. This level of control helps prevent overwatering or underwatering, promoting optimal plant growth.
- Time and Labor Savings: Once set up, a drip irrigation system requires minimal maintenance. Unlike manual watering or sprinkler systems, drip irrigation eliminates the need for daily watering, saving you time and effort. Additionally, by reducing the need for manual weeding and reducing water-related diseases, drip irrigation can significantly reduce the overall labor required to maintain your vegetable garden.
By harnessing the power of drip irrigation, you can optimize water usage, improve plant health, and enhance the overall productivity of your vegetable garden. With its numerous benefits, drip irrigation is a wise choice for both the environment and the long-term success of your gardening endeavors.
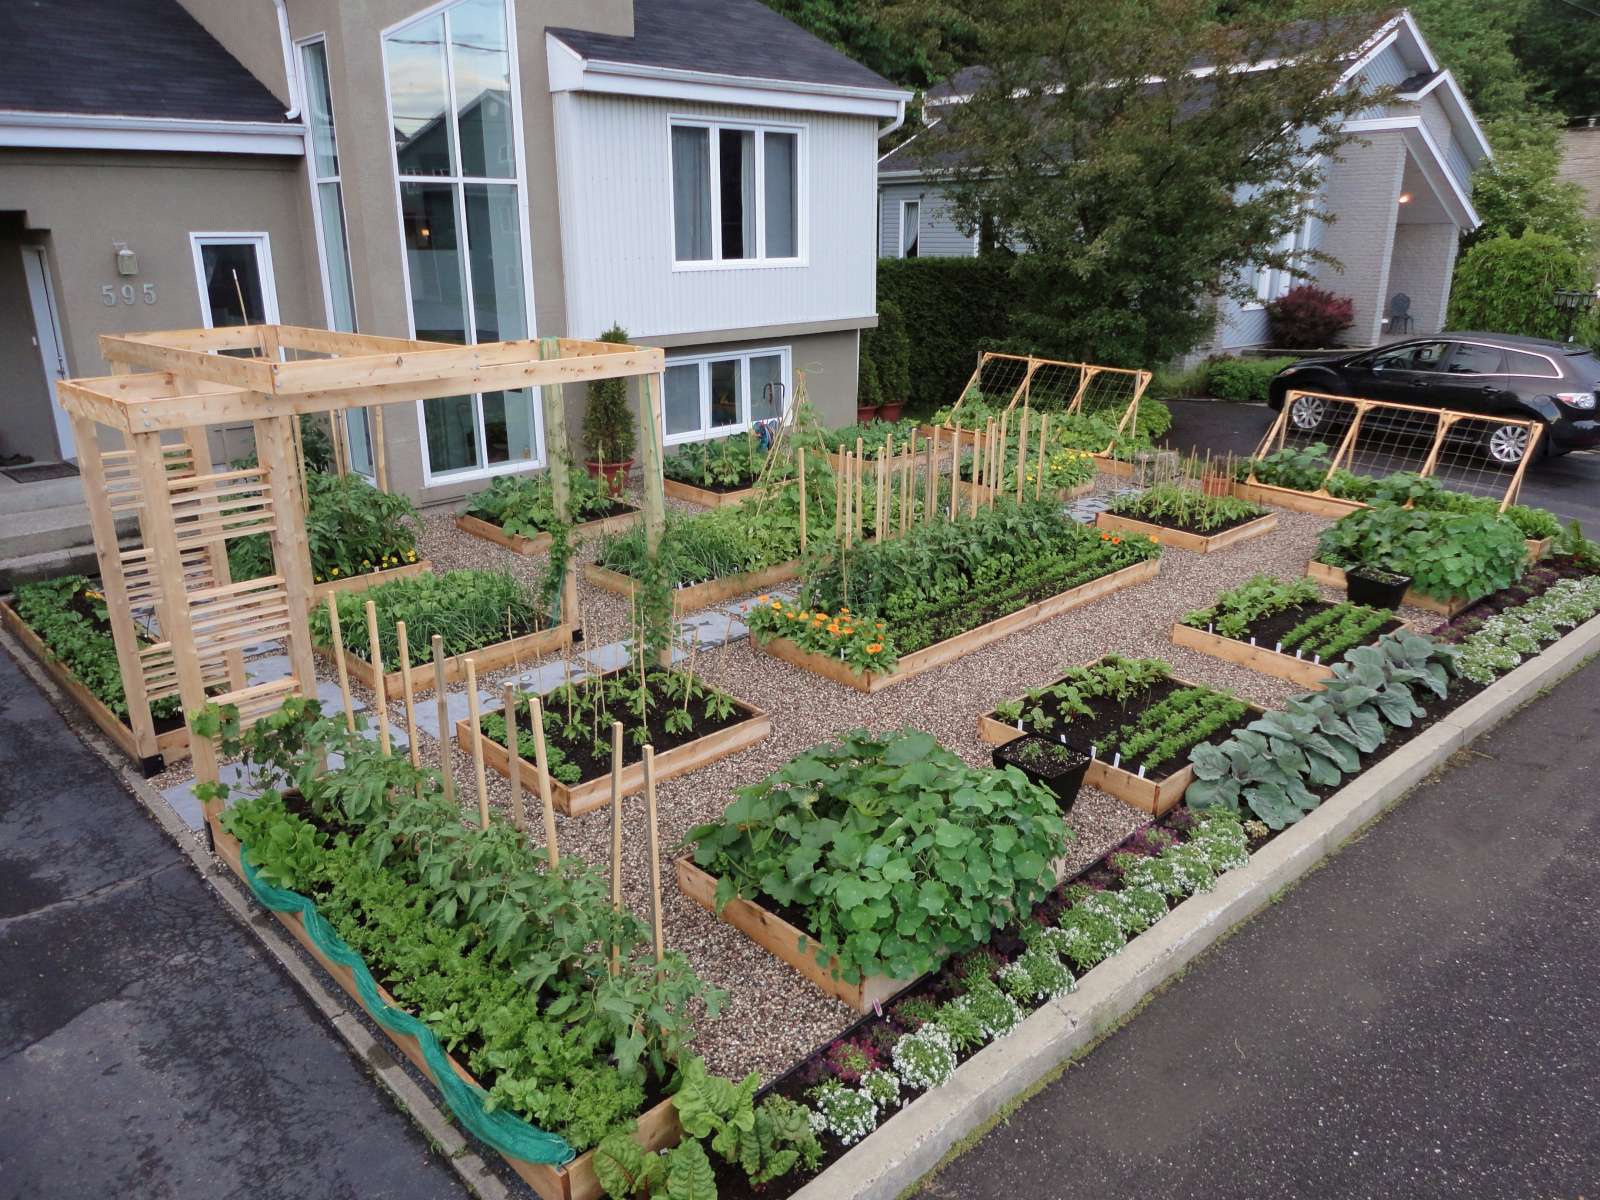
Planning and Designing Your Drip Irrigation System
Before installing a drip irrigation system in your vegetable garden, it’s essential to plan and design the layout to ensure efficient water distribution and coverage. Here are the key steps to consider when planning and designing your drip irrigation system:
1. Determine Your Water Source: Identify the water source for your drip irrigation system. This could be a tap, a rainwater harvesting system, or a well. Ensure that the water source has adequate pressure and flow to meet the needs of your irrigation system.
2. Measure Your Garden: Measure the dimensions of your vegetable garden to determine its size and layout. This will help you calculate the length of tubing and number of emitters needed for your system. Consider the location of your plants, pathways, and any barriers that may affect the water distribution.
3. Identify Plant Watering Needs: Different vegetable crops have varying water requirements. Determine the specific watering needs of each type of vegetable you are growing in your garden. This information will guide you in designing the system to provide adequate water to each plant.
4. Create a Layout Plan: Using graph paper or a digital tool, sketch a layout plan of your garden, detailing the position of plants, pathways, and any other relevant features. This plan will serve as a roadmap for designing the tubing layout and emitter placement for your drip irrigation system.
5. Calculate Water Requirements: Calculate the water requirements for your vegetable garden based on factors such as plant type, size, and climate conditions. This will help determine the flow rate and duration of irrigation needed to meet the plants’ water needs.
6. Select Tubing and Emitters: Choose the appropriate tubing size and type for your garden based on the flow rate and length of the irrigation system. Select emitters that provide the desired flow rate and coverage for specific plants. Consider using pressure-compensating emitters to ensure uniform water distribution even with varying elevations or lengths of tubing.
7. Plan for Expansion: Anticipate the future growth and expansion of your vegetable garden. Leave room for additional tubing and emitters to accommodate new plants or garden expansions. This will save you time and effort in the long run when you decide to expand your garden.
8. Consider Automation: Decide whether you want to incorporate automation into your drip irrigation system. Adding a controller or timer allows for scheduled watering, reducing the need for manual monitoring and freeing up your time.
By carefully planning and designing your drip irrigation system, you can ensure that it meets the specific needs of your vegetable garden. Proper planning will save you time, minimize water wastage, and ensure optimal plant health and productivity in the long run.
Gathering Supplies and Tools
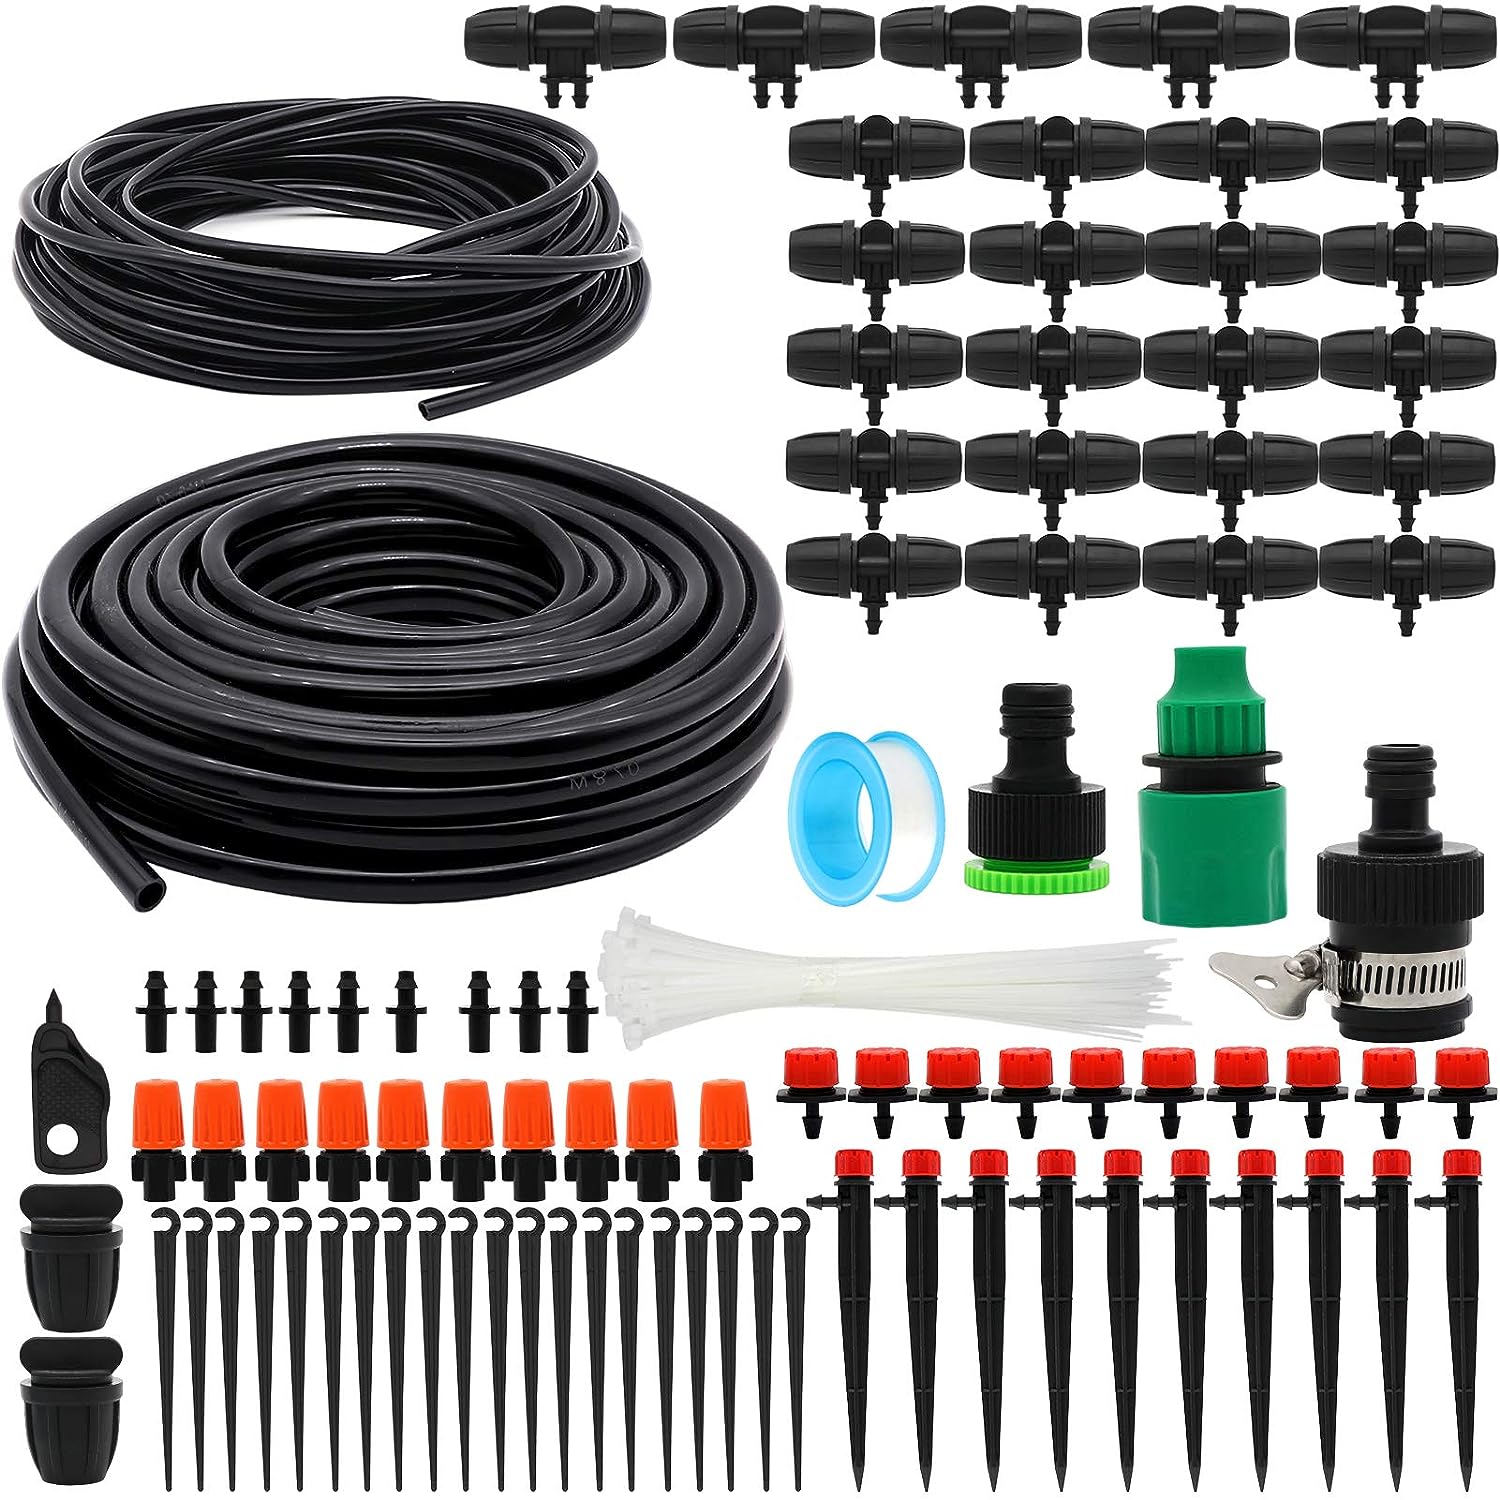
Once you have completed the planning and design phase for your drip irrigation system, the next step is to gather the necessary supplies and tools. Having the right equipment will ensure a smooth installation process and help you achieve optimal results. Here are the supplies and tools you will need:
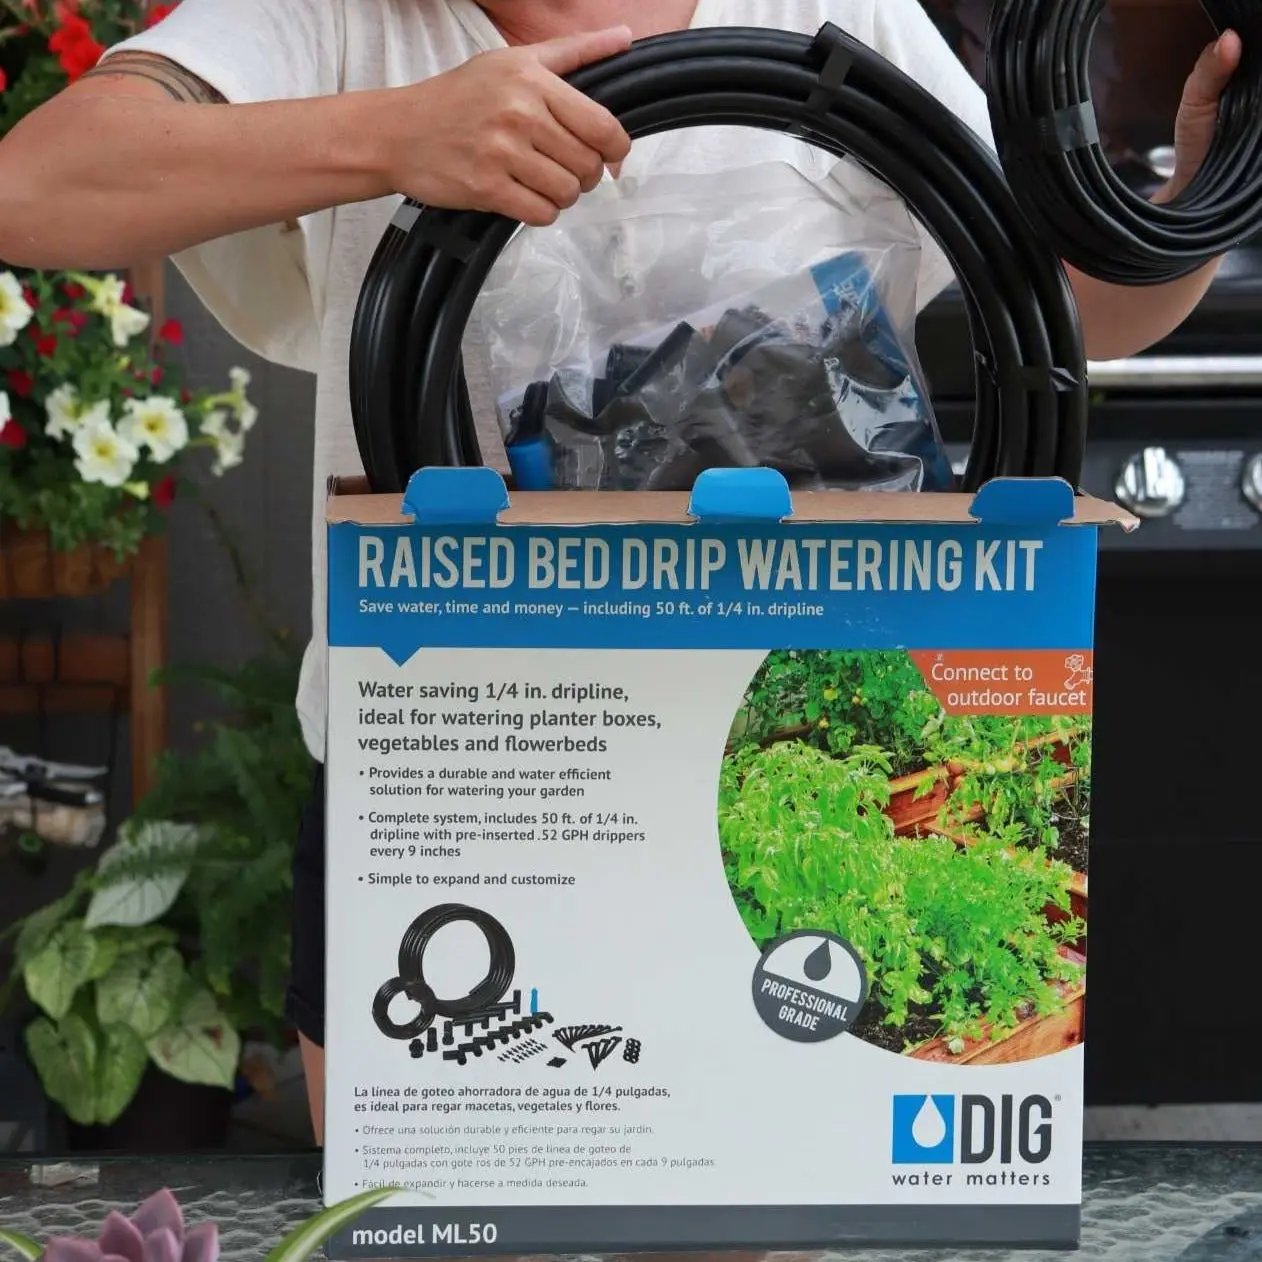
1. Tubing: Purchase high-quality, UV-resistant polyethylene tubing that is specifically designed for use in drip irrigation systems. The size of the tubing will depend on the water flow requirements and the distance between the water source and the plants. Measure the length needed based on your garden layout plan.
2. Emitters: Choose emitters that provide the desired flow rate for each plant. There are various types of emitters to choose from, including drippers, micro-sprinklers, and micro-sprayers. Consider the specific watering needs of your vegetable crops and select emitters that deliver water efficiently to the root zone.
3. Connectors and Fittings: Purchase connectors and fittings that will allow you to connect the tubing and emitters in your system. This may include elbow fittings, tees, couplings, and end caps. Make sure to choose fittings that are compatible with the tubing size you are using.
4. Pressure Regulators and Filters: Install pressure regulators and filters to ensure uniform water flow and prevent clogging of your emitters. A pressure regulator will help maintain the desired water pressure throughout the system, while a filter will remove any debris or sediment that can cause blockages.
5. Punch Tool: A punch tool is essential for creating holes in the tubing to insert the emitters. Look for a punch tool that is compatible with the tubing size you are using in your system. This tool will make it easy to insert the emitters precisely where you need them.
6. Timer or Controller: Consider investing in a timer or controller to automate your irrigation system. This will allow you to set a watering schedule and ensure consistent and efficient water delivery to your vegetable garden. Choose a timer or controller that suits your needs and is compatible with your irrigation system.
7. Measuring Tape or Ruler: A measuring tape or ruler will come in handy for accurately measuring the tubing length and spacing of emitters in your garden. This will ensure that your drip irrigation system is installed according to your garden layout plan.
8. Support Stakes: Depending on the type of emitters and plants you are watering, you may need support stakes. These stakes are used to hold the tubing and emitters in place, preventing them from shifting or getting damaged during the irrigation process.
9. Pipe Cutter or Scissors: Use a pipe cutter or sharp scissors to cut the tubing to the desired lengths. A clean and precise cut will ensure a secure and leak-free connection between the tubing and fittings.
10. Teflon Tape: Teflon tape is used for wrapping around the threaded connections to create a watertight seal. Apply the tape to the male threads of fittings before attaching them to prevent leaks.
By gathering the necessary supplies and tools beforehand, you will be well-prepared for the installation of your drip irrigation system. This will ensure a successful and efficient setup, allowing you to enjoy the benefits of improved water efficiency and healthier vegetable plants.
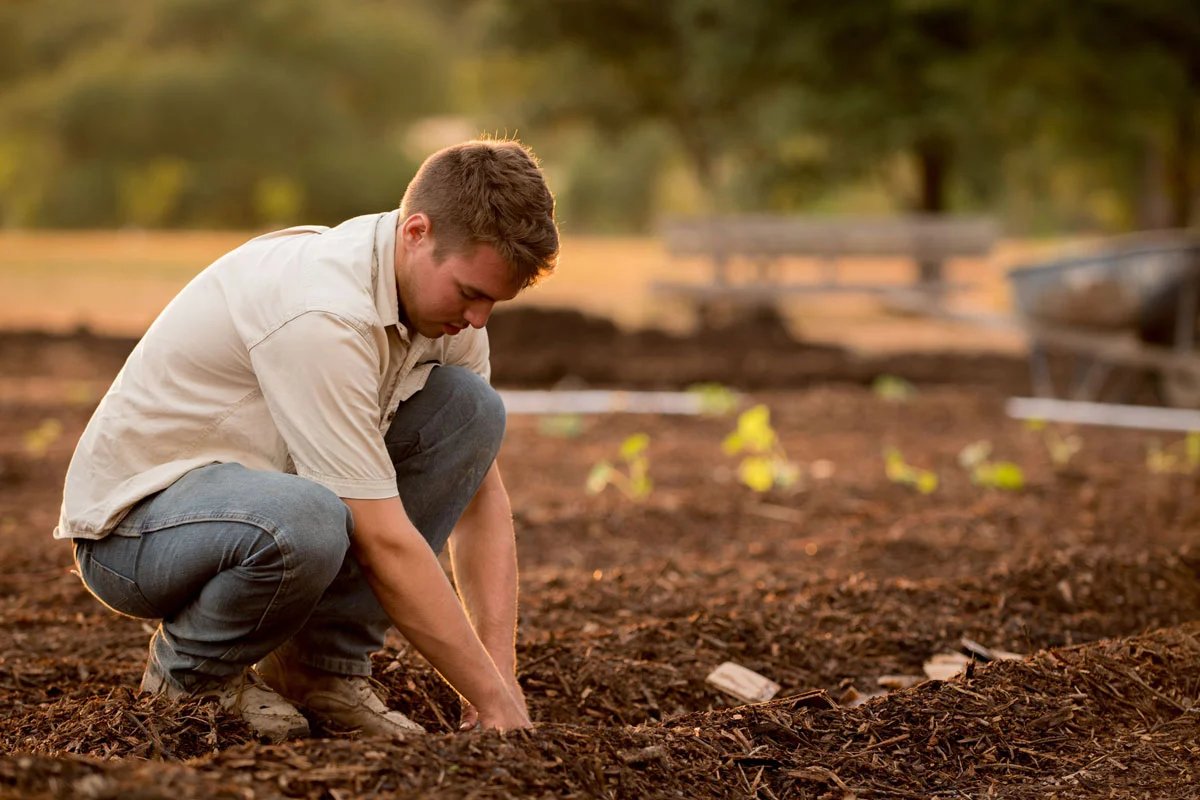
Site Preparation for Drip Irrigation Installation
Proper site preparation is essential for a successful drip irrigation installation. Taking the time to prepare your vegetable garden before installing the system will ensure that it functions optimally and provides efficient water distribution to your plants. Here are the key steps to follow for site preparation:
1. Clear the Area: Start by removing any existing vegetation, weeds, or debris from the area where you plan to install the drip irrigation system. Clearing the space will provide a clean and unobstructed surface for laying the tubing and placing the emitters.
2. Level the Ground: Check if the area is level or if it requires any adjustments. Uneven ground can cause issues with water distribution and may lead to water pooling in certain areas. Use a rake or shovel to level the ground as needed, ensuring a flat surface for the tubing and emitters.
3. Install Weed Barrier: Consider installing a weed barrier fabric or mulch around your vegetable plants. This will help prevent weed growth, reduce competition for water and nutrients, and keep the areas surrounding your plants tidy and manageable. Ensure that the weed barrier does not obstruct the placement of the emitters.
4. Locate the Water Source: Identify the location of your water source, whether it’s a tap or a rainwater harvesting system. Ensure that it is easily accessible and can provide sufficient water pressure and flow for your irrigation system. If needed, consult a plumber to install necessary valves or connections for your drip irrigation system.
5. Consider a Backflow Preventer: It’s a good practice to install a backflow preventer to safeguard your water supply from potential contamination. A backflow preventer prevents water from flowing back into the main water supply, thus protecting the potable water source.
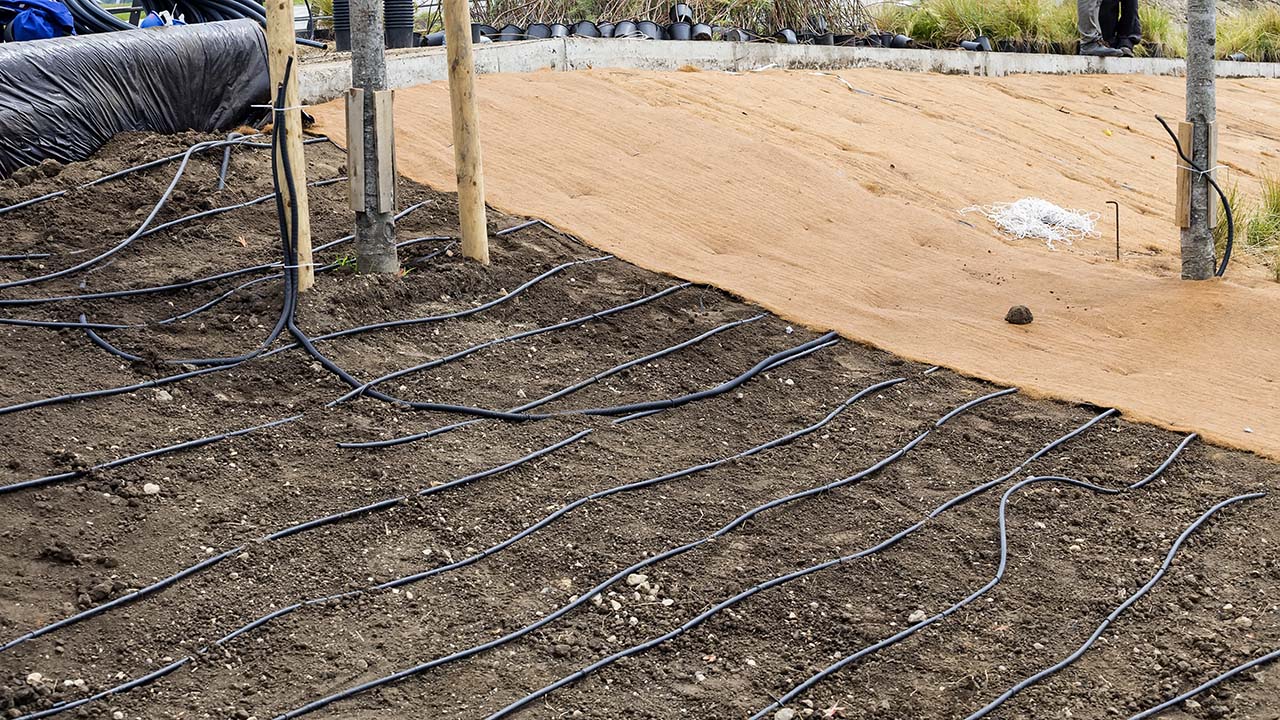
6. Lay Out the Tubing: Based on your garden layout plan, begin laying out the tubing along the desired pathways and around the plants. Use stakes or clips to secure the tubing to the ground if necessary. Ensure that the tubing is positioned close to the plants and follows the planned spacing for emitter installation.
7. Position Emitters: Using the punch tool, create holes in the tubing at the predetermined locations for the emitters. Insert the emitters into the holes, ensuring a secure fit. Take into account the specific water needs of each plant and adjust the emitter spacing accordingly.
8. Connect the Tubing: Use the appropriate connectors and fittings to connect sections of tubing. Ensure that all connections are tight and secure to avoid any leaks. Apply Teflon tape to the threaded connections for a watertight seal.
9. Test the System: Before burying the tubing or covering it with mulch, test the system to ensure proper water flow and functioning of the emitters. Turn on the water supply and observe the distribution of water from each emitter. Make any necessary adjustments to the emitter positions or flow rates.
10. Mulch or Cover the Tubing: Once you are satisfied with the system’s performance, cover the tubing with mulch or bury it slightly to protect it from sunlight and physical damage. Mulching also helps conserve soil moisture and further reduce weed growth.
By adequately preparing the site for your drip irrigation installation, you can ensure a smooth and effective system setup. Taking the time to clear the area, level the ground, and position the tubing and emitters correctly will result in efficient water delivery and healthier vegetable plants with less maintenance required.
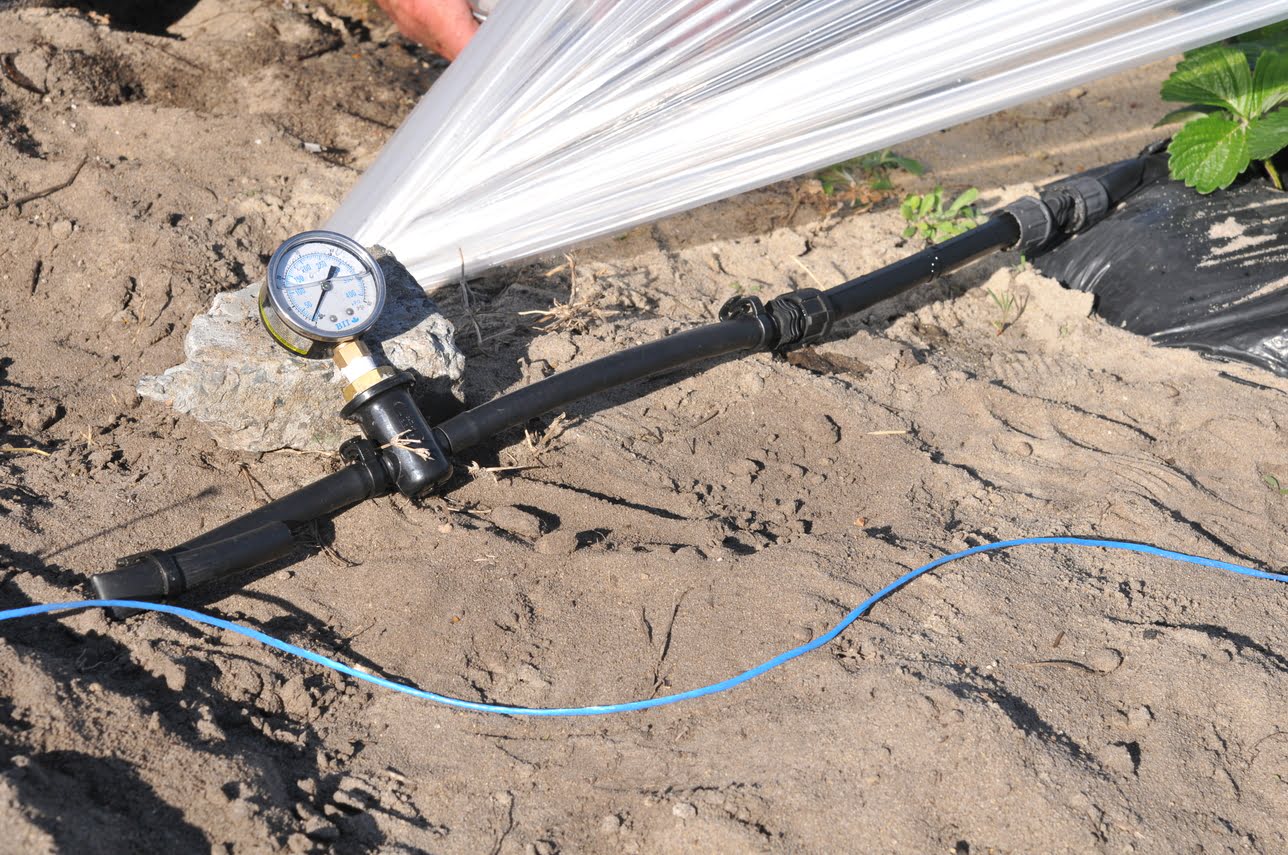
Installing the Main Water Line
Before you can begin installing the drip lines and emitters for your vegetable garden, it is crucial to set up the main water line. This step involves connecting the water source to the rest of the irrigation system, ensuring a reliable and continuous water supply. Here is a step-by-step guide to installing the main water line for your drip irrigation system:
1. Locate the Water Source: Identify the water source from which you will be drawing water for your drip irrigation system. This may be a tap or a rainwater harvesting system. Make sure the water source is easily accessible and provides the necessary flow rate and pressure for your system.
2. Determine the Supply Piping: Assess the distance between the water source and the area where you’ll install the drip lines. Measure the length of PVC or polyethylene supply piping needed to connect the water source to the irrigation area. Allow for additional piping if you plan to expand or add more zones to your system in the future.
3. Dig Trenches: Dig trenches along the planned route for the supply piping. The trenches should be deep enough to bury the piping, typically around 8 to 12 inches deep. Ensure the trench slopes slightly downward from the water source to facilitate water flow.
4. Cut and Assemble the Piping: Use a pipe cutter or PVC cutter to cut the supply piping to the required lengths. If using PVC piping, clean and prime the ends of the pipes and apply PVC cement to join them securely. If using polyethylene piping, use compression fittings or barbed fittings to connect the sections of piping.
5. Lay the Piping in the Trenches: Place the assembled piping in the trenches, ensuring that they are aligned with the planned route. Be mindful of any obstacles or existing infrastructure that may hinder the proper placement of the piping. Check the slope of the piping to ensure proper water flow.
6. Connect the Piping to the Water Source: Depending on the type of water source, connect the supply piping to the tap or the outlet of the rainwater harvesting system. Use the appropriate fittings, such as a brass or plastic connector, to create a secure connection. Apply Teflon tape to threaded connections for a watertight seal.
7. Backfill the Trenches: Once the piping is securely connected, carefully backfill the trenches with soil, ensuring that the piping remains in place. Tamp down the soil gently to eliminate air pockets. If desired, cover the trench with grass or mulch to restore the appearance of your garden.
8. Install a Valve or Shut-off Mechanism: Consider installing a valve or shut-off mechanism near the water source to control the flow of water to the irrigation system. This allows for easier maintenance, repairs, or adjustments without disrupting the entire water supply.
9. Test the Main Water Line: Before proceeding with the installation of drip lines and emitters, turn on the water supply and inspect the main water line for any leaks. Check all connections and joints, tightening them if necessary. Ensure that water flows consistently and evenly throughout the piping.
By correctly installing the main water line for your drip irrigation system, you lay the foundation for a reliable and efficient watering system for your vegetable garden. Taking the time to connect the water source securely and ensuring proper water flow will set you up for a successful installation of the drip lines and emitters.
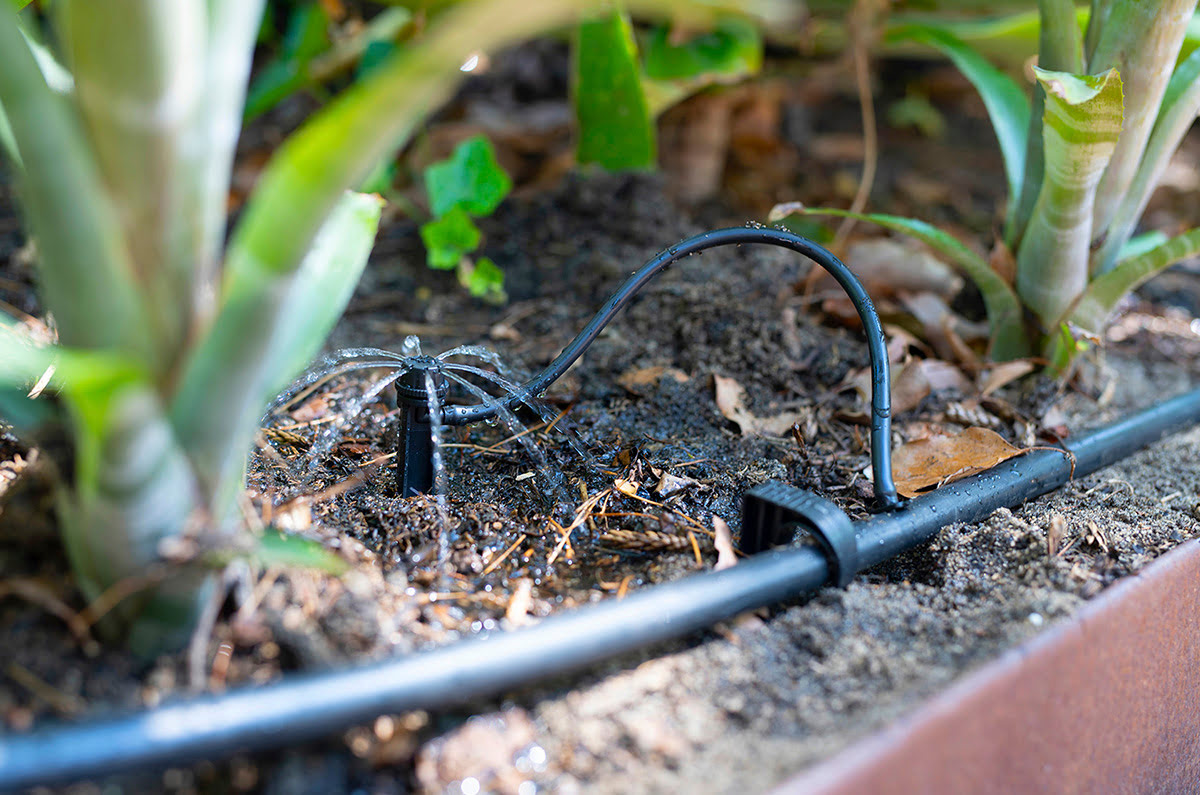
Installing the Drip Lines and Emitters
With the main water line in place, you’re ready to install the drip lines and emitters for your vegetable garden. This step is crucial as it determines the precise and efficient delivery of water to your plants’ root zones. Follow these steps to install the drip lines and emitters effectively:
1. Lay out the Drip Lines: Using your garden layout plan as a guide, position the drip lines along the designated pathways or planting rows. Lay the lines close to the plants, ensuring that they will deliver water to the root zones effectively. Avoid kinks or tangles in the lines for optimal water flow.
2. Connect the Drip Lines: Use appropriate fittings to connect the sections of drip lines together. Ensure that the connections are secure to prevent any leaks. If necessary, cut the drip lines to the desired length using sharp scissors or a pipe cutter. Attach the fittings according to the manufacturer’s instructions.
3. Insert Emitters: Using a punch tool, create holes in the drip lines at the predetermined intervals according to your garden layout plan. Insert the emitters into the holes, making sure they fit snugly and do not bend or dislodge. Take into account the specific water requirements of each plant and adjust the number of emitters accordingly.
4. Adjust Emitter Flow Rate: Some emitters come with adjustable flow rates. If necessary, adjust the flow rate of the emitters to meet the specific needs of your plants. This can help ensure that each plant receives the correct amount of water according to its requirements.
5. Secure the Drip Lines: Use stakes, clips, or wire pins to secure the drip lines to the ground, especially in windy areas. This will prevent movement or displacement of the lines and emitters. Ensure that the lines are properly positioned and do not interfere with plant growth or cultivation practices.
6. Test the System: Before burying the drip lines or covering them with mulch, it’s essential to test the system. Turn on the water supply and observe the distribution of water from the emitters. Confirm that each emitter is functioning properly and providing an even flow of water. Make adjustments as needed to ensure uniform water distribution.
7. Cover or Bury the Drip Lines: Once you are satisfied with the system’s performance, cover the drip lines with mulch or bury them slightly in the soil. This will help protect the lines from sunlight exposure and potential damage. Mulching also aids in soil moisture retention and weed control.
8. Ensure Proper Drainage: Check that the area where you installed the drip lines has proper drainage. Sloping the soil away from the plants and providing enough space between the lines and plant stems will help prevent drainage issues and potential root rot.
By carefully installing the drip lines and emitters, you can ensure effective and efficient watering for your vegetable garden. The precise placement of the lines and the correct functioning of the emitters will contribute to the health and productivity of your plants, ultimately resulting in a bountiful harvest.
Setting Up a Controller or Timer
Adding a controller or timer to your drip irrigation system provides convenience and automation, allowing you to easily manage the watering schedule for your vegetable garden. Setting up a controller or timer helps ensure consistent and efficient water delivery to your plants, even when you’re not available to manually monitor the irrigation. Follow these steps to set up a controller or timer for your drip irrigation system:
1. Choose the Right Controller or Timer: Select a controller or timer that suits your specific needs and is compatible with your drip irrigation system. Consider factors such as the number of zones or valves you require, programming features, power source (battery-powered or electric), and ease of use.
2. Read the Manufacturer’s Instructions: Familiarize yourself with the manufacturer’s instructions provided with the controller or timer. Pay particular attention to any specific setup requirements and programming instructions unique to the model you have chosen.
3. Select a Suitable Location: Choose a suitable location for mounting the controller or timer. Ideally, it should be near the water source and easily accessible for programming and maintenance. Consider protecting it from weather elements by using a waterproof enclosure or locating it indoors, if applicable.
4. Connect the Controller or Timer: Connect the controller or timer to your main water supply and the valve or valves controlling your drip irrigation system. Follow the manufacturer’s instructions to ensure proper wiring connections or wireless pairing, if applicable.
5. Set Date and Time: Enter the correct date and time on the controller or timer. This is essential for accurate scheduling and operation of the irrigation system. Many controllers have built-in calendars or automatic time settings, simplifying this step.
6. Set Watering Schedule: Set the watering schedule that aligns with the specific needs of your vegetable garden. Determine the frequency and duration of irrigation based on factors such as plant water requirements and weather conditions. Many controllers allow you to program multiple start times and customized schedules for different zones or areas of the garden.
7. Adjust for Seasonal Changes: Consider adjusting the watering schedule as seasons change. During hotter months, you may need to increase the frequency or duration of watering, while reducing it during cooler or rainy periods. Some controllers have seasonally adjusted programs or weather-based sensors that can automatically adapt the watering schedule.
8. Test and Fine-tune: Test the controller or timer to ensure that it activates the irrigation system at the scheduled times. Monitor the water distribution from the emitters and check for any issues or irregularities. Fine-tune the watering schedule as necessary to ensure the optimal moisture levels for your plants.
9. Regularly Maintain and Check: Regularly inspect and maintain your controller or timer to ensure proper functioning. Replace batteries if applicable, clean any debris or dust, and update programming as needed. Regular checks will help prevent any malfunctions and ensure that your drip irrigation system operates efficiently.
Setting up a controller or timer for your drip irrigation system simplifies the process of managing and automating your vegetable garden’s watering schedule. With proper programming and regular maintenance, it ensures consistent and efficient water delivery, promoting healthy plant growth and maximizing the productivity of your garden.
Testing and Adjusting the System
Testing and adjusting your drip irrigation system is a crucial step to ensure optimal performance and efficient water distribution to your vegetable garden. By testing the system and making necessary adjustments, you can address any issues and fine-tune the irrigation setup for the specific needs of your plants. Here are the steps to effectively test and adjust your drip irrigation system:
1. Run a Complete Test: Turn on the water supply and run a complete irrigation cycle to observe the system’s performance. Pay attention to the water distribution from the emitters and check for any leaks, clogged emitters, or uneven water flow. This will help identify any immediate issues that need to be addressed.
2. Inspect and Clear Clogged Emitters: Examine the emitters for any signs of clogging or reduced water flow. Small debris or sediment can accumulate over time, affecting the proper functioning of the emitters. Clear any clogs by removing the emitter, flushing it with clean water, and reinserting it into the drip line.
3. Check for Leaks: Inspect all connections, joints, and fittings for any signs of leaks. Tighten any loose connections and replace damaged or worn-out parts if necessary. Even small drips or leaks can lead to water wastage and inefficient irrigation.
4. Evaluate Water Distribution: Assess the uniformity of water distribution from the emitters. Make sure that each plant receives adequate water, with no dry or overwatered spots. Adjust the positioning and flow rate of the emitters as needed to ensure balanced hydration for your vegetable garden.
5. Measure Soil Moisture Levels: Use a soil moisture meter or manually check the moisture levels in different areas of your garden. This will help ensure that the irrigation schedule is providing sufficient water without overwatering. Adjust the frequency and duration of watering based on the moisture needs of your plants and the weather conditions.
6. Monitor Plant Health: Observe the overall health and growth of your vegetable plants. Look for signs of under or overwatering, such as wilting or yellowing leaves. Adjust the watering schedule and emitter placement accordingly to maintain optimal plant health and growth.
7. Fine-Tune the Irrigation Schedule: Based on the results of your testing and observations, fine-tune the irrigation schedule to ensure optimum water efficiency and plant health. Consider factors such as the specific needs of each plant, the local climate conditions, and any seasonal changes that may affect watering requirements.
8. Regularly Monitor and Adjust: Regularly monitor the performance of your drip irrigation system and make necessary adjustments as your plants grow and as environmental conditions change. Regular maintenance and observation will help ensure continuous efficient water delivery and minimize any potential issues.
By testing and adjusting your drip irrigation system, you can ensure that your vegetable garden receives the precise amount of water it needs for optimal growth. Regular monitoring and adjustments will help you maintain healthy plants, conserve water, and increase the productivity of your garden.
Maintaining Your Drip Irrigation System
Proper maintenance of your drip irrigation system is essential to ensure consistent and efficient water delivery to your vegetable garden. Regular maintenance helps prevent issues such as clogged emitters, leaks, or uneven water distribution. By incorporating these key maintenance practices, you can keep your drip irrigation system running smoothly and your plants thriving:
1. Check for Leaks: Regularly inspect all connections, joints, and fittings for any signs of leaks. Even small drips or leaks can waste water and lead to inefficient irrigation. Repair or replace any damaged or worn-out parts to maintain a leak-free system.
2. Clear Clogged Emitters: Periodically check the emitters for clogs or reduced water flow. Small debris or sediment can accumulate over time and affect the emitters’ performance. Clear any clogs by removing the emitter, flushing it with clean water, and reinserting it into the drip line.
3. Monitor Water Pressure: Regularly check the water pressure in your drip irrigation system. High water pressure can cause emitters to break or release water too forcefully, while low pressure can result in uneven water distribution. Adjust the pressure regulator as needed to maintain the optimal water flow for your system.
4. Inspect and Replace Filters: If your system includes filters, regularly inspect and clean or replace them as necessary. Filters help prevent debris, sediment, and particles from entering the emitters and causing blockages. A clean filter ensures efficient water flow and reduces the risk of clogged emitters.
5. Adjust Emitter Placement: As your plants grow, adjust the positioning of the emitters to ensure optimal water distribution. Make sure that the emitters are close to the plants’ root zones and not blocked by foliage or other obstacles. This will ensure that your plants receive the water they need for healthy growth.
6. Monitor Soil Moisture: Regularly monitor the moisture levels in the soil to ensure that your plants are receiving adequate water. Use a soil moisture meter or manually check the soil at different depths and locations. Adjust the watering schedule as needed to prevent over or under-watering.
7. Perform Seasonal Adjustments: Update your watering schedule and adjust the flow rate based on seasonal changes and variations in weather conditions. During hotter periods, you may need to increase the frequency or duration of watering, whereas cooler or rainy seasons may require reduced water amounts.
8. Remove Weeds and Debris: Regularly remove weeds and debris around the emitters and drip lines. Weeds can compete with your vegetable plants for water and nutrients, impacting their growth. Clearing away debris ensures unobstructed water flow and reduces the risk of clogged emitters.
9. Winterize the System: Before winter, properly winterize your drip irrigation system to protect it from freezing temperatures. Drain all water from the system and disconnect and store any removable parts. This prevents damage to the system and ensures it is ready for use in the following growing season.
10. Regular System Inspections: Regularly conduct overall system inspections to identify any potential issues. Check the tubing for signs of damage, the stakes for stability, and the overall system for proper functioning. Address any problems promptly to maintain the effectiveness and efficiency of your drip irrigation system.
By implementing these maintenance practices, you can extend the longevity of your drip irrigation system and ensure that your vegetable garden receives consistent and efficient water delivery. Regular maintenance will help keep your plants healthy, encourage optimal growth, and maximize the productivity of your garden.
Troubleshooting Common Issues
While drip irrigation systems are generally reliable and efficient, occasional issues may arise that require troubleshooting. Here are some common problems you may encounter with your drip irrigation system and tips to help you resolve them:
1. Clogged Emitters: If you notice reduced water flow or uneven distribution from the emitters, it may indicate a clog. Remove the clogged emitter from the drip line, flush it with clean water, and reinsert it. Regularly check and clean your emitters to prevent clogging.
2. Uneven Water Distribution: Uneven water distribution can occur due to various factors such as incorrect emitter placement, improper water pressure, or clogged emitters. Check the placement of your emitters, adjust the water pressure, and ensure that all emitters are functioning properly.
3. Leaks: Leaks can waste water and affect the efficiency of your system. Inspect all connections and fittings for any signs of leaks. Tighten loose connections or replace damaged parts to prevent leaks. Be thorough in your inspection, as even small drips can contribute to water loss over time.
4. Low Water Pressure: Low water pressure can result from a faulty pressure regulator, clogged filters, or insufficient water supply. Check and clean the filters, adjust or replace the pressure regulator if needed, and ensure that your water source is supplying enough pressure to meet the system requirements.
5. High Water Pressure: High water pressure can damage emitters or lead to excessive water flow. Install or adjust a pressure regulator to reduce the pressure within the system. This will help prevent damage to the emitters and ensure consistent and accurate water distribution.
6. Damaged Tubing: Tubing can become damaged over time due to sunlight exposure, rodents, or physical strain. Inspect the tubing regularly and repair or replace any damaged sections. Protect the tubing by covering it with mulch, using protective sleeves, or burying it slightly underground.
7. Root Intrusion: Tree roots or other plant roots can penetrate the tubing, causing blockages or leaks. Regularly check your drip lines for signs of root intrusion and take preventive measures like burying the lines deeper or using root barriers to prevent root damage.
8. System Malfunction: If your system is not functioning as expected, check for any electrical or mechanical issues. Ensure that the controller or timer is programmed correctly and receiving power. Inspect valves, wires, and connections for any faults. Seek professional assistance if needed.
9. Overspray or Underspray: Improperly positioned emitters or incorrect emitter flow rates can lead to overspray or underspray. Adjust the positions of the emitters to ensure accurate water delivery to the plants’ root zones. If necessary, select emitters with different flow rates to meet specific plant water requirements.
10. Poor Water Coverage: If certain areas are not receiving adequate water coverage, it may be due to incorrect emitter spacing or obstruction by plants or obstacles. Adjust the spacing between emitters or relocate them to ensure complete coverage of your garden beds or plant rows.
By troubleshooting these common issues with your drip irrigation system, you can maintain its efficiency and ensure optimal water delivery to your vegetable garden. Regular checks, proper maintenance, and timely problem resolution will help keep your system working smoothly, promoting healthy plant growth and maximizing the productivity of your garden.
Conclusion
Setting up a drip irrigation system for your vegetable garden can greatly enhance the efficiency and productivity of your gardening efforts. By delivering water directly to the root zones of your plants, drip irrigation minimizes water wastage and promotes healthier growth. Throughout this article, we have explored the benefits of drip irrigation, the process of planning and designing the system, gathering the necessary supplies and tools, and the importance of proper site preparation.
We have covered the steps for installing the main water line, laying out the drip lines and emitters, and setting up a controller or timer for automated watering. Additionally, we discussed the significance of testing and adjusting the system to ensure efficient water distribution and addressed common issues that may arise with drip irrigation. Lastly, we stressed the importance of maintaining the system to sustain its effectiveness over time.
By implementing the knowledge gained in this article, you can create a customized drip irrigation system that meets the specific needs of your vegetable garden. Remember to regularly monitor and maintain your system, making adjustments as necessary. Properly caring for your drip irrigation system will result in healthier plants, increased water efficiency, and a more bountiful harvest.
With a well-designed drip irrigation system in place, you can enjoy the benefits of reduced water consumption, minimized weed growth, and improved overall plant health. Embrace the efficiency and convenience that drip irrigation offers to optimize your vegetable-growing experience and cultivate a successful, thriving garden for years to come.