Home>Gardening Techniques>DIY Projects>How To Use A Rotating Compost Bin
DIY Projects
How To Use A Rotating Compost Bin
Modified: January 22, 2024
Learn how to make your own rotating compost bin with this DIY project. Start composting and reduce waste in your garden.
(Many of the links in this article redirect to a specific reviewed product. Your purchase of these products through affiliate links helps to generate commission for Chicagolandgardening.com, at no extra cost. Learn more)
Table of Contents
- Introduction
- Benefits of Using a Rotating Compost Bin
- Choosing the Right Rotating Compost Bin
- Setting up a Rotating Compost Bin
- Adding the Right Ingredients to the Compost Bin
- Maintaining the Compost Bin
- Harvesting and Using Compost from a Rotating Compost Bin
- Troubleshooting Common Issues with Rotating Compost Bins
- Conclusion
Introduction
Composting is a simple and effective way to reduce waste and create nutrient-rich soil for your garden. If you’re looking to venture into the world of composting, a rotating compost bin can be a game-changer. With its convenient design and accelerated decomposition process, a rotating compost bin offers a hassle-free approach to composting.
In this article, we will explore the benefits of using a rotating compost bin and provide a step-by-step guide on how to effectively use one. Whether you’re an experienced gardener or a DIY enthusiast, a rotating compost bin can take your composting efforts to the next level.
So, why should you consider using a rotating compost bin? Unlike traditional static compost bins, a rotating bin allows for easy mixing of organic matter, ensuring that the composting process is faster and more efficient. With just a few simple turns of the bin, you’ll have well-aerated compost in no time.
Another advantage of a rotating compost bin is that it takes up less space compared to larger compost heaps. If you have a small backyard or limited space, a rotating bin is a great option. It’s compact, portable, and can easily fit in tight spaces.
Additionally, a rotating compost bin helps keep pests and rodents away. By regularly rotating the bin, you disrupt their habitat and discourage them from making the compost their home. This is particularly important if you live in an area where pests are a common problem.
One of the main reasons people hesitate to start composting is the potential for odors. However, a well-maintained rotating compost bin minimizes odor issues. The constant aeration and proper balance of green and brown materials ensure that odors are kept to a minimum.
Whether you’re a gardening enthusiast or simply want to reduce your environmental footprint, using a rotating compost bin is a fantastic way to recycle kitchen scraps and yard waste. It not only helps create nutrient-rich soil but also plays a significant role in reducing landfill waste.
In the following sections, we will delve deeper into how to choose the right rotating compost bin, set it up, add the right ingredients, maintain it, and troubleshoot common issues that may arise. By the end of this article, you’ll have all the knowledge and guidance you need to start composting with a rotating compost bin.
Benefits of Using a Rotating Compost Bin
Using a rotating compost bin offers several advantages over traditional composting methods. Here are some key benefits:
- Accelerated Decomposition: One of the main benefits of a rotating compost bin is that it speeds up the decomposition process. The constant mixing and aeration provided by the rotation create an ideal environment for microorganisms to break down organic matter more quickly. This means you’ll have usable compost in a shorter timeframe compared to traditional composting methods.
- Convenience: Rotating compost bins are designed for convenience. The rotating mechanism allows for easy mixing of the compost. You can simply turn the bin a few times every few days, ensuring that the organic matter is evenly distributed and aerated. This eliminates the need for manual turning with a pitchfork or shovel, making the composting process much more manageable and less time-consuming.
- Space-Saving: If you have limited space in your backyard or garden, a rotating compost bin is a great solution. These bins are compact and take up less space compared to traditional compost heaps. You can place them in a corner or even on a balcony or patio, making them an ideal choice for urban dwellers or those with smaller outdoor areas.
- No-Pest Solution: Traditional compost heaps can sometimes attract unwanted pests, such as rats, raccoons, or flies. However, rotating compost bins help deter these pests by regularly disturbing their habitat. The constant movement and mixing disrupt their nesting areas, making them less likely to take up residence in your compost. This is especially beneficial if you live in an area prone to pest infestation.
- Odor Control: Proper aeration and the correct balance of green (nitrogen-rich) and brown (carbon-rich) materials in a rotating compost bin help minimize odor issues. With regular turning, the composting process remains aerobic, reducing the chances of unpleasant smells. This makes rotating compost bins a more neighbor-friendly option while ensuring that your composting efforts remain odor-free.
- Consistent Results: The controlled environment within a rotating compost bin allows for consistent and reliable results. The constant mixing promotes uniform decomposition, resulting in evenly composted material throughout the bin. This consistency ensures that you have a steady supply of high-quality compost for your garden or plants.
In summary, using a rotating compost bin offers numerous benefits, including accelerated decomposition, convenience, space-saving, pest control, odor control, and consistent results. These advantages make rotating compost bins a popular choice for gardeners and individuals who are looking for an efficient and hassle-free composting solution.
Choosing the Right Rotating Compost Bin
When it comes to selecting a rotating compost bin, there are a few factors to consider. Here are some key points to keep in mind:
- Size: Consider the amount of organic waste you generate and the available space in your garden or backyard. Choose a compost bin that suits your needs and fits comfortably in your outdoor area. If you have a small space, opt for a compact or vertical rotating compost bin.
- Material: Rotating compost bins are typically made of plastic or metal. Plastic bins are lightweight, affordable, and easy to move around. They also retain heat well, which can speed up the composting process. Metal bins, on the other hand, are more durable and resistant to rodents. Choose a material that best suits your needs and climate conditions.
- Capacity: Consider the volume of waste you generate and how much compost you require. Bins come in various sizes, ranging from small household bins to larger ones suitable for larger gardens or properties. Ensure that the bin’s capacity aligns with your composting goals.
- Design: Look for a rotating compost bin with a secure locking mechanism or a tight-fitting lid to keep pests out and prevent odors from escaping. Some bins have built-in air vents for better airflow and drainage systems to manage excess moisture.
- Ease of Use: Consider the ease of rotation and accessibility of the compost bin. Look for features like sturdy handles or grips that allow for easy turning without straining your back. Additionally, check if the bin has an opening or access point to remove compost when it’s ready.
- Budget: Determine your budget and explore compost bins within your price range. Remember to consider the long-term benefits of the bin in terms of quality, durability, and efficiency.
Before making a final decision, read customer reviews and consider the reputation of the brand or manufacturer. Look for compost bins that offer warranties or guarantees to ensure that you invest in a reliable and high-quality product.
Ultimately, choosing the right rotating compost bin involves considering factors like size, material, capacity, design, ease of use, and your budget. By selecting a bin that aligns with your needs and preferences, you can kickstart your composting journey on the right foot and enjoy the many benefits it offers.
Setting up a Rotating Compost Bin
Setting up a rotating compost bin is a straightforward process. Follow these steps to get started:
- Choose a Location: Select a suitable location for your compost bin. Ideally, place it on a level surface, such as bare ground, gravel, or concrete. Ensure that it’s easily accessible for adding materials and turning the bin.
- Prepare the Area: Clear the area of any debris or obstacles that may hinder the rotation of the bin. Remove weeds or grass to create a clean and dedicated space for your compost bin.
- Assemble the Bin: Follow the manufacturer’s instructions to assemble the rotating compost bin. Typically, this involves connecting the base, sides, and lid securely. Ensure that all components are properly assembled and locked into place.
- Add a Base Layer: Start by adding a layer of twigs, straw, or other coarse materials at the bottom of the bin. This promotes airflow and drainage, preventing the compost from becoming too compact or waterlogged.
- Collect Composting Materials: Gather a mix of green and brown materials for your compost. Green materials include fresh grass clippings, fruit and vegetable scraps, coffee grounds, and plant trimmings. Brown materials include dried leaves, straw, shredded paper, and cardboard. Aim for a balance of roughly equal amounts of green and brown materials.
- Add Materials: Begin by adding a layer of brown materials as the first layer in the bin. This creates a foundation for the compost pile. Then add a layer of green materials on top. Continue alternating layers of green and brown materials until the bin is about three-quarters full.
- Moisten the Compost: Sprinkle water over the compost layers to ensure the materials are evenly moist. The compost should be moist, like a damp sponge, but not overly wet. Moisture is essential for the composting process and helps microorganisms break down the organic matter.
- Secure the Lid: Close and secure the lid of the compost bin. This helps retain heat, moisture, and keeps pests out. Ensure that the lid fits tightly to prevent any odors from escaping.
- Start Rotating: Begin rotating the compost bin by turning it a few times every few days. This helps mix the materials, aerate the compost, and provide optimal conditions for decomposition. Continue rotating the bin regularly to maintain proper airflow.
- Monitor and Adjust: Regularly monitor the compost temperature, moisture levels, and odor. Adjust the composting process by adding more green or brown materials, adjusting moisture levels, or turning the bin more frequently to achieve the ideal composting environment.
By following these steps, you can effectively set up your rotating compost bin and initiate the composting process. Remember to regularly maintain and monitor the compost bin to ensure successful decomposition and the production of nutrient-rich compost for your gardens or plants.
Adding the Right Ingredients to the Compost Bin
Adding the right ingredients to your compost bin is essential for creating a well-balanced and nutrient-rich compost. Here’s a guide to help you add the right ingredients:
- Green Materials: Green materials, also known as nitrogen-rich materials, provide the essential nutrients and moisture needed for the composting process. These include fruit and vegetable scraps, coffee grounds, tea bags, fresh grass clippings, and plant trimmings. Chop or shred larger pieces to speed up decomposition.
- Brown Materials: Brown materials, also known as carbon-rich materials, help balance the compost and provide structure. These include dried leaves, straw, shredded paper, cardboard, and wood chips. Avoid using materials like glossy or colored paper, as they may contain chemicals that are harmful to the compost ecosystem.
- Avoid Animal Products: Do not add meat, dairy products, bones, or oily foods to your compost bin. These items attract pests and can cause an unpleasant odor. Stick to plant-based materials to keep your compost clean and healthy.
- Avoid Diseased Plants and Weeds with Seeds: Avoid adding diseased plants to your compost bin, as the diseases may survive the composting process and spread to your garden. Additionally, avoid adding weeds with seeds, as the seeds may survive and sprout in your compost.
- Keep a Good Carbon-to-Nitrogen Ratio: Maintaining a proper carbon-to-nitrogen ratio in your compost is crucial. Aim for a ratio of roughly 30 parts carbon to 1 part nitrogen. This balance ensures decomposition occurs effectively. If your compost is too wet and smelly, add more carbon-rich materials. If it’s too dry and slow to decompose, add more nitrogen-rich materials.
- Add Water as Needed: The compost pile should be consistently moist but not soggy. If the pile is too dry, it will decompose slowly. If it’s too wet, it may become compacted and develop an unpleasant odor. Check the moisture level regularly and add water when necessary.
- Mix the Materials: To ensure proper decomposition, mix the materials in your compost bin regularly. This helps distribute moisture evenly and encourages the breakdown of organic matter. Use a compost aerator or pitchfork to turn the pile, ensuring that the outer materials move towards the center and vice versa.
- Layer the Ingredients: Layering the compost ingredients can promote better airflow and decomposition. Start with a layer of brown materials as the base, followed by a layer of green materials. Continue alternating layers until your bin is full.
- Crush Eggshells: Crushed eggshells are a valuable addition to the compost bin as they add calcium and help balance the pH level. Rinse them to remove any residual egg, let them dry, and crush them before adding to the compost. This promotes faster decomposition.
- Utilize Compost Starter: If you want to give your compost a boost, you can use a compost starter. These commercial products contain beneficial microorganisms that help kickstart and accelerate the composting process.
Remember to regularly monitor and adjust the compost pile as needed. With the right combination of green and brown materials, proper moisture levels, and regular turning, you’ll create a nutrient-rich compost that will nourish your plants and promote a healthy garden ecosystem.
Maintaining the Compost Bin
Maintaining your compost bin is essential to ensure the successful decomposition of organic materials and the production of high-quality compost. Here are some key maintenance tasks to keep in mind:
- Monitor Moisture Levels: Regularly check the moisture levels in your compost bin. The compost should be damp, like a wrung-out sponge. If it’s too dry, add water to moisten the pile. If it’s too wet and soggy, add more dry carbon materials, such as shredded paper or dried leaves, to absorb excess moisture.
- Maintain Proper Aeration: Adequate airflow is crucial for the composting process. Regularly turn the compost with a pitchfork or a compost aerator to aerate the pile and prevent it from becoming compacted. Mixing the materials also helps distribute moisture and allows oxygen to reach the microorganisms responsible for decomposition.
- Add Materials as Needed: Continuously add organic materials to your compost bin to maintain a healthy and active composting process. As you generate kitchen scraps, yard waste, and garden trimmings, introduce them to the bin regularly. Aim for a balanced mix of green (nitrogen-rich) and brown (carbon-rich) materials to maintain the ideal carbon-to-nitrogen ratio.
- Remove Large or Non-Compostable Items: Occasionally, you may come across larger items in your compost that take longer to decompose. Remove these items from the compost bin and either discard them or add them to a separate, slower composting pile. Similarly, remove any non-compostable materials, such as plastic or metal, to keep your compost clean and free from contaminants.
- Manage Odors: If your compost bin starts to emit foul odors, it may be an indication of improper aeration or excessive moisture. Mix the compost thoroughly to improve airflow, add dry materials to absorb excess moisture, and avoid adding any materials that may contribute to odors, such as meat or dairy products.
- Protect from Excessive Heat or Cold: Extreme temperatures can affect the composting process. In hot weather, ensure that the compost pile is adequately moist to prevent it from drying out too quickly. In cold weather, insulate the bin with a layer of straw, leaves, or a compost cover to help retain heat and facilitate decomposition.
- Monitor Compost Temperature: Regularly check the temperature of your compost pile. The ideal composting temperature ranges between 120°F (48°C) and 160°F (71°C). This range encourages the growth of beneficial microorganisms and speeds up decomposition. If the temperature drops significantly, it may indicate that the compost needs more green materials or turning to heat up again.
- Keep a Compost Diary: Consider maintaining a compost diary to track the materials you add, turning frequency, and any observations you make. This will help you identify patterns, troubleshoot issues, and make adjustments to your composting routine more effectively.
- Be Patient: Composting is a natural process that takes time. Be patient and allow the microorganisms to work their magic. Depending on the materials and conditions, composting can take anywhere from a few months to a year. Regular maintenance and proper composting practices will yield excellent results over time.
By following these maintenance practices, you’ll create a well-maintained compost bin that consistently produces nutrient-rich compost for your garden. Regular monitoring, turning, and addressing any issues that arise will ensure a healthy composting process and help you reap the benefits of your composting efforts.
Harvesting and Using Compost from a Rotating Compost Bin
Harvesting and utilizing the compost from your rotating compost bin is an exciting and rewarding part of the composting process. Here’s a guide on how to harvest and make the most of your compost:
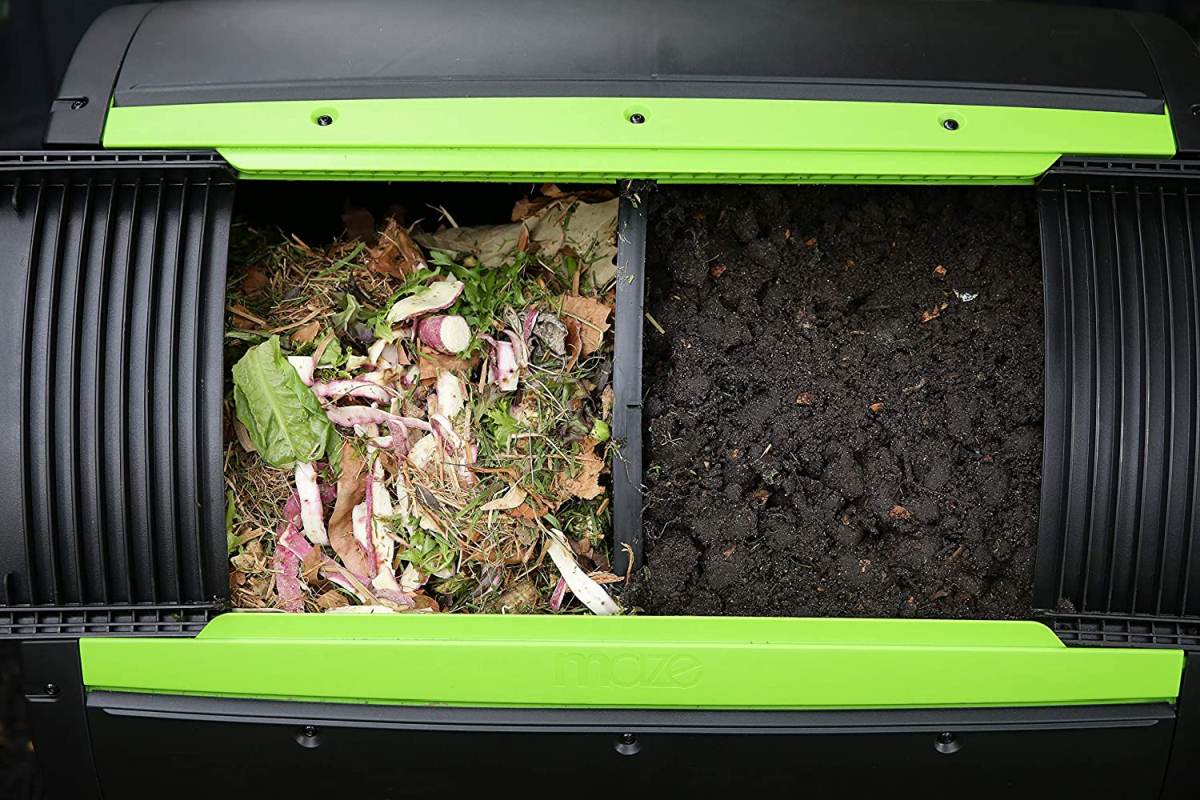
- Wait for Compost Maturity: The composting process takes time, and it’s important to wait until the compost is fully mature before harvesting. Mature compost will have a dark brown, crumbly texture and an earthy smell. This indicates that the organic materials have broken down completely and are ready to be used.
- Stop Adding Materials: At least two to four weeks prior to harvesting, stop adding any new materials to the compost bin. This allows the remaining materials to fully decompose and ensures that you’re harvesting a consistent batch of compost without any unfinished materials.
- Check Moisture Levels: Before harvesting, ensure the compost has the right moisture level. It should be moist but not excessively wet. If the compost is too dry, lightly moisten it with water a few days before harvesting. If it’s too wet, allow it to dry slightly by leaving the lid off for a day or two.
- Harvest from the Bottom of the Bin: In a rotating compost bin, the finished compost will settle at the bottom. Start by rotating the bin so that the contents gradually shift to one side. Then, open the hatch or access point at the bottom of the bin and begin harvesting the mature compost from there. Remove the compost in small batches, leaving any unfinished or unprocessed materials behind.
- Sift Compost (Optional): If desired, you can sift the harvested compost to remove any larger particles or undecomposed materials. This will result in a finer, more uniform texture. Use a mesh or screen to sift the compost, or simply use your hands to break up any clumps.
- Utilize Compost: Your harvested compost is now ready to be used in a variety of ways. Use it to enrich soil in your garden beds, mix it into potting soil for container plants, or spread a layer of compost around the base of established plants as a nutrient-rich mulch.
- Compost Storage: If you have excess compost or want to save it for future use, store it in a dry, covered container, such as a plastic bin or a compost bag. Keep it in a cool, dry place to maintain its quality. Avoid storing compost in a tightly sealed container, as it may retain excessive moisture and lead to unpleasant odors or mold.
- Continue Composting: After harvesting, continue to add new organic materials to your compost bin to start the process again. By maintaining a constant cycle of adding, composting, and harvesting, you can ensure a steady supply of nutrient-rich compost for your gardening needs.
Remember, compost is a valuable resource that improves soil structure, promotes healthy plant growth, and reduces the need for chemical fertilizers. By harvesting and utilizing your compost properly, you can maximize its benefits and contribute to a more sustainable and thriving garden ecosystem.
Troubleshooting Common Issues with Rotating Compost Bins
While rotating compost bins offer many benefits, they can sometimes encounter common issues. Here are some troubleshooting tips to help you overcome these challenges:
- Slow Decomposition: If your compost is decomposing slowly, it may be due to a lack of moisture or insufficient aeration. Check the moisture level and ensure that the compost remains damp but not overly wet. Increase aeration by turning the compost more frequently or adding more brown materials to improve airflow.
- Foul Odors: Foul odors are often a sign of an anaerobic composting process. Ensure that the compost is well-aerated by regularly turning the bin. Adjust the carbon-to-nitrogen ratio by adding more brown materials to absorb excess moisture. Avoid adding meat, dairy, or oily foods, as they can contribute to odor issues.
- Pest Infestation: If pests such as flies, rats, or raccoons are attracted to your compost bin, make sure it is secure and that the lid fits tightly. Avoid adding food scraps that may attract pests. Consider placing wire mesh or a barrier at the bottom of the bin to prevent rodents from entering.
- Excessive Moisture: If your compost is excessively wet and does not decompose properly, add more dry brown materials, such as shredded paper or dried leaves, to absorb the excess moisture. Avoid adding materials that are too wet, like food scraps that have a high water content. Ensure proper aeration by turning the bin more frequently.
- Poor Quality Compost: If your compost does not have a dark brown, crumbly texture and an earthy smell, it may not be fully decomposed or properly balanced. Adjust the carbon-to-nitrogen ratio by adding more green or brown materials as needed. Increase aeration by turning the bin more regularly and monitor moisture levels to ensure optimal conditions for decomposition.
- Temperature Fluctuations: Extreme temperatures can impact the composting process. In cold weather, insulate the bin using straw or a compost cover to help retain heat. In hot weather, monitor moisture levels to prevent the compost from drying out too quickly. Adjust the compost mixture by adding more green materials in cold weather or more brown materials in hot weather.
- Poor Air Circulation: Proper airflow is crucial for composting. Ensure that the compost bin has proper ventilation through air vents or by leaving gaps between the materials. Avoid packing the bin too tightly, as this restricts air circulation. Regularly turn the compost to improve airflow and mix the materials.
- Presence of Weed Seeds: If weeds continue to sprout from your compost, it’s likely that the composting process did not reach a high enough temperature to kill the weed seeds. Avoid adding weeds with seeds to your compost bin. If weed seeds persist, consider using a hot composting method that reaches higher temperatures to eliminate weed seeds.
By understanding and addressing these common issues, you can troubleshoot and overcome challenges that may arise with your rotating compost bin. With proper maintenance, adjustments, and a little patience, you’ll be able to produce high-quality compost for your garden and enjoy the benefits of sustainable and eco-friendly gardening practices.
Conclusion
A rotating compost bin is a fantastic tool for anyone interested in composting and sustainable gardening. With its numerous benefits, including accelerated decomposition, convenience, space-saving design, pest control, odor control, and consistent results, a rotating compost bin offers an efficient and hassle-free approach to composting.
In this article, we explored the process of using a rotating compost bin from start to finish. We discussed the importance of choosing the right bin based on factors such as size, material, capacity, design, ease of use, and budget. We also explored how to set up the compost bin, add the right ingredients, and maintain proper composting conditions.
By following the guidelines for adding the right organic materials, maintaining moisture levels, ensuring proper aeration, and troubleshooting common issues, you can achieve successful composting results. Harvesting your finished compost and utilizing it in various ways, such as enriching soil, nourishing plants, or storing it for future use, allows you to reap the benefits of your composting efforts.
Composting with a rotating compost bin not only reduces waste and landfill impact but also helps create nutrient-rich soil, promotes healthy plant growth, and reduces the need for chemical fertilizers. It is a rewarding and sustainable practice that contributes to a more eco-friendly and thriving garden ecosystem.
So, whether you’re an enthusiastic gardener looking to improve soil health, a sustainability advocate seeking to minimize waste, or a DIY enthusiast embracing hands-on projects, using a rotating compost bin is a practical and effective way to engage in the world of composting. Start composting with a rotating compost bin today and enjoy the many benefits it brings to both your garden and the environment.