Home>Gardening Techniques>Plant Care>How To Transplant A Rosemary Bush
Plant Care
How To Transplant A Rosemary Bush
Published: January 29, 2024
Discover the essential steps of transplanting a rosemary bush for optimal plant care. Learn how to successfully move your rosemary plant to a new location and promote healthy growth.
(Many of the links in this article redirect to a specific reviewed product. Your purchase of these products through affiliate links helps to generate commission for Chicagolandgardening.com, at no extra cost. Learn more)
Table of Contents
- Introduction
- Step 1: Choose the right time to transplant
- Step 2: Prepare the new location
- Step 3: Dig up the rosemary bush
- Step 4: Trim the roots and foliage
- Step 5: Transplant the rosemary bush
- Step 6: Water and mulch the transplanted bush
- Step 7: Monitor and care for the transplanted rosemary bush
- Conclusion
Introduction
Transplanting a rosemary bush can be a rewarding experience for any plant enthusiast. Whether you are moving to a new home or simply rearranging your garden, knowing how to properly transplant a rosemary bush is essential for its survival and continued growth. Rosemary is a versatile herb with fragrant evergreen foliage that is commonly used in cooking, aromatherapy, and medicinal purposes. With its strong aroma and delicate purple-blue flowers, rosemary adds beauty and flavor to any garden.
Transplanting a rosemary bush may seem like a daunting task, but with proper care and preparation, it can be done successfully. This article will guide you through the necessary steps to ensure a smooth and successful transplant. From choosing the right time to transplant, to preparing the new location, and caring for the transplanted bush, this guide will provide you with all the information you need to transplant your rosemary bush with confidence.
Before we delve into the specific steps, it’s important to understand that rosemary plants have a deep root system and prefer well-drained soil. They thrive in full sun and can tolerate dry conditions once established. This resilient herb is native to the Mediterranean region and is well-suited for warm climates.
Now, let’s get started on the journey of transplanting your rosemary bush. With a little patience and care, you can successfully relocate your rosemary bush and continue to enjoy its beauty and benefits for years to come.
Step 1: Choose the right time to transplant
Timing is crucial when it comes to transplanting a rosemary bush. The best time to transplant a rosemary bush is during the dormant season, which is typically in early spring or fall. During these periods, the plant is not actively growing, making it less susceptible to shock and stress.
If you live in a mild climate where winters are not extremely cold, you can opt to transplant in the fall. This allows the root system to establish itself before the onset of winter. However, if you experience harsh winters, it’s advisable to wait until early spring when the weather starts to warm up.
Before you begin the transplanting process, it’s important to consider the weather conditions. Choose a day when the weather is mild and there is no immediate threat of frost. Ideally, pick a day when the soil is moist but not overly saturated.
Keep in mind that rosemary plants are sensitive to extreme temperatures. Avoid transplanting during hot summer months when the plant is more likely to suffer from heat stress. Similarly, avoid transplanting during winter freezes, as the cold temperatures can damage the plant.
By selecting the right time to transplant your rosemary bush, you give it the best chance of establishing itself in its new home and thriving in the long run.
Step 2: Prepare the new location
Before you start digging up your rosemary bush, it’s important to prepare the new location where it will be transplanted. Here are some steps to follow:
- Choose the right spot: Look for a location in your garden that receives full sun for at least 6-8 hours a day. Rosemary thrives in sunny conditions and requires ample sunlight to grow and thrive.
- Prepare the soil: Rosemary prefers well-drained soil, so make sure the new location has soil that is loose, sandy, and well-draining. Improve the soil by incorporating organic matter, such as compost or well-rotted manure, to enhance the soil’s fertility and drainage.
- Test the soil pH: Rosemary prefers a slightly acidic to neutral soil pH, ideally between 6.0 and 7.0. You can test the soil pH using a soil testing kit available at your local garden center. If the soil pH is too acidic or too alkaline, you can adjust it by adding organic amendments such as lime or sulfur.
- Clear any weeds or debris: Before transplanting your rosemary bush, remove any weeds or unwanted plants from the new location. Clear away rocks, sticks, and other debris to create a clean and open space for your rosemary bush to thrive.
- Consider drainage: Ensure that the new location has proper drainage to prevent waterlogging. If the area tends to be soggy or retains water, it’s recommended to create a raised bed or add organic matter to improve drainage.
By adequately preparing the new location for your rosemary bush, you provide it with a favorable environment to grow and establish itself in its new home. Investing time and effort in preparing the soil and ensuring proper drainage will greatly contribute to the success and longevity of your transplanted rosemary bush.
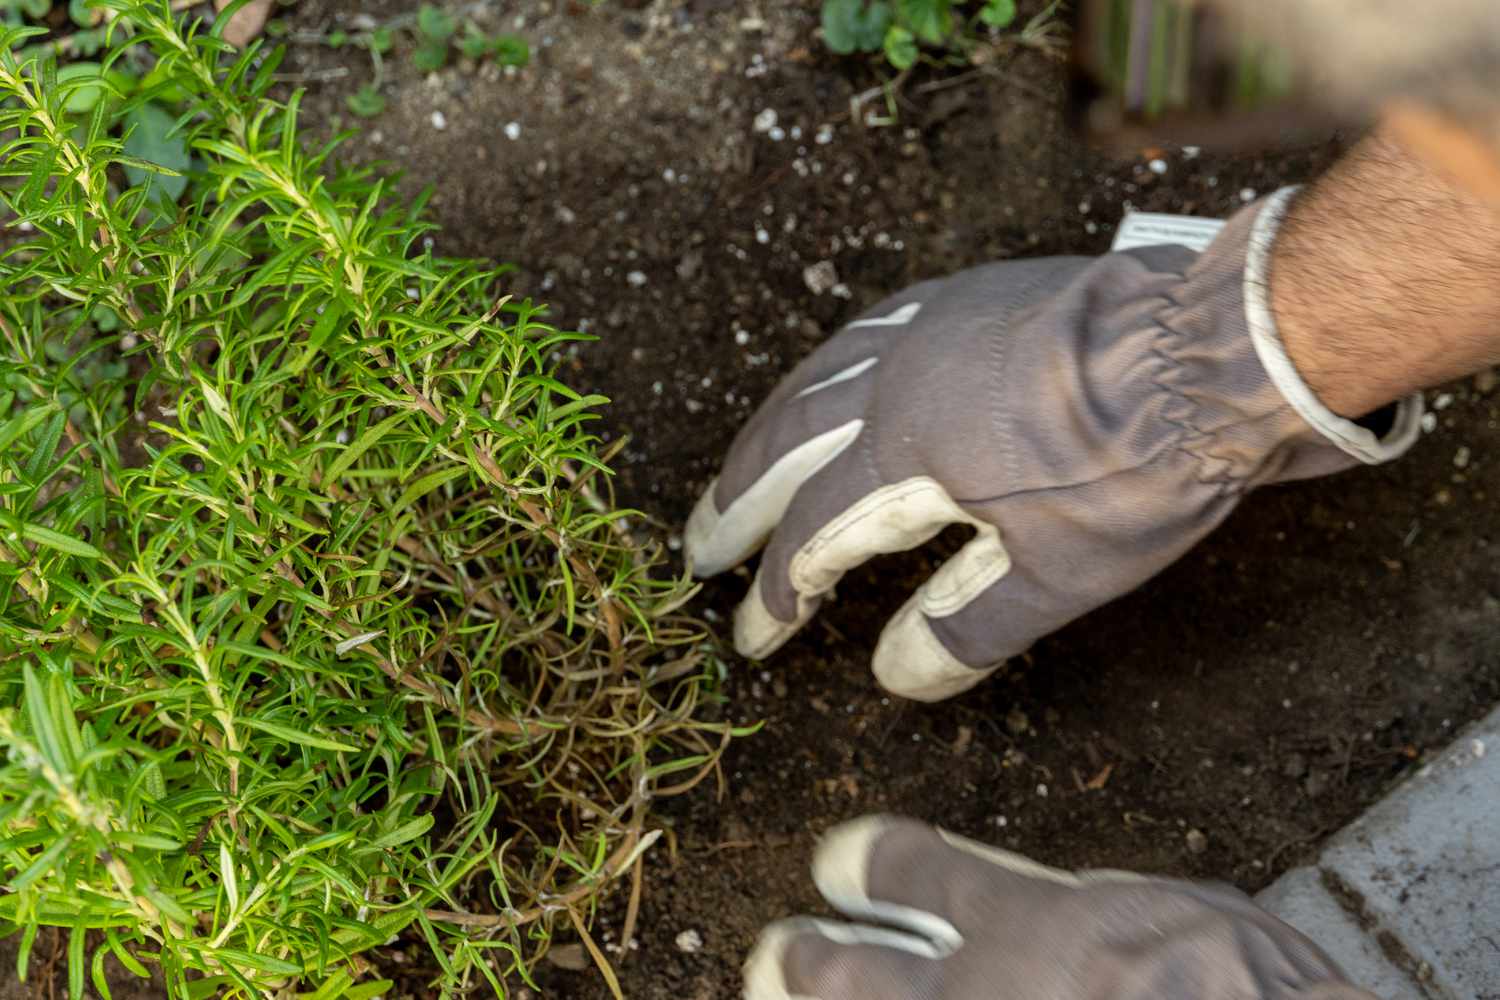
Step 3: Dig up the rosemary bush
Once you have chosen the right time and prepared the new location, it’s time to dig up your rosemary bush. Follow these steps to safely remove the plant:
- Water the rosemary bush: Before digging up the plant, give it a thorough watering. Moist soil will help hold the root ball together and minimize stress on the plant during the transplanting process.
- Prepare the tools: Gather the necessary tools for digging, including a shovel or garden fork, a hand trowel, and a pair of pruners for any necessary root trimming.
- Carefully dig around the plant: Begin by digging a trench around the base of the rosemary bush, making sure to dig wide enough to avoid damaging the roots. Insert the shovel or garden fork at an angle, gently prying and loosening the soil as you work your way around the plant.
- Lift the plant: Once you have loosened the soil around the entire plant, carefully lift the rosemary bush by grasping the base of the plant near the soil line. Support the root ball with your other hand to prevent it from falling apart.
- Inspect the root ball: Take a moment to examine the root ball and look for any signs of damage, disease, or pests. Trim off any damaged or diseased roots using clean and sharp pruning shears. This will promote healthy growth in the new location.
Transplanting a rosemary bush can be a delicate process, and it’s important to handle the plant with care to avoid damaging the roots. By following these steps, you can safely dig up your rosemary bush and prepare it for transplantation to its new home.
Step 4: Trim the roots and foliage
After digging up the rosemary bush, it’s important to trim the roots and foliage to ensure the plant’s healthy growth and successful transplantation. Here are the steps to follow:
- Trim the roots: Examine the root ball and trim any long or damaged roots using clean and sharp pruning shears. Trim back any excessively long roots to encourage the development of new, healthy roots. Be careful not to remove too much of the root system, as this can hinder the plant’s ability to establish itself in the new location.
- Trim the foliage: Depending on the size of the plant and the amount of foliage, you may need to trim back some of the branches and foliage. Prune any dead, damaged, or overgrown branches using clean and sharp pruning shears. Aim to maintain a balanced and compact shape for the rosemary bush.
- Consider root hormone: If desired, you can dip the trimmed ends of the roots in a rooting hormone powder or gel. This will help stimulate root growth and increase the chances of successful transplantation. However, this step is optional and not necessary for all transplanted rosemary bushes.
Trimming the roots and foliage of the rosemary bush helps to promote healthy growth and reduce stress on the plant during transplantation. By removing any damaged or excessive parts, you ensure that the plant can devote its energy and resources to establishing itself in its new home.
Step 5: Transplant the rosemary bush
Now that you have prepared the new location and trimmed the roots and foliage of your rosemary bush, it’s time to transplant it to its new home. Follow these steps for a successful transplant:
- Dig a hole: Dig a hole in the prepared new location that is slightly larger and deeper than the root ball of the rosemary bush. Make sure the hole is deep enough to accommodate the entire root system without bending or crowding the roots.
- Place the plant in the hole: Carefully place the rosemary bush in the center of the hole, making sure it is positioned at the same depth as it was in its previous location. The top of the root ball should be level with the surrounding soil.
- Backfill the hole: Fill the hole with the soil you dug out, gently firming it around the root ball as you go. Avoid packing the soil too tightly, as this can hinder root growth and water penetration. Leave a slight depression around the base of the plant to catch water during watering.
- Water the plant: After transplanting, give the rosemary bush a thorough watering to help settle the soil and remove any air pockets around the roots. Water until the soil is evenly moist, but not saturated. This will help the plant establish itself in its new location.
Transplanting the rosemary bush requires careful positioning and proper backfilling to ensure its successful establishment. By following these steps, you can ensure that the plant is placed and secured properly in its new home, setting the stage for healthy growth and continued development.
Step 6: Water and mulch the transplanted bush
Proper watering and mulching are essential steps in caring for a transplanted rosemary bush. These steps help retain moisture, promote root growth, and protect the plant from extreme temperatures. Follow these guidelines to ensure the health and well-being of your transplanted rosemary bush:
- Watering: After transplanting, it’s crucial to provide adequate water to help the plant establish itself in its new location. Water the rosemary bush thoroughly immediately after transplanting, ensuring that the soil is evenly moist. Afterward, water the plant regularly, keeping the soil consistently moist but not waterlogged. Be mindful not to overwater, as rosemary does not tolerate soggy conditions.
- Mulching: Apply a layer of organic mulch around the base of the transplanted rosemary bush. Mulching helps retain moisture, suppresses weed growth, and regulates soil temperature. Use materials such as straw, wood chips, or shredded bark, and spread the mulch layer evenly, keeping it around 2-3 inches thick. Be cautious to keep the mulch away from the base of the plant to prevent moisture buildup and potential rotting.
- Monitor soil moisture: Regularly check the moisture level of the soil around the transplanted rosemary bush. Stick your finger into the soil to a depth of about an inch. If it feels dry, it’s time to water. On the other hand, if it feels consistently moist, reduce the frequency of watering to prevent waterlogging.
- Watering during drought conditions: During periods of drought or extreme heat, pay extra attention to watering. Rosemary plants are drought-tolerant, but newly transplanted bushes require regular watering until they are fully established. Water deeply, making sure the water reaches the root zone, and allow the soil to dry out slightly between watering sessions.
By providing sufficient water and mulch to your transplanted rosemary bush, you create an optimal environment for its growth and development. Regular monitoring and proper watering practices will help the plant establish strong roots and adapt to its new surroundings.
Step 7: Monitor and care for the transplanted rosemary bush
After transplanting your rosemary bush, ongoing care and monitoring are essential for its health and vitality. Follow these guidelines to ensure that your transplanted rosemary bush thrives in its new location:
- Provide adequate sunlight: Rosemary bushes thrive in full sunlight. Ensure that the transplanted bush receives at least 6-8 hours of direct sunlight each day. If necessary, prune nearby trees or plants that may cast shade on the rosemary bush.
- Regularly monitor soil moisture: Check the moisture level of the soil around the rosemary bush regularly. Adjust your watering schedule accordingly to maintain consistent but not excessive moisture. Remember, rosemary prefers well-drained soil, so avoid overwatering.
- Prune as needed: Regularly prune your rosemary bush to maintain its shape and promote healthy growth. Remove any dead or damaged branches and trim back excessive growth. Pruning also helps improve air circulation, reducing the risk of diseases.
- Fertilize sparingly: Rosemary bushes do not require excessive fertilization. A light application of balanced organic fertilizer once or twice a year, in early spring and late summer, is usually sufficient. Avoid over-fertilization, as it can lead to excessive foliage growth at the expense of essential oil production.
- Protect from extreme cold: If you live in an area with harsh winter conditions, provide protection for your transplanted rosemary bush. Cover the bush with burlap or a breathable winter cover during freezing temperatures to prevent damage.
- Maintain weed control: Keep the area around the rosemary bush free from weeds. Weeds compete for nutrients and water, potentially impacting the growth and health of the rosemary bush. Regularly weed the area to create a weed-free environment.
By monitoring and providing necessary care, you can ensure the long-term health and vigor of your transplanted rosemary bush. Stay vigilant in maintaining optimal growing conditions, and your rosemary bush will reward you with its aromatic foliage and culinary delights for years to come.
Conclusion
Transplanting a rosemary bush may seem like a challenging task, but with proper knowledge and care, it can be a rewarding experience. By following the steps outlined in this guide, you can successfully transplant your rosemary bush to a new location and ensure its continued growth and vitality.
Remember, choosing the right time to transplant, preparing the new location, and taking care during the digging process are crucial for a successful transplant. Trimming the roots and foliage, along with providing adequate water and mulch, are essential steps to promote the health and establishment of the transplanted rosemary bush.
Once the transplanted rosemary bush is in its new home, continuous monitoring and care are necessary. Ensure it receives sufficient sunlight, maintain the right soil moisture, and prune as needed to encourage healthy growth. Protect the plant from extreme cold and maintain weed control to minimize competition for nutrients.
With patience, attention, and the right care, your transplanted rosemary bush will thrive and continue to provide you with its aromatic fragrance, culinary delights, and other benefits for years to come. Enjoy the beauty and bounty of your newly transplanted rosemary bush!