Home>Gardening Techniques>DIY Projects>How To Make A Tonic With Herbs
DIY Projects
How To Make A Tonic With Herbs
Published: September 27, 2023
Learn how to make your own tonic using herbs with this easy DIY project. Enhance your health and wellness naturally.
(Many of the links in this article redirect to a specific reviewed product. Your purchase of these products through affiliate links helps to generate commission for Chicagolandgardening.com, at no extra cost. Learn more)
Table of Contents
Introduction
Are you interested in creating your own homemade tonic with herbs? Not only is it a rewarding DIY project, but it also provides numerous health benefits. By incorporating a variety of herbs into your tonic, you can harness their therapeutic properties and enhance your well-being.
Creating your own tonic allows you to have full control over the ingredients, ensuring that you’re using only the freshest and highest quality herbs. Additionally, making your own tonic can save you money in the long run, as store-bought tonics can be quite pricey. With a little knowledge and the right ingredients, you’ll be able to make a tonic that suits your tastes and preferences.
Not only does making your own tonic give you the satisfaction of creating something from scratch, but it also allows you to experiment with different flavor combinations. You can personalize your tonic by selecting herbs that resonate with you and provide the specific benefits you’re looking for. Whether you’re seeking a tonic to boost your immune system, improve digestion, or promote relaxation, there’s a wide range of herbs to choose from that can address your needs.
Throughout this article, we will guide you through the process of making a tonic with herbs, from choosing the right herbs to storing and using the final product. By following these steps, you’ll be well on your way to creating a homemade tonic that can support your overall health and wellness.
Choosing the Right Herbs
When it comes to making a tonic with herbs, selecting the right herbs is crucial. Each herb has its own unique properties and benefits, so it’s important to choose those that align with your specific health goals and preferences.
First, consider the purpose of your tonic. Are you looking to boost your immune system, improve digestion, or promote relaxation? Once you have identified your goal, you can start researching herbs that are known to support that particular area of health.
For immune support, consider herbs like echinacea, elderberry, and astragalus. These herbs are known for their immune-boosting properties and can help protect against common illnesses.
If you’re looking to improve digestion, herbs like ginger, peppermint, and fennel can be beneficial. These herbs can help soothe the digestive system, alleviate bloating, and promote healthy digestion.
To promote relaxation and reduce stress, consider herbs like chamomile, lavender, and passionflower. These herbs have calming properties that can help you unwind and improve sleep quality.
It’s also important to consider any specific health conditions or concerns you may have. Some herbs may interact with medications or exacerbate certain conditions, so it’s always a good idea to consult with a healthcare professional before incorporating new herbs into your routine.
When selecting herbs, opt for organic and dried varieties whenever possible. This ensures that you’re getting the highest quality herbs without any potential pesticides or contaminants.
Lastly, don’t be afraid to get creative and experiment with different herb combinations. You may discover a blend of herbs that perfectly suits your tastes and provides even greater benefits.
Gathering the Herbs
Now that you’ve chosen the herbs for your tonic, it’s time to gather them and prepare for the tonic-making process. There are a few different ways you can obtain the herbs you need:
- Growing your own: If you have a green thumb and access to some outdoor space, consider growing your own herbs. This allows you to have complete control over the growing conditions and ensures that you’re using the freshest herbs possible. Plus, tending to your own herb garden can be a rewarding and therapeutic experience.
- Purchasing from a local market or nursery: If you don’t have the space or time to grow your own herbs, look for local markets or nurseries that sell fresh, organic herbs. This way, you can support local businesses and be confident in the quality of the herbs you’re buying.
- Ordering online: Another option is to order your herbs online. Many reputable online stores specialize in selling a wide variety of dried herbs. Make sure to read reviews and choose a trusted source to ensure the quality and freshness of the herbs.
When gathering the herbs, handle them with care to preserve their beneficial properties. Avoid crushing or bruising the herbs excessively, as this can diminish their potency. It’s also important to gather the herbs at the right time, as some herbs are best harvested in the morning when their essential oils are at their peak.
Whether you’re growing your own herbs or purchasing them, make sure to gather more than you think you’ll need. This way, you’ll have enough to experiment with different ratios and adjust the flavor of your tonic according to your preferences.
Before using the gathered herbs, give them a gentle wash to remove any dirt or debris. Once cleaned, pat them dry or allow them to air dry before proceeding with the tonic-making process.
Gathering and preparing the herbs is an important step that sets the foundation for a flavorful and effective tonic. Taking the time to source high-quality herbs will greatly enhance the overall quality of your homemade tonic.
Preparing the Base
Now that you have gathered your herbs, it’s time to prepare the base for your tonic. The base is the liquid that will be infused with the herbs to extract their beneficial properties. There are a few different options for the base:
- Water: Using water as the base is a simple and cost-effective option. It allows the flavors and properties of the herbs to shine through without any additional flavors. You can use filtered or spring water to ensure the best quality for your tonic.
- Apple Cider Vinegar: Apple cider vinegar adds a tangy and slightly acidic flavor to the tonic. It also has its own health benefits, such as promoting digestion and supporting a healthy immune system.
- Alcohol: Using alcohol, such as vodka or brandy, as the base creates a tincture-like tonic. This method is often used when the goal is to extract the medicinal properties of the herbs. Keep in mind that the alcohol content will evaporate during the tonic-making process, leaving behind the herbal essence.
To prepare the base, simply pour the desired amount of water or liquid into a clean glass container. If using water, make sure it is at room temperature. If using alcohol or apple cider vinegar, be cautious of the alcohol content and dilute it with water if necessary.
When preparing the base, it’s essential to use clean and sterilized equipment to prevent any contamination. Cleanse the container and any utensils you will be using with hot, soapy water, or use a diluted vinegar solution.
Once the base is ready, it’s time to move on to the next step: adding the herbs. The combination of the base and the herbs will create a potent tonic that you can enjoy for its flavor and health benefits.
Adding the Herbs
With the base prepared, it’s time to add the herbs to infuse their flavors and properties into your tonic. The amount of herbs you use will depend on personal preference and the desired strength of the tonic.
Start by selecting the herbs you want to include in your tonic. You can use a single herb or create a unique blend of herbs to achieve the desired flavor and benefits. Consider the flavors and aromas of each herb and how they will complement each other in the final tonic.
If using dried herbs, a general guideline is to use about 2-3 teaspoons of herbs per cup of base liquid. Adjust the amount depending on your taste preferences and the potency of the herbs you are using. Feel free to experiment with different ratios to find the perfect balance.
Before adding the herbs, crush or grind them slightly to release their essential oils and maximize their flavors. This can be done using a mortar and pestle or by rubbing the herbs gently between your palms.
Slowly add the crushed herbs to the base liquid. Stir gently to ensure that the herbs are evenly distributed. You can use a wooden or stainless-steel spoon for stirring, avoiding any reactive materials that may affect the flavors or properties of the herbs.
As you add the herbs, take a moment to appreciate the vibrant colors and aromas that they bring to the tonic. This process is not just about the end result, but also about the journey of creating something unique and special.
Once the herbs are added, cover the container with a clean cloth or a lid. This will prevent any external contaminants from entering while still allowing air circulation.
Now that the herbs are infused in the base, it’s time to let the tonic steep and develop its flavors. In the next section, we will explore the process of infusing the tonic to extract the beneficial properties of the herbs.
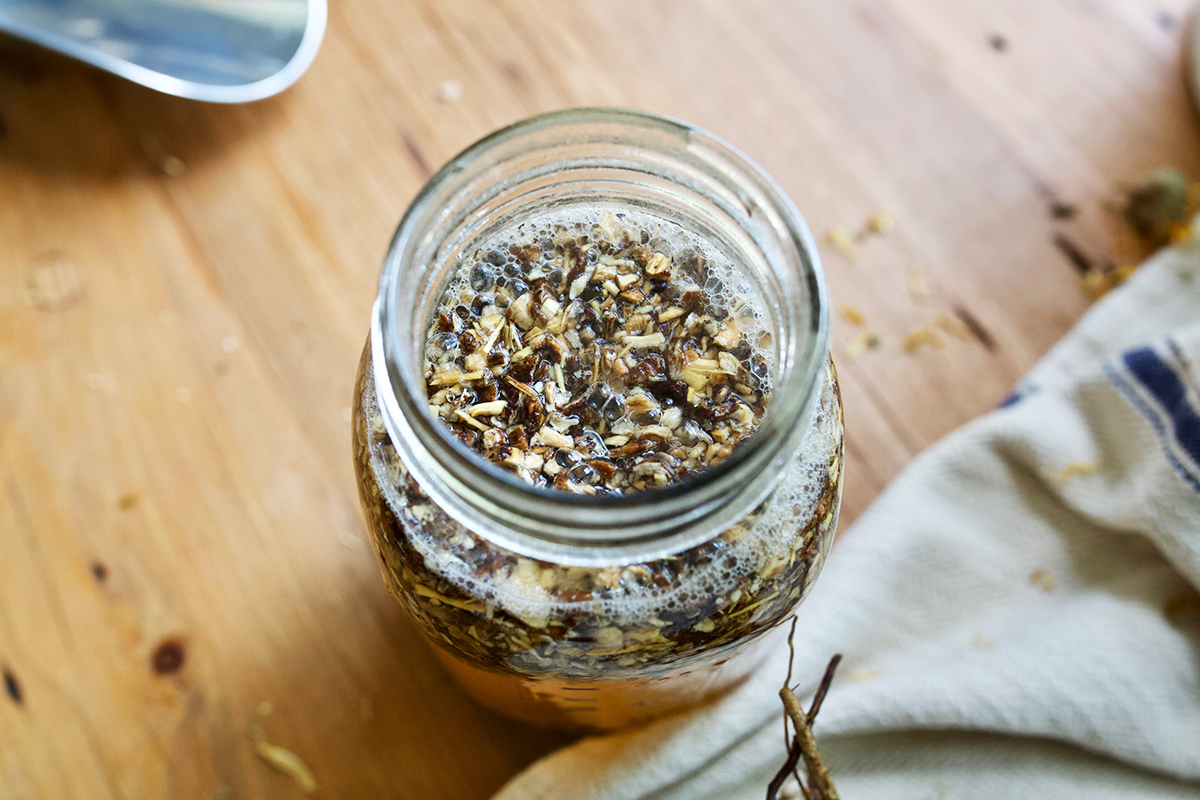
Infusing the Tonic
Infusing the tonic is the process of allowing the herbs to steep in the base liquid, extracting their flavors and beneficial properties. This step requires patience and time, as the infusion process can take anywhere from a few days to a few weeks.
Place the container with the herbs and base in a cool, dark location. This will help preserve the potency of the herbs and prevent degradation due to exposure to light or heat. Make sure to check on the tonic periodically, giving it a gentle stir to promote the infusion process.
The duration of the infusion depends on the herbs used and the desired strength of the tonic. Some herbs infuse quickly, while others require a longer steeping time. As a general guideline, you can start tasting the tonic after a few days to gauge the strength and flavors. If you’re satisfied with the taste, you can proceed to the next step. However, if you prefer a stronger infusion, you can continue steeping the tonic for a longer period.
While the tonic infuses, take a moment to reflect on the transformative process that is occurring. The base liquid absorbs the essence of the herbs, resulting in a unique and powerful concoction that can support your well-being.
During the infusion process, pay attention to any changes in color, aroma, and taste. These changes indicate that the herbs’ properties are being released into the tonic. Enjoy the evolving complexity of flavors as the herbs work their magic.
Remember, the longer the infusion period, the stronger the tonic will become. However, be cautious not to over-infuse, as this can lead to an overpowering taste or a bitter flavor.
Once you’re satisfied with the infusion, it’s time to move on to the next step: straining the tonic. We will discuss this process in detail in the following section.
Straining the Tonic
After the infusion period, it’s time to strain the tonic to remove the herbs and obtain a smooth and clear liquid. Straining will help remove any plant material or sediment, resulting in a visually appealing and pleasant tasting tonic.
Begin by preparing a clean container to collect the strained tonic. It’s best to use a glass container as it won’t react with the tonic and will keep it fresh and flavorful. Sterilize the container to ensure cleanliness.
Next, prepare your straining equipment. You can use a fine mesh strainer, cheesecloth, or a nut milk bag. Place the strainer over the clean container or use a funnel lined with cheesecloth.
Carefully pour the tonic through the strainer, allowing the liquid to pass through while catching the herbs and any solids. Take your time to make sure all the liquid is strained, pressing gently on the herbs to extract any remaining liquid.
Once the straining is complete, you’ll be left with a clear and refined tonic. Marvel at the transformation from a mixture of herbs and liquid to a smooth and concentrated elixir.
If desired, you can repeat the straining process for a finer filtration and to ensure no herb particles remain. This step is optional, but it can result in a more polished and visually appealing tonic.
Remember not to waste the leftover herbs. They can still be valuable. You can compost them or use them in other culinary creations, such as herbal teas or in cooking.
Now that the tonic is strained and ready, it’s time to learn how to store and use the tonic effectively. We will explore these important aspects in the next section.
Storing and Using the Tonic
Once your homemade tonic is strained, it’s important to store it properly to maintain its freshness and effectiveness. Here are some guidelines for storing and using your tonic:
Store in airtight containers: Transfer the strained tonic into dark glass bottles or jars with airtight lids. This will help protect the tonic from light and air, which can degrade its quality over time. Label the containers with the name of the tonic and the date of preparation.
Keep in a cool, dark place: Store the bottles/jars in a cool, dark place, such as a cupboard or pantry. Avoid exposure to direct sunlight, as it can lead to the breakdown of beneficial compounds in the tonic.
Avoid extreme temperatures: Fluctuations in temperature can affect the potency and flavors of the tonic. It’s best to store it in a place with a consistent temperature. Avoid storing it near heat sources or in the refrigerator, as this can alter the taste and texture of the tonic.
Use within a reasonable timeframe: While homemade tonics can last for several months when stored properly, it’s recommended to use them within 6-12 months for optimal freshness and potency. Over time, the flavors and effectiveness may diminish.
Now, let’s talk about how to use your homemade tonic:
Dosage and frequency: Start with a small dosage and gradually increase if needed. The recommended dosage depends on the specific tonic and your individual needs. It’s best to consult with a herbalist or healthcare professional to determine the appropriate dosage for you.
Enjoy on its own or incorporate into recipes: You can consume the tonic directly by taking a small amount under the tongue or diluting it in a glass of water. Alternatively, you can incorporate it into various recipes, such as smoothies, juices, or salad dressings, to enjoy its flavors and benefits.
Listen to your body: Pay attention to how your body responds to the tonic. Everyone’s bodies are different, so it’s important to observe any changes or reactions and adjust accordingly. If you experience any adverse effects, discontinue use and consult a healthcare professional.
By storing your tonic properly and using it mindfully, you can reap the benefits of your homemade creation on a regular basis.
Conclusion
Creating your own homemade tonic with herbs is a fulfilling and empowering DIY project. It allows you to harness the therapeutic properties of herbs and tailor your tonic to your specific health goals and preferences. Through careful herb selection, gathering, preparation, infusion, straining, and storage, you can create a flavorful and potent tonic that supports your overall well-being.
Remember to choose the right herbs based on your desired health benefits, and gather them from reliable sources. The base you select, whether water, apple cider vinegar, or alcohol, will add unique characteristics to your tonic. Infusing the tonic allows the herbs to release their flavors and properties, while straining removes any solids and sediment, resulting in a smooth and visually appealing elixir.
Storing your homemade tonic in airtight containers, in a cool and dark place, will help maintain its quality and effectiveness. Using the tonic involves finding the right dosage, enjoying it on its own or incorporating it into recipes, and listening to your body for any potential reactions or adjustments that may be necessary.
Embarking on the journey of creating your own tonic with herbs not only provides you with a personalized and natural wellness tool, but also offers a connection to nature and the satisfaction of making something with your own hands. So, gather your herbs, prepare your base, infuse, strain, and savor the fruits of your labor in the form of a homemade tonic that can support your health and well-being.
Remember, this is just the beginning. With experimentation and further exploration, you can continue to refine and create your own unique tonic recipes, embracing the endless possibilities that herbs have to offer.