Home>Gardening Techniques>DIY Projects>How To Terrace A Hillside For Planting


DIY Projects
How To Terrace A Hillside For Planting
Modified: February 8, 2024
Learn how to terrace a hillside for planting with these DIY projects. Transform your landscape and create a stunning garden on even the steepest slopes.
(Many of the links in this article redirect to a specific reviewed product. Your purchase of these products through affiliate links helps to generate commission for Chicagolandgardening.com, at no extra cost. Learn more)
Table of Contents
Introduction
Welcome to the world of DIY projects! If you’ve been wondering how to make the most of a sloping hillside in your backyard, you’ve come to the right place. Terracing a hillside offers a brilliant solution to transform an unusable space into a beautiful and functional area for planting and landscaping.
By creating terraced beds, you can prevent soil erosion, maximize sunlight exposure, and create distinct levels for different plants and garden features. Whether you’re an experienced gardener or a first-time DIY enthusiast, this step-by-step guide will walk you through the process of terrace construction, from assessing the hillside to planting and maintenance.
Terracing not only enhances the visual appeal of your outdoor space but also allows you to cultivate a wider variety of plants, from colorful flowers to lush vegetables and herbs. Plus, it can add depth and dimension to your landscape, making it more inviting and enjoyable for outdoor activities. So, let’s dive into the exciting world of terracing and create a stunning garden on your hillside!
Assessing the Hillside
The first step in terrace construction is assessing your hillside to determine its suitability for terracing. Take a careful look at the slope, soil composition, drainage, and existing vegetation. This evaluation will help you plan and design your terrace effectively.
Start by measuring the slope of the hillside using a measuring tape or an inclinometer. This will give you an idea of the degree of slope and help you determine the number of terraces you’ll need. Consider the accessibility of the slope as well, as you’ll need to navigate it during construction and maintenance.
Next, evaluate the soil composition. Sandy or loamy soils are more suitable for terracing, as they drain well and are easier to work with. Clay soils, on the other hand, can be more challenging due to their poor drainage. If you have clay soil, you may need to amend it with organic matter or consider implementing additional drainage systems.
Check for any existing vegetation on the hillside. Trees and large shrubs may need to be removed or relocated to ensure the stability and safety of the terraces. Consider the shade cast by these plants and how it will impact the amount of sunlight each terrace receives.
Lastly, assess the natural drainage patterns of the hillside. Excessive water runoff can erode the terraces and cause instability. Identify any areas where water tends to pool and make a note of them for future reference.
Remember, safety is paramount in any DIY project. If your hillside is too steep or poses high risks, it might be best to consult a professional landscaper or engineer before proceeding with the construction of terraces. They can provide valuable insights and recommendations based on the specific characteristics of your hillside.
Designing the Terrace
Once you have assessed the hillside and determined its suitability for terracing, it’s time to start designing your terrace. A well-planned design will not only maximize the functionality of the space but also enhance its aesthetic appeal. Here are some key considerations when designing your terrace:
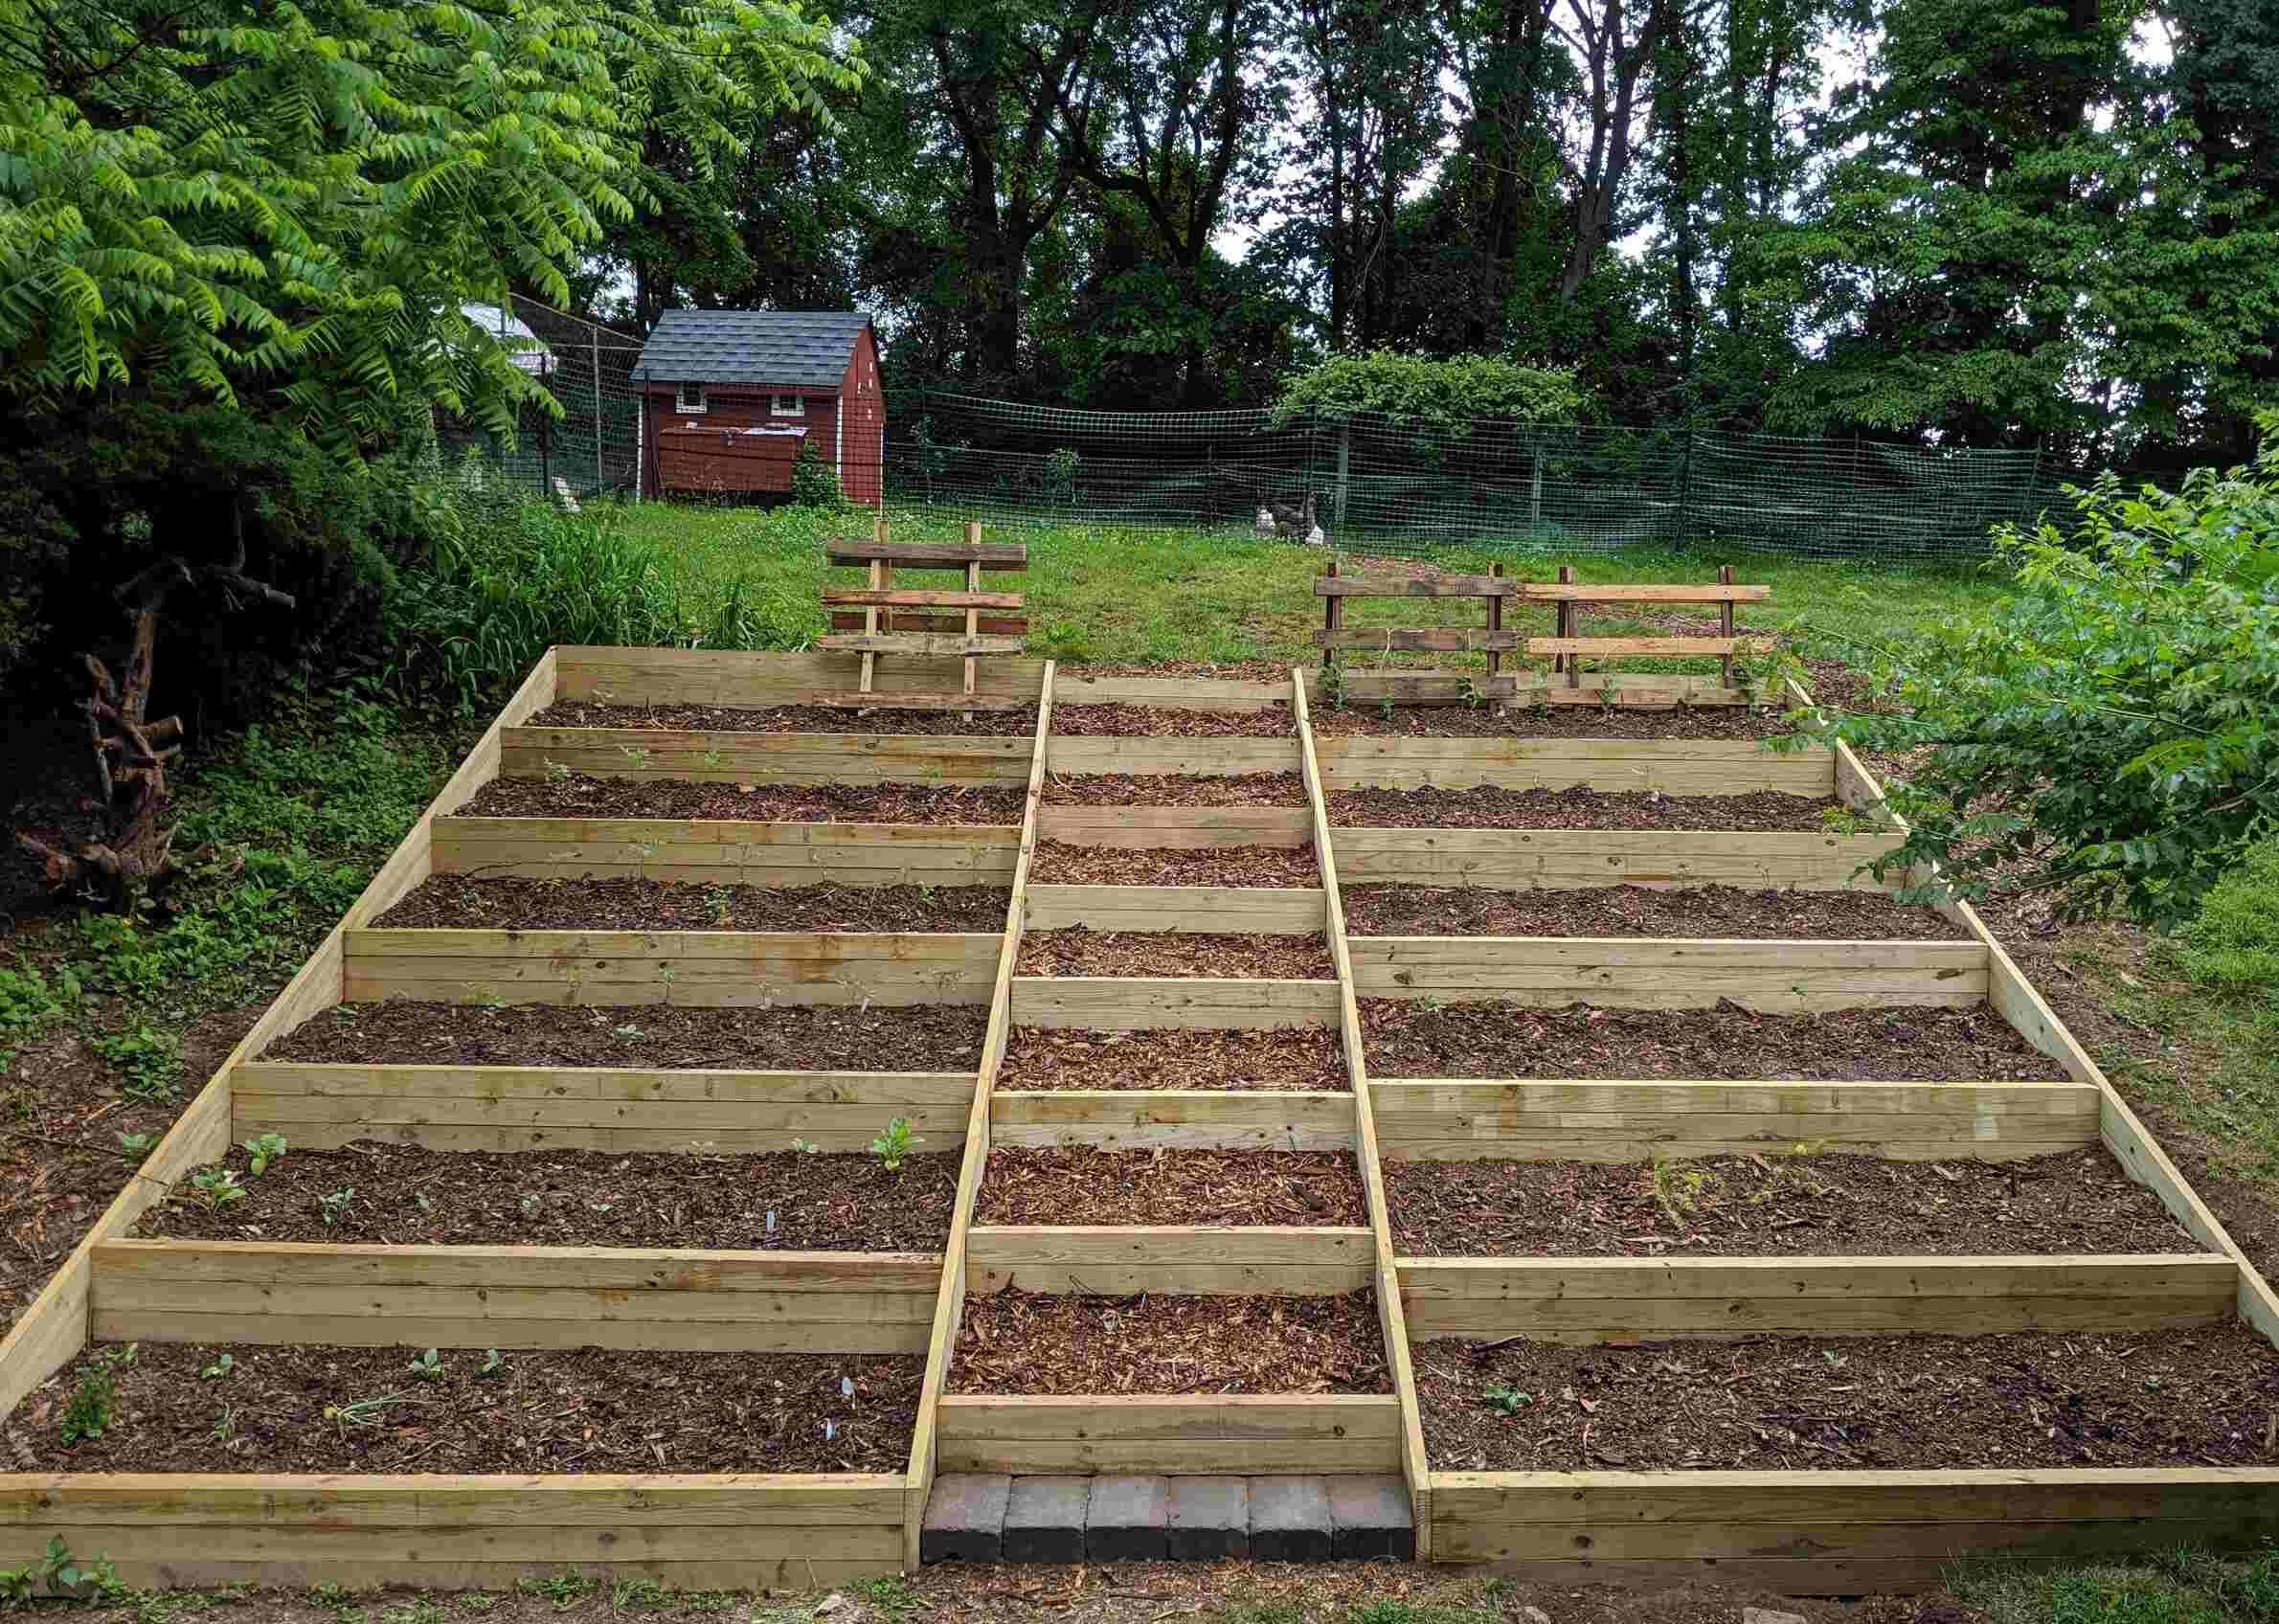
- Leveling the terraces: Divide the hillside into terraces of equal width and maintain a consistent slope between them. This will ensure proper water drainage while providing stability to the overall structure.
- Retaining wall design: Decide on the height and material for the retaining walls that will hold each terrace in place. Popular materials include stone, brick, concrete blocks, or timber. Consider the overall style and theme of your garden when selecting the material.
- Accessibility: Plan for convenient access to each terrace by incorporating steps or pathways between levels. This will make maintenance and harvesting easier while adding a touch of functionality and style to your terraced garden.
- Planting zones: Identify the different microclimates within each terrace based on sunlight exposure, shade, and soil moisture. This will help you select the appropriate plants for each zone and create a diverse and thriving garden.
- Watering system: Consider installing an irrigation system to ensure consistent and efficient watering throughout the terraced beds. Drip irrigation or soaker hoses are ideal options for delivering water directly to the plant roots.
- Additional features: Incorporate additional features like seating areas, decorative elements, or retaining wall caps to enhance the functionality and aesthetics of your terraced garden. These elements can help create a cohesive and inviting outdoor space.
Take the time to sketch a rough design or use design software to visualize how your terraced garden will look. Consult gardening books, online resources, or seek inspiration from other terrace designs to help refine your vision. Remember, the design process allows for creativity, so don’t be afraid to experiment and make adjustments as needed.
By carefully designing your terraced garden, you can create an attractive and functional space that suits your gardening style and complements the natural beauty of your hillside.
Clearing and Preparing the Site
Before you start building your terraces, it’s essential to clear and prepare the site properly. This preparation will ensure a solid foundation for your terraced beds and make the construction process smoother. Here are the steps to follow:
- Remove existing vegetation: Clear the hillside of any plants, weeds, or grass. Use a shovel or a garden rake to dig up the vegetation, making sure to remove the roots to prevent regrowth. If necessary, enlist the help of a sod cutter or a weed trimmer to speed up the process.
- Grade the slope: Use a rake or a garden hoe to create a smooth, even surface on the slope. Remove any large rocks, debris, or tree roots that may obstruct the construction process or affect the stability of the terraces.
- Mark the terrace boundaries: Use stakes and string to mark the boundaries of each terrace. This will serve as a guide during the construction process and help maintain consistency in the size and shape of the terraces.
- Prepare the foundation: Excavate the soil along the marked boundaries of each terrace to create a level platform for the retaining walls. Ensure that the depth of the foundation is sufficient to support the height of the walls.
- Compact the soil: Use a tamper or a plate compactor to compact the soil in the excavated areas. This will provide a stable base for the retaining walls and prevent shifting or settling over time.
- Add drainage material: Place a layer of gravel or crushed stone at the bottom of each terrace to improve drainage. This will help prevent water buildup behind the retaining walls and reduce the risk of erosion.
- Check for levelness: Use a level to ensure that each terrace is properly leveled. Adjust the soil as needed to achieve a flat and even surface.
Take your time during the site preparation phase to ensure that everything is done correctly. Clearing the site and preparing a solid foundation will contribute to the long-term stability and success of your terraced garden.
Building Retaining Walls
Retaining walls play a crucial role in terrace construction as they provide structural support and prevent soil erosion. Building sturdy and well-designed retaining walls is essential for the longevity and stability of your terraces. Here’s a step-by-step guide to constructing retaining walls:
- Select the materials: Choose the appropriate material for your retaining walls, such as stone, brick, concrete blocks, or timber. Consider the durability, aesthetics, and availability of the materials.
- Prepare the foundation: Dig a trench along the marked boundaries of each terrace, ensuring that it is wide enough to accommodate the desired width of the retaining wall. The depth of the trench should be below the frost line to prevent frost heaving in colder climates.
- Install the first row of blocks: Lay the first row of blocks or stones in the trench, leveling them and ensuring they are aligned properly. Use a rubber mallet to tap them into place firmly.
- Continue building the walls: Add additional rows of blocks, staggering the joints to create a stronger and more stable structure. Apply adhesive or mortar between the blocks for added stability.
- Check for levelness: Use a level to ensure the retaining walls are level horizontally and vertically. Make adjustments as needed by adding or removing soil behind the wall.
- Add drainage pipes: Install perforated drainage pipes behind the retaining walls to redirect water away from the terrace. Cover the pipes with a layer of gravel to prevent clogging.
- Backfill and compact: Carefully backfill the space behind the retaining walls with a quality backfill material, such as gravel or a mixture of soil and compost. Compact the backfill using a hand tamper or a plate compactor to provide additional stability.
- Finish the walls: Depending on the material chosen, you may need to cap the top of the retaining walls for a finished appearance. This can be done using stone, concrete caps, or timber boards.
Remember to follow any local building codes and regulations when constructing your retaining walls. If you’re unsure about the structural integrity of your walls, it’s recommended to consult a professional engineer or mason for their expertise and guidance.
Building sturdy and well-built retaining walls is crucial to the success of your terraced garden, so take your time and ensure they are constructed with care and precision.
Creating Terraced Beds
Now that your retaining walls are in place, it’s time to create the terraced beds where you’ll be planting your desired vegetation. Building terraced beds involves adding soil, forming distinct planting areas, and ensuring proper drainage. Follow these steps to create your terraced beds:
- Add quality soil: Fill each terrace with a high-quality soil mixture that is appropriate for the plants you intend to grow. Use a mix of compost, topsoil, and other organic matter to promote healthy plant growth.
- Shape the terraced beds: Use a garden rake or shovel to shape the soil in each terrace, creating gentle slopes and raised planting areas. This will help prevent water from pooling and improve drainage.
- Planting areas: Decide on the size and layout of your planting areas within each terrace. Consider the space required for each plant to grow and allow room for walkways or mulched areas between the beds.
- Borders and edging: Add decorative borders or edging materials around the terraced beds to define the planting areas and enhance the visual appeal. This can be done using bricks, stones, or timber.
- Consider companion planting: Take advantage of the different microclimates within each terrace by practicing companion planting. Choose plants that benefit each other, such as pairing shade-loving plants with those that thrive in full sun.
- Add mulch: Apply a layer of organic mulch, such as wood chips or straw, around the plants in each bed. Mulch helps retain moisture, suppress weed growth, and regulate soil temperature.
- Install support structures: For plants that require support, such as climbing vines or tall vegetables, install trellises, stakes, or cages within the terraced beds. This will promote healthy growth and prevent damage.
- Watering and irrigation: Determine the watering needs of your plants and establish a watering schedule. Consider installing drip irrigation or soaker hoses in each bed to ensure efficient and consistent watering.
Creating the terraced beds allows you to maximize the use of space and create distinct planting areas within your terraces. By carefully planning the layout and considering the needs of your plants, you can create a visually appealing and productive garden.
Ensuring Proper Drainage
Proper drainage is essential for the health and longevity of your terraced garden. It prevents waterlogging, erosion, and root rot, ensuring that your plants thrive in a well-drained environment. Here are some important steps to ensure proper drainage in your terraced beds:
- Improve soil structure: If you have heavy clay soil, amend it with organic matter like compost or well-rotted manure. This helps break up compacted soil, allowing for better water movement.
- Incorporate drainage materials: To enhance drainage, consider adding gravel or coarse sand at the bottom of each terraced bed. This forms a layer that promotes water movement away from the plant roots.
- Use raised beds: Raised beds can improve drainage by elevating the soil above ground level. This prevents water from pooling around plant roots and facilitates better airflow.
- Install drainage pipes: For terraces prone to water accumulation, consider installing perforated drainage pipes along the bottom of the retaining walls. These pipes redirect excess water away from the terraced beds.
- Grade the terrace surfaces: Ensure that the surface of each terrace is gently sloped to allow water to flow away from the plants. This prevents water from pooling and causing root rot or fungal diseases.
- Add drainage channels: For terraces with a high water flow, create small channels or swales along the edges of the terraces. These channels help redirect excess water away from the planting areas.
- Check for blockages: Regularly inspect drainage outlets, pipes, and channels to ensure they are free from debris or blockages. Clear any obstructions to maintain proper water flow.
- Monitor watering practices: Overwatering can lead to poor drainage and waterlogged soil. Ensure you’re providing the right amount of water for each plant and adjust watering schedules according to the weather and plant needs.
Remember that different plants have varying drainage requirements. Some plants, like succulents, prefer well-drained soil, while others, like water-loving vegetables, can tolerate higher moisture levels. Tailor your planting choices to the specific drainage conditions of each terrace.
By taking these steps to ensure proper drainage in your terraced beds, you’ll promote healthy root growth and minimize the risk of water-related problems in your garden.
Planting on the Terraces
Now comes the exciting part – planting on your terraces! With careful planning and consideration for the specific needs of your plants, you can create a vibrant and thriving garden. Here are some key steps to follow when planting on the terraces:
- Select suitable plants: Choose plants that are well-suited to the growing conditions of each terrace, taking into account factors such as sunlight exposure, soil moisture, and climate. Research the preferred growing requirements of your chosen plants to ensure their success.
- Planting method: Dig holes for each plant that are wide and deep enough to accommodate their root systems. Gently remove the plants from their containers, loosen the root ball, and place them in the holes. Backfill with soil, firm the soil gently around the plants, and water thoroughly.
- Spacing: Consider the potential size of the plants at maturity and leave ample space between them to allow for proper growth. Crowded plants can compete for resources and hinder their overall development.
- Vertical gardening: Utilize trellises, obelisks, or vertical structures to create vertical gardening opportunities. This maximizes planting space and adds aesthetic interest to the terraces.
- Companion planting: Take advantage of companion planting to create a harmonious and mutually beneficial garden. Plant combinations that complement each other, such as pairing nitrogen-fixing plants with heavy feeders.
- Mulching: Apply a layer of organic mulch around your plants to help conserve moisture, suppress weed growth, and regulate soil temperature. Leave a small gap between the plant stem and the mulch to prevent rot.
- Watering: Establish a watering routine based on the needs of your plants. Monitor the soil moisture levels and water deeply, allowing the water to reach the root zones. Be mindful of overwatering, as excessive moisture can cause root rot.
- Fertilizing: Feed your plants with appropriate fertilizers to provide necessary nutrients. Organic options like compost or well-balanced slow-release granular fertilizers are ideal for long-term nourishment.
- Regular maintenance: Keep an eye on your plants for signs of pests, diseases, or nutrient deficiencies. Prune or trim as needed, deadhead flowers to promote new blooms, and remove any weeds that may compete with your plants for resources.
- Monitor plant growth: Regularly assess the growth and health of your plants. If needed, adjust the spacing, provide support to tall plants, and make any necessary changes to ensure their optimal growth.
Each terrace can be a unique and diverse planting zone within your garden. By selecting the right plants, providing appropriate care, and monitoring their growth, you can create a stunning display of color and foliage on your terraces.
Maintenance and Care
Maintaining and caring for your terraced garden is essential to ensure its continued health and beauty. Regular maintenance tasks will help keep your plants thriving and your terraces structurally sound. Here are some key maintenance and care practices to follow:
- Watering: Monitor the moisture levels in the terraced beds and water accordingly. Be mindful of the specific watering needs of each plant and adjust your watering schedule based on weather conditions.
- Weeding: Regularly remove weeds from the terraced beds to prevent them from competing with your plants for nutrients and water. Mulching can help suppress weed growth, making the task of weeding more manageable.
- Pruning and trimming: Prune and trim your plants as needed to promote healthy growth and maintain their desired shape. Remove dead, damaged, or diseased foliage to prevent the spread of diseases and pests.
- Fertilizing: Apply fertilizers or organic amendments, such as compost, to replenish the nutrients in the soil. Follow the recommended application rates and timing specific to each type of plant.
- Pest and disease control: Keep a close eye on your plants for signs of pests or diseases. Quickly identify and address any issues by using appropriate organic or chemical treatments to minimize damage.
- Supporting structures: Check and reinforce any supporting structures, such as trellises or stakes, to ensure they are secure and effectively supporting climbing or tall plants.
- Harvesting: Regularly harvest ripe fruits, vegetables, or herbs from your terraced beds. This not only keeps your plants productive but also ensures that they have enough space and resources for continuous growth.
- Seasonal care: Adjust your maintenance practices in accordance with the changing seasons. This may include protecting tender plants from frost in winter or providing shade for heat-sensitive plants during the summer months.
- Inspect retaining walls: Regularly inspect the retaining walls for any signs of damage, such as cracks or bulges. Address any structural issues promptly to maintain the stability of your terraces.
- Monitor and adapt: Continuously observe the growth and performance of your plants. Adjust your care practices based on their specific needs, as some plants may require more attention or modifications to their environment.
Remember to enjoy your terraced garden as you care for it. Spend time nurturing your plants, observing their growth, and appreciating the beauty they bring to your landscape. Regular maintenance will help ensure the long-term success and enjoyment of your terraced garden.
Conclusion
Congratulations on successfully creating and maintaining your terraced garden! Terracing a hillside for planting not only transforms unusable space into a beautiful and functional garden but also allows you to unleash your creativity and showcase your gardening skills. Through careful planning, proper assessment, and thoughtful design, you have turned a challenging landscape into a stunning masterpiece.
By following the steps outlined in this guide, you’ve learned how to assess the hillside, design the terraces, build retaining walls, create terraced beds, ensure proper drainage, and care for your plants. Each step contributes to the success and sustainability of your terraced garden, allowing it to flourish and thrive.
However, the journey doesn’t end here. Remember to continue maintaining your terraced garden through regular watering, pruning, fertilizing, and pest control. Stay observant and adapt your care practices as needed to ensure the health and growth of your plants.
Enjoy the rewards of your hard work as you witness the beauty of your terraced garden come to life. Whether you’re growing vibrant flowers, delicious fruits and vegetables, or a combination of both, your terraced garden will serve as a sanctuary for relaxation, a source of fresh produce, and a showcase for your gardening prowess.
With time, patience, and a little bit of creativity, your terraced garden will continue to evolve and bring you joy for years to come. So roll up your sleeves, grab your gardening tools, and let your terraced garden thrive amidst the beauty of your hillside.


