Home>Types of Gardening>Ornamental Gardening>How To Plant Maple Seeds
Ornamental Gardening
How To Plant Maple Seeds
Published: September 14, 2023
Learn the art of ornamental gardening with our step-by-step guide on planting maple seeds. Create a stunning landscape with these tips and techniques.
(Many of the links in this article redirect to a specific reviewed product. Your purchase of these products through affiliate links helps to generate commission for Chicagolandgardening.com, at no extra cost. Learn more)
Table of Contents
Introduction
Welcome to the world of ornamental gardening! If you have a love for nature and a passion for enhancing the beauty of your outdoor space, then ornamental gardening is the perfect hobby for you. One of the key elements of this type of gardening is planting ornamental trees, and maple trees are a popular choice for their vibrant foliage and graceful appearance.
Maple trees not only provide shade and shelter, but they also add a touch of elegance and charm to any landscape. While many people prefer to purchase young maple trees from a nursery, planting maple seeds can be a rewarding and cost-effective alternative. By following a few simple steps, you can grow your own maple trees from seeds and witness their transformation from tiny sprouts into majestic trees.
This guide will walk you through the process of planting maple seeds and caring for the seedlings. From gathering the seeds to transplanting the seedlings into your garden, you’ll learn all the necessary steps to create a thriving maple tree ecosystem. Whether you’re a novice gardener looking to experience the joy of planting or a seasoned green thumb seeking a new horticultural adventure, this article has got you covered!
So, roll up your sleeves, grab your gardening tools, and let’s dive into the fascinating world of ornamental gardening by learning how to plant maple seeds!
Step 1: Gathering Maple Seeds
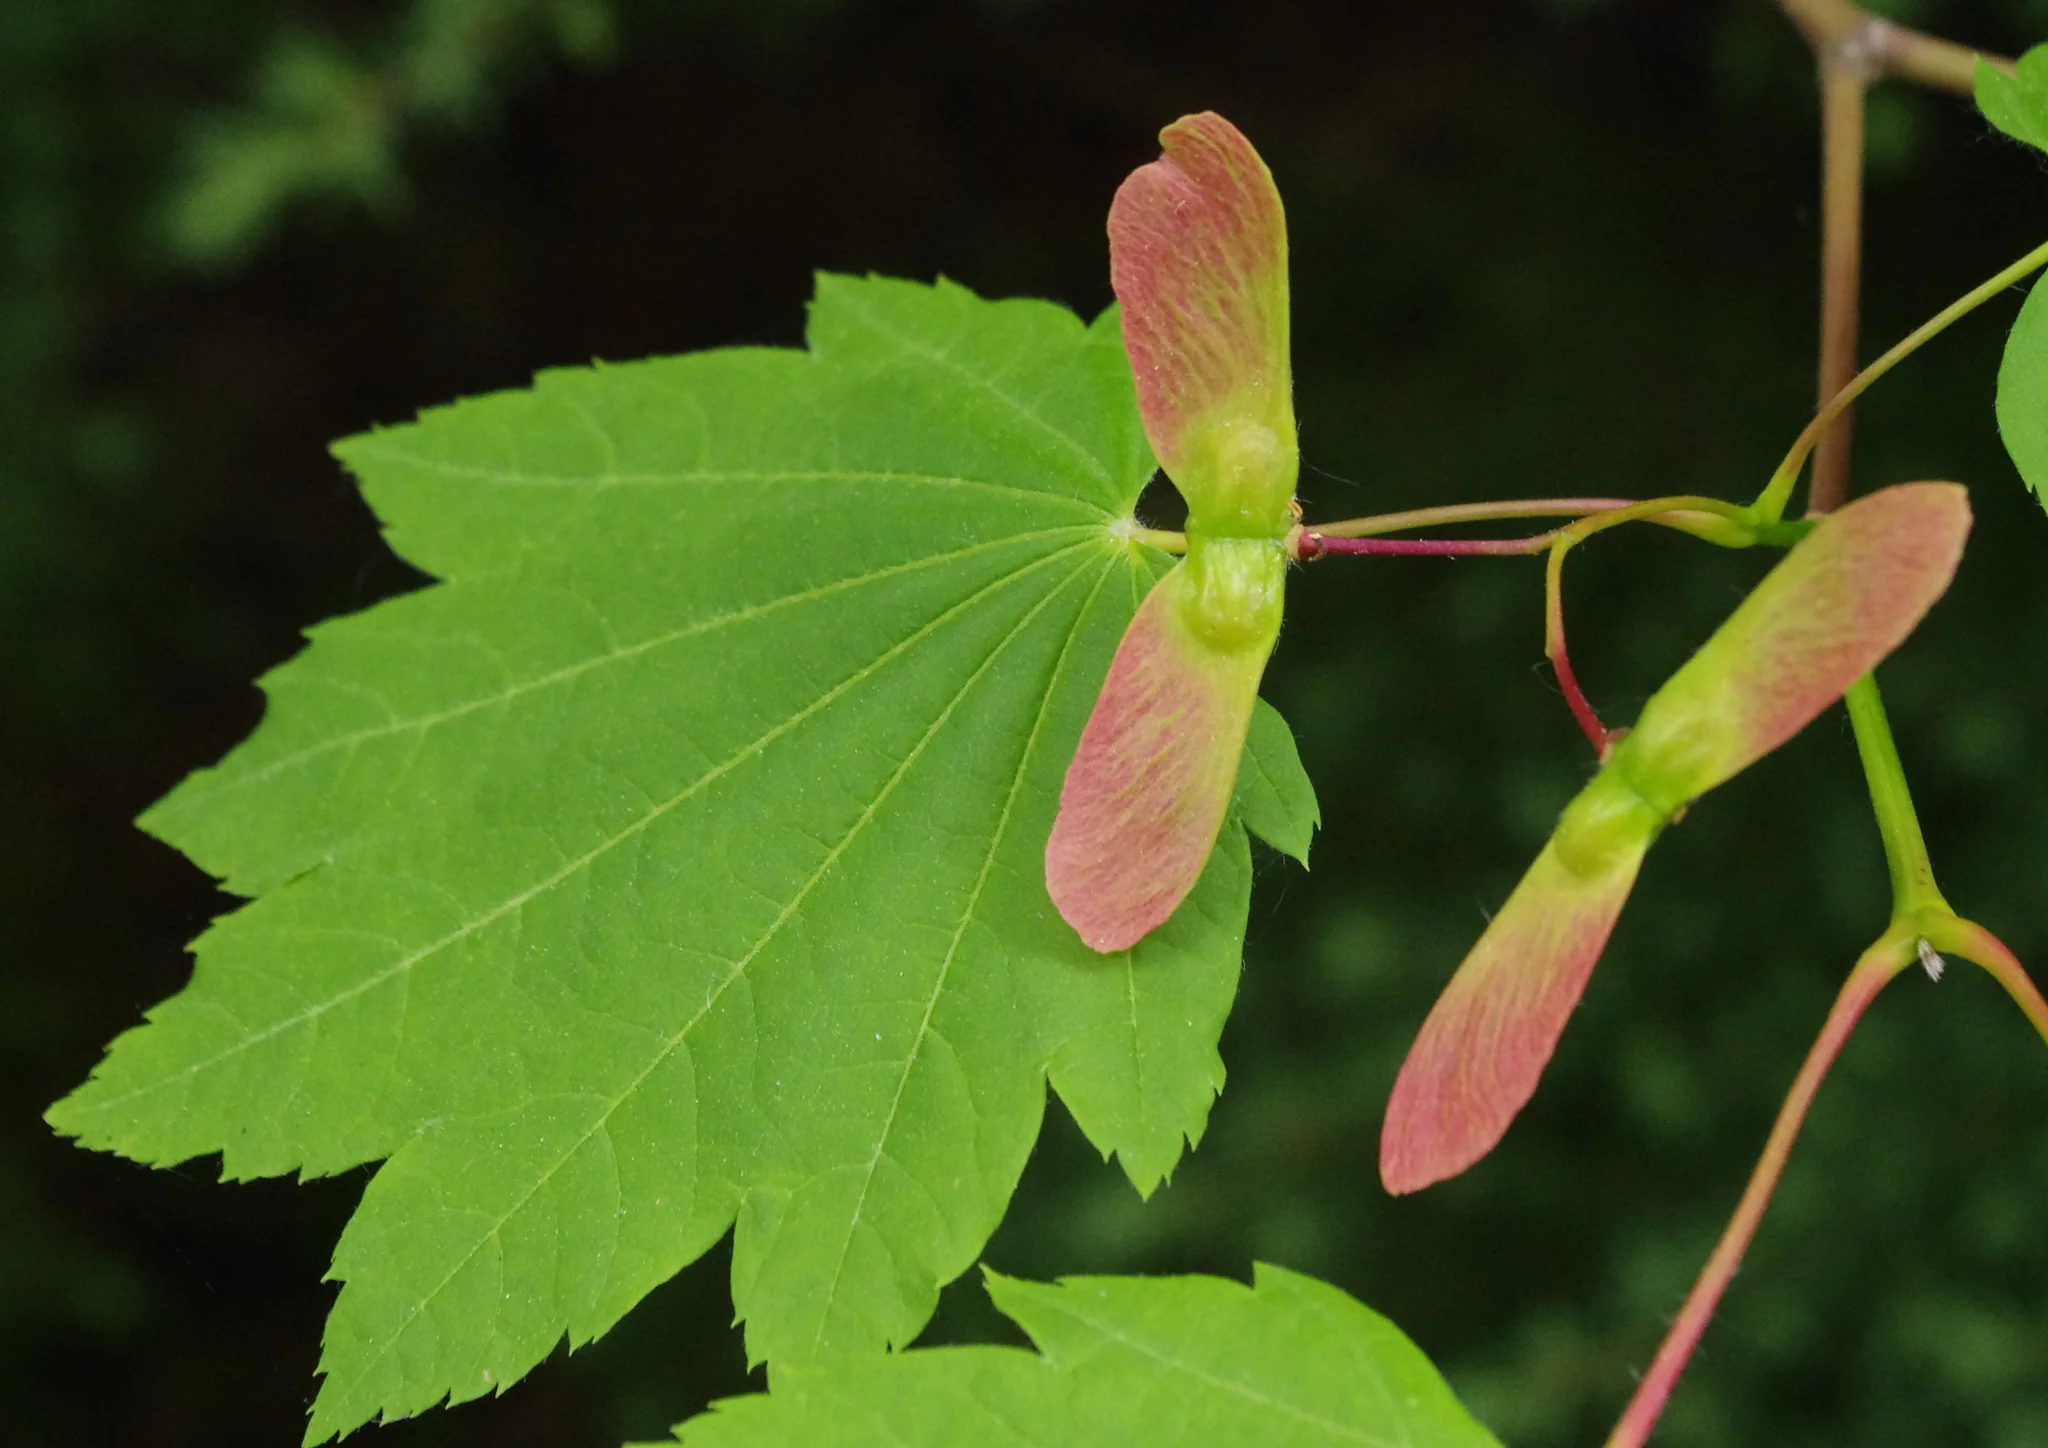
The first step in planting maple seeds is to gather them during the appropriate season. Maple trees produce seeds, known as samaras or “helicopters,” in the late spring or early summer. Look for mature maple trees in your area and keep an eye out for branches with clusters of samaras.
When collecting maple seeds, make sure they are fully developed and have turned a brownish color. Avoid picking seeds that are green or not yet mature. Gently twist or snap off the samaras from the branches, being careful not to damage them.
It’s important to collect a sufficient number of maple seeds to increase the chances of successful germination. Aim to gather around 10 to 20 samaras, as not all seeds will germinate. Collecting more seeds also allows you to select the healthiest and strongest ones for planting.
Once you have gathered the maple seeds, place them in a paper bag or envelope. Label the container with the date and location where the seeds were collected. This will help you keep track of the seed’s origin and ensure proper documentation for future reference.
Remember that maple seeds are prone to drying out quickly, so it’s important to protect them from excessive heat, sunlight, and dry conditions. Keep the container in a cool and dark place until you are ready to prepare and plant the seeds.
By diligently gathering mature maple seeds and storing them properly, you will be well-prepared for the next step in the process: preparing the seeds for planting.
Step 2: Preparing the Seeds
Now that you have gathered your maple seeds, it’s time to prepare them for planting. The preparation process helps improve the seed’s germination rate and ensures a higher likelihood of successful growth.
Start by inspecting the collected maple seeds. Discard any damaged or discolored seeds, as they are less likely to germinate. Focus on selecting seeds that are firm, plump, and free from any signs of disease or pest infestation.
Before planting, it’s important to break the dormancy of the maple seeds. This can be done through a process called stratification. Stratification mimics the natural conditions that maple seeds experience during winter, which helps stimulate germination in the spring.
To stratify the seeds, you have two options: wet stratification or cold stratification. Wet stratification involves soaking the seeds in water for 24 to 48 hours. After soaking, place the seeds on a damp paper towel and seal them in a plastic bag. Keep the bag in the refrigerator for several weeks, periodically checking the moisture level to prevent mold growth.
Cold stratification, on the other hand, requires placing the seeds in a container with damp sand or peat moss. Put the container in the refrigerator for 60 to 90 days. This process simulates the seed’s exposure to cold temperatures and moisture, breaking their dormancy and preparing them for germination.
After the stratification period is over, remove the seeds from the refrigerator or the damp paper towel and let them reach room temperature. This will help them acclimate to the environment before planting.
Now that the maple seeds are prepped and ready, you can move on to the next step: preparing the soil for planting.
Step 3: Preparing the Soil
The quality of the soil plays a crucial role in the growth and development of your maple seedlings. Before planting the seeds, it’s essential to prepare the soil to provide the best possible conditions for their germination and subsequent growth.
Maple trees thrive in well-draining soil that is rich in organic matter. Start by selecting a planting location that receives partial shade or dappled sunlight. Avoid areas that are prone to waterlogging or have compacted soil, as these conditions can hinder root development.
Begin the soil preparation process by removing any weeds, rocks, or debris from the planting area. These unwanted elements can compete with the maple seedlings for nutrients and moisture, stunting their growth.
Next, loosen the top layer of soil using a garden fork or a tiller. This will improve drainage and create a loose, aerated environment for the roots to establish. If the soil is heavy clay or sandy, consider adding organic matter such as compost or well-rotted manure to improve its texture and nutrient content.
Before planting the seeds, it’s important to perform a soil pH test. Maple trees prefer slightly acidic to neutral soil, with a pH range between 6.0 and 7.5. You can use a soil testing kit or send a sample to a local agricultural extension office for analysis. If the soil pH is outside the preferred range, you can amend it with lime to increase acidity or sulfur to decrease acidity.
Once the soil is prepared and the pH is adjusted if necessary, create small planting holes with a depth of approximately half an inch to one inch. Space the holes at least six inches apart to ensure adequate room for the seedlings to spread their roots.
With the soil ready, it’s time to move on to the exciting part: planting the maple seeds.
Step 4: Planting the Seeds
Now that you have prepared the soil, it’s time to plant the maple seeds. This step is crucial as it determines the initial conditions for seed germination and the establishment of healthy seedlings.
Take each stratified maple seed and gently press it into the prepared planting hole. Make sure to place the seed with the pointed end facing down and the rounded end facing up. The pointed end represents the root, while the rounded end is where the stem and leaves will emerge.
Cover the seeds lightly with soil, just enough to bury them. Avoid packing the soil too tightly as it may hinder germination. Water the planting area gently to settle the soil around the seeds and provide necessary moisture. Ensure that the soil remains consistently moist but not waterlogged throughout the germination process.
After planting, consider mulching the area with a layer of organic mulch, such as wood chips or shredded leaves. Mulch helps retain soil moisture, suppresses weed growth, and regulates soil temperature. Keep the mulch a few inches away from the base of the seedlings, allowing sufficient air circulation.
Place a plant marker or label near the seeded area to identify the type of maple and the date of planting. This will help you keep track of your gardening progress and ensure proper care and maintenance.
Now that the maple seeds are planted, it’s time to move on to the next step: caring for the maple seedlings.
Step 5: Caring for Maple Seedlings
After planting the maple seeds and witnessing the first signs of germination, it’s time to focus on caring for your precious maple seedlings. Proper care during the early stages of growth is essential for their long-term health and vitality.
Watering is a critical aspect of caring for maple seedlings. Keep the soil consistently moist, but not overly saturated. Avoid allowing the soil to dry out completely, as this can cause stress and hinder growth. Water the seedlings regularly, especially during dry spells or hot weather.
Regularly monitor the moisture level of the soil by touching the top layer with your finger. If it feels dry, it’s time to water. Use a gentle stream of water to avoid disturbing the delicate seedlings.
As the seedlings continue to grow, it’s important to weed the surrounding area regularly. Weeds can compete with the maple seedlings for nutrients, sunlight, and water. Gently remove any weeds by hand or use a small gardening tool to prevent damaging the young roots of the maple seedlings.
Maple seedlings benefit from occasional fertilization to promote healthy growth. Apply a balanced slow-release fertilizer specifically formulated for ornamental trees according to the manufacturer’s instructions. Be careful not to over-fertilize, as this can lead to excessive growth or nutrient imbalances.
Monitor the seedlings for any signs of pests or diseases. Common pests that may affect maple trees include aphids, scales, and caterpillars. If you notice any signs of infestation, consult with a local garden center or horticulturist for appropriate pest control measures.
Protect the seedlings from harsh weather conditions, such as strong winds or extreme temperatures. Consider providing temporary shade during the hottest hours of the day or placing a protective barrier around the seedlings to shield them from strong winds.
Continue to monitor and care for the maple seedlings for the first growing season. As they establish their roots and develop leaf growth, you’ll be one step closer to witnessing the beauty of mature maple trees in your garden.
With proper care, your maple seedlings will thrive and become the focal point of your ornamental garden.
Step 6: Transplanting Maple Seedlings
As your maple seedlings continue to grow and develop, there may come a time when they outgrow their initial planting location or need to be moved to a more permanent spot in your garden. This step will guide you through the process of transplanting your maple seedlings.
Before transplanting, it’s important to choose the right time of year. The ideal time to transplant maple seedlings is during the dormant season, typically in late fall or early spring. Transplanting during these periods allows the seedlings to establish their roots before the stress of hot summer temperatures or freezing winter conditions.
Choose a new planting location that provides adequate sunlight and enough space for the mature maple tree to grow. Make sure the soil in the new location is well-drained and of suitable quality for the specific maple tree species.
Start by digging a hole twice as wide and just as deep as the root ball of the seedling. Gently remove the seedling from its current location, being careful not to disturb the delicate roots. If the root ball is compacted, loosen it slightly with your fingers or a small gardening tool.
Place the seedling into the prepared hole, ensuring that it sits at the same depth as it was in its previous location. Backfill the hole with the surrounding soil, gently firming it around the roots to eliminate air pockets. Water the newly transplanted seedling thoroughly to settle the soil and provide moisture for the roots.
To help protect the transplanted seedling from stress and promote its establishment, consider placing a layer of mulch around the base. This will help retain soil moisture, suppress weed growth, and regulate soil temperature.
After transplanting, closely monitor the seedling and continue to provide proper care, including regular watering and protection from extreme weather conditions. The seedling may experience some transplant shock initially, but with time and care, it will adapt and thrive in its new location.
Remember, successful transplantation is dependent on proper handling, adequate preparation, and post-transplant care. Pay close attention to the specific needs of your maple seedlings to ensure their long-term success in their new home.
Congratulations! You have successfully completed the process of transplanting your maple seedlings, and now you can enjoy watching them grow into majestic maple trees in your garden.
Conclusion
Congratulations, you’ve now learned how to plant maple seeds and nurture them into thriving seedlings. Ornamental gardening is a rewarding and fulfilling hobby, and growing your own maple trees from seeds adds a special touch to your outdoor space.
From gathering mature maple seeds and preparing them for planting to creating an optimal environment for germination and caring for the seedlings, each step in the process is crucial for the success of your maple tree journey. Remember to gather mature seeds and properly store them, prepare the soil with organic matter and ensure the right pH, and provide consistent care and attention to your maple seedlings.
As your seedlings grow, it’s important to monitor their progress, provide necessary water and nutrients, and protect them from pests and extreme weather conditions. With time and care, your small maple seedlings will transform into majestic trees, providing shade, beauty, and a sense of tranquility to your garden.
The joy of watching your maple seedlings grow and evolve is a testament to your dedication and gardening skills. Whether you choose to transplant them into larger containers or transfer them directly to your garden, maintaining proper care throughout their growth journey will ensure their long-term health and vitality.
So, grab your gardening tools, gather some mature maple seeds, and embark on the journey of planting and nurturing your own maple trees. With this guide by your side, you have all the knowledge and expertise to create a stunning maple tree ecosystem in your very own backyard.
Get ready to enjoy the vibrant colors, graceful branches, and the calming presence of maple trees in your ornamental garden. Happy gardening!