Home>Gardening Techniques>DIY Projects>How To Build A Compost Toilet

DIY Projects
How To Build A Compost Toilet
Modified: January 22, 2024
Learn how to build a DIY compost toilet with our step-by-step guide. Start your sustainable living journey today with this eco-friendly project.
(Many of the links in this article redirect to a specific reviewed product. Your purchase of these products through affiliate links helps to generate commission for Chicagolandgardening.com, at no extra cost. Learn more)
Table of Contents
- Introduction
- Step 1: Gather the necessary materials
- Step 2: Choose a suitable location
- Step 3: Build the composting chamber
- Step 4: Construct the toilet seat and frame
- Step 5: Set up the ventilation system
- Step 6: Add the composting medium
- Step 7: Maintain and monitor the compost toilet
- Step 8: Use and empty the compost toilet
- Conclusion
Introduction
A compost toilet is an eco-friendly and sustainable alternative to traditional flush toilets. It not only helps to reduce water consumption but also transforms human waste into nutrient-rich compost that can be used in gardening or other agricultural practices. Building a compost toilet may seem like a daunting task, but with the right materials and a little bit of know-how, it can be a rewarding and practical DIY project.
In this article, we will guide you through the step-by-step process of building your own compost toilet. From gathering the necessary materials to maintaining and using the toilet, we will cover everything you need to know.
Before we begin, it’s important to note that building a compost toilet requires basic DIY skills and a willingness to handle and process human waste. It’s also crucial to follow local regulations and guidelines regarding the disposal of waste to ensure that you are in compliance with your area’s health and sanitation standards.
Constructing a compost toilet not only benefits the environment by reducing water usage and waste, but it also adds a sustainable element to your lifestyle. By reusing and repurposing organic matter, you are contributing to the circular economy and minimizing your ecological footprint.
Now, let’s dive into the step-by-step process of building your very own compost toilet!
Step 1: Gather the necessary materials
The first step in building a compost toilet is to gather all the necessary materials. These include:
- A large plastic or metal container with a tight-fitting lid to serve as the composting chamber.
- A toilet seat and frame that is sturdy and can support the weight of users.
- A ventilation system, such as a fan or a pipe, to ensure adequate air circulation and prevent odors.
- A composting medium, such as sawdust, wood chips, or straw, to aid in the decomposition process.
- A waste container or bucket with a lid to collect the solid waste.
- A liquid waste container, such as a urine diverter, to separate liquid waste from solid waste.
- PVC pipes, fittings, and connectors to set up the ventilation system.
- Sand, gravel, or concrete blocks to create a stable base for the compost toilet.
- Tools such as a saw, drill, screws, and nails for construction.
When gathering the materials, make sure to choose high-quality, durable items that will withstand the test of time. It’s also a good idea to consider the size and capacity of the composting chamber based on the expected usage and the number of people using the toilet.
Additionally, check local regulations and guidelines to ensure that you are using approved and safe materials for constructing a compost toilet. Some areas may have specific requirements or restrictions on the type of materials that can be used.
Once you have gathered all the necessary materials, you are ready to move on to the next step of building your compost toilet. Remember to double-check your list and have everything readily available before proceeding.
Step 2: Choose a suitable location
Selecting the right location for your compost toilet is crucial for its functionality and convenience. Here are a few factors to consider when choosing the ideal spot:
- Accessibility: The compost toilet should be easily accessible for all users. Consider locating it near other bathroom facilities or areas frequently visited by occupants, such as a garden shed or an outdoor living space.
- Privacy: Ensure that the chosen location provides sufficient privacy for users. It should be shielded from view by surrounding foliage, fences, or other structures.
- Ventilation: The location should allow for proper ventilation to disperse odors and facilitate airflow. Avoid placing the compost toilet in enclosed or poorly ventilated areas to prevent unpleasant smells from circulating.
- Distance from water sources: Keep the compost toilet a safe distance away from any water sources, such as wells, streams, or bodies of water. This is to avoid contamination and health hazards.
- Garden accessibility: If you plan to utilize the compost produced by the toilet in your garden, consider placing it in close proximity to your gardening area for ease of transport and application.
- Ground stability: Ensure that the location provides a stable ground for the compost toilet. If necessary, use sand, gravel, or concrete blocks to create a level and secure base.
Take some time to assess your property and identify the best location that meets the above criteria. Keep in mind that the location should not only be practical but also aesthetically pleasing and harmonious with your outdoor space.
Once you have chosen a suitable location, you can proceed to the next steps of building your compost toilet. Remember to consider any specific regulations or permits that may be required in your area before installation begins.
Step 3: Build the composting chamber
Building a proper composting chamber is essential for effective waste decomposition and odor control. Follow these steps to construct the composting chamber:
- Prepare the container: Start by cleaning and sanitizing the chosen container thoroughly. Make sure it has a tight-fitting lid to prevent insects and pests from entering.
- Create air vents: Drill small holes along the sides and bottom of the container to allow for air circulation. This is crucial for the aerobic composting process.
- Add a drain system: If necessary, install a drainage system at the bottom of the container to remove excess moisture. This can be achieved by drilling holes and attaching a collection container.
- Line the container: Line the inside of the container with a thick layer of composting medium, such as sawdust or wood chips. This will serve as the initial carbon-rich base for waste decomposition.
- Install a hinged door: Attach a hinged door on one side of the container for easy access to the compost pile. This will allow you to add waste and monitor the composting process.
- Secure the lid: Place the lid securely on top of the container to keep pests out and maintain the proper moisture level inside the composting chamber.
Remember to label the composting chamber clearly to avoid any accidental misuse or confusion. Additionally, ensure that the chamber is well-ventilated and protected from extreme weather conditions.
By building a sturdy and well-designed composting chamber, you are laying the foundation for successful waste decomposition and composting. Once the chamber is constructed, you can move on to the next step of building your compost toilet.
Step 4: Construct the toilet seat and frame
The construction of a comfortable and sturdy toilet seat and frame is crucial for the functionality and usability of your compost toilet. Follow these steps to create the seat and frame:
- Select the seat type: Choose a toilet seat that is designed for composting toilets or opt for a regular toilet seat that can be easily cleaned and sanitized.
- Measure and cut the frame: Measure the dimensions of the composting chamber and create a frame using sturdy wooden beams or metal pipes. Ensure that the frame provides sufficient support and stability for the seat.
- Attach the seat: Securely attach the toilet seat to the frame using appropriate screws or bolts. Make sure it is centered and aligned properly on the frame.
- Stabilize the frame: Use additional supports or braces to stabilize the frame and prevent any wobbling or movement during use.
- Secure the frame to the chamber: Attach the frame to the composting chamber, ensuring that it is securely fastened. This can be done using screws, brackets, or other suitable methods.
- Ensure proper seat height: Adjust the seat height to ensure comfortable usage for individuals of different heights. Remember to consider users with mobility issues or physical disabilities.
It is essential to prioritize safety and comfort when constructing the toilet seat and frame. Double-check the stability of the seat and frame before moving on to the next steps of setting up your compost toilet.
By creating a well-built and stable toilet seat and frame, you are ensuring a pleasant and functional experience for users of your compost toilet.
Step 5: Set up the ventilation system
A well-designed ventilation system is crucial to prevent odors and ensure proper airflow within your compost toilet. Follow these steps to set up the ventilation system:
- Choose a ventilation method: Decide on the type of ventilation system that suits your needs. Some common options include a small electric fan, a solar-powered fan, or a natural ventilation system using pipes or vents.
- Install the fan: If you opt for an electric or solar-powered fan, follow the manufacturer’s instructions to install it in a suitable location. Ensure that it is positioned to draw air out of the composting chamber and expel it outside.
- Create ventilation holes: If you choose a natural ventilation system, drill ventilation holes at strategic locations in the composting chamber. These holes should be large enough to facilitate airflow but small enough to prevent pests from entering.
- Connect the pipes: If using a pipe system, connect PVC pipes from the composting chamber to the outside. This will allow air to circulate and keep the composting process aerobic.
- Install a cover or filter: To prevent pests and debris from entering the ventilation system, install a cover or filter over the intake and exhaust openings. This will also help to filter out any odors.
- Test the ventilation: Before using the compost toilet, test the ventilation system to ensure that it is functioning properly. Check for adequate airflow and make any necessary adjustments.
Proper ventilation is essential for maintaining an odor-free and sanitary composting environment. It promotes the decomposition of waste and aids in the prevention of harmful pathogens.
Once the ventilation system is set up and tested, you are ready to move on to the next steps of building and maintaining your compost toilet.
Step 6: Add the composting medium
The composting medium plays a vital role in the decomposition process and helps control odor in your compost toilet. Here’s how to add the composting medium:
- Select the composting material: Choose a carbon-rich material such as sawdust, wood chips, straw, or a mixture of these. Avoid using materials that contain chemicals or are toxic to plants.
- Add a generous layer: Begin by adding a thick layer of the composting medium to the bottom of the composting chamber. This layer will absorb moisture and provide a carbon source for decomposition.
- Add after each use: After each use, sprinkle a handful of the composting medium over the waste to absorb moisture and cover any odors. This helps to maintain a healthy balance of carbon and nitrogen, necessary for the composting process.
- Monitor moisture levels: Pay attention to the moisture content in the composting chamber. It should be moist but not overly wet or dry. Adjust the amount of composting medium accordingly to maintain the proper moisture balance.
- Regularly replenish the composting medium: As the composting process progresses, the material will break down and reduce in volume. Regularly add fresh composting medium to ensure proper coverage and absorption.
The composting medium not only aids in waste decomposition but also helps to control odors and promote a healthy microbial environment within the composting chamber.
Remember to handle the composting medium with care and store it in a dry, well-ventilated area to prevent moisture buildup and mold growth.
With the composting medium properly added, your compost toilet will be well-equipped for efficient waste decomposition and odor control.
Step 7: Maintain and monitor the compost toilet
Maintaining and monitoring your compost toilet is crucial to ensure its effectiveness and longevity. Follow these steps to keep your compost toilet operating smoothly:
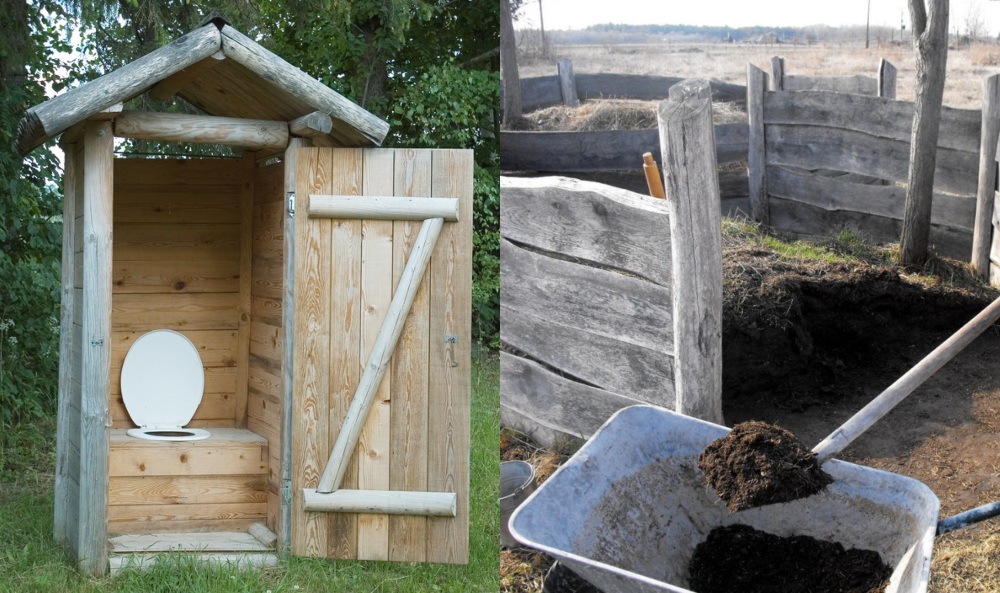
- Regularly check and empty the solid waste container: Monitor the level of solid waste in the container and empty it as needed. Transfer the waste to a dedicated compost pile or bin to continue the decomposition process.
- Manage liquid waste: Empty the liquid waste container regularly to maintain a proper balance in the composting chamber. Dilute the urine with water and use it as a fertilizer for non-edible plants or grassy areas.
- Ensure proper ventilation: Regularly check and clean the ventilation system to prevent blockages and maintain good airflow. This will help to control odors and promote optimal composting conditions.
- Monitor the moisture levels: Keep an eye on the moisture content inside the composting chamber. If it becomes too dry, add some water. If it becomes too wet, add more composting medium to absorb the excess moisture.
- Maintain a carbon-to-nitrogen balance: Adjust the amount of composting medium and waste added to maintain an appropriate carbon-to-nitrogen ratio. This will aid in the decomposition process and prevent foul odors.
- Regularly inspect for pests: Check the composting chamber for any signs of pests, such as flies or rodents. Take appropriate measures to deter and control these pests to ensure a hygienic environment.
- Monitor compost temperature: Use a thermometer to periodically check the temperature inside the composting chamber. A temperature between 110°F to 140°F (43°C to 60°C) indicates proper microbial activity and decomposition.
- Document observations: Keep a record of your observations, including temperature readings, maintenance tasks, and any issues or concerns that arise. This information will help you track the progress of the composting process and make necessary adjustments.
Regular maintenance and monitoring will ensure the effective operation and longevity of your compost toilet. By staying proactive, you can address any issues promptly and maintain a healthy composting environment.
Now that you know how to maintain and monitor your compost toilet, let’s move on to the final step: using and emptying the compost toilet.
Step 8: Use and empty the compost toilet
Using and emptying the compost toilet properly is essential for hygiene and continued functionality. Follow these steps to make the most of your compost toilet:
- Use the toilet correctly: Educate users on the proper usage of the compost toilet. Remind them to only deposit human waste, toilet paper, and compostable materials. Avoid disposing of non-biodegradable items that can hinder the composting process.
- Follow appropriate hygiene practices: Encourage users to practice good hygiene by washing their hands thoroughly after using the compost toilet. Provide handwashing facilities nearby, ensuring they have access to clean water and soap.
- Add composting medium after each use: After each use, sprinkle a small amount of composting medium over the waste to absorb moisture and control odors. This step is essential for maintaining a healthy composting process.
- Regularly empty the solid waste container: Monitor the level of solid waste and empty the container as needed. Transfer the waste to a designated compost pile or bin for further decomposition.
- Empty the liquid waste container: Regularly empty the liquid waste container to prevent overflow and maintain a healthy moisture balance in the composting chamber. Dilute the urine with water and use it as a natural fertilizer for non-edible plants or grassy areas.
- Properly manage the compost: Ensure that the compost from the toilet is stored separately from edible plant areas and undergoes a thorough composting process. Follow local guidelines and regulations for the safe and proper use of the compost in your garden or landscaping.
- Regularly clean and sanitize: Periodically clean and sanitize the composting chamber, toilet seat, and frame to maintain a hygienic environment. Use eco-friendly cleaning products and ensure thorough rinsing to prevent any harmful residues.
By following these steps, you can ensure a healthy, hygienic, and efficient compost toilet system. Regular maintenance and proper waste management will help maintain a pleasant odor-free experience for users.
Congratulations! You have successfully completed the steps to creating, maintaining, and using your compost toilet. Enjoy the eco-friendly and sustainable benefits it brings to your home and the environment.
Conclusion
Building your own compost toilet is a rewarding and sustainable DIY project that can have a significant impact on water conservation and waste reduction. By transforming human waste into nutrient-rich compost, you are contributing to a more environmentally-friendly lifestyle.
Throughout this guide, we have walked you through the step-by-step process of building a compost toilet. From gathering the necessary materials to constructing the composting chamber, setting up the ventilation system, and maintaining the toilet, each step plays a crucial role in ensuring the functionality and effectiveness of your compost toilet.
Remember to always follow local regulations and guidelines regarding waste disposal and composting practices. Safety, hygiene, and adherence to sanitation standards should always be prioritized in the construction and usage of your compost toilet.
Building a compost toilet not only offers practical benefits such as reducing water consumption and providing a sustainable waste management solution, but it also fosters a closer connection with nature and promotes self-sufficiency. The compost produced can be used as a valuable resource to enrich your garden or landscape, closing the loop in the nutrient cycle.
We hope that this guide has provided you with the knowledge and inspiration to embark on your own compost toilet project. By taking on this DIY endeavor, you are embracing environmental consciousness and making a positive impact on our planet.
So, gather your materials, choose a suitable location, and begin the journey of building your very own compost toilet. Start small, and with each use and emptying, you will take one step closer to a greener, more sustainable future.


