Home>Garden Design>How To Build Backyard Shed
Garden Design
How To Build Backyard Shed
Modified: January 22, 2024
Learn how to build a backyard shed with expert landscape design tips. Create a stunning outdoor space with our step-by-step guide and transform your backyard today.
(Many of the links in this article redirect to a specific reviewed product. Your purchase of these products through affiliate links helps to generate commission for Chicagolandgardening.com, at no extra cost. Learn more)
Table of Contents
- Introduction
- Step 1: Planning and Designing Your Shed
- Step 2: Gathering Materials and Tools
- Step 3: Preparing the Site
- Step 4: Building the Foundation
- Step 5: Constructing the Frame
- Step 6: Adding the Walls
- Step 7: Installing the Roof
- Step 8: Putting Up Doors and Windows
- Step 9: Finishing Touches and Interior Design
- Step 10: Maintenance and Upkeep
- Conclusion
Introduction
Welcome to the world of landscape design, where creativity meets nature to transform outdoor spaces into stunning and functional living areas. Whether you have a vast backyard or a small patio, incorporating landscape design elements can not only enhance the aesthetic appeal of your outdoor space but also create a haven for relaxation and enjoyment.
From lush gardens to inviting pathways, landscape design offers endless possibilities to create a personalized outdoor retreat. By blending elements such as hardscapes, plants, lighting, and water features, you can create a harmonious and cohesive design that reflects your own unique style and meets your specific needs.
But landscape design is more than just arranging plants and building structures. It’s about understanding the principles of design, considering the functionality of the space, and the environmental factors that come into play. This includes factors like soil conditions, climate, and maintenance requirements.
In this comprehensive guide, we will take you through the process of landscape design step-by-step, providing you with the knowledge and tools to create your own backyard oasis. Whether you’re a beginner looking to dip your toes into the world of landscape design or have some experience and want to take your skills to the next level, this guide will equip you with the essential information you need.
From planning and designing your outdoor space to selecting materials and executing your vision, we’ll cover it all. So let’s dive in and discover the art of landscape design!
Step 1: Planning and Designing Your Shed
Before you start building your backyard shed, it’s essential to plan and design the structure to ensure it meets your needs and complements your outdoor space. Taking the time to carefully consider the purpose, size, layout, and style of your shed will set the foundation for a successful project.
First, determine the primary purpose of your shed. Will it be used for storage, a workshop, a garden retreat, or a combination of these? Understanding the intended use will help you decide on the size, features, and layout that best meet your requirements.
In addition to functionality, consider the aesthetics of your shed. Take into account the architectural style of your home and the surrounding landscape. You may want your shed to blend seamlessly with its surroundings or become a standout feature that adds character to your outdoor space.
Next, measure the available space in your backyard. Consider factors such as setback requirements, access to utilities, and any existing structures or landscaping features you need to work around. This will help you determine the ideal size and placement of your shed.
Sketch out your shed design, taking note of the dimensions, door and window placements, and any other specific features you want to incorporate. This will serve as your blueprint throughout the construction process.
Once you have a clear plan and design in mind, it’s a good idea to consult with a local building department to check if you need any permits or if there are any specific building codes you need to adhere to. This step is crucial to ensure your shed meets all legal requirements and is built to last.
Planning and designing your shed is an exciting process that allows you to unleash your creativity while keeping practical considerations in mind. Take your time to explore different design options, gather inspiration from magazines or online resources, and make sure your shed aligns with your overall vision for your backyard.
By investing time and effort in the planning and design phase, you will lay a solid foundation for a successful shed-building project. So grab your sketchpad and let your imagination run wild as you envision the perfect shed for your backyard!
Step 2: Gathering Materials and Tools
Once you have a clear plan and design for your backyard shed, it’s time to gather the materials and tools you’ll need to bring your vision to life. Having the right materials and tools on hand will not only ensure a smoother construction process but also help you achieve a more professional and durable end result.
Start by creating a detailed list of all the materials required for your shed. This will typically include items such as lumber, roofing materials, siding, nails, screws, insulation, paint, and any other specific components needed for your specific design.
When selecting materials, prioritize durability and quality. Opt for pressure-treated or rot-resistant wood for the framing and siding to protect against moisture and decay. Consider the climate in your area and choose roofing materials that can withstand the elements.
Alongside the materials, make a list of the tools you’ll need for the construction process. This will vary depending on the complexity of your shed design, but some common tools include a hammer, tape measure, saw, screwdriver, level, drill, and safety equipment such as goggles and gloves.
Take inventory of the tools you already have and determine what additional tools or equipment you may need to purchase or rent. This will ensure that you’re well-prepared and have everything you need before starting the construction process.
In addition to gathering materials and tools, it’s a good idea to research and familiarize yourself with any special techniques or building methods specific to your shed design. Online tutorials, instructional videos, or books on shed construction can provide valuable insights and guidance.
Before making any purchases, compare prices, and check for any discounts or deals available from local suppliers. It’s also worth considering the delivery options for the materials, especially if you’re working with larger quantities or heavy items.
By gathering all the necessary materials and tools ahead of time, you’ll be well-prepared to begin the construction phase of your shed project. This will save you time and minimize any potential delays or disruptions as you move forward in building your backyard oasis.
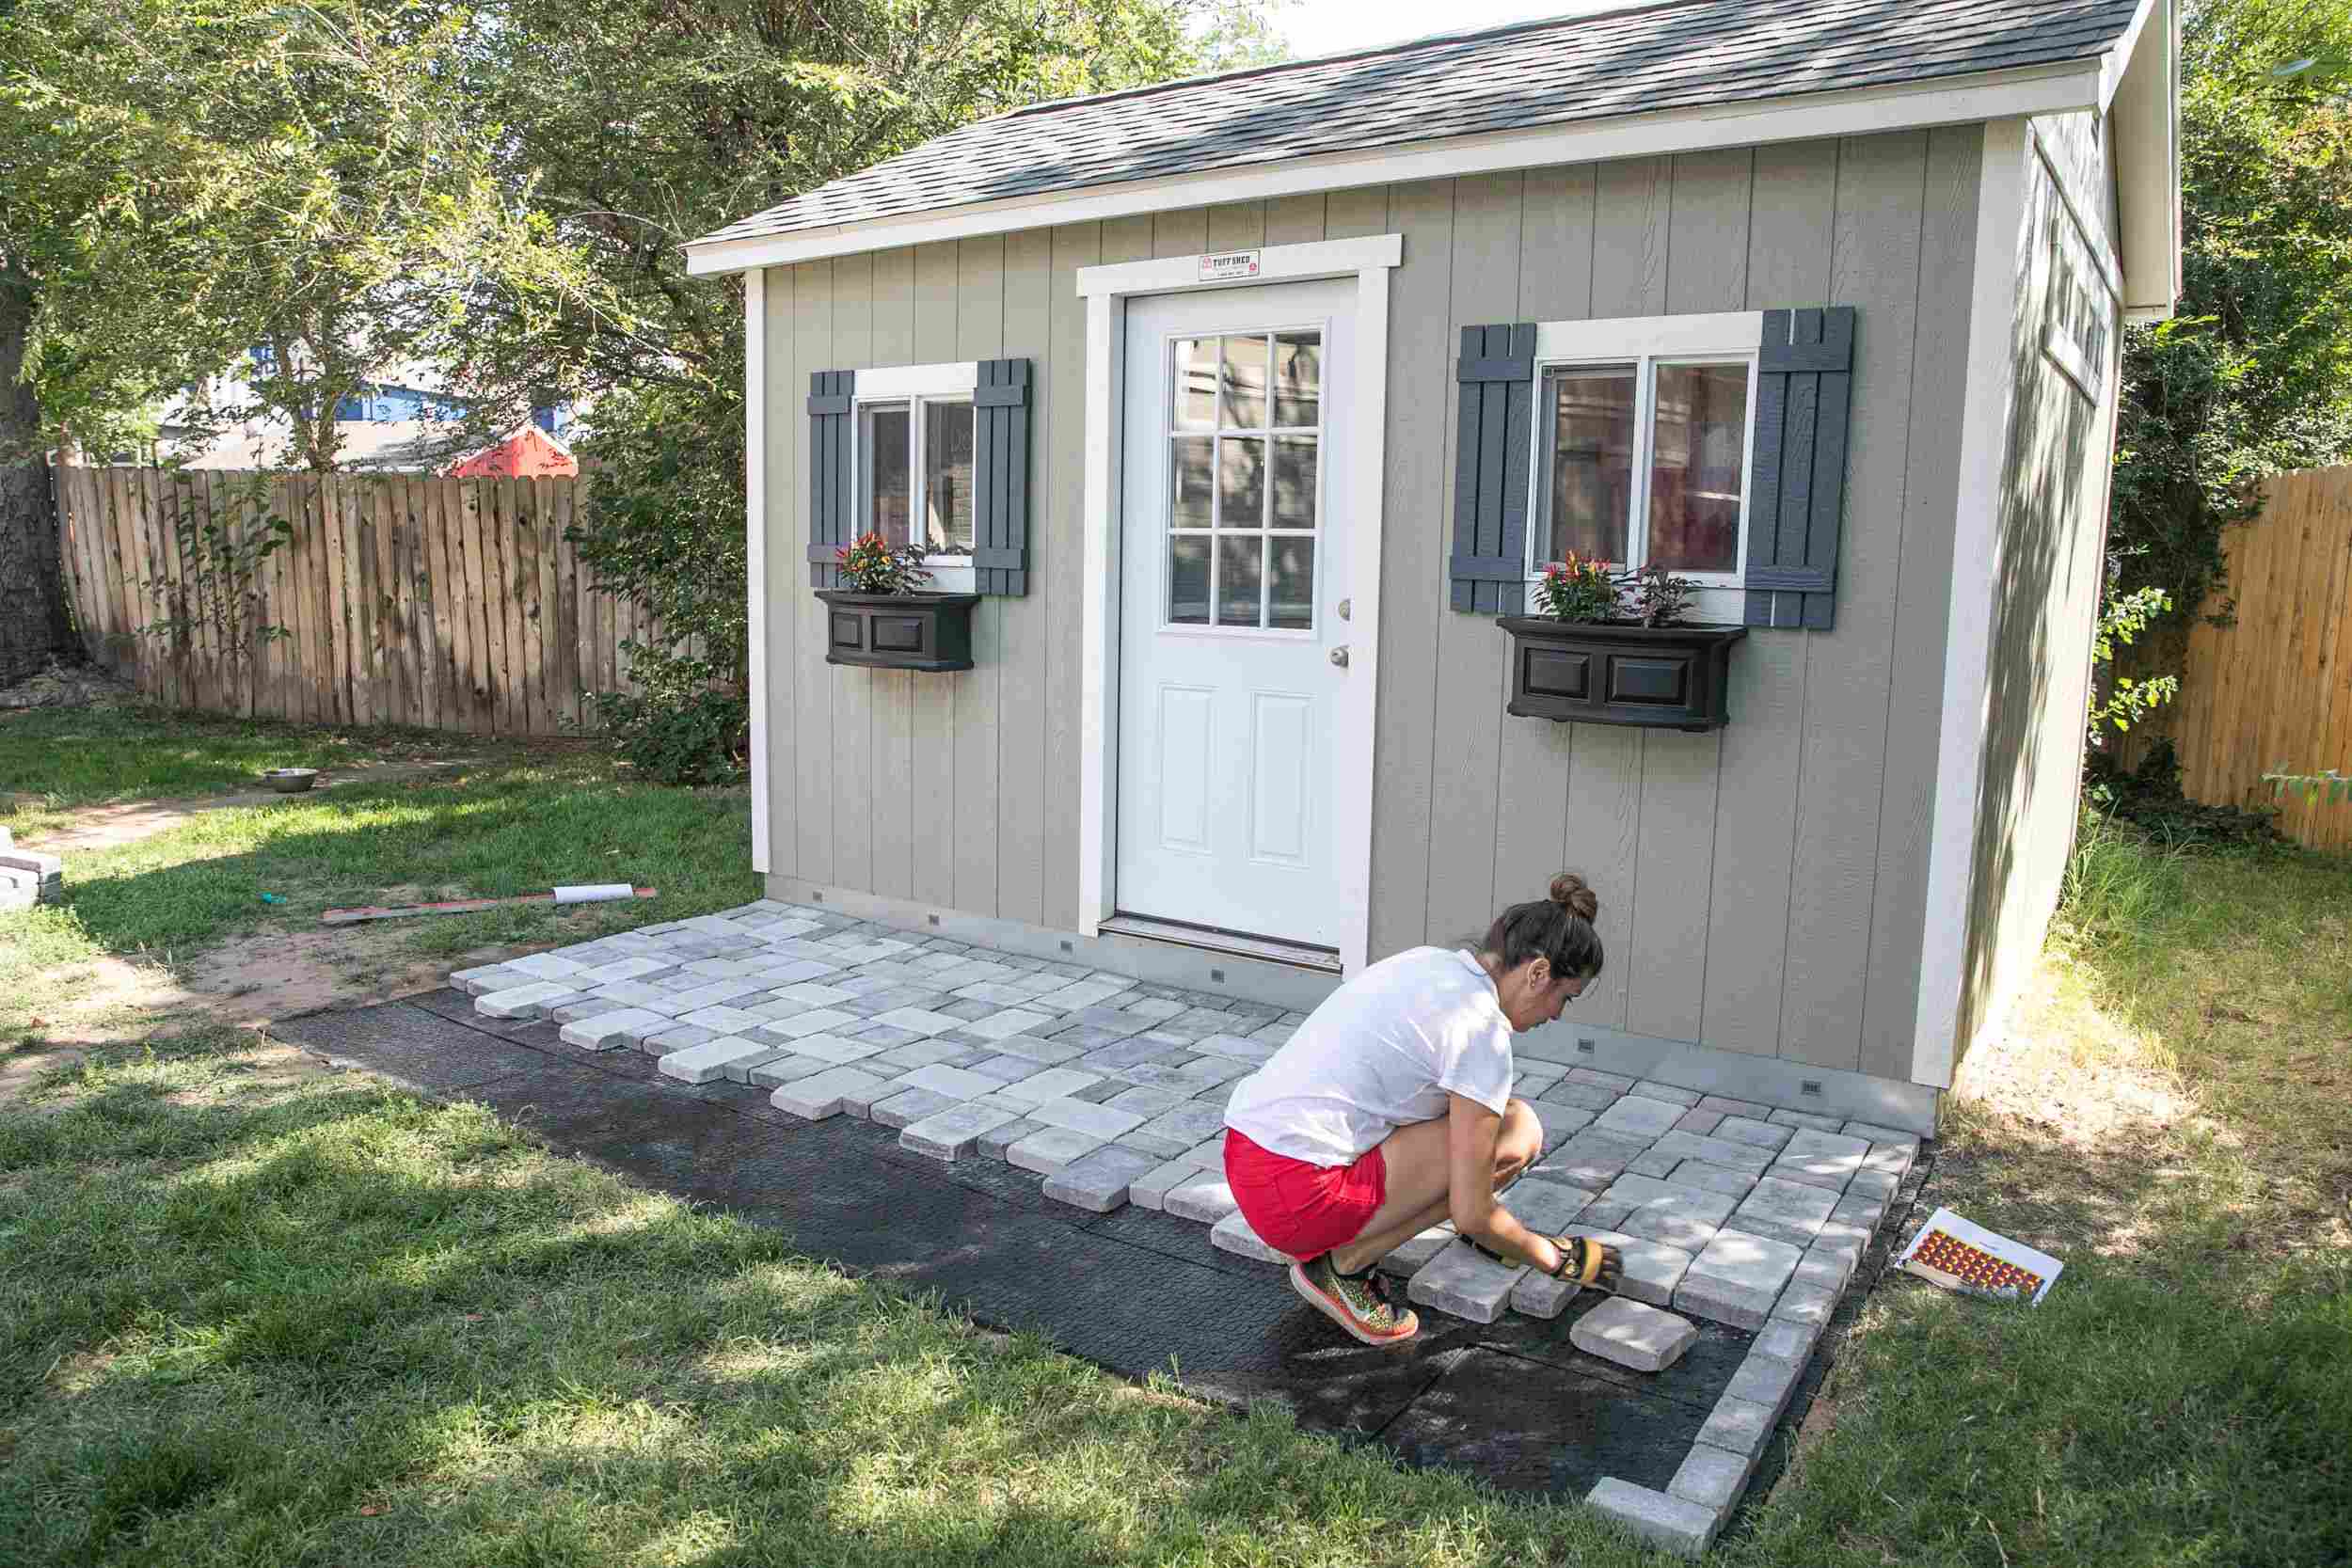
Step 3: Preparing the Site
Before you can start constructing your backyard shed, it’s crucial to properly prepare the site where it will be built. By taking the time to prepare the site, you’ll ensure a stable and level foundation, which is essential for the structural integrity and longevity of your shed.
The first step in preparing the site is to clear the area of any debris, vegetation, or obstacles. Remove any rocks, tree roots, or other objects that could interfere with the construction process or compromise the stability of the shed.
Next, assess the natural terrain of the site. Ideally, you’ll want to select a location that is relatively flat and provides good drainage to prevent water from pooling around or under the shed. If necessary, you may need to level the ground using a shovel, rake, or a mechanical tool, such as a compacting plate.
Once the site is cleared and level, it’s time to mark the area where the shed will be located. Use stakes and string to outline the exact dimensions of the shed’s footprint. This will serve as a guide during the foundation and framing stages of the construction process.
Before proceeding, it’s essential to check for any underground utility lines, such as electrical, gas, or water lines. Contact your local utility companies or consult a professional to ensure that there are no utility lines running through the designated site. Digging into utility lines can be dangerous and costly.
After verifying that the site is clear of utility lines, it’s time to lay the foundation for your shed. There are several types of foundations to choose from, including concrete slabs, pier and beam systems, or skids. Select the foundation type that best suits your shed design and local building requirements.
Prepare the foundation according to the specific requirements of your chosen option. This may involve excavating the site, pouring concrete, or laying gravel or pavers. Ensure that the foundation is level and properly compacted to provide a solid base for your shed.
By taking the time to thoroughly prepare the site, you’ll set the stage for a successful shed construction project. A well-prepared site will facilitate the construction process and help ensure that your shed stands strong for years to come.
Step 4: Building the Foundation
With the site prepared, it’s time to move on to the next crucial step in constructing your backyard shed: building the foundation. The foundation provides the structural support and stability for your shed, ensuring that it remains level and secure.
The type of foundation you choose will depend on various factors, including your shed design, local building codes, and personal preferences. Common options include concrete slabs, pier and beam systems, or skids.
If you opt for a concrete slab foundation, start by creating a formwork using wooden boards that are secured firmly in place. Ensure that the formwork is level and square, as this will dictate the accuracy and stability of your foundation.
Next, prepare the concrete mixture according to the manufacturer’s instructions. Pour the concrete into the formwork, taking care to evenly distribute it and eliminate any air pockets. Smooth the surface with a trowel and use a level to ensure it remains level and flat.
If you choose a pier and beam foundation, begin by placing concrete piers at regular intervals along the marked outline of the shed. These piers act as the support pillars for the structure. Use a level to ensure that each pier is perfectly plumb and level.
Next, construct beams across the piers to provide a solid base for the shed floor. Use pressure-treated lumber and secure it to the piers using appropriate fasteners, such as anchor bolts or brackets.
For a skid foundation, lay pressure-treated wooden skids along the marked outline of the shed. These skids act as runners that provide support and elevation for the shed. Ensure that the skids are level and properly aligned before proceeding.
Whichever foundation type you choose, it’s essential to allow adequate time for the concrete to cure or the piers to settle before proceeding with further construction. Follow the manufacturer’s instructions for curing times, and avoid placing any excessive weight on the foundation prematurely.
Building a solid and well-constructed foundation is crucial for the stability and longevity of your shed. Take the time to carefully build the foundation according to the specific requirements, and ensure that it is level, secure, and capable of supporting the weight of the shed.
Once the foundation is complete and fully cured, you’re ready to move forward with the next steps in constructing your backyard shed, bringing you one step closer to your dream outdoor space.
Step 5: Constructing the Frame
With the foundation in place, it’s time to move on to the exciting stage of constructing the frame of your backyard shed. The frame serves as the structural skeleton, providing support and stability for the entire structure.
Start by gathering the necessary lumber and cut it to the required dimensions according to your shed design. Use a tape measure, square, and saw to ensure accurate and precise cuts. Label each piece of lumber to easily identify them during the construction process.
Begin building the frame by constructing the four walls of the shed. Lay out the bottom plates, which are horizontal boards that will form the base of the walls. Attach the studs vertically at regular intervals, using nails or screws to secure them to the bottom plates and each other.
Ensure that the walls are plumb (upright) and square by using a level and measuring diagonally from corner to corner. This will help maintain structural integrity and ensure that your shed is properly aligned.
Once the walls are built, it’s time to attach them to the foundation. Use anchor bolts, brackets, or other appropriate fasteners to secure the walls to the foundation, following local building codes and guidelines.
Next, add the horizontal top plates and the roof framing members, such as rafters or trusses, depending on your shed design. Connect the roof framing to the walls using joist hangers or other suitable connectors. This will provide the support for the roof and ensure its stability.
As you construct the frame, check for any gaps or inconsistencies and make any necessary adjustments along the way. It’s important to maintain a strong and sturdy frame to support the weight of the shed and withstand the elements.
Throughout the frame construction process, don’t forget to consider any additional features you want to incorporate, such as windows, doors, or ventilation openings. Make appropriate cutouts in the frame and install these elements securely.
Building the frame is a critical step in the shed construction process. Take your time to ensure that the frame is sturdy, level, and properly aligned. A well-constructed frame will provide the foundation for the rest of the shed and set the stage for the final stages of construction.
With the frame complete, you’re now ready to move on to the next steps in building your backyard shed, bringing you one step closer to a functional and beautifully designed outdoor space.
Step 6: Adding the Walls
With the frame of your backyard shed complete, it’s time to move on to the next step: adding the walls. The walls will enclose the structure, providing both structural support and protection from the elements.
Start by gathering the appropriate materials for your shed walls. This may include plywood, siding, or any other cladding material specified in your shed design. Cut the materials to the required dimensions, ensuring they fit snugly between the wall studs.
If you plan to insulate your shed for better temperature control, this is the time to install insulation between the wall studs. Choose insulation suitable for your climate and follow the manufacturer’s instructions for proper installation.
Begin by attaching the wall cladding to the exterior side of the shed frame. Use nails, screws, or other recommended fasteners to secure the cladding to the wall studs. Work your way around the shed, ensuring that the cladding is securely attached and aligned.
If your shed design includes windows, carefully measure and cut openings for the windows in the wall cladding. Install the windows according to the manufacturer’s instructions, using appropriate sealing and flashing techniques to ensure they are weatherproof.
Once the exterior walls are complete, move to the interior side of the shed. Install any additional insulation or vapor barriers as needed, following local building codes and guidelines. Then, attach the interior wall cladding using the same techniques as the exterior walls.
Take extra care to ensure that the corners and seams of the walls are properly aligned and sealed. This will help maintain the structural integrity of the shed and prevent any moisture or drafts from entering the interior space.
While adding the walls, it’s essential to consider any door openings. If your shed design includes doors, measure and cut the appropriate openings in the wall cladding. Install the doors according to the manufacturer’s instructions, ensuring they are properly aligned, level, and securely attached.
As you add the walls, regularly check for any gaps, uneven surfaces, or structural issues. Address any concerns promptly, making necessary adjustments or repairs to ensure the walls are solid and well-constructed.
Adding the walls brings your backyard shed one step closer to completion. With the walls in place, you can clearly see your shed taking shape and envision the finished product. It’s an exciting milestone in your shed construction journey!
With the walls securely in place, it’s time to move on to the next steps in building your backyard shed and transforming your outdoor space into a functional and aesthetically pleasing oasis.
Step 7: Installing the Roof
With the walls of your backyard shed complete, it’s time to move on to the next critical step: installing the roof. The roof provides essential protection from the elements and completes the overall structure of your shed.
Start by gathering the necessary materials for your shed roof. This typically includes roofing materials such as shingles, metal panels, or corrugated sheets, as well as underlayment, flashing, and appropriate fasteners.
If your shed design includes roof trusses, position them on top of the wall frames, ensuring they are properly aligned and securely fastened. Trusses provide the structural support for the roof and distribute the weight of the roof evenly.
Next, install the roofing underlayment, which acts as a protective barrier between the roof deck and the roofing material. Follow the manufacturer’s instructions and ensure the underlayment is properly fastened and covers the entire roof surface.
If using shingles, metal panels, or other roofing materials, begin installing them from the bottom edge of the roof and work your way up. Follow the manufacturer’s instructions for proper installation, overlapping each row to ensure proper water drainage and weatherproofing.
If your shed design includes any roof vents or skylights, carefully measure and cut openings in the roofing material. Install the vents or skylights according to the manufacturer’s instructions, ensuring they are properly sealed and secure.
Take extra care to install flashing around any roof penetrations, such as chimneys or vent pipes. Flashing provides additional protection against water intrusion and helps to maintain the integrity of the roof.
As you install the roof, regularly check for any gaps, misalignments, or areas that require additional sealant. Address any issues promptly to ensure proper weatherproofing and the long-term durability of your shed.
During the roof installation process, it’s important to prioritize safety. Use appropriate safety equipment such as harnesses, non-slip footwear, and caution when working at heights.
By installing the roof, you’re reaching the final stages of constructing your backyard shed. The roof not only provides protection but also enhances the overall appearance of your shed, bringing it one step closer to becoming a functional and visually appealing space.
With the roof complete, you’re almost ready to move on to the final steps of building your backyard shed. Keep up the momentum as you approach the finishing touches that will transform your shed into a beautiful and inviting outdoor retreat.
Step 8: Putting Up Doors and Windows
As you near the final stages of building your backyard shed, it’s time to focus on putting up the doors and windows. Installing these important features not only adds functionality to your shed but also enhances its overall aesthetics.
Begin by measuring and marking the appropriate locations for doors and windows on your shed walls. Take into consideration the size, shape, and desired placement of these features, keeping in mind both practicality and design aesthetics.
If your shed design includes pre-made doors or windows, carefully follow the manufacturer’s instructions for installation. Measure the openings and ensure that the doors or windows fit properly, making any necessary adjustments or modifications as needed.
Install the doors by attaching hinges to the door frame and then securing them to the shed wall. Ensure that the doors open and close smoothly, and adjust the hinges if necessary for proper alignment. Install any required door hardware, such as handles, locks, or latches.
For windows, carefully position them within the prepared openings. Use appropriate fasteners to secure the windows to the shed walls, making sure they are level and properly aligned. Install any recommended sealing materials or weather-stripping to ensure a snug fit and proper insulation.
If your shed design includes custom-made doors or windows, follow the same principles of proper measurement, alignment, and secure installation. Use appropriate tools, such as a saw or router, to create the necessary openings and frame the doors or windows securely.
During the installation process, regularly check for any gaps or drafts around the doors and windows. Properly seal any openings or seams to ensure weather resistance and insulation. This will help maintain the functionality and energy efficiency of your shed.
Don’t forget to consider additional features such as screens, shutters, or window treatments if desired. These can provide added privacy, ventilation, or decorative elements to enhance the overall look and functionality of your shed.
By putting up doors and windows, you’re adding the finishing touches to your backyard shed and making it a complete and usable space. Step back and admire the transformation as your shed becomes a functional and inviting retreat.
With the doors and windows in place, you’re now ready to move on to the final steps of your shed construction project, where you’ll add those personalized touches and make interior design decisions that will bring your vision to life.
Step 9: Finishing Touches and Interior Design
As you approach the final stages of constructing your backyard shed, it’s time to focus on the finishing touches and interior design. This step allows you to transform your shed from a functional space into a visually appealing and personalized retreat.
Consider the overall style and purpose of your shed as you plan the finishing touches. Determine the color scheme, materials, and decorative elements that will best reflect your taste and complement the surrounding environment.
Start by applying a fresh coat of paint or stain to the exterior walls, doors, and trim. Choose colors that resonate with your desired aesthetic, whether it’s a vibrant and bold statement or a more subtle and natural look. Properly prepare the surfaces beforehand to ensure the paint adheres well and lasts longer.
Once the exterior is complete, turn your attention to the interior of the shed. Consider the functionality of the space and how you plan to use it. Will it be a workshop, a storage area, or a relaxation space?
If your shed will serve as a workspace, consider adding shelves, pegboards, or storage cabinets to keep the area organized and maximize efficiency. Construct or install a workbench or sturdy table to provide a dedicated area for projects or hobbies.
For storage purposes, utilize modular storage systems, hooks, or wall-mounted racks to optimize space and keep tools, equipment, or supplies neatly arranged.
To create a cozy and inviting atmosphere, consider adding insulation to the interior walls and ceiling. This will help regulate temperature and improve comfort year-round. Install lighting fixtures that suit the purpose of the shed, whether it’s bright task lighting or softer ambient lighting.
Enhance the aesthetics of the interior by incorporating appropriate decor elements. Hang artwork, photographs, or mirrors on the walls to add personality and create a sense of space. Consider adding curtains, blinds, or window treatments to control natural light and add privacy.
Don’t forget about the flooring. Choose a flooring material that is durable, easy to clean, and suitable for your shed’s purpose. Options include concrete finishes, laminate flooring, or even outdoor rugs or mats.
Lastly, personalize your shed with decorative touches that reflect your unique style. Add potted plants, wall decals, or any other decorative accents that speak to your interests and make the space truly feel like your own.
Finishing touches and interior design allow you to put your stamp on your backyard shed. This is where your creativity can shine, and you can create a space that is both functional and visually appealing.
With the finishing touches in place, step back and admire your completed shed project. It’s now time to enjoy your new outdoor oasis and reap the benefits of your hard work and careful design choices.
Step 10: Maintenance and Upkeep
Congratulations on completing your backyard shed project! Now that you have your dream outdoor space, it’s important to prioritize ongoing maintenance and upkeep to ensure its longevity and preserve its beauty.
Regular maintenance is essential to keep your shed in optimal condition. Here are some important maintenance tasks to keep in mind:
1. Cleaning: Regularly clean the exterior of your shed to remove dirt, debris, and stains. Use a mild detergent and a soft brush or sponge to gently scrub the surfaces. Rinse thoroughly with water and allow it to dry completely.
2. Inspect and Repair: Periodically inspect your shed for any signs of damage, such as cracks, rot, or loose components. Repair any issues promptly to prevent further deterioration. Replace any damaged or worn-out materials, including roofing, siding, or windows.
3. Paint or Stain: Depending on the type of finish you chose for your shed, you may need to repaint or restain it periodically to maintain its appearance and protect it from the elements. Follow the manufacturer’s recommendations for the appropriate timing and application process.
4. Pest Control: Regularly check for any signs of pest infestation, such as termites, rodents, or insects. Take preventive measures, such as sealing any holes or cracks, using insect repellents, or consulting with a professional pest control service if necessary.
5. Roof Maintenance: Inspect the roof regularly for any loose or damaged shingles, flashing, or other roofing materials. Replace any worn-out or damaged components promptly to prevent leaks and water damage.
6. Gutters and Drainage: Keep the gutters and downspouts clean and free from debris to ensure proper water drainage. Regularly check for any clogs or damage and address them promptly to prevent water buildup around the shed.
7. Landscaping: Maintain the surrounding landscape by trimming any overhanging branches or foliage that may damage or obstruct the shed. Keep the area around the shed clear of plants, weeds, and debris to prevent moisture buildup and potential pest infestation.
8. Seasonal Preparation: Prepare your shed for the changing seasons. In colder climates, ensure the shed is properly insulated and consider using a dehumidifier or moisture-absorbing materials to prevent condensation and mold growth. In warmer climates, use proper ventilation to keep the shed cool and prevent humidity.
9. Security Measures: Install proper security measures, such as locks, alarms, or surveillance systems, to protect your shed and its contents from theft or unauthorized access.
By following these maintenance practices, you’ll ensure that your backyard shed remains a functional, safe, and visually pleasing space for years to come. Regular upkeep will extend its lifespan and preserve the value of your investment.
Remember to consult any specific maintenance guidelines or recommendations provided by the manufacturers of the materials used in your shed construction. They may have additional tips or requirements to ensure the longevity and performance of their products.
Most importantly, enjoy your backyard shed! Take pride in the hard work you’ve put into creating your own personal oasis, and make the most of the versatile space it provides for relaxation, hobbies, and storage.
Conclusion
Congratulations on completing the construction of your backyard shed! With dedication, careful planning, and attention to detail, you have transformed your outdoor space into a functional and aesthetically pleasing retreat.
Throughout the process of landscape design and shed construction, you have learned the importance of strategic planning, gathering the right materials and tools, preparing the site, building a solid foundation, constructing the frame, adding the walls, installing the roof, putting up doors and windows, and focusing on finishing touches and interior design. Each step has contributed to the successful creation of your backyard shed.
Remember that maintenance and upkeep play a crucial role in preserving the longevity and beauty of your shed. Regular cleaning, inspections, repairs, and appropriate care will ensure that your shed continues to stand strong and look its best for years to come.
Enjoy the benefits of your newly constructed shed, whether it’s an organized workspace, a storage solution, or simply a peaceful escape in your own backyard. Personalize the space with your own unique touches and make it a reflection of your style and interests.
Continue to explore and expand your knowledge in landscape design, considering additional elements such as pathways, plants, lighting, and water features to further enhance your outdoor space and create a harmonious environment.
Don’t forget that your shed is not just a structure, but a testament to your creativity, determination, and the joy of working with your own hands. Share your experience and newfound knowledge with others who may be inspired to embark on their own landscape design or shed construction journey.
Thank you for joining us on this comprehensive guide to landscape design and shed construction. We hope it has empowered you to create a backyard oasis that brings you joy, relaxation, and a connection to nature. Happy landscaping and shed building!