Home>Gardening Techniques>DIY Projects>How To Build A Sauna In Your Backyard
DIY Projects
How To Build A Sauna In Your Backyard
Modified: January 22, 2024
Learn how to build a sauna in your backyard with this comprehensive DIY project guide. Whether you're a beginner or expert, we've got you covered!
(Many of the links in this article redirect to a specific reviewed product. Your purchase of these products through affiliate links helps to generate commission for Chicagolandgardening.com, at no extra cost. Learn more)
Table of Contents
- Introduction
- Planning and Designing Your Sauna
- Choosing the Location
- Gathering Materials and Tools
- Building the Sauna Frame
- Installing the Sauna Walls
- Building the Sauna Roof
- Insulating the Sauna
- Installing the Sauna Door
- Ventilation and Lighting
- Installing Sauna Benches
- Sauna Flooring Options
- Sauna Heating System
- Decor and Finishing Touches
- Conclusion
Introduction
Are you looking for a relaxing and rejuvenating experience right in the comfort of your own backyard? Building a sauna may be the perfect DIY project for you. A sauna is a small room or building designed for the purpose of sweating and bathing in high temperatures. It offers a multitude of health benefits, including detoxification, stress relief, improved circulation, and relaxation of both the mind and body.
In this comprehensive guide, we will take you through the step-by-step process of building a sauna in your backyard. Whether you’re a seasoned DIY enthusiast or a beginner, this project can be accomplished with some basic woodworking skills and a little bit of help from friends or family. By following the instructions in this guide, you’ll soon have your very own backyard oasis where you can unwind and indulge in the therapeutic experience of a sauna.
We will begin by discussing the planning and design phase of your sauna project. This includes considerations such as the size and layout of the sauna, as well as any specific features or amenities you want to incorporate. Next, we will guide you through the process of choosing the ideal location for your sauna, ensuring it complies with local building codes and regulations.
Once you’ve finalized your design and selected the location, we will delve into the materials and tools you’ll need to gather. From wood and insulation to screws and nails, we’ll provide you with a comprehensive list of everything you’ll need to purchase or gather before getting started. With the necessary materials in hand, we will then move on to building the sauna frame and installing the walls and roof.
Insulation is a crucial component of any sauna, as it helps to retain heat and create the desired sauna environment. We’ll walk you through the process of insulating your sauna, ensuring it is well-sealed and energy-efficient. Additionally, we’ll discuss the importance of proper ventilation and lighting in the sauna, and provide guidance on how to incorporate these features into your design.
No sauna is complete without comfortable seating, so we’ll explain how to install benches that are both functional and aesthetically pleasing. We’ll also explore different flooring options, taking into consideration factors such as durability, slip resistance, and ease of maintenance. And of course, we’ll guide you on how to choose the right sauna heating system to create the perfect sauna experience.
Finally, we’ll discuss the finishing touches and decorative elements that will transform your sauna into a tranquil retreat. From choosing the right sauna door to adding soothing lighting and accessories, we’ll help you create a space that exudes relaxation and tranquility.
Now that you have a glimpse of what awaits you, it’s time to dive into the planning and designing phase of your sauna project. Get ready to embark on an exciting journey that will result in a serene oasis right in your own backyard.
Planning and Designing Your Sauna
Before you start building your sauna, it’s important to spend some time planning and designing to ensure that you create a space that meets your needs and preferences. Consider the following factors as you embark on the journey of creating your own personal sauna retreat.
1. Size and Layout: Determine how many people you want your sauna to accommodate at once. This will help you determine the size requirements for your sauna room. Additionally, consider the layout of the sauna, including the placement of benches, the sauna heater, and any accessories you plan to include.
2. Sauna Type: Decide on the type of sauna you want to build. Traditional saunas use hot rocks to generate heat, while infrared saunas use infrared heaters to directly heat the body. Research the pros and cons of each type to determine which one is best for you.
3. Building Codes and Regulations: Research local building codes and permit requirements before starting your sauna project. Some areas may have specific regulations regarding the size, ventilation, and electrical systems of saunas. Ensure that your design complies with these regulations to avoid any issues in the future.
4. Heat Source: Consider the type of heat source you want to use in your sauna. Electric heaters are the most common option, but you can also use wood-burning or gas heaters. Each option has its own benefits and considerations, so research and choose the one that suits your preferences and budget.
5. Insulation: Adequate insulation is crucial for a sauna to retain heat effectively. Research the different types of insulation materials available, such as fiberglass, mineral wool, or foam board, and choose the one that provides optimal heat retention for your specific climate.
6. Accessibility and Safety: Consider the accessibility and safety features of your sauna. Install proper ventilation to ensure fresh air circulation and prevent moisture buildup. Incorporate safety measures such as non-slip flooring, rounded edges on benches, and easily accessible temperature controls.
7. Budget: Determine your budget for the sauna project, taking into account the cost of materials, permits, and any additional features or accessories you plan to include. Research and compare prices to ensure that you stay within your budget while still achieving the sauna of your dreams.
By carefully planning and designing your sauna, you’ll have a clear roadmap to follow as you progress through each step of the building process. This will not only save you time and effort but also help you create a sauna that reflects your preferences and provides a truly enjoyable and rejuvenating experience.
Choosing the Location
Choosing the right location for your backyard sauna is key to ensuring a comfortable and enjoyable sauna experience. Consider the following factors when selecting the perfect spot:
1. Space availability: Assess the amount of space you have in your backyard. Ensure that the chosen location can comfortably accommodate the size of the sauna you have planned, leaving enough room for any additional features or accessories you may wish to include.
2. Privacy: Look for a secluded area that offers privacy. A sauna is a place to relax and unwind, so having a peaceful and uninterrupted atmosphere is essential. Consider the natural surroundings and any existing features, such as trees or fences, that can provide privacy.
3. Accessibility: Choose a location that is easily accessible from your house. This will make it convenient for you to use the sauna regularly and ensure that you have easy access to amenities such as water and electricity.
4. Sun exposure: Consider the amount of sunlight the location receives throughout the day. While some natural light can enhance the overall sauna experience, too much direct sunlight can cause the sauna to become uncomfortably hot. Aim for a balance of sunlight and shade, or consider adding blinds or curtains to regulate the amount of light entering the sauna.
5. Drainage: Ensure that the chosen location has proper drainage to prevent water accumulation around the sauna. Poor drainage can lead to moisture issues and potential damage to the structure over time.
6. Building codes and restrictions: Check with your local building department to understand any specific guidelines or restrictions regarding the placement of structures in your backyard. Some areas may have setback requirements or restrictions related to distance from property lines or other structures.
7. Aesthetics: Consider the aesthetics of your backyard and how the sauna will fit into the overall landscape. Take into account the views from both inside the sauna and from the outside. You may want to strategically place the sauna to take advantage of pleasant views or create a focal point in your backyard.
Take your time to carefully evaluate each of these factors before finalizing the location for your sauna. Once you’ve chosen the ideal spot, you’ll be one step closer to creating a serene and tranquil oasis right in your own backyard.
Gathering Materials and Tools
Before starting the construction of your sauna, it’s important to gather all the necessary materials and tools. Having everything you need at the beginning will help streamline the building process and ensure that you have everything on hand to complete the project. Here are the essentials you’ll need:
1. Sauna Kit or Materials: Determine whether you want to buy a pre-made sauna kit or source the materials individually. Sauna kits typically include all the necessary materials, such as sauna boards, insulation, and sauna benches. If you prefer a customized sauna, you can purchase the materials separately, including cedar or spruce boards for the walls and ceilings, sauna insulation, and sauna accessories.
2. Plumbing and Electrical Supplies: If you’re planning to include a shower or any other plumbing fixtures in your sauna, you’ll need to gather the necessary plumbing supplies like pipes, valves, and fittings. Additionally, if you’re installing any electrical components, such as sauna lighting or a thermostat, make sure to have the appropriate wiring and electrical supplies.
3. Tools: To successfully build your sauna, you’ll need a variety of tools. The exact tools required will depend on the complexity of your sauna design, but here are some common tools you’re likely to need: a circular saw, a miter saw, a drill, a level, a tape measure, a hammer, a chisel, clamps, a sander, a nail gun, and a ladder. Ensure that all tools are in good working condition and have the necessary safety gear, like goggles and gloves, to protect yourself during construction.
4. Fasteners and Hardware: You’ll need a supply of screws, nails, and other fasteners to secure the sauna materials together. Choose corrosion-resistant options, especially if your sauna will be exposed to moisture. Additionally, gather the necessary hardware, such as hinges and handles, for installing the sauna door.
5. Insulation and Vapor Barrier: Insulation plays a crucial role in retaining heat and maintaining energy efficiency in your sauna. Purchase high-quality sauna insulation, like fiberglass or mineral wool, as well as a vapor barrier to prevent moisture from penetrating the sauna walls.
6. Finishing Materials: Depending on your design preferences, you may need to gather finishing materials, such as stain or paint, to protect and enhance the appearance of the sauna. Choose a product that is suitable for saunas and can withstand high temperatures.
7. Safety Equipment: Lastly, don’t forget about safety equipment. During construction, make sure to have safety goggles, gloves, and a dust mask to protect yourself from potential hazards and irritants.
Take the time to research and create a comprehensive list of all the materials and tools you’ll need for your specific sauna project. This will ensure that you have everything ready to go and minimize any unnecessary delays or interruptions during the construction process.
Building the Sauna Frame
Building the sauna frame is the crucial first step in constructing your sauna. The frame provides the structural support for the walls, roof, and other components of the sauna. Follow these steps to build a sturdy and durable sauna frame:
1. Measure and Mark: Measure the dimensions of your sauna design on the ground or the designated area. Use a tape measure and mark the corners and edges of the sauna frame with stakes or spray paint.
2. Prepare the Base: Clear the area of any debris or vegetation. If necessary, level the ground and create a solid, flat base for the sauna frame. You can use a combination of gravel, sand, and concrete blocks to ensure stability and prevent moisture buildup.
3. Cut the Frame Materials: Measure and cut the lumber for the sauna frame. Use pressure-treated or rot-resistant wood, such as cedar, for longevity and durability. Cut the pieces according to the dimensions of your design, making sure to account for any additional framing required for windows or doors.
4. Assemble the Walls: Lay out the bottom plates (horizontal pieces) and position the wall studs (vertical pieces) at the designated intervals. Attach the studs to the bottom plates using screws or nails. Use a level to ensure the walls are plumb (vertical) and square (90-degree angles).
5. Install the Top Plates: Attach the top plates (horizontal pieces) to the top of the wall studs. This will create a secure connection between the walls and provide stability to the overall frame structure.
6. Frame the Roof: Determine the desired pitch for your sauna roof, typically a slight slope to allow for water runoff. Attach the roof rafters (angled pieces) to the top plates, spaced according to your design. Secure them in place with appropriate fasteners.
7. Reinforce the Frame: To enhance the stability of the sauna frame, add additional support by installing cross-bracing or diagonal bracing between the walls and roof rafters. This will prevent twisting or shifting of the frame during construction and eventual use.
8. Double Check Measurements and Level: Before proceeding to the next construction phase, double-check that all measurements are accurate and that the frame is level and square. This will ensure that subsequent installation steps align correctly and result in a properly constructed sauna.
By following these step-by-step instructions, you’ll have a solid and secure frame for your sauna. The frame is the foundation for the rest of the sauna construction, so take the time to ensure it is built accurately and with precision.
Installing the Sauna Walls
Once the sauna frame is constructed, the next step is to install the sauna walls. The walls not only provide privacy and enclosure but also contribute to the insulation and overall aesthetics of the sauna. Follow these steps to successfully install the sauna walls:
1. Prepare the Walls: Before installing the walls, ensure that the frame is clean, free of any obstructions, and ready to receive the wall materials. Make sure that all the studs and plates are securely fastened and level.
2. Choose Your Wall Material: Decide on the type of wall material you want to use for your sauna. Common options include sauna boards, which are specifically designed for saunas and provide a natural and authentic look, or tile, which can create a sleek and modern aesthetic.
3. Cut and Install the Wall Material: Measure and cut the wall material according to the dimensions of your sauna frame. Ensure that the cuts are accurate and fit snugly against the frame. Attach the wall material to the sauna frame using appropriate fasteners, such as screws or nails.
4. Create an Air Gap: To improve insulation and prevent moisture issues, consider creating an air gap between the wall material and the sauna frame. This can be achieved by using strips of insulation or furring strips placed horizontally or vertically between the frame and the wall material.
5. Seal the Joints: Apply a high-temperature silicone sealant to the joints between the wall material and the sauna frame. This will create a tight seal and prevent heat from escaping and moisture from entering the sauna.
6. Repeat for Each Wall: Install the wall material on all sides of the sauna frame, paying close attention to corners and ensuring a tight fit between the pieces. Take your time to ensure that each wall is installed securely and aligned properly.
7. Leave Room for Ventilation and Electrical Outlets: When installing the walls, remember to leave space for ventilation vents and electrical outlets if required. Plan their placement carefully to ensure they align with your sauna design and provide adequate airflow and electricity access.
8. Finish the Walls: Once all the walls are installed, it’s time to finish them. If you’ve used sauna boards, you can apply a sauna-specific finish, such as sauna oil or sauna sealer, to enhance the natural beauty of the wood. If you’ve used tile, grout and seal the tiles to create a waterproof and easy-to-clean surface.
By following these steps, you’ll successfully install the walls of your sauna, creating an enclosed and insulated space for you to enjoy the maximum benefits of sauna bathing.
Building the Sauna Roof
The sauna roof is an essential component of your sauna, providing protection from the elements and helping to retain heat within the sauna space. Follow these steps to successfully build the sauna roof:
1. Determine the Roof Design: Decide on the type of roof design you want for your sauna. Common options include a gable roof, which forms a peak in the center, or a flat roof, which offers a clean and modern look. Consider the overall style of your sauna and choose a roof design that complements it.
2. Measure and Cut the Rafters: Measure and cut the roof rafters to the necessary length and angle to match your chosen roof design. Take precise measurements and ensure that the cuts are accurate for a secure and stable roof structure.
3. Attach the Rafters to the Sauna Frame: Attach the roof rafters to the top plates of the sauna frame using appropriate fasteners, such as screws or nails. Space the rafters according to your design and ensure they are installed securely and evenly across the length of the sauna frame.
4. Add Support Bracing: To add further stability to the roof structure, install support bracing between the rafters. This will help distribute the weight of the roof evenly and prevent any sagging or shifting over time.
5. Install Plywood Sheathing: Cover the roof structure with plywood sheathing. Cut the plywood to fit the dimensions of the sauna roof and attach it securely to the rafters using screws or nails. This will provide a solid base for the final roofing material.
6. Choose Roofing Material: Select the roofing material that suits your aesthetic and climate requirements. Consider options such as asphalt shingles, metal roofing, or cedar shakes. Ensure that the chosen material is suitable for outdoor use and can withstand the heat and moisture of the sauna environment.
7. Install Roofing Material: Install the roofing material according to the manufacturer’s instructions. Each material will have its own specific installation process, whether it involves nailing down shingles or securing metal panels. Follow the guidelines carefully to ensure a watertight and durable roof.
8. Ventilation: Incorporate proper ventilation in the roof design to allow for adequate airflow within the sauna. Install ventilation vents or a ridge vent to prevent heat and moisture buildup, ensuring a comfortable and safe sauna experience.
By following these steps, you’ll have a sturdy and functional sauna roof that protects the interior from the elements and helps maintain the optimal sauna environment for relaxation and rejuvenation.
Insulating the Sauna
Proper insulation is crucial to ensure that your sauna retains heat effectively and creates a comfortable and energy-efficient environment. Follow these steps to successfully insulate your sauna:
1. Choose the Right Insulation: Select insulation materials that are suitable for sauna use. Common options include fiberglass insulation, mineral wool, or foam board insulation. Choose insulation with a high R-value for optimal heat retention.
2. Insulate the Walls: Install the insulation material between the sauna wall studs. Measure and cut the insulation to fit snugly between the studs, ensuring there are no gaps or spaces. Secure the insulation in place using adhesive or staples, following the manufacturer’s instructions.
3. Insulate the Ceiling: Apply insulation to the sauna ceiling in the same manner as the walls. Cut the insulation to fit between the roof rafters and secure it in place. Properly insulating the ceiling will help prevent heat loss through the sauna’s uppermost area.
4. Vapor Barrier: Install a vapor barrier on the inner side of the insulated walls and ceiling. A vapor barrier prevents moisture from being absorbed by the insulation and helps maintain a dry and comfortable sauna environment. Use a sauna-specific vapor barrier or a material like plastic sheeting to provide an effective barrier.
5. Seal the Joints: Use high-temperature silicone or specialized sauna sealant to seal any gaps, joints, or seams in the insulation material and vapor barrier. This will help create an airtight and waterproof barrier, preventing heat loss and moisture penetration.
6. Insulate the Floor: Consider insulating the sauna floor to further enhance heat retention and energy efficiency. Insulation boards or a layer of insulation material beneath the sauna flooring can help maintain the desired temperature within the sauna space.
7. Test the Insulation: Once the insulation is installed, test its effectiveness by heating the sauna and monitoring the temperature and heat retention. Make any necessary adjustments or improvements to ensure optimal insulation performance.
Proper insulation plays a crucial role in creating a comfortable and inviting sauna space. By following these steps, you’ll ensure that your sauna retains heat effectively, allowing you to relax and enjoy the therapeutic benefits of sauna bathing.
Installing the Sauna Door
The sauna door not only provides access to your sauna but also helps to keep the heat and steam inside the sauna room. Installing the sauna door requires careful attention to ensure a proper fit and airtight seal. Follow these steps to successfully install the sauna door:
1. Determine the Door Type: Choose the type of sauna door that best suits your needs and design preferences. Common options include traditional wood doors, glass doors, or even custom-made doors. Consider factors such as durability, insulation, and aesthetics when selecting the door.
2. Measure the Door Opening: Measure the height and width of the door opening to determine the correct size for your sauna door. Consider any additional space needed for door hardware, such as hinges and handles.
3. Prepare the Door Opening: Prepare the door opening by ensuring that it is clean, free of debris, and level. Remove any obstructions that may hinder the installation process.
4. Install the Door Frame: Place the door frame in the opening and make sure it fits snugly and evenly. Use a level to ensure the frame is straight and plumb. Secure the frame in place using screws or nails, ensuring it is firmly attached to the sauna walls.
5. Hang the Door: Attach the door to the frame using the appropriate hinges. Make sure the door hangs smoothly and swings freely. Test the door to ensure it opens and closes properly without any obstructions.
6. Install Door Seal: Apply a heat-resistant door seal around the edges of the door. This seal will help create an airtight seal when the door is closed, preventing heat and steam from escaping the sauna. Follow the manufacturer’s instructions for proper installation.
7. Check for Proper Seal: Close the sauna door and inspect for any gaps or spaces along the edges. If necessary, adjust the door or seal to ensure a tight and secure fit. Proper sealing is essential for temperature regulation and energy efficiency.
8. Install Door Hardware: Install any additional hardware, such as handles or locks, according to the manufacturer’s instructions. Ensure that the hardware is securely attached and functions properly.
By following these steps, you’ll successfully install the sauna door, providing both functional access to your sauna and a tight seal to retain the heat and steam inside. Take your time during the installation process to ensure a properly fitted and functioning sauna door.
Ventilation and Lighting
Proper ventilation and lighting are essential components of a well-functioning and comfortable sauna. They contribute to the overall atmosphere, air quality, and user experience. Here are some key considerations when it comes to sauna ventilation and lighting:
1. Ventilation System: Install a ventilation system to ensure adequate air circulation within the sauna. Proper ventilation helps control humidity levels, prevents the buildup of odors, and ensures a constant supply of fresh air. Consider installing an exhaust fan or a passive ventilation system, such as vents or grilles, to facilitate proper air exchange.
2. Vent Placement: Position the vents strategically to allow for optimal air circulation. Place vents near the floor to draw cool, fresh air into the sauna, and near the upper part of the walls or ceiling to allow for the expulsion of hot, moist air. This will help maintain a comfortable and balanced sauna environment.
3. Sauna Heater Ventilation: If you’re using a sauna heater, ensure it has proper ventilation to dissipate excess heat and fumes. Follow the manufacturer’s guidelines for installation and ventilation requirements to maintain both safety and efficiency.
4. Lighting: Choose appropriate lighting for your sauna that can withstand high temperatures and moisture. Consider using sauna-specific lighting fixtures that are designed for sauna use. These fixtures typically come with heat-resistant materials and waterproofing features to ensure longevity and safety.
5. Lighting Placement: Install the sauna lighting strategically to provide even illumination throughout the sauna. Consider placing lights near the seating areas and along the walls to create a warm and inviting ambiance. Avoid placing lights directly above the sauna heater, as the heat may affect the bulbs or fixtures.
6. Light Dimmers: Consider installing dimmer switches to control the brightness of the sauna lights. This allows you to adjust the lighting according to your mood and preference, creating a customized and relaxing sauna experience.
7. Safety Precautions: Ensure that all electrical work associated with sauna ventilation and lighting is performed by a licensed electrician. Adhere to safety guidelines and local building codes to prevent any electrical hazards.
Proper ventilation and lighting are integral to creating a comfortable and enjoyable sauna environment. Whether it’s ensuring a fresh airflow or setting the right mood with lighting, these factors contribute to your overall sauna experience. Take the time to plan and implement effective ventilation and lighting systems to enhance your sauna sessions.
Installing Sauna Benches
Sauna benches are a crucial element of any sauna, providing a comfortable seating area for sauna bathers. Installing sauna benches requires careful planning to ensure optimal comfort, safety, and functionality. Here are the steps to successfully install sauna benches:
1. Determine Bench Placement: Decide on the best placement for your sauna benches. Consider factors such as size, shape, and location within the sauna. Typically, benches are placed along the walls, at different heights, to accommodate varying preferences and body positions.
2. Measure and Mark: Measure and mark the desired positions for the benches on the sauna walls. Use a level to ensure the lines are straight and accurately aligned. Take into account the available space and the intended number of bench levels.
3. Choose Bench Material: Select a suitable material for the sauna benches. Sauna-specific materials, such as cedar or spruce, are popular choices due to their natural resistance to moisture and high temperatures. Ensure that the chosen material is comfortable, durable, and free of any rough edges or splinters.
4. Cut Bench Boards: Measure and cut the bench boards to the desired length. Take into account any angles or corners and ensure that the boards fit perfectly within the marked areas. Remember to leave some space between the boards to allow for proper air circulation and moisture evaporation.
5. Install Support Brackets: Attach support brackets to the sauna walls for each bench level. Place the brackets at regular intervals to provide even support for the bench boards. Use screws or other appropriate fasteners to secure the brackets firmly in place.
6. Install Bench Boards: Align the bench boards with the support brackets and place them on top. Secure the boards to the brackets using screws or nails, ensuring a stable and secure installation. Be mindful of any spacing requirements between the boards to maintain proper ventilation.
7. Add Backrests: Consider installing backrests for added comfort and support. These can be attached to the sauna walls, at a suitable height and angle, using appropriate hardware. Backrests can enhance the overall relaxation experience and make the sauna more comfortable for extended periods.
8. Sand and Finish: Once the benches are installed, sand any rough edges or surfaces to ensure a smooth and comfortable seating area. Apply a sauna-specific finish or sealer to protect the wood and enhance its natural aesthetics.
By following these steps, you’ll successfully install sauna benches that provide a comfortable and inviting seating area for sauna bathers. Take your time during installation, ensuring accurate measurements and sturdy construction, to create a relaxing and enjoyable sauna experience.
Sauna Flooring Options
Choosing the right flooring for your sauna is essential for both aesthetics and functionality. The sauna floor should be comfortable, slip-resistant, durable, and easy to maintain. Here are some popular sauna flooring options to consider:
1. Cedar Flooring: Cedar is a popular choice for sauna flooring due to its natural resistance to moisture, durability, and pleasant aroma. Cedar boards can be installed for a smooth, warm, and comfortable sauna floor.
2. Tile Flooring: Ceramic or porcelain tiles are a versatile option for sauna flooring. They are easy to clean, resistant to moisture, and can withstand high temperatures. Opt for textured or non-slip tiles to enhance safety.
3. Vinyl Flooring: Vinyl flooring is a cost-effective and low-maintenance option for sauna floors. It is available in various styles, designs, and colors, giving you flexibility in achieving your desired aesthetic. Choose a high-quality vinyl that is moisture-resistant and can withstand the heat of the sauna.
4. Stone Flooring: Natural stone, such as slate or granite, can create a luxurious and timeless look for your sauna floor. Stone flooring is durable, slip-resistant, and has excellent heat retention properties. However, it may require professional installation and regular maintenance to keep it in optimal condition.
5. Concrete Flooring: Concrete is a durable and cost-effective option for sauna flooring. It can be left as is for a minimalistic look or treated with a sealant for a smoother and more polished finish. Add texture or mats to improve slip resistance.
6. Rubber Mats: Rubber mats offer excellent slip resistance and comfort. They are easy to clean, water-resistant, and can be cut to fit the sauna floor. Rubber mats are a popular choice for commercial saunas or high-traffic areas.
7. Interlocking Wood Tiles: Interlocking wood tiles provide a versatile and DIY-friendly option for sauna flooring. These tiles are made of quality wood and are designed to interlock for easy installation. They can withstand the heat and moisture in the sauna while providing a comfortable and visually appealing surface.
8. Natural-Fiber Mats: Natural-fiber mats, such as bamboo or cork, can add a touch of elegance to your sauna floor. These mats are comfortable to stand or sit on, absorb moisture, and provide a warm and natural look.
Consider the specific requirements of your sauna, such as moisture levels, heat retention, and slip resistance, when choosing the flooring option. Remember to follow the manufacturer’s guidelines for installation and maintenance to ensure the longevity and safety of your sauna floor.
Sauna Heating System
The sauna heating system is the heart of your sauna, responsible for creating the desired temperatures and generating the heat that allows you to enjoy the health benefits of sauna bathing. Choosing the right heating system is crucial for optimal sauna performance. Here are some popular types of sauna heating systems to consider:
1. Electric Sauna Heater: Electric sauna heaters are the most common and widely used option. They are easy to install, operate, and maintain. Electric heaters are available in various sizes and power outputs to accommodate different sauna sizes. They provide reliable and consistent heat, allowing you to achieve the desired sauna temperatures quickly and efficiently.
2. Wood-Burning Sauna Stove: For those seeking a traditional sauna experience, a wood-burning sauna stove is an excellent choice. Wood-burning stoves create a unique ambiance and emit a natural scent as they heat the sauna. They require ventilation and a chimney for proper operation. Wood-burning stoves require more maintenance and tending compared to electric heaters but offer an authentic sauna experience.
3. Infrared Sauna Heating Panels: Infrared sauna heating panels use infrared heat to directly warm the body rather than heating the air in the sauna. They are energy-efficient, heat up quickly, and provide a gentle and therapeutic heat. Infrared panels are a popular choice for individuals who prefer lower temperatures or have specific health conditions that benefit from infrared therapy.
4. Gas Sauna Heater: Gas sauna heaters, typically powered by propane or natural gas, provide an efficient and powerful heating option. They can heat larger saunas quickly and are often used in commercial or outdoor sauna setups. Gas heaters require proper ventilation and compliance with safety regulations to ensure safe operation.
5. Combination Sauna Heater: Combination sauna heaters offer the flexibility of using both electric and wood-burning heating methods. They usually have a compartment for burning wood, and an electric heating element as a backup or for added convenience. Combination heaters provide the traditional feel of a wood-burning sauna while offering the ease and reliability of an electric heater when needed.
6. Steam Generator: Steam generators are used in steam saunas to produce steam by heating water. They offer a humid and relaxing sauna experience. Steam generators require a water source and electrical connection, and they require regular maintenance to prevent mineral buildup and ensure proper operation.
When choosing a sauna heating system, consider factors such as the size of your sauna, desired temperature range, ease of operation, energy efficiency, and aesthetic preferences. Consult with a professional or experienced sauna supplier to determine the best heating system for your specific sauna needs.
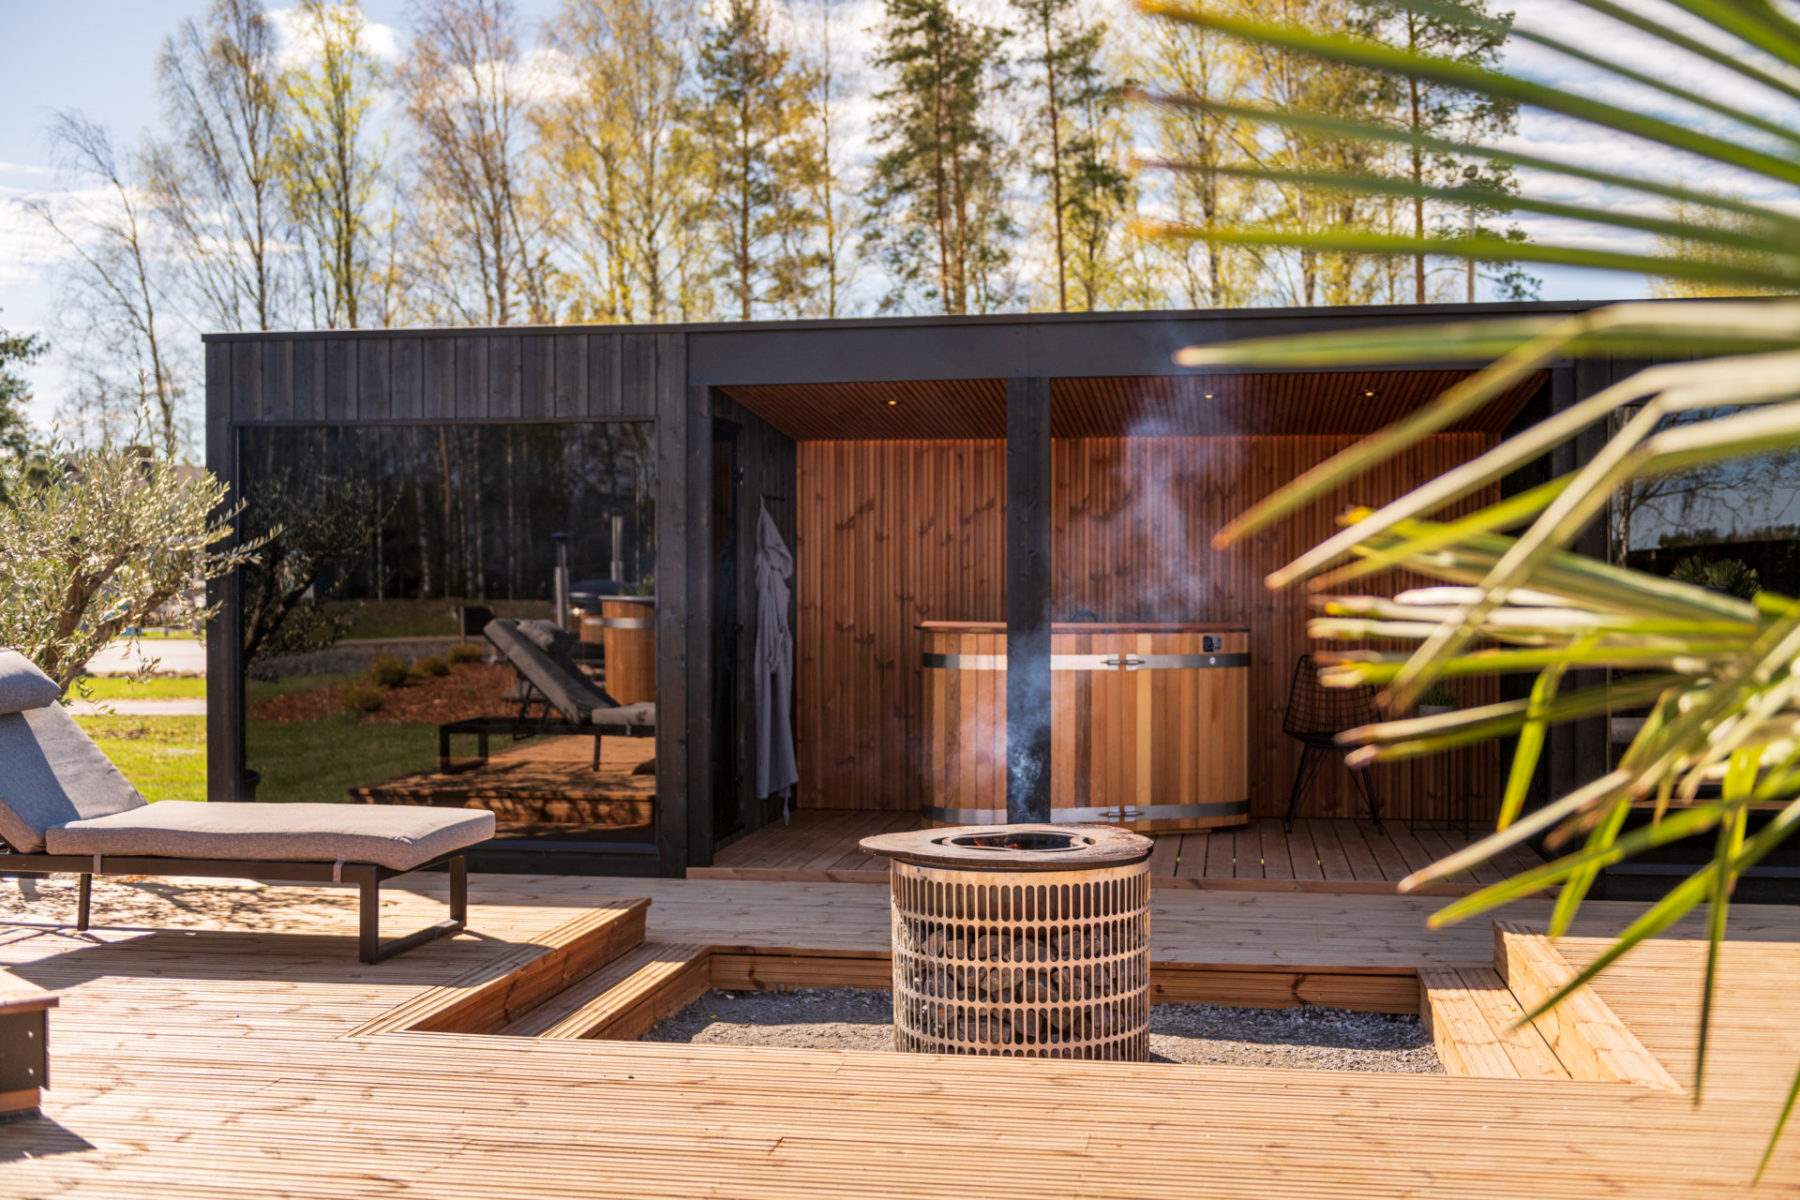
Decor and Finishing Touches
Adding the right decor and finishing touches to your sauna can elevate the overall aesthetic appeal and create a relaxing and inviting atmosphere. Here are some ideas to enhance the decor of your sauna:
1. Lighting: Install soft, dimmable lighting to create a soothing ambiance. Consider LED lights that emit a warm, natural glow. Experiment with different lighting placements to highlight specific features or create a tranquil overall glow.
2. Sauna Accessories: Incorporate sauna accessories such as wooden ladles, buckets, and hourglasses for authenticity. These accessories can enhance the traditional sauna experience and add a touch of elegance to the sauna decor.
3. Towel Hooks and Racks: Install hooks or racks to hang towels and robes within easy reach. Opt for materials that can withstand the heat and humidity of the sauna, such as stainless steel or coated hooks.
4. Aromatherapy: Use natural scents in the sauna to enhance relaxation. Consider incorporating essential oils or sauna-specific aromatherapy products, such as birch or eucalyptus, to create an invigorating or calming atmosphere. Remember to use sauna-safe options and follow instructions for proper usage.
5. Natural Elements: Bring in natural elements to create a soothing environment. Use potted plants, rocks, or even a small indoor fountain to add a touch of nature and create a serene atmosphere inside the sauna.
6. Sauna Signage: Consider adding personalized or decorative signage to enhance the sauna decor. Have a custom wood sign made with your sauna’s name or a motivational quote to complete the ambiance.
7. Music or Sound System: Install a waterproof or sauna-specific sound system to enjoy relaxing music or recorded nature sounds while in the sauna. Music can enhance the overall relaxation experience and create a peaceful environment.
8. Personal Touches: Add personal touches that reflect your individual style and preferences. Hang artwork or photographs that evoke tranquility or provide a calming focal point within the sauna. Display items that hold sentimental value or bring positivity to your sauna experience.
Remember to consider safety and temperature compatibility when selecting decor and accessories for your sauna. Choose materials that can withstand the heat and humidity and do not pose a risk of injury.
By incorporating these decor and finishing touches, you can create a personalized and inviting atmosphere in your sauna. Take the time to curate a space that promotes relaxation, enhances your sauna experience, and helps you unwind from the stresses of daily life.
Conclusion
Congratulations! You have now completed the journey of building your very own sauna in your backyard. By following the steps outlined in this comprehensive guide, you have gained the knowledge and skills necessary to construct a sauna that meets your needs for relaxation, rejuvenation, and wellness.
Throughout the process, you have learned the importance of careful planning and design, selecting the right location, and gathering the necessary materials and tools. You have successfully built the sauna frame, installed the walls, built the roof, insulated the sauna, and installed essential components such as the sauna door, ventilation, lighting, and seating.
Now, it’s time to put the finishing touches on your sauna, adding the decor and personal touches that will transform it into a tranquil retreat. Consider incorporating lighting, accessories, and aromatherapy for an enhanced sauna experience that suits your preferences.
Remember to prioritize safety in all aspects of your sauna construction and maintenance. Follow local building codes and regulations, consult professionals if needed, and ensure proper ventilation, insulation, and electrical installations.
As you embark on this DIY sauna project, embrace the creativity and enjoyment that comes with building something with your own hands. It is an accomplishment to create a space where you can unwind, relax, and improve your overall well-being.
Now, go ahead and indulge in the therapeutic benefits of your very own sauna. Take time to relax, rejuvenate, and enjoy the serenity of your backyard oasis. Happy sauna bathing!