Home>Gardening Techniques>DIY Projects>How To Build A Beach In Your Backyard
DIY Projects
How To Build A Beach In Your Backyard
Modified: January 22, 2024
Learn how to create your own beach oasis right in your backyard with these easy-to-follow DIY projects. Transform your outdoor space into a relaxing paradise!
(Many of the links in this article redirect to a specific reviewed product. Your purchase of these products through affiliate links helps to generate commission for Chicagolandgardening.com, at no extra cost. Learn more)
Table of Contents
Introduction
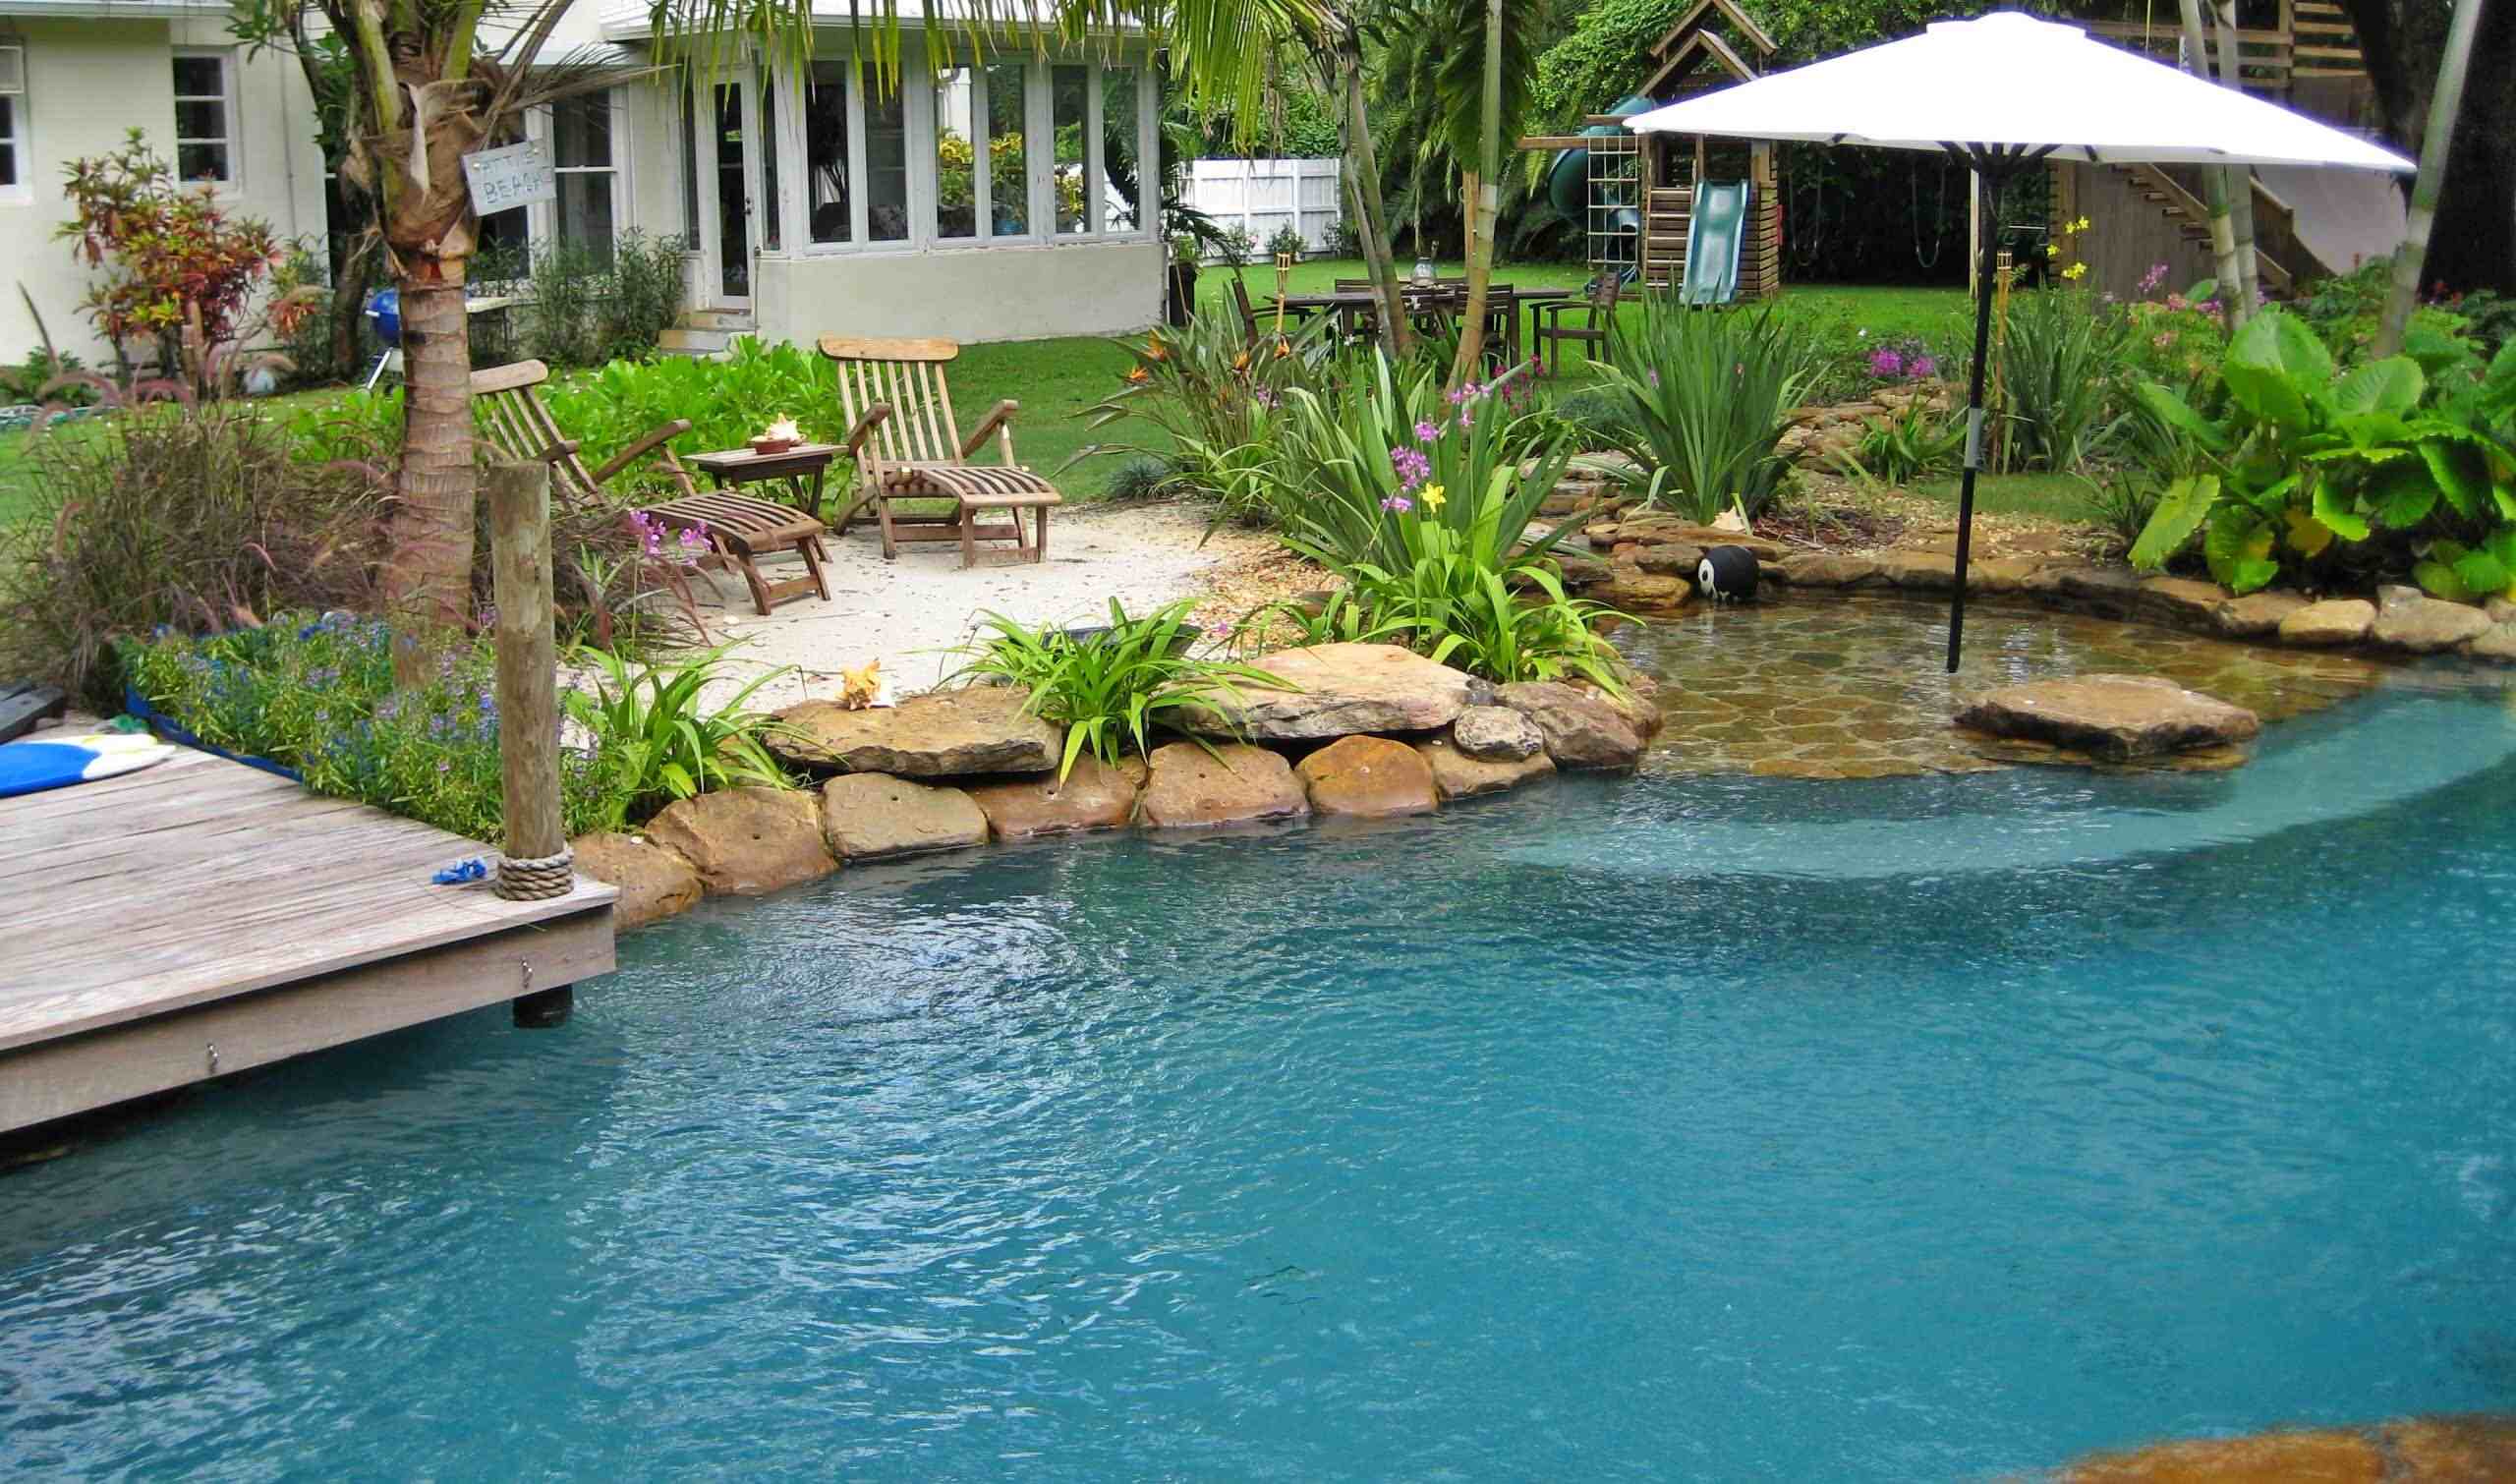
Imagine coming home from a long, tiring day and being able to relax on your own private beach. The sound of waves crashing, warm sand beneath your feet, and a tranquil atmosphere, all within the comfort of your backyard. Building a beach in your backyard may sound like a dream, but with a little planning and effort, it can become a reality.
Creating your backyard beach retreat not only adds a unique and beautiful element to your outdoor space, but it also provides a perfect place for relaxation, entertainment, and making memories with your family and friends. Whether you live near the coast or in a landlocked area, constructing a beach in your backyard allows you to enjoy the benefits of a coastal vacation without having to travel far.
In this article, we will guide you through the step-by-step process of building a beach in your backyard. From planning and designing to adding the final touches, we will cover all the essential elements to create your very own slice of paradise. So, grab a beach chair, put on some sunscreen, and let’s get started on creating your backyard oasis.
Step 1: Planning and Designing
The first step in building your backyard beach is to carefully plan and design the layout. Consider the available space, your desired beach size, and any existing landscaping or structures that may need to be incorporated or removed.
Start by measuring the area where you want to build your beach. Take note of any obstacles such as trees, shrubs, or structures that need to be taken into account during the construction process. This will help you determine the size and shape of your beach.
Next, think about the overall theme and design elements you want to incorporate. Are you going for a tropical getaway vibe or a serene coastal retreat? Consider elements such as palm trees, beach grass, rocks, and seating areas. Creating a diagram or a rough sketch of your design can help visualize the final result.
If you have existing landscaping, evaluate whether it complements or conflicts with your beach theme. You may need to remove or relocate certain plants or structures to achieve the desired look. Consider consulting with a landscaping professional for expert advice and assistance.
In addition to the physical layout, think about the practical aspects of your backyard beach. Will you need to install proper drainage to prevent water pooling? Are there any electrical or plumbing requirements for features like outdoor showers or lighting? Take these factors into consideration during the planning phase to ensure a smooth and functional beach experience.
Lastly, set a budget for your project. Consider the costs of materials, equipment rentals, and any professional help you may need. Research and compare prices to get the best deals. Remember to leave room in your budget for additional accessories and amenities, such as beach chairs, umbrellas, and a fire pit.
Once your planning and design are complete, you are ready to move on to the next step: clearing and leveling the area.
Step 2: Clearing and Leveling the Area
After finalizing your beach design, it’s time to prepare the area by clearing and leveling the space. This step is important to ensure a solid foundation for your backyard beach and create a smooth and even surface.
Start by removing any vegetation, rocks, or debris from the area where your beach will be. This includes grass, weeds, and any unwanted plants. Use a garden shovel or a lawn edger to loosen the soil and remove the vegetation. If you have larger plants or trees that need to be removed, consider seeking professional help to safely uproot or relocate them.
Once the area is clear, it’s time to level the ground. Use a rake, shovel, or a leveled board to remove any bumps or uneven surfaces. Fill in any low spots and make sure the ground is level throughout the designated beach area. A smooth and even surface will not only enhance the aesthetics of your beach but also provide a better experience when walking or lounging on the sand.
If your backyard has a slope or uneven terrain, you may need to create a retaining wall or use additional soil to level the area. This will help prevent erosion and ensure the stability of your beach. Consider consulting with a professional landscaper or engineer for guidance on the best approach for your specific situation.
During the clearing and leveling process, it’s also important to consider drainage. You don’t want water to collect and pool on your beach. If necessary, create a gentle slope away from the beach area to allow proper water drainage. Additionally, consider installing a drainage system or using permeable materials to help with water absorption.
With the area cleared and leveled, your backyard beach is one step closer to reality. Now, it’s time to move on to the next step: building a sand base.
Step 3: Building a Sand Base
Building a sand base is a crucial step in constructing your backyard beach. The sand base not only provides a comfortable and aesthetically pleasing surface, but it also helps with proper drainage and stability.
The first step in building the sand base is to choose the right type of sand. Opt for coarse or medium-grain sand, as it provides better drainage and prevents compaction. Avoid fine-grain sand, as it tends to retain water and can become muddy.
Measure the area of your beach and calculate the amount of sand you’ll need. As a general rule of thumb, aim for a depth of around 4-6 inches of sand. Multiply the length and width of the beach area to determine the total square footage, then multiply it by the desired depth to calculate the amount of sand required. Make sure to account for any slopes or uneven surfaces when calculating the quantity of sand.
If necessary, remove a layer of the topsoil before adding the sand. This will help prevent weeds from growing through the sand and ensure a clean and uniform look for your beach.
Spread a layer of landscaping fabric over the prepared area. This will act as a barrier between the sand and the soil, preventing the sand from mixing into the underlying layers. Cut the fabric to fit the shape of your beach, ensuring that it covers the entire area.
Now it’s time to add the sand. Start by spreading a layer of sand evenly across the beach area. Use a rake or a level board to smooth out the surface and ensure an even depth. Repeat this process until you achieve the desired depth of sand.
Once the sand is in place, moisten it lightly with water. This will help the sand settle and compact slightly. Use a garden hose or a sprinkler to lightly dampen the sand, being careful not to flood the area. Allow the sand to dry for a day or two before proceeding to the next step.
With the sand base complete, your backyard beach is starting to take shape. The next step is to create a border to contain the sand and define the boundaries of your beach.
Step 4: Creating a Border
Creating a border is an essential step in building your backyard beach. The border not only serves to contain the sand and prevent it from spreading, but it also adds a defined and polished look to your beach area.
There are various options for creating a border, depending on your desired aesthetic and budget. Here are a few popular choices:
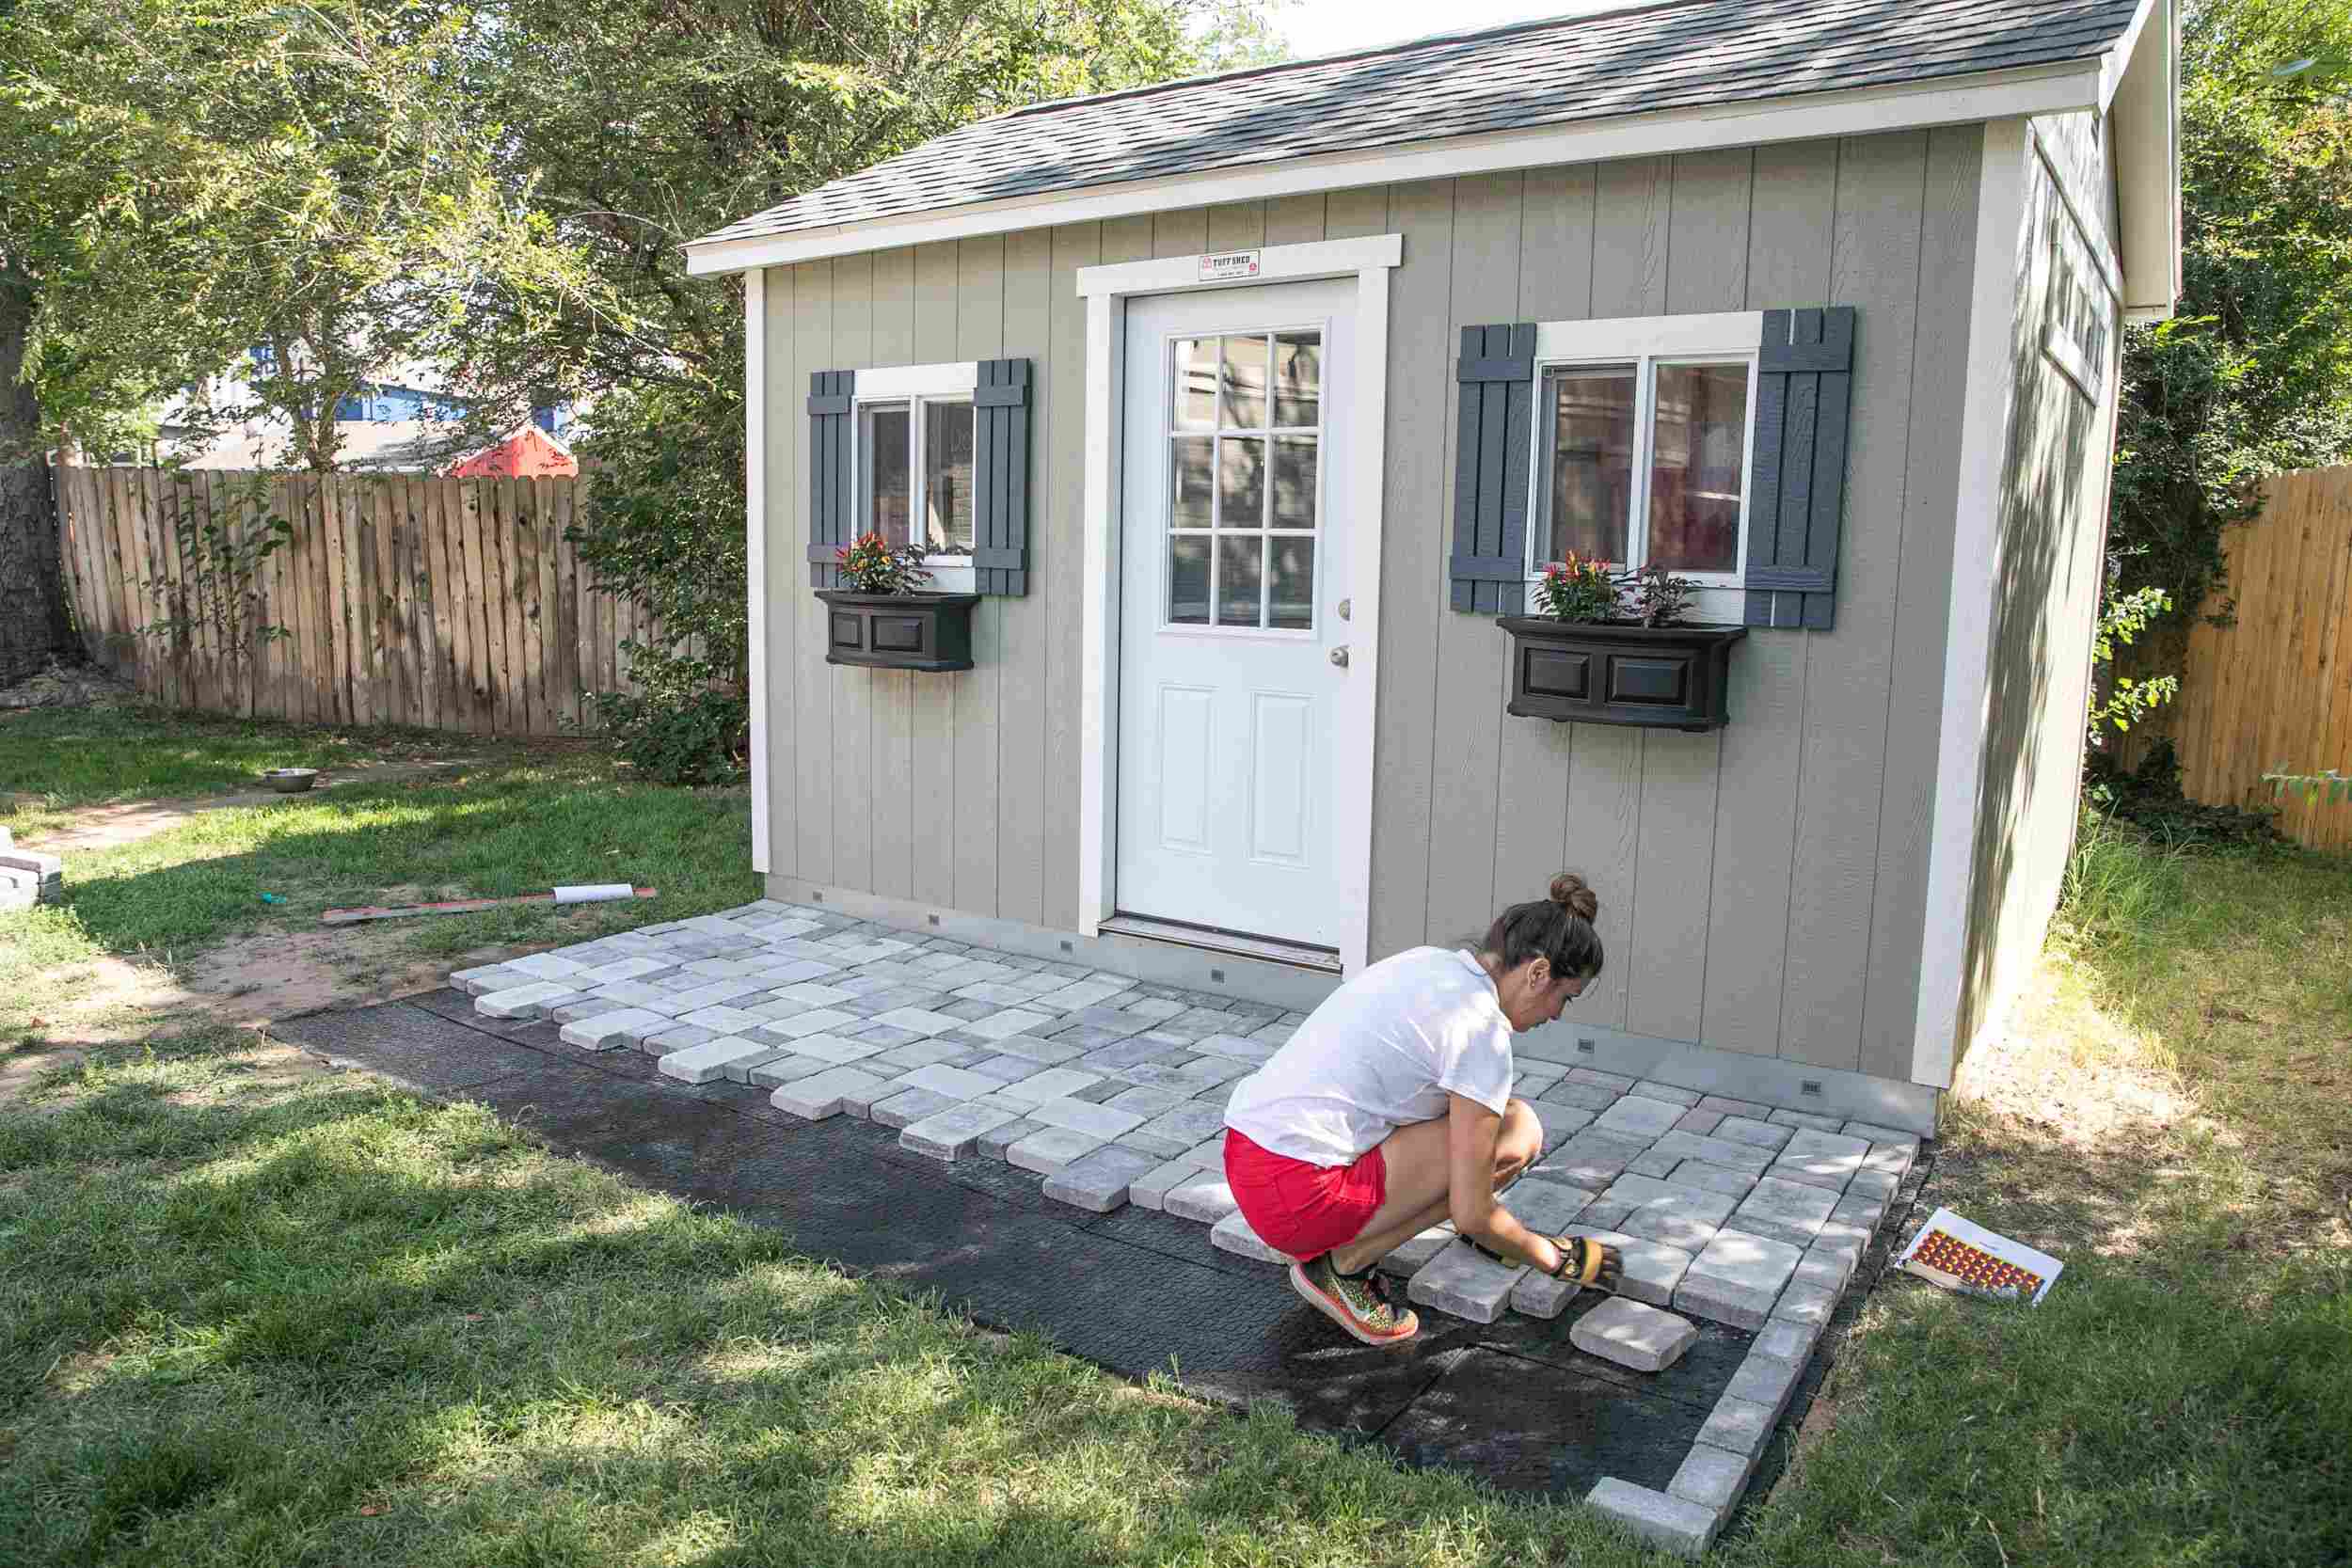
- Brick or Paver Border: Brick or paver borders are durable and provide a classic and elegant look to your beach. Dig a trench around the perimeter of the beach area, slightly wider and deeper than the bricks or pavers. Install the bricks or pavers snugly together in the trench, using sand or gravel as a base and filler. Firmly tamp down the bricks or pavers, making sure they are level and stable.
- Timber or Wood Border: Timber or wood borders offer a natural and rustic feel to your beach design. Choose treated lumber or cedar boards that are resistant to rot and weathering. Dig a narrow trench around the beach area and install the boards vertically or horizontally, securing them with stakes or screws. Make sure the boards are level and secure, providing a sturdy border.
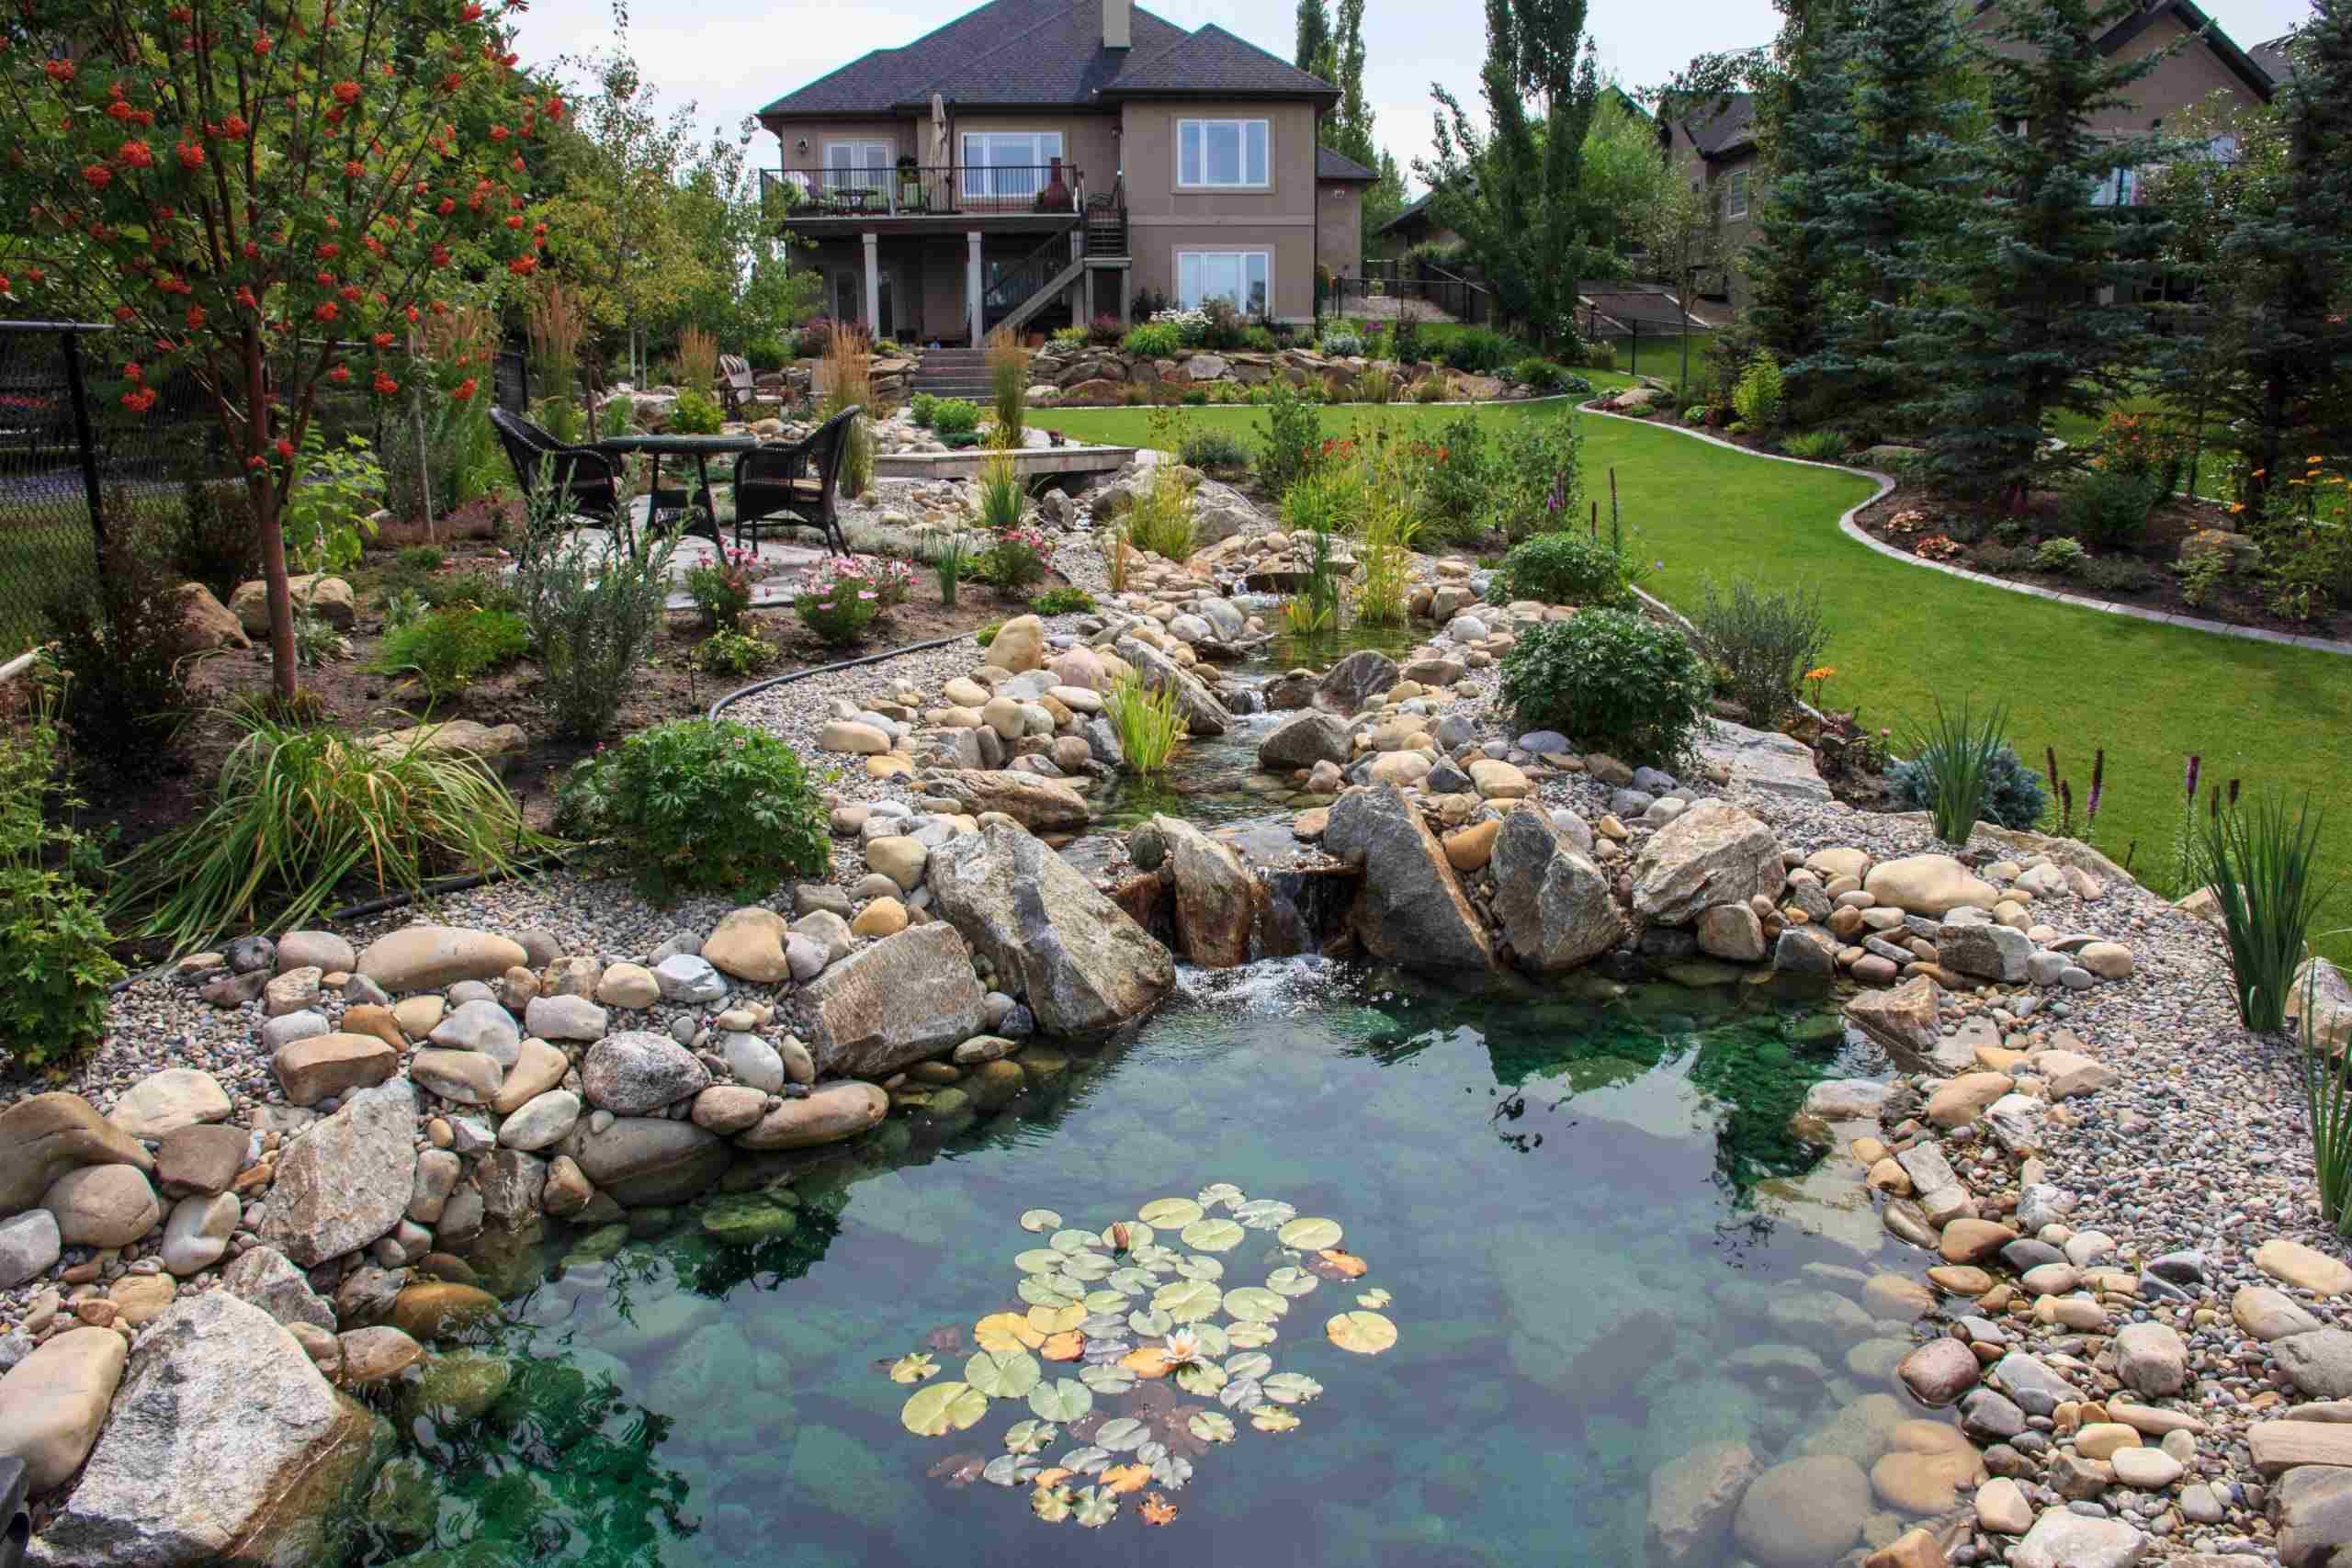
- Rock or Boulder Border: Rocks or boulders can create a visually striking border for your backyard beach. Select rocks or boulders of various sizes and shapes, and dig a trench to accommodate them. Place the rocks or boulders tightly together along the trench, ensuring they are stable and do not move. Consider filling any gaps between the rocks with gravel or sand to enhance stability.
Whichever border option you choose, make sure it is securely installed and provides a clear distinction between the beach area and the surrounding landscape. The border not only adds functionality but also enhances the visual appeal of your backyard beach.
Remember to consider any necessary drainage requirements when creating the border. Ensure that there are adequate outlets or gaps in the border to allow for proper water flow and prevent water from collecting on your beach.
With the border in place, your backyard beach is starting to look more defined and inviting. Now, it’s time to move on to the next step: installing a liner to further protect and stabilize your beach area.
Step 5: Installing a Liner
Installing a liner is an important step in building your backyard beach as it provides an additional layer of protection and stability. The liner serves to prevent weeds, insects, and other elements from penetrating the sand, ensuring a clean and comfortable beach surface.
There are different types of liners available, such as plastic, fabric, or rubber. Choose a liner that is durable, weather-resistant, and specifically designed for use in outdoor settings. Measure the dimensions of your beach area and purchase a liner that fits accordingly.
Before installing the liner, make sure the sand base is smooth and free of debris. Clear away any rocks or sharp objects that could potentially damage the liner. If needed, rake the sand to create an even surface.
Unroll the liner over the sand base, starting from one end of the beach area. Gently smooth out any wrinkles or folds in the liner to ensure a flat and snug fit. If the liner is larger than your beach area, use sharp scissors or a utility knife to trim off the excess material. Be careful not to cut the liner too short or leave any gaps.
Once the liner is in place, secure it to the border or the surrounding landscape to prevent it from shifting or moving. You can use landscaping staples, heavy-duty adhesive, or small rocks or sandbags to anchor the edges of the liner. Make sure the liner is taut and doesn’t sag or bunch up, as this could hinder the appearance and functionality of your beach.
Inspect the liner for any visible holes or tears. If you notice any damage, patch or repair it using a suitable liner repair kit. This will ensure the longevity and integrity of your liner.
Installing a liner provides an extra layer of protection for your backyard beach, preserving the integrity of the sand base and preventing issues like erosion or contamination. With the liner securely in place, your beach is now ready for the next step: filling it with sand or gravel.
Step 6: Filling with Sand or Gravel
Once the liner is installed and secured, it’s time to fill your backyard beach with sand or gravel. The choice of material will depend on your desired aesthetic and the level of comfort you want to achieve.
If you prefer a traditional beach feel, opt for high-quality beach sand. Look for sand that is clean, free of debris, and has a natural color and texture. Calculate the amount of sand you’ll need based on the dimensions of your beach area and the desired depth.
For a different look or if you prefer a more stable and compact surface, you can fill your beach area with gravel. Gravel is available in various colors and sizes, allowing you to create a unique and customizable beach design. Calculate the quantity of gravel needed based on the same principles as for sand.
Start filling your beach area with sand or gravel, spreading it evenly and working in layers. Use a rake, shovel, or a leveled board to distribute the material and ensure an even depth throughout. Tamp down the sand or gravel gently to compact it slightly, making sure it is firmly in place.
If you choose to fill your beach with sand, you can create different zones by varying the depth. For example, you can have a shallow area for lounging and sunbathing, and a deeper section for swimming or wading. This adds versatility and enhances the overall functionality of your backyard beach.
Take some time to step back and assess the levelness and appearance of the sand or gravel. Make any necessary adjustments or additions to achieve the desired look and feel. Remember to consider any slopes or contours in the beach area and ensure a smooth transition between different sections.
Once you are satisfied with the sand or gravel fill, take a moment to walk on it and test its stability. The surface should be firm and comfortable to walk on, and provide a solid foundation for chairs, loungers, or other beach accessories.
With the sand or gravel properly filled, your backyard beach is nearing completion. The next step is to add the finishing touches and incorporate beach accessories to enhance the ambiance and enjoyment of your outdoor oasis.
Step 7: Adding Beach Accessories
Adding beach accessories to your backyard oasis will elevate the overall experience and create a true coastal vibe. These accessories not only enhance the aesthetics of your beach but also provide comfort and functionality for you and your guests to enjoy.
Here are some essential beach accessories to consider:
- Beach Chairs and Loungers: Invest in comfortable and durable beach chairs and loungers for ultimate relaxation. Look for chairs and loungers that are weather-resistant and adjustable to ensure optimal comfort.
- Umbrellas or Shade Structures: Create a shady spot on your beach by adding umbrellas or shade structures. These can provide relief from the sun and make your beach area more comfortable on hot days.
- Outdoor Rugs and Mats: Place outdoor rugs or mats in strategic areas of your beach for a cozy and stylish addition. Not only do they provide a comfortable surface to walk on, but they also add texture and visual appeal.
- Beach Accessories: Consider adding beach essentials such as towels, beach balls, beach umbrellas, and sand toys for children. These items add a playful and fun element to your beach, making it enjoyable for the whole family.
- Outdoor Shower: Install an outdoor shower near your beach to rinse off sand, saltwater, or chlorine before entering your home. This keeps your beach area clean and prevents tracking sandy or wet feet indoors.
- Coastal Decor: Enhance the coastal ambiance by incorporating decor elements such as seashells, driftwood, beach-inspired artwork, or lanterns. These small details can transform your backyard beach into a serene and idyllic retreat.
When selecting beach accessories, consider their durability and resistance to outdoor elements. Look for materials that can withstand sun exposure, moisture, and occasional rain. Additionally, choose accessories that complement your beach theme and personal style.
Arrange the accessories strategically around your beach area, considering both functionality and aesthetics. Create designated seating areas, relaxation zones, and space for socializing. Ensure that there is enough room for unrestricted movement and that the placement of accessories doesn’t obstruct the view or flow of the beach area.
Lastly, regularly clean and maintain your beach accessories to keep them in prime condition. Wipe down chairs, umbrellas, and other items to remove any dirt or debris. Store or cover them during inclement weather or during periods when the beach is not in use, to prolong their lifespan.
With the addition of these beach accessories, your backyard beach will truly come to life. The final step is to add the finishing touches and establish a maintenance routine to ensure the longevity and enjoyment of your beach oasis.
Step 8: Final Touches and Maintenance
As you approach the final stage of building your backyard beach, focus on adding the finishing touches and establishing a maintenance routine to ensure the longevity and enjoyment of your beach oasis.
Here are some important final touches and maintenance tips:
- Landscaping and Plantings: Enhance the beauty of your beach by incorporating landscaping elements and plantings. Choose coastal-inspired plants such as beach grass, palm trees, or colorful flowers to create a lush and vibrant backdrop.
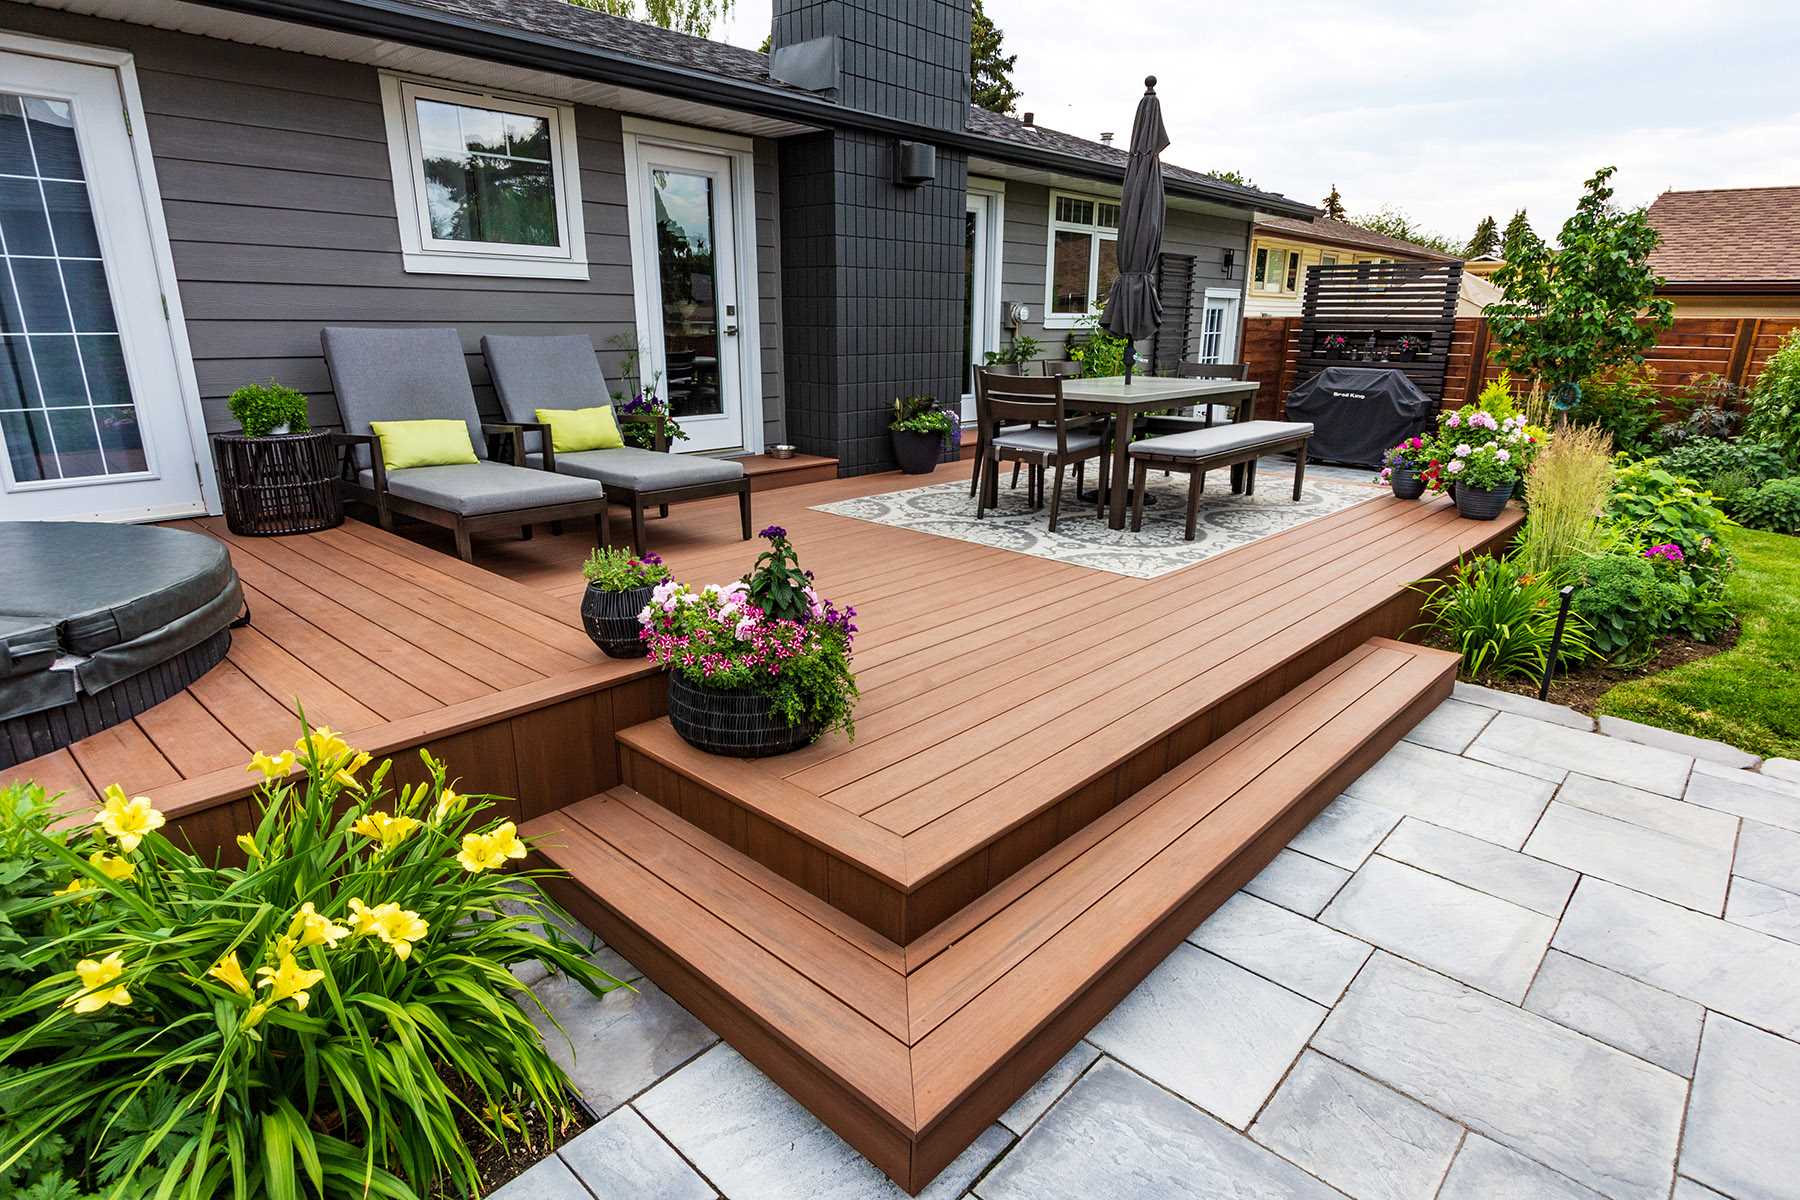
- Pathways and Walkways: Create defined pathways or walkways leading to and around your beach area. Use materials such as stepping stones, gravel, or colored pavers to guide the flow and create a cohesive design.
- Fire Pit or Outdoor Fireplace: Install a fire pit or outdoor fireplace near your beach area to extend your enjoyment into the cooler evenings. This provides a cozy and inviting ambiance and allows for gatherings and relaxation while enjoying the beach atmosphere.
- Regular Cleaning: Keep your backyard beach clean by regularly removing debris, leaves, and any other material that may accumulate. Use a rake, broom, or leaf blower to sweep the sand surface and maintain its cleanliness.
- Weed Control: Stay vigilant about weed control to ensure your beach stays pristine. Regularly inspect the area for any weed growth and promptly remove them to prevent them from taking hold and spreading.
- Watering and Irrigation: Adequate watering and irrigation are important for the health and maintenance of any surrounding plants or landscaping. Monitor the moisture levels and ensure your plants receive the necessary water while avoiding overwatering that could cause erosion or damage to the sand base.
- Seasonal Maintenance: With changing seasons, some additional maintenance may be required. For example, during winter months, consider covering or storing beach accessories to protect them from harsh weather conditions.
- Periodic Sand or Gravel Replacement: Over time, sand or gravel may deplete or become compacted. Periodically assess the condition of your beach and consider adding more material or redistributing it to maintain the desired depth and appearance.
Regular maintenance and care are essential to ensure the longevity and enjoyment of your backyard beach. By staying on top of these tasks, you can keep your beach looking pristine and ready for relaxation and entertainment throughout the year.
Remember, your backyard beach is a reflection of your creativity and personal taste. Continue to add personalized touches and regularly evaluate and update the design as your preferences evolve. With proper maintenance and a touch of creativity, your backyard beach will continue to be a haven of relaxation and enjoyment for years to come.
Conclusion
Building a beach in your backyard is a rewarding and exciting project that allows you to bring the serene and relaxing atmosphere of the coast into your own personal space. By following the step-by-step process outlined in this guide, you can create a backyard oasis that provides endless opportunities for relaxation, entertainment, and making memories with family and friends.
From careful planning and designing to clearing and leveling the area, building a sand base, creating a border, installing a liner, and filling with sand or gravel, each step contributes to the overall success and functionality of your beach. Adding beach accessories, putting on the finishing touches, and establishing a maintenance routine ensure that your backyard beach remains a beautiful and welcoming space year-round.
Remember, the key is to balance functionality, aesthetics, and your personal preferences. Incorporate elements that reflect your desired beach theme and create a space that resonates with your style and taste. Whether you prefer a tropical paradise or a serene coastal escape, your backyard beach can be a true reflection of your vision.
As you embark on this DIY project, keep in mind that patience and attention to detail are key. Enjoy the process and take pride in the transformation of your outdoor space into a private beach retreat. With proper planning, construction, and maintenance, you can create a backyard beach that brings joy and relaxation for years to come.
So, grab your beach chair, dig your toes into the sand, and immerse yourself in the tranquility of your very own backyard beach.