Home>Gardening Techniques>DIY Projects>How To Build A Waterfall In Your Backyard
DIY Projects
How To Build A Waterfall In Your Backyard
Modified: January 22, 2024
Learn how to build a stunning DIY waterfall in your backyard with our step-by-step guide. Create a tranquil oasis and add beauty to your outdoor space.
(Many of the links in this article redirect to a specific reviewed product. Your purchase of these products through affiliate links helps to generate commission for Chicagolandgardening.com, at no extra cost. Learn more)
Table of Contents
- Introduction
- Choosing the Right Location
- Gathering Materials and Tools
- Designing the Waterfall
- Excavating the Area
- Building the Base
- Installing the Pond Liner
- Creating the Waterfall Structure
- Adding Rocks and Stones
- Installing the Pump and Water System
- Landscaping around the Waterfall
- Adding Final Touches and Maintenance Tips
- Conclusion
Introduction
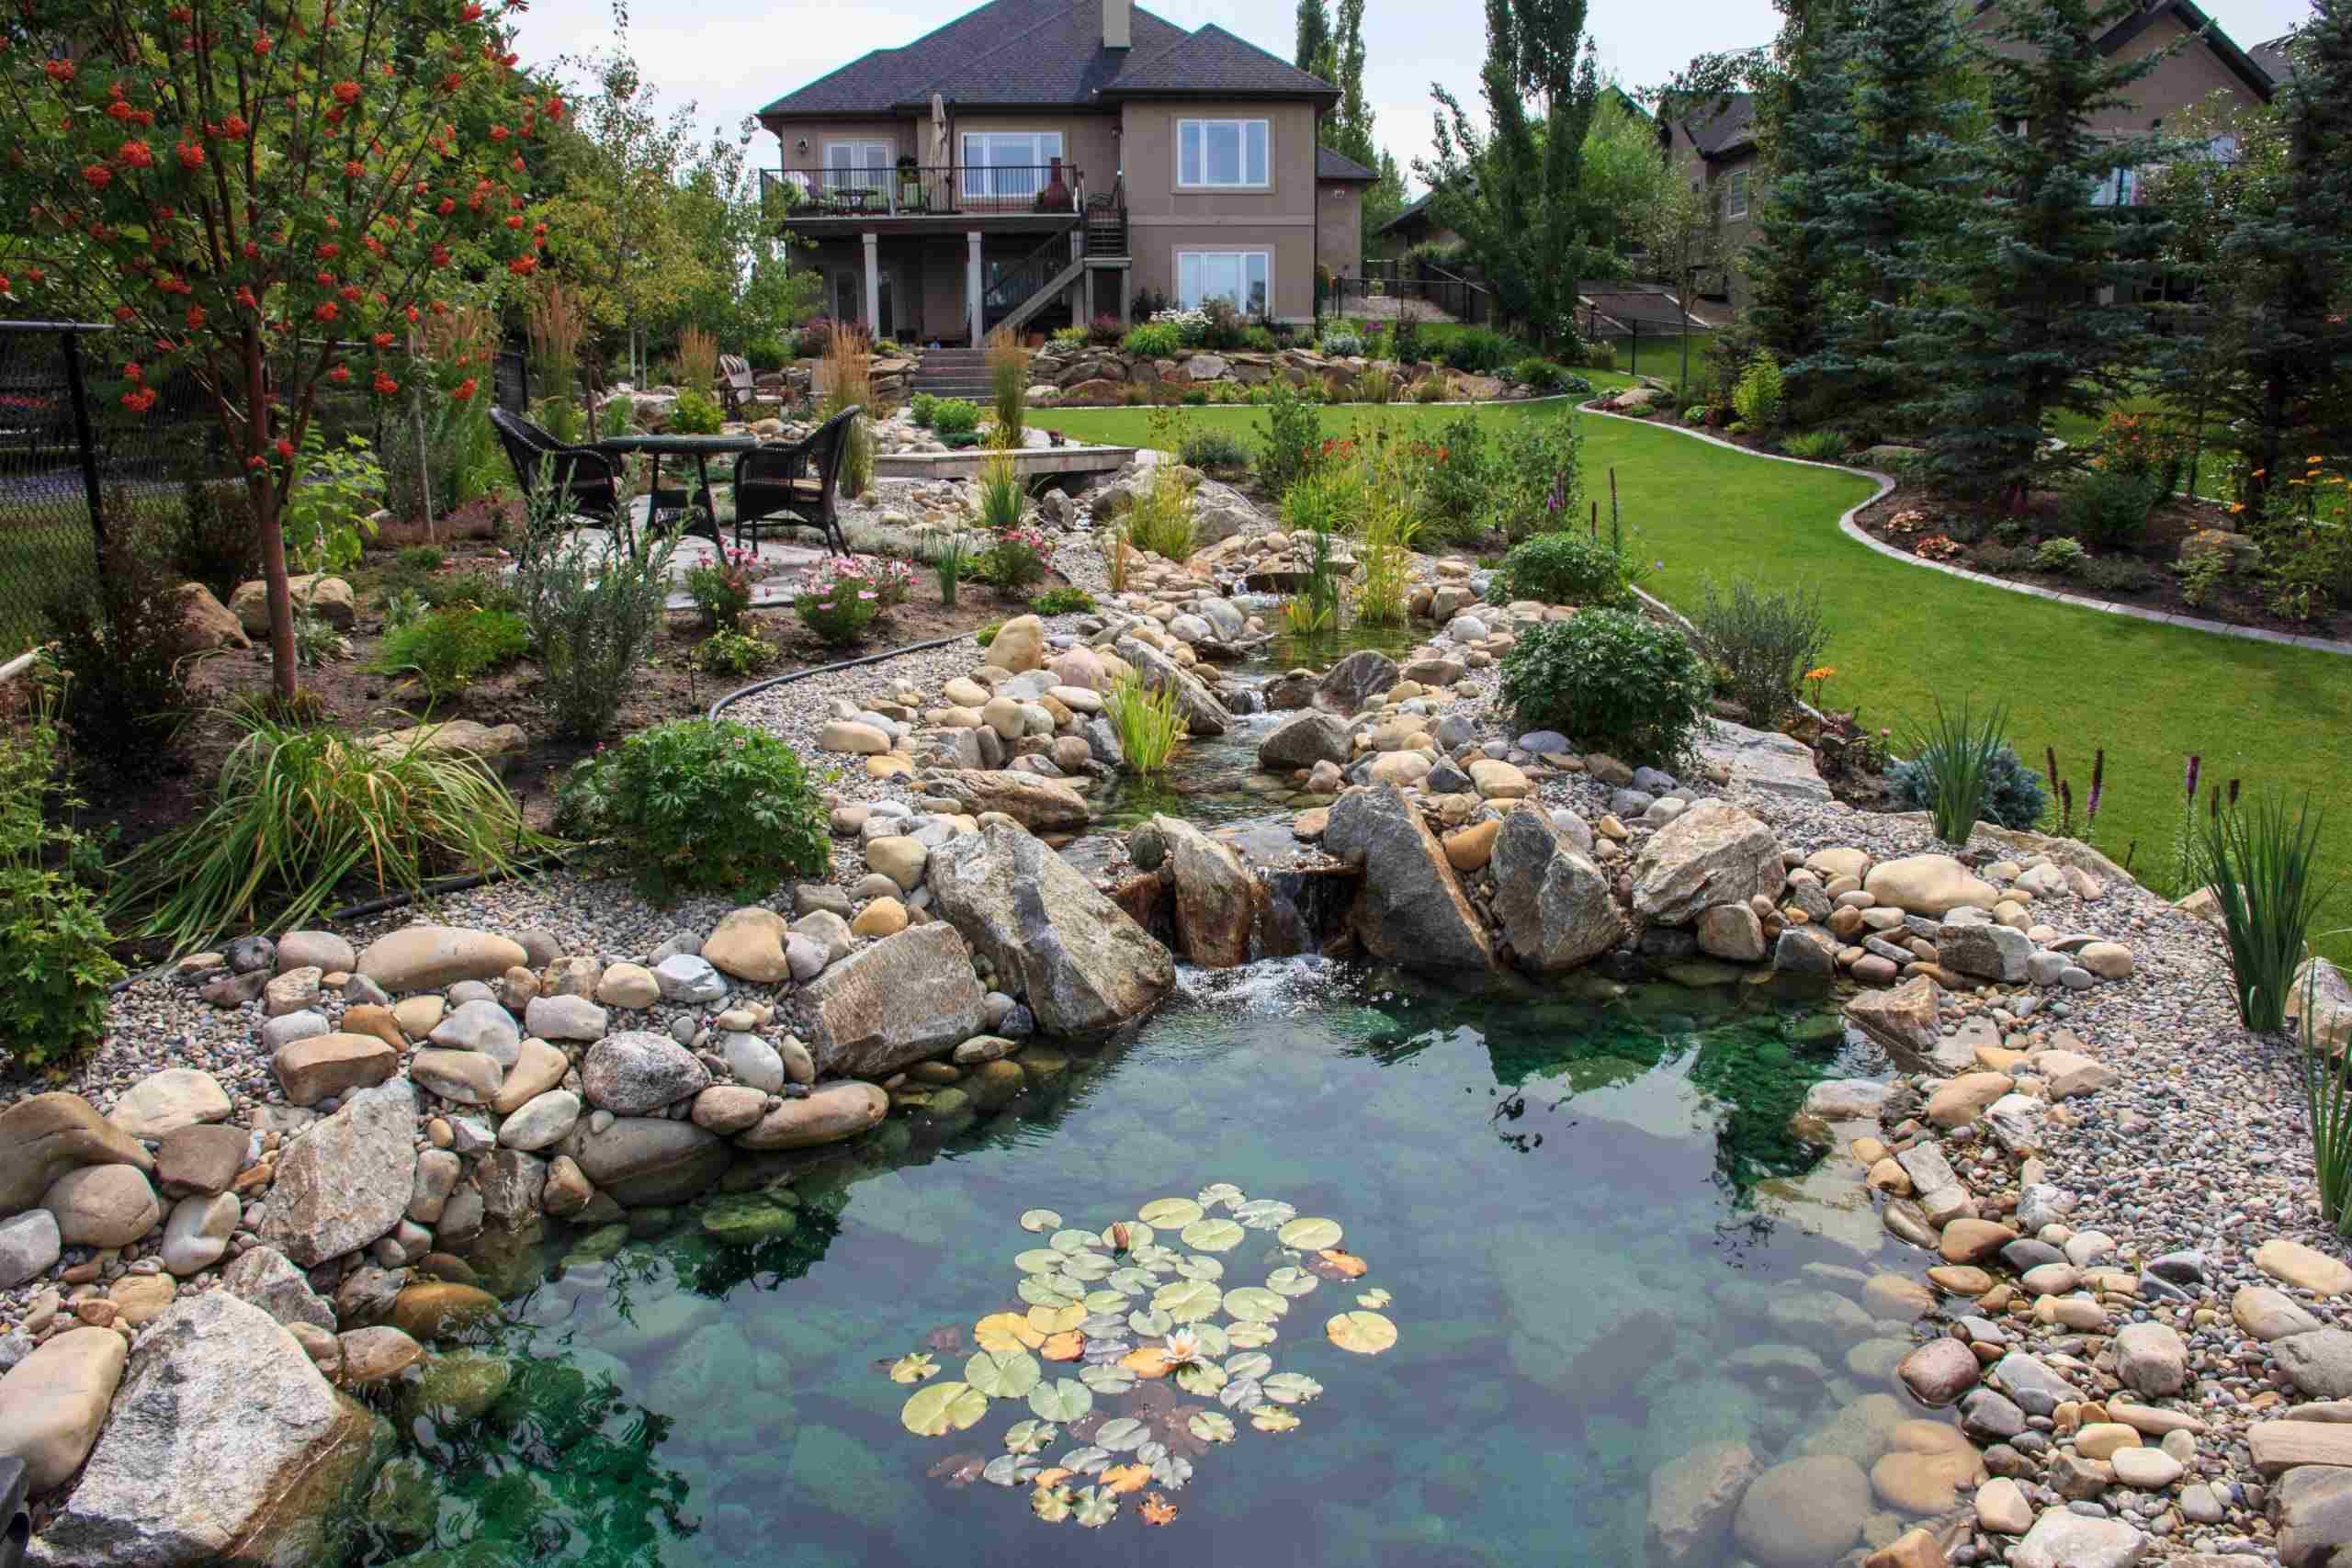
Building a waterfall in your backyard is a fantastic DIY project that can transform your outdoor space into a serene and picturesque oasis. The sound of cascading water, combined with the beauty of rocks and lush vegetation, creates a soothing and tranquil atmosphere that can bring a sense of peace and relaxation to your home.
Not only does a backyard waterfall provide aesthetic appeal, but it also has practical benefits. The gentle flow of water can help to mask any unwanted noise from nearby traffic or neighbors, creating a calming ambiance for outdoor gatherings or personal reflection.
While it may seem like a complex and daunting task, creating your own waterfall is actually more achievable than you might think. With careful planning, the right materials, and some basic DIY skills, you can bring the beauty and tranquility of a natural waterfall right into your backyard.
In this article, we will guide you through the process of building a waterfall from start to finish. We will cover everything from choosing the right location to gathering materials and tools, designing the waterfall, excavating the area, building the base, installing the pond liner, creating the waterfall structure, adding rocks and stones, installing the pump and water system, landscaping around the waterfall, and adding final touches.
Whether you are a seasoned DIY enthusiast or a beginner looking to try your hand at a new project, this step-by-step guide will provide you with the knowledge and confidence to create your own stunning backyard waterfall. So, let’s dive in and discover the wonders of DIY water feature construction!
Choosing the Right Location
Choosing the right location for your backyard waterfall is crucial to ensure its success and enjoyment. There are a few key factors to consider when selecting the ideal spot:
- Available Space: Assess the available space in your backyard and determine how much room you have for the waterfall. Consider the dimensions and shape of the area to determine what size and design will work best.
- Accessibility: Ensure that the location is easily accessible for maintenance and upkeep. You’ll need to regularly clean the waterfall and access the pump and water system.
- Sunlight: Take note of the sunlight patterns in your yard. Ideally, the waterfall should receive some direct sunlight during the day to promote plant growth and prevent algae build-up.
- Proximity to Power Source: Consider the proximity of the waterfall to a power source. You’ll need electricity to run the pump and other water features, so ensure that it is accessible without the need for long extension cords.
- Avoiding Underground Utilities: Before you start digging, be sure to check for any underground utilities, such as gas lines or electrical cables. Contact your local utility companies to mark the underground lines to avoid any accidents.
- Aesthetics: Finally, choose a location that will enhance the overall aesthetics of your backyard. Consider the view from your home and how the waterfall will fit into the overall landscape design.
By carefully considering these factors, you can choose a location that will not only meet your practical needs but also create a visually appealing and harmonious addition to your outdoor space.
Gathering Materials and Tools
Before you begin building your backyard waterfall, it’s important to gather all the necessary materials and tools. Here is a list of what you’ll need:
- Pond Liner: The pond liner will be used to create the waterproof barrier for your waterfall. Choose a durable and flexible liner that is suitable for outdoor use.
- Rocks and Stones: Look for rocks and stones that will create a natural and aesthetically pleasing waterfall structure. You can source them from local quarries, garden centers, or even your own property.
- Pump and Water System: A submersible pond pump is essential for circulating the water in your waterfall. Make sure to choose a pump with the right flow rate for your desired water feature.
- Tubing: Tubing will be used to connect the pump to the waterfall structure. Choose tubing that is suitable for outdoor use and the size of your pump.
- Filter: A filter is important to keep debris and algae from clogging the pump and water system. Choose a filter that is appropriate for the size of your waterfall.
- Landscaping Fabric: Use landscaping fabric to help prevent weeds and soil erosion around the waterfall area.
- Shovels and Digging Tools: You’ll need a variety of shovels and digging tools to excavate the area and create the base for your waterfall.
- Level and Measuring Tools: A level will help ensure that your waterfall structure is properly aligned, while measuring tools will assist in accurately gauging the placement and positioning of various elements.
- Gloves and Safety Equipment: Don’t forget to prioritize safety. Wear gloves and any other necessary safety equipment to protect yourself during the construction process.
Once you have gathered all the required materials and tools, you’ll be well-prepared to begin building your backyard waterfall. Make sure to double-check your inventory and purchase any additional items needed before you start the construction process.
Designing the Waterfall
The design of your backyard waterfall is where your creativity can truly shine. Consider these key steps when designing your waterfall:
- Research and Inspiration: Explore various waterfall designs online or visit local gardens and parks to gather inspiration. Take note of the different shapes, heights, and styles that appeal to you.
- Match the Landscape: Design your waterfall to harmonize with the existing landscape. Consider the overall theme and style of your outdoor space, and aim for a waterfall design that complements it.
- Flow and Water Movement: Decide on the desired flow and movement of water in your waterfall. Will it have a gentle trickle or a more dramatic cascade? Determine the sound and visual effects you want to achieve.
- Choosing the Right Rocks: Select rocks and stones that fit your design vision. Consider their shape, size, and texture, and arrange them in a way that mimics the natural flow of water.
- Levels and Layers: Create levels and layers in your waterfall design to add visual interest and simulate the natural cascading effect. This can be achieved by using rocks of varying sizes and arranging them in a stepped formation.
- Placement of Plants: Integrate plants and foliage into your waterfall design to enhance its natural aesthetic. Choose aquatic plants that thrive in water and can add color, texture, and a sense of life to your waterfall.
- Accessibility: Ensure that your waterfall design allows for easy maintenance and accessibility. Leave enough space around the structure for cleaning, adjusting the pump, and adding or removing rocks.
When designing your backyard waterfall, take the time to sketch out your ideas and create a basic blueprint. This will help you visualize the final result and make any necessary adjustments before construction begins.
Remember, the design process is an exciting opportunity to personalize your waterfall and make it a unique feature of your backyard. So let your imagination flow and create a design that will bring you joy for years to come.
Excavating the Area
Excavating the area is a crucial step in building your backyard waterfall. Follow these guidelines to properly excavate the site:
- Mark the Area: Use stakes and string to mark out the desired shape and size of your waterfall. This will serve as a guide as you start excavating.
- Measure and Dig: Start by digging the foundation for your waterfall. Use a shovel and other digging tools to carefully remove the sod and soil within the marked area. Begin with a shallow depth and gradually dig deeper, keeping in mind the desired level and height of your waterfall.
- Smooth the Bottom: Once you have excavated the area, use a rake or shovel to create a smooth and level bottom. This will ensure a solid base for your waterfall and help prevent shifting later on.
- Check for Level: Use a level to verify that the excavated area is even and level. This will help ensure the stability and structural integrity of your waterfall.
- Clear Debris: Remove any rocks, roots, or debris from the excavated area. These can interfere with the placement of the pond liner and the overall construction of your waterfall.
- Consider Water Flow: While excavating, think about the desired flow of water in your waterfall. Create slopes and contours that will guide the water along the desired path and create an aesthetically pleasing effect.
Remember to take breaks and pace yourself during the excavation process. The size and depth of your waterfall will determine the amount of time and effort required. If needed, enlist the help of friends or family members to make the job easier and faster.
By properly excavating the area, you will lay a solid foundation for your backyard waterfall and create a sturdy structure that can withstand the test of time.
Building the Base
Building a solid base is a crucial step in the construction of your backyard waterfall. Follow these steps to create a strong and stable foundation:
- Add a Layer of Sand: Begin by adding a layer of sand to the excavated area. This will help create a level surface and provide stability for the base of your waterfall.
- Compact the Sand: Use a tamper or compactor to compact the sand layer. This will ensure that it is firmly packed and will prevent shifting or settling over time.
- Install Landscape Fabric: Place a layer of landscape fabric over the compacted sand. This will help prevent weed growth and provide additional stability to the base.
- Add Gravel: Spread a layer of small gravel over the landscape fabric. This will serve as a draining material, allowing water to escape and preventing the base from becoming saturated.
- Compact the Gravel: Again, use a tamper or compactor to compact the gravel layer. This will ensure that it is well-settled and provides a solid base for your waterfall.
- Check for Level: Use a level to verify that the base is even and level. Adjust as needed to achieve a flat and stable surface.
Building a solid base is essential to support the weight of the waterfall structure and ensure its long-term stability. Take the time to properly prepare and compact the sand and gravel layers, as this will contribute to the overall durability of your waterfall.
Once the base is built and leveled, you can move on to the next steps of installing the pond liner and creating the waterfall structure.
Installing the Pond Liner
The pond liner is an essential component of your backyard waterfall as it creates a waterproof barrier that prevents water from seeping into the ground. Follow these steps to properly install the pond liner:
- Measure and Cut: Measure the dimensions of your waterfall area and add an additional few inches to allow the liner to overhang. Use these measurements to cut the pond liner to the appropriate size.
- Position the Liner: Carefully place the pond liner into the excavated area, ensuring that it covers the entire base and extends up the sides of the waterfall structure. Smooth out any wrinkles or folds in the liner.
- Secure the Liner: Use heavy rocks or bricks to anchor the liner in place around the edges of the waterfall. This will prevent it from shifting or becoming dislodged once water is added.
- Adjust for Water Flow: Arrange the liner in a way that directs the flow of water along the desired path of your waterfall. Create dips and folds to guide the water and achieve the desired cascading effect.
- Trim Excess Liner: Once the liner is positioned and secured, trim any excess material using sharp scissors or a utility knife. Leave a few inches of overhang to ensure proper coverage.
During the installation process, take care not to puncture or tear the pond liner. It is important to handle it gently and avoid sharp objects that could cause damage.
Once the pond liner is successfully installed, you are ready to move on to the next step of creating the waterfall structure.
Creating the Waterfall Structure
Creating the waterfall structure is where your creative vision will come to life. Follow these steps to construct a beautiful and natural-looking waterfall:
- Arrange the Rocks: Start by arranging rocks and stones along the edges of the pond liner, building the foundation of your waterfall structure. Begin with larger rocks at the base and gradually work your way up with smaller rocks.
- Stack the Rocks: Carefully stack rocks on top of each other, creating different levels and layers. Ensure that the rocks are stable and securely placed to prevent them from shifting or toppling over.
- Consider Water Flow: As you position the rocks, take into account the desired flow of water. Create channels and gaps that will guide the water down the waterfall in a natural and visually appealing manner.
- Create Cascades: Arrange rocks in a way that creates cascades and small pools, allowing water to flow from one level to another. This will add depth and movement to your waterfall.
- Secure the Rocks: Use a combination of mortar, concrete, or landscaping adhesive to secure the rocks in place. Apply the adhesive sparingly and conceal it with smaller rocks for a seamless look.
- Add Natural Elements: Incorporate natural elements such as driftwood or moss-covered rocks to enhance the organic and authentic appearance of your waterfall.
Remember to step back and assess your work as you progress, ensuring that the waterfall structure is visually appealing and natural-looking. Adjust the placement of rocks as needed to achieve the desired effect.
Creating the waterfall structure requires patience and an eye for detail. Take your time, experiment with different arrangements, and enjoy the process of bringing your vision to life.
Adding Rocks and Stones
Adding rocks and stones is a crucial step in creating a beautiful and realistic waterfall in your backyard. Follow these steps to add the finishing touches with rocks and stones:
- Choose Appropriate Rocks: Select rocks and stones that have varying shapes, sizes, and textures. Look for rocks that resemble natural formations you would find in a waterfall, such as flat rocks for cascades or larger boulders for the base.
- Place Rocks Strategically: Begin by placing larger rocks at the base of the waterfall. Gradually work your way up the structure, adding smaller rocks and stones to create a layered, natural appearance. Think about the flow of water and position the rocks to guide it down the waterfall.
- Create Depth and Dimension: Place rocks at different angles and depths to create depth and dimension in your waterfall. This will make it look more realistic and visually appealing.
- Vary the Size and Shape: Use rocks and stones of different sizes and shapes to add visual interest. Mix flat rocks with round ones, and vary the height of the rocks to create a more organic look.
- Consider Balance: Ensure that the rocks are balanced and stable. Use smaller stones or gravel to fill any gaps or holes between rocks, providing additional support and preventing water from escaping.
- Mimic Nature: Look to natural waterfalls for inspiration. Notice how rocks are arranged and try to recreate that authentic look and feel in your own waterfall.
- Be Mindful of Safety: Protect yourself and others by ensuring that the rocks are securely placed and won’t pose a danger of falling or causing injury.
Adding rocks and stones is a creative and artistic process that can truly transform the look and feel of your waterfall. Take your time, experiment with different placements, and step back to assess the overall effect as you go.
Remember, the goal is to create a natural and visually stunning waterfall that will be a centerpiece of your backyard oasis.
Installing the Pump and Water System
The pump and water system are the heart of your backyard waterfall, responsible for circulating the water and creating that soothing and beautiful flow. Follow these steps to install the pump and water system:
- Select the Right Pump: Choose a submersible pump that is suitable for the size of your waterfall. Consider the flow rate and any additional features, such as adjustable flow control or energy efficiency.
- Place the Pump: Submerge the pump in the deepest part of your pond or reservoir, ensuring that it is securely positioned and level. Rest it on a stable surface, such as a flat rock or brick.
- Connect the Tubing: Attach flexible tubing to the outlet of the pump. The tubing should be long enough to reach up to the top of the waterfall structure. Secure the connection with a hose clamp or zip tie.
- Guide the Tubing: Lay the tubing along the waterfall structure, following the desired path for the water flow. Conceal the tubing behind rocks or under foliage for a seamless and natural appearance.
- Create Water Paths: Use rocks and stones to create channels or paths that guide the water along the desired route. Arrange the rocks in a way that directs the flow and adds visual interest to your waterfall.
- Install the Filter: Connect the filter to the inlet of the pump. The filter will help remove debris and prevent clogging, ensuring that the pump operates smoothly. Make sure the filter is easily accessible for cleaning and maintenance.
- Connect to a Power Source: Use weatherproof electrical cords and follow safety guidelines to connect the pump to a power source. Consider using a GFCI (Ground Fault Circuit Interrupter) for added safety.
- Test the Water System: Fill the reservoir with water and turn on the pump to test the water flow. Check for leaks, adjust the flow rate if necessary, and ensure that the water is circulating effectively.
Proper installation of the pump and water system is crucial for the functionality and longevity of your waterfall. Take the time to carefully position the pump and connect all the components, ensuring that everything is secure and in working order.
Once the pump and water system are installed and functioning correctly, you’re one step closer to enjoying the soothing sights and sounds of your backyard waterfall.
Landscaping around the Waterfall
The landscaping around your waterfall is just as important as the waterfall itself. It can enhance the overall aesthetic appeal and create a seamless integration with the surrounding environment. Follow these steps to effectively landscape around your waterfall:
- Choose Suitable Plants: Select plants that are suitable for the water and moisture levels around your waterfall. Opt for water-loving plants such as water lilies, iris, or ferns. Consider using a mix of aquatic, marginal, and terrestrial plants to create a diverse and visually appealing landscape.
- Create a Planting Zone: Designate a planting zone around the waterfall where you’ll place the plants. Dig holes and add rich, well-draining soil or gravel to provide a healthy growing environment.
- Vary Plant Heights: Use plants of varying heights to create depth and visual interest. Place taller plants towards the back and sides and shorter plants towards the front to create a layered effect.
- Add Texture and Color: Incorporate plants with different textures and colors to create a vibrant and visually appealing landscape. Consider using plants with interesting foliage or flowers to add pops of color.
- Consider Proximity to Water: Determine how close you want the plants to be to the water’s edge. Some plants thrive with their roots submerged in water, while others are better suited to the moist soil just outside the water.
- Plant in Groups: Planting in groups or clusters can create a more natural and cohesive look. Arrange plants in odd numbers for a visually pleasing arrangement.
- Integrate Rocks and Stones: Place smaller rocks, pebbles, or stones around the base of plants to provide stability and enhance the natural appearance. This can also help with water retention and minimize erosion.
- Maintain Proper Drainage: Ensure that the landscaping around your waterfall has proper drainage to prevent excessive pooling of water. This can be achieved by using a combination of soil, gravel, and landscape features.
Landscaping around your waterfall will not only add beauty and visual appeal, but it will also help create a harmonious environment where plants and water seamlessly coexist. Regularly maintain and care for the plants, keeping them well-watered and pruned as needed to ensure they thrive in their new home.
By carefully selecting and arranging plants, you can create a stunning and lush landscape that complements the beauty of your backyard waterfall.
Adding Final Touches and Maintenance Tips
Adding the final touches to your backyard waterfall will help elevate its beauty and ensure its longevity. Additionally, regular maintenance is crucial to keep your waterfall in pristine condition. Here are some final touches and maintenance tips to consider:
- Decorative Elements: Consider adding decorative elements such as lighting, statues, or water plants to enhance the overall aesthetic appeal of your waterfall. These elements can create a captivating focal point, especially during nighttime.
- Lighting: Install outdoor lighting around your waterfall to highlight its beauty during the evening hours. Use low voltage LED lights to illuminate specific features, or opt for underwater lighting to create a mesmerizing glow within the waterfall itself.
- Regular Cleaning: Regularly clean your waterfall and remove any debris, such as fallen leaves or twigs, that may accumulate in the water or on the rocks. This will prevent clogging, maintain water flow, and keep the waterfall looking pristine.
- Algae Control: To prevent algae growth, use an algae control agent or install a UV clarifier to keep the water clear and free from green discoloration. Follow the instructions provided by the manufacturer for the appropriate usage and dosage.
- Inspect and Maintain the Pump: Check the pump regularly to ensure it is functioning properly. Clean the pump intake and impeller to remove any debris that may obstruct the water flow. Lubricate the pump if necessary and replace any worn-out or damaged parts.
- Monitor Water Levels: Regularly monitor the water level in your waterfall, especially during hot and dry seasons. Refill the reservoir as needed to maintain the proper water level for optimal performance and to prevent damage to the pump.
- Winter Maintenance: If you live in a colder climate, take appropriate steps to winterize your waterfall. This may involve shutting down the pump, draining the water, and protecting the components from freezing temperatures.
- Check for Leaks: Periodically check for any leaks in the waterfall structure or the plumbing system. Look for signs of water seepage or pooling around the waterfall, and promptly address any issues to prevent further damage.
By adding these final touches and following regular maintenance practices, you’ll ensure that your backyard waterfall remains a stunning and enjoyable feature of your outdoor space for years to come.
Remember, regular maintenance is key to the longevity and efficiency of your waterfall. By dedicating a little time and effort to its care, you can continue to enjoy the natural beauty and soothing sounds of your personal oasis.
Conclusion
Building a waterfall in your backyard is an exciting and rewarding DIY project that can transform your outdoor space into a tranquil haven. By following the step-by-step process outlined in this guide, you can create a stunning and natural-looking waterfall that brings beauty and serenity to your home.
From choosing the right location and gathering the necessary materials to designing the waterfall and installing the pump, each step plays a crucial role in the overall success of your project. By carefully considering factors such as space, sunlight, accessibility, and aesthetics, you can ensure that your waterfall seamlessly integrates into your outdoor environment.
Throughout the construction process, incorporating rocks and stones, installing the pond liner, and creating the waterfall structure add depth and authenticity to your waterfall. By designing water paths, varying rock sizes, and securing the rocks in place, you can achieve a natural and visually appealing result.
Once the core components are in place, landscaping around the waterfall and adding final touches such as decorative elements and lighting will elevate the overall ambiance. Regular maintenance, including cleaning, algae control, and pump inspection, is essential to preserve the beauty and functionality of your waterfall over time.
So, whether you are looking to create a peaceful retreat, mask unwanted noise, or simply enhance the visual appeal of your backyard, building a waterfall is a DIY project that offers both aesthetic and therapeutic benefits. With proper planning, careful execution, and a bit of creativity, you can bring the beauty and tranquility of a natural waterfall right into your own backyard. So, roll up your sleeves and embark on this wonderful journey to create your very own oasis.