Home>Gardening Techniques>DIY Projects>How To Build A Backyard Batting Cage

DIY Projects
How To Build A Backyard Batting Cage
Published: August 5, 2023
Learn how to build a DIY backyard batting cage with step-by-step instructions and save money on your next DIY project.
(Many of the links in this article redirect to a specific reviewed product. Your purchase of these products through affiliate links helps to generate commission for Chicagolandgardening.com, at no extra cost. Learn more)
Table of Contents
Introduction
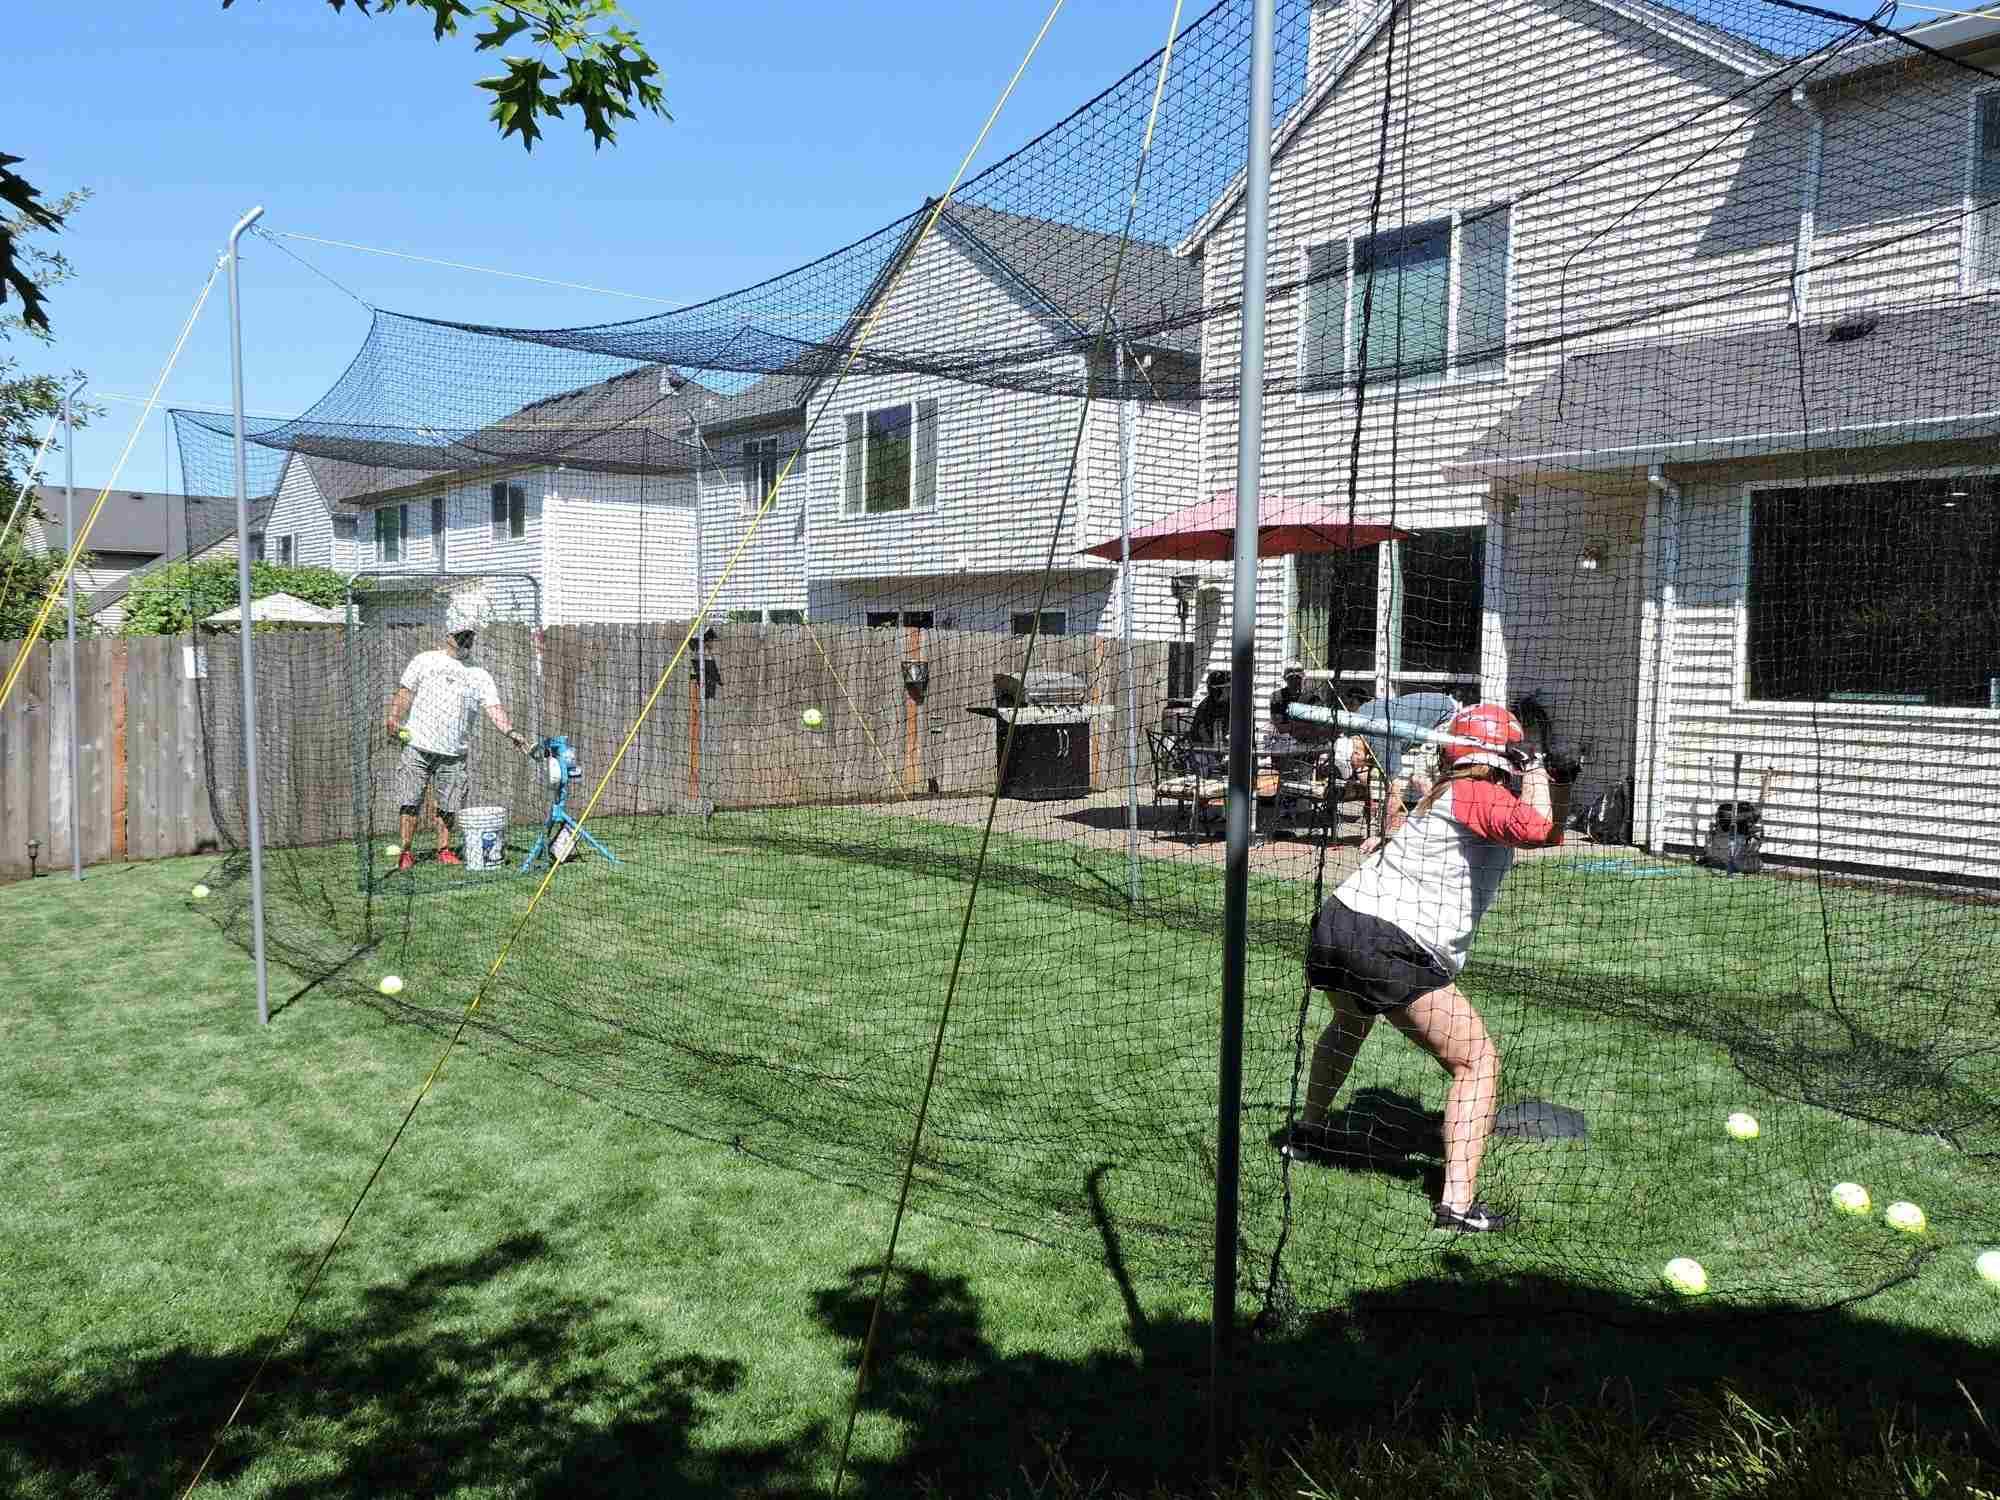
Welcome to the exciting world of DIY projects! If you are a baseball enthusiast looking to improve your swing and practice your batting skills, building a backyard batting cage can be a rewarding and fun endeavor. Not only will it allow you to work on your game whenever you want, but it can also be a great way to spend time outdoors with friends and family. In this step-by-step guide, we will walk you through the process of building your own backyard batting cage.
Constructing a batting cage from scratch may sound intimidating, but with the right planning and materials, it can be a manageable and enjoyable project. By following these steps and investing a bit of time and effort, you’ll have a custom-made batting cage that will enhance your training experience and take your baseball skills to the next level.
Before we dive into the building process, it’s important to note that you should check local regulations and obtain any necessary permits before starting this project. Additionally, keep in mind that the size and dimensions of your batting cage may vary depending on the available space in your backyard and your specific needs.
Now, let’s get started on this exciting DIY journey to create your backyard batting cage. Get ready to swing for the fences and enjoy countless hours of practice and fun!
Step 1: Selecting the Location
The first step in building your backyard batting cage is selecting the right location. Consider the size and shape of your yard, as well as any obstructions like trees, buildings, or utility lines. Ideally, you’ll want a flat and open area with enough space to accommodate the cage and allow for comfortable batting practice.
Here are a few factors to consider when choosing the location for your batting cage:
- Size and dimensions: Determine the maximum size of the batting cage that will comfortably fit in your available space. Measure both the width and length, and consider leaving a few extra feet of clearance around the cage to prevent any unwanted collisions.
- Positioning: Assess the direction of the prevailing wind in your area. It’s advisable to align the batting cage perpendicular to the wind to minimize the effect it may have on the ball’s trajectory. This will help create an optimal practice environment.
- Accessibility: Ensure that the location you choose allows for easy access to and from the batting cage. You may want to consider placing it closer to your house or a convenient entry point to avoid long walks back and forth.
- Privacy and noise: Keep in mind your neighbors and any potential noise concerns. Select a location that minimizes disturbance to nearby homes and provides some privacy for concentrated practice sessions.
Once you’ve selected the ideal location, mark the boundaries with stakes and string to clearly define the area where the batting cage will be installed. Taking the time to carefully choose the location will set the foundation for a successful batting cage project and ensure that you can fully utilize the space for practice and enjoyment.
Step 2: Gather the Materials
Now that you have decided on the location for your backyard batting cage, it’s time to gather all the necessary materials. Having the right materials on hand will ensure a smooth construction process and a sturdy, long-lasting batting cage.
Here’s a list of the essential materials you’ll need:
- Poles or metal tubing: You will need sturdy poles or metal tubing to serve as the framework for your batting cage. The number of poles required depends on the size and dimensions of your cage, so calculate accordingly. Consider using galvanized steel or aluminum for durability.
- Netting: High-quality netting is a crucial component of any batting cage. Look for netting specifically designed for sports use, as it should be strong, durable, and able to withstand heavy use. Measure the dimensions of your cage to determine the size and amount of netting needed.
- Hardware: Collect the necessary hardware such as screws, nuts, bolts, and metal brackets to secure the poles and connect the netting. Opt for rust-resistant hardware to ensure longevity.
- Ground anchors: Ground anchors are essential to stabilize and secure the batting cage. Depending on the type of soil in your yard, you may need different types of anchors, such as ground stakes or concrete footings.
- Padding and turf: To enhance safety and provide a more realistic playing surface, consider adding padding to the poles and installing artificial turf in the batting area.
- Other optional accessories: Depending on your preferences and budget, you may also want to consider additional accessories such as a pitching machine, L-screen for added protection, or a backstop netting to prevent balls from flying too far.
Take some time to research and compare the different options available for each material. Quality is key when it comes to building a batting cage that will stand the test of time and provide an optimal practice experience. Ordering everything you need in advance will ensure that you have all the materials ready to go once you start the construction process.
Step 3: Constructing the Frame
With the materials assembled, it’s time to start constructing the frame of your backyard batting cage. This step involves setting up the poles or metal tubing that will form the skeletal structure of the cage.
Follow these steps to construct the frame:
- Measure and mark: Start by measuring and marking the desired locations for the poles. Use a measuring tape and stakes to ensure accuracy. Take into account the height and width of the cage, as well as any clearances needed around the batting area.
- Dig holes (if necessary): If you are using poles that require holes to be dug, use a post hole digger or auger to create holes that are deep enough to secure the poles firmly in the ground. Make sure the holes are straight and evenly spaced to ensure a stable structure.
- Insert the poles: Carefully insert the poles into the holes or directly into ground anchors. Use a level to ensure that the poles are perfectly vertical. Fill the holes with cement or soil to secure the poles in place.
- Connect the poles: Once all the poles are securely in place, connect them using the appropriate hardware. This may include brackets, screws, and nuts. Double-check that all connections are tight and secure.
- Add padding: For added safety and player protection, consider adding padding to the poles. Foam tubing or other cushioning material can be wrapped around the poles at the height where balls are most likely to make contact.
As you construct the frame, it’s essential to periodically step back and assess the overall structure to ensure it is sturdy and level. Take your time to make any necessary adjustments or reinforcements as needed.
Once the frame is built, you have completed a significant portion of the batting cage construction process. The frame serves as the foundation for the rest of the project, and with it in place, you’re one step closer to having your very own backyard batting cage.
Step 4: Installing the Netting
Now that the frame of your backyard batting cage is constructed, it’s time to install the netting. The netting is a critical component that will contain the balls and allow you to practice your swings without worrying about them flying off into the distance.
Follow these steps to install the netting:
- Measure and cut the netting: Measure the dimensions of your batting cage and cut the netting to the appropriate size. Ensure that the netting is slightly larger than the frame to allow for proper coverage.
- Attach the top portion: Start by attaching the netting to the top portion of the frame. Depending on the design of your batting cage, this may involve using zip ties, ropes, or clips to securely fasten the netting to the poles or tubing. Begin at one end and work your way across, ensuring that the netting is taut and evenly distributed.
- Secure the sides: Once the top portion is attached, move on to securing the sides of the netting. Use the same method as before to fasten the netting to the poles or tubing, ensuring that it remains stretched tightly.
- Secure the bottom: Finally, secure the bottom portion of the netting. This can be done by burying the excess netting in the ground, using ground anchors, or attaching it to the bottom section of the frame. The goal is to prevent balls from escaping under the netting.
- Inspect and make adjustments: After the netting is installed, carefully inspect the entire cage to ensure that the netting is securely attached and there are no gaps or loose sections. Make any necessary adjustments or enhancements to ensure the netting is fully functional.
Installing the netting requires precision and attention to detail. Take your time to ensure that the netting is properly attached and stretched, as it will greatly impact the effectiveness and safety of your batting cage. A well-installed netting will provide a dependable barrier and allow you to practice your swing without concerns about errant balls.
Step 5: Adding Safety Features
Safety should always be a top priority when it comes to your backyard batting cage. Adding safety features will help protect both the players and the surrounding areas from potential accidents. Here are some essential safety features to consider:
- Padding: Install padding on the poles and any other hard surfaces within the batting area. This will help prevent injuries in case of accidental contact and minimize the risk of players getting hurt.
- Warning signs: Place visible warning signs around the batting cage to alert others to the potential dangers and to remind them to stay clear of the area during practice sessions. This is particularly important if your batting cage is located close to a public space or shared area.
- Protective screens: Consider adding protective screens, such as an L-screen, to shield the pitcher or a pitching machine operator during practice. This will help prevent direct contact with batted balls and reduce the risk of injury.
- Safety netting: If your backyard batting cage is close to a property line or areas where stray balls may cause damage, consider adding additional safety netting beyond the boundaries of the batting cage. This will act as a buffer zone and ensure that any batted balls are contained within the cage.
- Ground anchors: Make sure that all poles and framework are securely anchored to the ground. Loose or unstable structures can pose a significant safety risk, so proper anchoring is essential.
- Supervision and rules: Establish clear rules and guidelines for using the batting cage, especially if it will be used by children or inexperienced players. Always supervise young players and emphasize the importance of safety precautions and responsible behavior.
By implementing these safety features, you can create a secure and worry-free environment for practicing your batting skills. Remember, safety should never be overlooked, and taking the necessary precautions will ensure that everyone can enjoy the benefits of your backyard batting cage without any accidents or injuries.
Step 6: Finishing Touches
With the main components of your backyard batting cage in place, it’s time to add some finishing touches to enhance its functionality and aesthetics. These final details can make a significant difference in your overall batting experience. Here are some ideas for the finishing touches:
- Turf or flooring: Consider adding artificial turf or durable flooring material to create a level and realistic playing surface within the batting area. This will not only improve the overall look of your batting cage but also provide a more comfortable and professional feel.
- Lighting: If you plan on using the batting cage during the evenings or in low-light conditions, install adequate lighting to ensure visibility and safety. Use weather-resistant and energy-efficient lighting fixtures designed for outdoor use.
- Bat and ball storage: Install hooks or shelves within the batting cage area to store bats, balls, helmets, and other equipment conveniently. This will keep everything organized and easily accessible for practice sessions.
- Bench or seating area: Include a bench or seating area within or near the batting cage for players to take breaks and observe others’ batting practice. This will create a comfortable and social space where everyone can enjoy the experience.
- Personalized touches: Add personal touches to make your batting cage unique and fun. Consider painting the poles in your favorite team’s colors, hanging posters or signs of famous baseball players, or even creating a scoreboard to keep track of hits.
- Regular maintenance: Lastly, make a habit of regularly inspecting and maintaining your batting cage. Check for any signs of wear, replace damaged netting, and ensure that all safety features are in place and functioning properly. This will help prolong the lifespan of your batting cage and keep it in optimal condition.
By focusing on these finishing touches, you can transform your backyard batting cage into a personalized and enjoyable space. The extra effort put into these details will contribute to a more immersive and satisfying experience for both yourself and anyone using the batting cage.
Conclusion
Congratulations! You have successfully completed the journey of building your own backyard batting cage. By following the step-by-step guide and incorporating the necessary materials, you have created a space where you can hone your batting skills and enjoy countless hours of practice.
Remember, constructing a batting cage from scratch may seem daunting at first, but with the right planning and execution, it is a manageable and rewarding DIY project. Your backyard batting cage offers convenience, flexibility, and the opportunity to improve your baseball skills on your own terms.
Throughout the process, you have learned the importance of selecting the right location, gathering the necessary materials, constructing a sturdy frame, installing the netting, adding safety features, and adding those final finishing touches. These steps not only contribute to the functionality of your batting cage but also enhance the overall aesthetics and safety.
Now, it’s time to put your newly constructed batting cage to good use. Grab your bat, step into the cage, visualize that upcoming game-winning hit, and swing away! Embrace your new training space as a place of growth and improvement in your baseball journey.
Remember to practice regularly, maintain your batting cage, and continue to prioritize safety while enjoying this great addition to your backyard. Share the joy and invite friends and family to join you for some fun-filled batting sessions.
Building a backyard batting cage is not only a practical addition to your property, but it also provides endless opportunities for improving your skills and fostering a love for the game of baseball. So grab your gear and prepare to take your batting skills to new heights right in the comfort of your own backyard!
