Home>Gardening Techniques>DIY Projects>How To Build A Backyard Pizza Oven
DIY Projects
How To Build A Backyard Pizza Oven
Published: August 5, 2023
Discover how to build your own backyard pizza oven with this step-by-step DIY project guide. Create delicious homemade pizzas right in your own backyard!
(Many of the links in this article redirect to a specific reviewed product. Your purchase of these products through affiliate links helps to generate commission for Chicagolandgardening.com, at no extra cost. Learn more)
Table of Contents
Introduction
Welcome to the world of DIY projects! If you love spending time outdoors and enjoy cooking, then building your very own backyard pizza oven is the perfect project for you. Imagine the satisfaction of cooking delicious, wood-fired pizzas right in your own backyard. Not only will you have a practical and functional addition to your outdoor living space, but you’ll also have a conversation starter and a source of endless culinary adventures.
Building a backyard pizza oven may seem like a daunting task, but fear not – with the right guidance and a little bit of patience, you’ll be able to create a backyard masterpiece that will have your friends and family in awe. In this comprehensive guide, we’ll walk you through each step of the process, from choosing the ideal location for your oven to adding the finishing touches.
Before we dive into the nitty-gritty details, let’s talk about the benefits of having a backyard pizza oven. First and foremost, the taste and texture of a wood-fired pizza are unparalleled. The intense heat generated by the wood fire creates a crispy crust while keeping the toppings juicy and flavorful. Plus, cooking in a pizza oven allows you to experiment with a variety of ingredients and flavors, turning each pizza into a unique culinary creation.
Another benefit of an outdoor pizza oven is the social aspect it brings. Picture yourself gathering with friends and family, rolling out dough, adding toppings, and enjoying the process together while sharing stories and laughter. A pizza party in your own backyard will undoubtedly become a cherished memory for all.
Building a backyard pizza oven is also a sustainable choice. By utilizing wood as the fuel source, you’ll be reducing your carbon footprint compared to conventional ovens. Additionally, you have the freedom to select sustainable and local ingredients, supporting local farmers and minimizing the environmental impact of your meals.
Now that you’re excited about the idea of having a backyard pizza oven, let’s move on to the first step: choosing the perfect location.
Step 1: Choosing the Location
Choosing the right location for your backyard pizza oven is essential for optimal functionality and convenience. Here are some factors to consider:
- Space: Ensure that you have enough space in your backyard to accommodate the size of the oven and provide proper ventilation. Consider the overall layout of your outdoor area and select a spot that allows for easy access and good visibility.
- Sun and Wind Exposure: Look for an area that receives adequate sunlight throughout the day. Sunlight is not only important for the cooking process but also for creating a warm and inviting atmosphere. Additionally, consider the wind patterns in your area. You don’t want strong gusts blowing smoke and heat towards your seating area.
- Proximity to Utilities: If you plan on connecting your pizza oven to gas or electrical utilities, choose a location that is in close proximity to these connections. This will make the installation process much easier and more cost-effective.
- Safety: Ensure that the location is safe and away from flammable materials. It’s also important to check local building codes and regulations to ensure compliance.
- Aesthetics: Consider how the pizza oven will fit into the overall aesthetics of your backyard. You may want to position it as a focal point or integrate it seamlessly into an existing outdoor kitchen or patio design.
Take some time to walk around your backyard and visualize where the pizza oven would best fit. Consider these factors and choose a location that meets your needs and preferences.
Once you’ve chosen the perfect spot, you’re ready to move on to the next step: gathering the necessary materials and tools.
Step 2: Gathering Materials and Tools
Before you start building your backyard pizza oven, it’s essential to gather all the necessary materials and tools. Here’s a list of what you’ll need:
- Firebricks: These are specialized bricks that can withstand high temperatures. They will be used to build the oven dome and cooking surface.
- Insulating materials: Insulation is crucial to ensure the efficiency and heat retention of the pizza oven. Vermiculite or perlite mixed with cement are commonly used for insulation.
- Refractory mortar: This is a special type of mortar that can withstand high temperatures. It is used to bond the firebricks together.
- Concrete mix: You’ll need a durable concrete mix to build the base and support structure for the oven.
- Rebar or steel mesh: This provides reinforcement for the concrete, making it structurally strong and stable.
- Sheet metal or chimney pipe: Depending on your design preference, you’ll need either sheet metal or a chimney pipe to construct the chimney. Make sure it is suitable for the high temperatures generated by the oven.
- Steel angle iron or bricks: These will be used to create a supportive frame for the oven dome.
- Measuring tools: A tape measure, level, and square will be essential for ensuring accurate and level construction.
- Masonry tools: You’ll need tools such as a trowel, masonry hammer, brick chisel, and a masonry saw if necessary.
- Protective gear: Safety should always be a priority, so make sure you have gloves, safety glasses, and a dust mask to protect yourself during construction.
Check with local building codes and regulations to ensure you have any necessary permits or permissions for your project. Additionally, consider consulting with a professional or an experienced DIYer for guidance on choosing the right materials specific to your location and design.
Once you have gathered all the materials and tools, you’re ready to begin building the base for your pizza oven, which we will cover in the next step.
Step 3: Building the Base
The base of your pizza oven provides stability and support for the entire structure. Here’s a step-by-step guide on how to build the base:
- Prepare the area: Clear the chosen location, ensuring that the ground is level and free of any debris. Mark out the dimensions of the base using stakes and string.
- Excavate the foundation: Dig a trench along the marked outline, making it about 8-10 inches deep. This will serve as the foundation for the base.
- Add gravel: Fill the trench with a layer of compacted gravel. This will provide a stable and well-drained base for the concrete slab.
- Build the formwork: Construct a formwork using wooden boards to create the shape and dimensions of the base. Ensure it is level and square by using a level and a square tool.
- Pour the concrete: Mix and pour the concrete into the formwork. Use a trowel to evenly spread the concrete and remove any air bubbles. Smooth the surface with a float or trowel.
- Install rebar or steel mesh: Place rebar or steel mesh into the wet concrete to reinforce it and provide added strength.
- Cure the concrete: Allow the concrete to cure according to the manufacturer’s instructions. This typically involves keeping the concrete moist and protected from extreme temperatures for a few days.
Once the base is fully cured and dried, you can proceed with the next steps to build the oven itself. Remember to double-check the dimensions and make any necessary adjustments before starting the construction of the oven dome.
With the base in place, you’re ready to move on to the exciting part – constructing the oven dome, which we will cover in the next step.
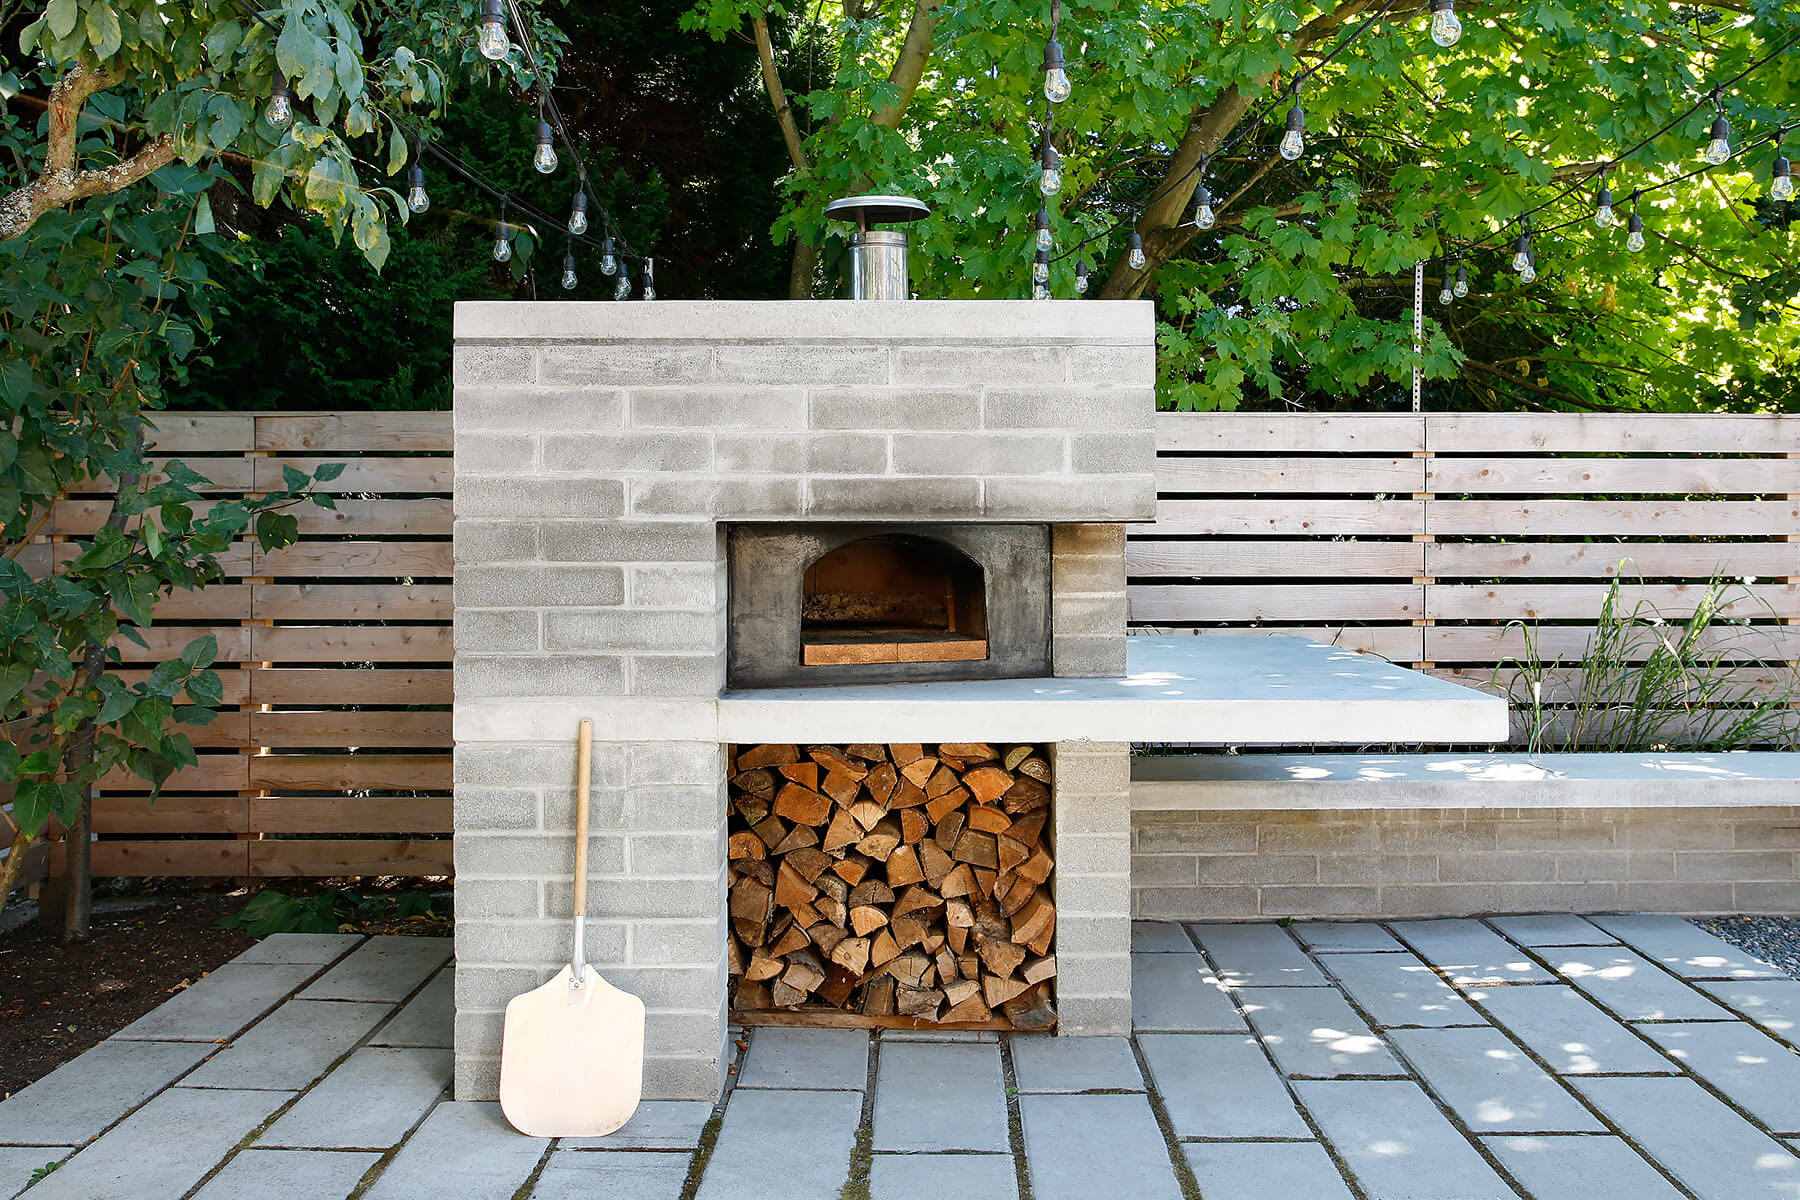
Step 4: Constructing the Oven Dome
The oven dome is the heart of your backyard pizza oven. It’s where the magic happens, as it’s responsible for retaining and radiating the heat to cook your delicious pizzas. Here’s how to construct the oven dome:
- Prepare the oven base: Before starting the dome construction, make sure the oven base is clean and free from any debris. This will ensure a solid foundation for the dome.
- Create the supportive frame: Using steel angle iron or bricks, build a supportive frame around the base of the oven. This will help provide stability for the dome during construction.
- Begin laying the firebricks: Start by placing a layer of refractory mortar on the base of the oven. Then, lay the firebricks in a circular pattern, leaving a small gap between each brick for expansion. Make sure to follow the manufacturer’s instructions for spacing and placement.
- Build the dome structure: Continue laying the firebricks, gradually tapering them inward as you move upwards, to create the dome shape. Use the refractory mortar between each brick to ensure a secure bond. Work carefully and take your time to maintain the structure and symmetry of the dome.
- Check for levelness: As you progress, regularly check the levelness of the dome using a spirit level. This will help ensure that your pizzas cook evenly. Make any necessary adjustments to maintain a level surface.
- Construct the entrance arch: Leave an opening at the front of the oven for the entrance. Build an archway using firebricks and refractory mortar to create a door frame for easy access to the oven.
- Complete the dome: Once you’ve reached the desired height and shape of the dome, allow the refractory mortar to dry and set according to the manufacturer’s instructions. This usually takes several days.
Constructing the oven dome requires precision and attention to detail. Take your time to ensure each brick is properly placed and the dome structure is solid. Once the dome is complete, you’re ready to move on to the next step – building the chimney.
Step 5: Building the Chimney
The chimney is an essential component of your backyard pizza oven as it helps to draw out smoke and exhaust gases, ensuring proper ventilation and a pleasant cooking experience. Here’s how to build the chimney:
- Determine the size and placement: Decide on the size and location of the chimney. It should be positioned at the back of the oven, opposite to the entrance, to allow for optimal airflow and smoke ventilation.
- Choose the chimney material: Select a suitable material for your chimney, such as sheet metal or a chimney pipe. Ensure that it is designed to withstand high temperatures to avoid any damage or safety hazards.
- Construct the chimney: Cut a hole through the back of the oven dome that aligns with the chimney placement. Insert the chimney material into the hole and secure it in place using refractory mortar or heat-resistant sealant.
- Extend the chimney height: The height of the chimney is crucial for efficient smoke extraction. Extend the chimney above the highest point of the oven dome to ensure that the smoke is safely directed away from your cooking area and nearby structures.
- Add a chimney cap: Install a chimney cap at the top of your chimney to prevent rainwater, debris, and animals from entering. This helps to maintain the cleanliness and functionality of your pizza oven.
Take care to follow local building codes and regulations when constructing your chimney. These guidelines may vary depending on your location, so it’s important to ensure compliance for safety and legal purposes.
With the chimney built and in place, you can now focus on adding insulation to your pizza oven, which we will cover in the next step.
Step 6: Adding Insulation
Adding insulation to your backyard pizza oven is crucial for maintaining high temperatures, improving energy efficiency, and preventing heat loss. Here’s how you can insulate your oven:
- Clean the oven dome: Before applying insulation, make sure the oven dome is clean and free of any debris or loose materials. This will ensure a proper bond between the insulation and the dome.
- Choose the insulation material: There are various options for insulation, including vermiculite, perlite, ceramic fiber blanket, or a combination of these materials. Research the benefits and suitability of each option to determine which is best for your pizza oven.
- Mix the insulation material: If you are using loose materials like vermiculite or perlite, mix them with refractory cement or clay to create a paste-like consistency. If you are using a ceramic fiber blanket, ensure it is cut to fit the shape of the dome.
- Apply the insulation: Use a trowel or gloved hand to apply the insulation material evenly onto the oven dome. Create a layer of insulation with a thickness of around 2-3 inches. Ensure the entire dome, including the archway and chimney area, is covered.
- Smooth and shape the insulation: Use a trowel or your gloved hand to smooth out the insulation layer, ensuring there are no gaps or uneven spots. Shape the insulation to follow the contours of the oven dome, creating a seamless and consistent layer.
- Allow the insulation to dry: Follow the manufacturer’s instructions for drying time. The insulation material may require several days to fully cure and set.
Insulating your pizza oven will significantly improve its performance and efficiency. The layer of insulation will help to retain heat, ensuring an even and consistent temperature for optimal cooking results.
Once the insulation has dried, you’re ready to move on to the exciting final step – applying the finish to your pizza oven.
Step 7: Applying the Finish
Applying a finish to your backyard pizza oven not only enhances its appearance but also helps to protect the structure and extend its lifespan. Here’s how you can apply a finish to your oven:
- Choose the finish material: There are various options for finishing materials, such as heat-resistant paint, stucco, or tiles. Consider the aesthetic you want to achieve and select a finish that is suitable for high temperatures.
- Prepare the surface: Ensure the oven dome is clean and free from any debris or dust. If necessary, use a brush or a damp cloth to remove any loose material from the surface.
- Apply the finish: Follow the manufacturer’s instructions for the chosen finishing material. If using paint or stucco, carefully apply an even coat onto the oven dome using a brush or roller. If using tiles, apply adhesive to the back of each tile and press them onto the oven dome, making sure they are correctly aligned and spaced.
- Allow the finish to dry or cure: Give the finishing material sufficient time to dry or cure, as per the manufacturer’s instructions. This may take a few days depending on the specific product used.
- Consider additional protection: Depending on your climate and personal preference, you may want to consider adding a sealant or coating to provide extra protection to the finish, ensuring its longevity and resistance to weather elements.
The finish of your pizza oven is a chance to showcase your creativity and personalize the design. Whether you choose a rustic stucco finish, a vibrant tile mosaic, or a sleek and simple paint, the final touch will make your oven a standout feature in your backyard.
With the finish applied and dried, you’re now ready for the last step – curing the oven, which is crucial before you start firing it up for your delicious pizzas. Let’s dive into the final step.
Step 8: Curing the Oven
Before you can start cooking pizzas in your backyard pizza oven, it’s important to properly cure the oven. Curing is the process of gradually heating the oven to gradually remove any moisture and strengthen the materials. Here’s how to cure your oven:
- Start with small fires: Begin by lighting small fires in the oven, using dry kindling or small pieces of firewood. Allow the fire to burn for approximately 30 minutes, letting the oven gradually heat up.
- Gradually increase the heat: Over the course of several days, gradually increase the size of the fires, adding larger pieces of firewood. This will help to slowly increase the temperature inside the oven and remove any remaining moisture.
- Monitor the temperature: Use a thermometer to monitor the temperature inside the oven. Aim to gradually increase the temperature to around 500°F (260°C) over the course of a week. This will help to strengthen the oven and eliminate any residual moisture.
- Refrain from high-heat cooking during curing: During the curing process, avoid cooking pizzas or any high-heat dishes. The focus should be on gradually raising the temperature rather than intense cooking.
- Allow for cool-down periods: After each fire, allow the oven to cool down naturally before starting a new fire. This will prevent rapid temperature changes that could cause damage to the oven.
- Continue monitoring and curing: The curing process may take several weeks, depending on the size and materials of your pizza oven. Monitor the temperature, ensure proper airflow, and patiently cure the oven until it is fully ready for high-heat cooking.
Properly curing your oven is crucial for its long-term durability and performance. It allows the materials to settle and strengthen, ensuring that your oven can withstand the high temperatures required for cooking pizzas.
Once the oven is fully cured and you have completed these steps, you are now ready to fire up your backyard pizza oven and start enjoying the delicious creations you can make. Happy cooking!
Conclusion
Congratulations on completing your DIY backyard pizza oven! By following the steps outlined in this guide, you’ve learned how to choose the perfect location, gather the necessary materials and tools, build a solid base, construct the oven dome, add a chimney, insulate the oven, apply a finish, and properly cure the oven. Now, it’s time to reap the rewards of your hard work and enjoy the delicious wood-fired pizzas that you’ll be able to create right in your own backyard.
Building a backyard pizza oven is not only a rewarding project but also a fantastic addition to your outdoor living space. It allows you to unleash your creativity in the kitchen, experiment with flavors, and entertain family and friends with memorable pizza parties.
Remember, as you begin your culinary adventures, take care to monitor temperatures, experiment with different types of wood, and practice safe fire management techniques. With time and experience, you’ll become a master at managing the heat and achieving perfectly cooked pizzas with that irresistible wood-fired flavor.
So gather your loved ones, roll out the dough, and let the aroma of freshly baked pizzas fill the air. Your backyard pizza oven will be the center of attention and a source of endless enjoyment for years to come.
Enjoy every moment of your pizza-making journey and savor the delicious results!