Home>Gardening Techniques>Plant Care>How To Propogate Herbs
Plant Care
How To Propogate Herbs
Modified: February 9, 2024
Learn the best plant care techniques and step-by-step instructions on how to propagate herbs successfully. Discover the secrets to growing healthy and abundant herb plants at home.
(Many of the links in this article redirect to a specific reviewed product. Your purchase of these products through affiliate links helps to generate commission for Chicagolandgardening.com, at no extra cost. Learn more)
Table of Contents
- Introduction
- Understanding Herb Propagation
- Choosing the Right Method for Herb Propagation
- Propagating Herbs from Seeds
- Propagating Herbs from Cuttings
- Propagating Herbs through Division
- Propagating Herbs through Layering
- Propagating Herbs through Grafting
- Caring for Newly Propagated Herb Plants
- Common Mistakes to Avoid in Herb Propagation
- Conclusion
Introduction
Welcome to the world of herb propagation! Whether you’re an experienced gardener or just starting out, learning how to propagate herbs is a valuable skill that will allow you to expand your herb garden and save money by growing your own plants from scratch.
Propagation is the process of producing new plants from existing ones. It’s a cost-effective way to grow a wide variety of herbs, and it can be a rewarding and enjoyable experience. By propagating herbs, you can not only increase your plant collection but also share your favorite herbs with friends and family.
There are several different methods of herb propagation, each with its unique advantages and challenges. From seeds to cuttings, division to layering, and even grafting, there is a propagation method suitable for every herb and every gardener’s preference.
In this article, we will explore the various methods of herb propagation and provide you with step-by-step instructions to help you successfully propagate your favorite herbs. We will also discuss essential care tips for newly propagated herb plants and highlight common mistakes to avoid.
Whether you’re interested in growing herbs for culinary purposes, medicinal benefits, or simply for their aromatic beauty, this article will serve as a comprehensive guide to help you nurture and expand your herb garden.
So, let’s dive into the world of herb propagation and discover the wonderful journey of creating new plant life from the comfort of your own home or garden!
Understanding Herb Propagation
Before we delve into the methods of herb propagation, it’s important to understand the basic principles behind this process. Herb propagation is essentially the reproduction of herbs, creating new plants that are genetically identical to the parent plant.
One of the key concepts in herb propagation is that plants have the ability to regenerate and reproduce through various means. They have specific tissues, such as meristems, that are responsible for cell division and growth. These tissues allow plants to generate new shoots, roots, or even entire plants.
There are different ways in which plants naturally propagate themselves, including through seeds, cuttings, division, layering, and grafting. Understanding these methods will help you determine which one is best suited for a particular herb. Let’s take a closer look at each method:
- Seeds: Seeds are the most common and well-known method of herb propagation. By collecting seeds from mature herbs, you can grow new plants that exhibit the same characteristics as the parent plant. This method allows for genetic diversity and can be an exciting way to experiment with different varieties of herbs.
- Cuttings: Propagating herbs from cuttings involves taking a small piece of the parent plant, typically a stem or leaf, and encouraging it to develop roots and grow into a new plant. This method is particularly useful when you want to replicate specific traits of an herb, as the new plant will be an exact clone of the parent plant.
- Division: Division is a method commonly used for perennial herbs that grow in clumps or have multiple stems. It involves carefully separating the herb into smaller sections, each with its own set of roots and stem. This allows you to create multiple plants from a single plant, which can then be replanted and grown separately.
- Layering: Layering is a technique where a branch or stem of the parent plant is bent and buried in soil or a growing medium while it is still attached to the main plant. Over time, roots will form along the buried section, and a new plant can be detached and grown independently.
- Grafting: Grafting is a more advanced method of herb propagation that involves joining the tissue of two different plants (the scion and the rootstock) to create a single, hybrid plant. This technique is often used to combine the desirable traits of one plant with the strong root system of another.
By understanding the different methods of herb propagation, you can choose the most appropriate technique for the specific herb you want to propagate. Some methods may be more suitable for certain herbs, while others may require a combination of methods to achieve the desired results.
Now that we have a solid understanding of the basics of herb propagation, let’s explore each method in more detail and learn how to successfully propagate herbs from seeds, cuttings, division, layering, and grafting.
Choosing the Right Method for Herb Propagation
When it comes to propagating herbs, choosing the right method is crucial for the success of your propagation efforts. Each method has its own advantages and challenges, and selecting the appropriate technique will depend on factors such as the type of herb, availability of plant materials, and your own level of experience and resources. Let’s explore some key considerations to help you decide:
- Herb Type: Different herbs have varying preferences for propagation methods. For example, herbs with woody stems, like rosemary or lavender, are often propagated through cuttings. On the other hand, herbs like basil or dill are easily propagated from seeds. Understanding the preferred propagation method for each herb will guide you in making the right choice.
- Availability of Plant Materials: Some propagation methods require specific plant parts, such as stems or leaves, while others rely on seeds or divisions. Assess the availability of plant materials you have access to. If you have healthy, mature plants with suitable stems for cuttings, then that method might be the best option for you. If you have access to high-quality seeds, then propagating from seeds might be a viable choice.
- Time and Resources: Consider the time and resources required for each propagation method. Propagating herbs from seeds, for example, can be a longer process compared to taking cuttings or dividing plants. If you have limited time and want quicker results, methods like cuttings or division might be more suitable.
- Difficulty Level: Different propagation methods vary in difficulty. Some methods, such as taking cuttings or collecting seeds, are relatively easy and can be done by beginners. On the other hand, methods like grafting or layering require more advanced skills and techniques. Assess your level of experience and comfort with each method to choose one that matches your skill level.
- Desired Plant Characteristics: Consider the specific characteristics you want to preserve in the propagated plants. If you want to maintain the exact traits of the parent plant, methods like cuttings or grafting are ideal as they create clones. However, if you’re open to variation and eager to explore new varieties, propagating from seeds might be a better choice.
By considering these factors, you can make an informed decision on the most suitable propagation method for your herb. Remember, there is no one-size-fits-all approach, and experimentation is part of the joy of herb propagation. Don’t be afraid to try different methods and explore what works best for you and your herbs.
In the next sections, we will dive into the step-by-step processes for each propagation method, providing you with detailed instructions on propagating herbs from seeds, cuttings, division, layering, and grafting. Whether you’re a seasoned gardener or a beginner, there’s a method for everyone to successfully propagate herbs and expand their herb garden.
Propagating Herbs from Seeds
Propagating herbs from seeds is one of the most common and accessible methods. It allows you to grow a wide variety of herbs and experiment with different cultivars. Here is a step-by-step guide to successfully propagate herbs from seeds:
- Seed Selection: Start by selecting high-quality seeds from a reputable supplier or save seeds from mature herb plants in your garden. Look for seeds that are fresh, viable, and specific to the herb variety you wish to propagate.
- Preparing the Growing Medium: Fill a seed tray or small pots with a well-draining potting mix. Alternatively, you can create your own mix by combining equal parts of potting soil, perlite, and vermiculite.
- Seed Sowing: Follow the recommended sowing depth and spacing for the specific herb you are propagating. Generally, the rule of thumb is to sow seeds at a depth of two to three times their size and space them according to their eventual size.
- Watering: Gently water the seeds, ensuring that the soil is evenly moist but not waterlogged. Avoid overwatering, as it can lead to rotting of the seeds or damping off of the seedlings.
- Providing Optimal Conditions: Place the seed tray or pots in a warm and well-lit area, such as a sunny windowsill or a greenhouse. Herbs generally require temperatures of around 70 to 75°F (21 to 24°C) for germination. Provide consistent moisture and ensure good air circulation to prevent fungal diseases.
- Germination: Be patient, as germination times can vary depending on the herb. Some herbs may sprout within a week, while others may take several weeks. Keep the soil moist during this period and avoid disturbing the seeds or young seedlings.
- Thinning and Transplanting: Once the seedlings have developed their first set of true leaves, thin them out if they are overcrowded. Allow only the strongest and healthiest seedlings to remain in the tray or pots. Transplant the seedlings into larger containers or directly into the garden when they have grown to a suitable size.
- Caring for Seedlings: Provide the seedlings with adequate sunlight, water, and nutrition. Gradually acclimate them to outdoor conditions if you plan to plant them in the garden. Protect young seedlings from extreme weather conditions and pests.
- Harvesting and Enjoying: As your herb plants mature, you can start harvesting leaves, flowers, or seeds depending on the herb. Enjoy the flavors and aromas of your homegrown herbs in your cooking, teas, or herbal remedies.
Remember that not all herbs are easily propagated from seeds. Some herbs, like mint or lemon balm, have a tendency to spread rapidly and may be best propagated through other methods to control their growth.
By following these steps and providing the necessary care, you can enjoy the satisfaction of growing herbs from seeds and expanding your herb garden with a diverse array of flavors, aromas, and textures.
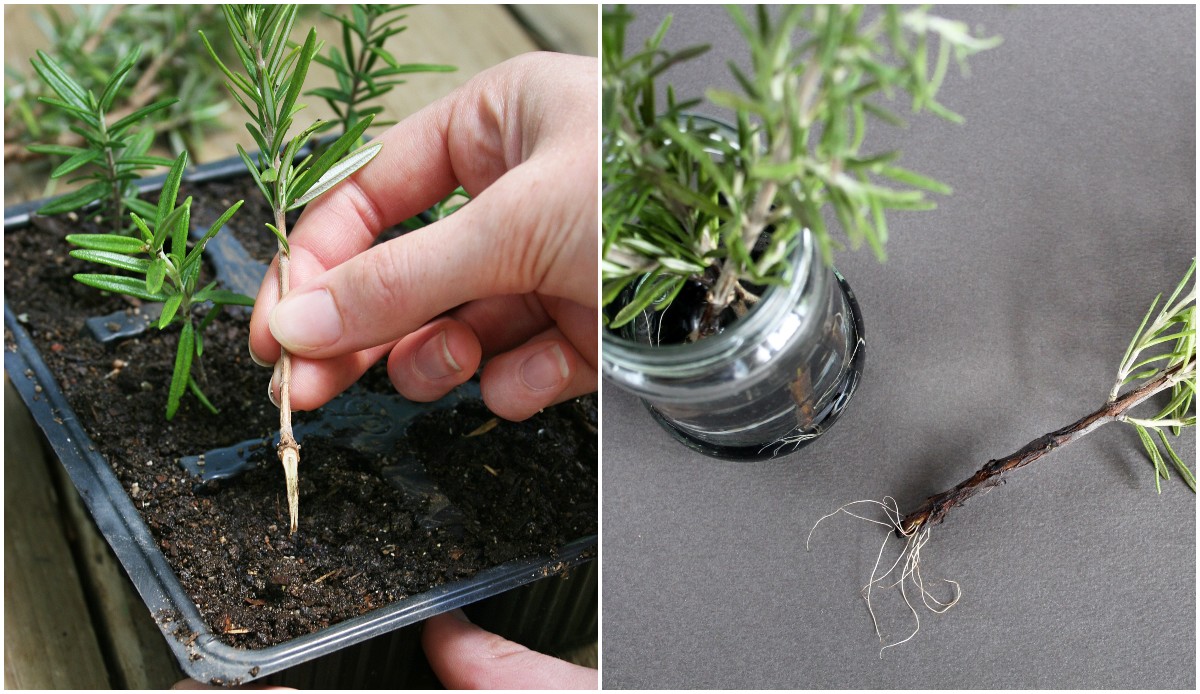
Propagating Herbs from Cuttings
Propagating herbs from cuttings is a popular method that allows you to create exact clones of your favorite herb plants. This method is particularly useful when you want to replicate specific traits or characteristics of an herb. Here is a step-by-step guide to successfully propagate herbs from cuttings:
- Choosing the Right Stem: Select a healthy and mature herb plant from which to take your cuttings. Look for stems that are firm and have not yet started flowering. Ideally, choose stems that are 3-6 inches (7-15 cm) long.
- Preparing the Cuttings: Use sharp and clean pruning shears to make a clean cut just below a node (the point where a leaf or bud emerges) on the selected stem. Remove any lower leaves, leaving a few leaves intact on the upper part of the cutting.
- Rooting Hormone (optional): If desired, you can dip the cut end of the stem into a rooting hormone powder or gel. This can help stimulate root growth and increase the chances of successful rooting.
- Planting the Cuttings: Fill a small pot or container with a well-draining potting mix. Create holes in the soil using a pencil or finger, and gently insert the cut ends of the herb cuttings into the holes, ensuring that at least one node is below the soil surface.
- Watering: Water the potting mix thoroughly after planting the cuttings. Ensure that the soil is evenly moist but not soggy. Mist the leaves with water to maintain humidity and prevent wilting.
- Providing Optimal Conditions: Place the pot with the cuttings in a warm and well-lit location without direct sunlight. A temperature of around 70-75°F (21-24°C) is ideal for rooting. Maintain high humidity levels by covering the pot with a clear plastic bag or using a propagator.
- Root Development: Be patient, as it can take several weeks for the cuttings to develop roots. Avoid disturbing the cuttings during this period and keep the soil moist. With time, you will notice the development of new roots.
- Transplanting: Once the cuttings have established a strong root system, usually indicated by visible root growth through the drainage holes or by gently tugging on the stem to feel resistance, they can be transplanted into larger pots or directly into the garden.
- Caring for the New Plants: Provide the newly propagated herb plants with good care, including regular watering, appropriate sunlight, and protection from extreme weather conditions. Gradually harden off the plants if transplanting them outdoors, allowing them to adjust to outdoor conditions before planting.
- Enjoying the Propagated Herbs: As the new plants grow and thrive, you can begin harvesting leaves or using the herbs in your culinary creations, teas, or herbal remedies. Revel in the satisfaction of successfully propagating herbs from cuttings and expanding your herb garden.
Propagation from cuttings is a reliable and efficient method for many herbs, such as rosemary, thyme, and sage. It allows you to preserve the specific characteristics of the parent plant and enjoy the flavors and aromas of your favorite herbs in abundance.
Now that you have learned how to propagate herbs from cuttings, you can easily create an endless supply of herbs to enhance your cooking and bring beauty and fragrance to your garden.
Propagating Herbs through Division
Propagating herbs through division is a simple and effective method, especially for perennial herbs that grow in clumps or have multiple stems. By dividing these plants, you can create new herb plants and increase the size of your herb garden. Here is a step-by-step guide to successfully propagate herbs through division:
- Choosing the Right Time: Spring or early fall is generally the best time to divide herb plants. Avoid dividing plants during extreme weather conditions or when they are actively flowering.
- Preparing the Plant: Start by watering the herb plant thoroughly a day or two before dividing. This helps to hydrate the roots and make the division process easier.
- Removing the Plant: Gently dig around the plant, slightly away from the center, using a garden fork or spade. Lift the entire plant out of the ground, taking care to keep the root ball intact.
- Dividing the Plant: With a sharp knife or garden shears, divide the root ball into smaller sections. Each division should have its own set of roots and stems. If the plant has tough, woody stems, you may need to use a saw or pruning saw.
- Trimming: Inspect the divisions and remove any damaged or overcrowded roots. Trim back the foliage by about one-third to reduce stress on the newly divided plants.
- Planting the Divisions: Replant the divisions in their desired locations, spacing them appropriately. Dig a hole wide and deep enough to accommodate the root system comfortably. Place the division in the hole, making sure that the crown (where the roots meet the stem) is level with or slightly above the soil surface.
- Backfilling and Watering: Fill the hole with soil and gently firm it around the roots. Water the newly divided plants thoroughly to settle the soil and eliminate any air pockets. Keep the soil consistently moist during the establishment period.
- Caring for the New Plants: Provide the newly propagated herb plants with appropriate sunlight, water, and nutrition. Protect them from extreme weather conditions, and avoid disturbing the freshly divided plants for a few weeks to allow them to establish their root systems.
- Enjoying the Propagated Herbs: As the new plants grow and flourish, you can start harvesting leaves or utilizing the herbs for culinary purposes, teas, or herbal remedies. Revel in the satisfaction of successfully propagating herbs through division and watching your herb garden expand.
Propagation through division is an excellent way to rejuvenate overgrown herb plants, control their spread, and create more plants to enjoy. It also allows you to share your divided herb plants with friends and family, spreading the joy of gardening and the culinary delights of fresh herbs.
Now that you have learned how to propagate herbs through division, you can confidently divide your herb plants and continue to expand your herb garden with ease.
Propagating Herbs through Layering
Propagating herbs through layering is a simple and effective technique that allows you to create new plants from existing ones without needing to sever or detach any parts. This method is ideal for herb plants with flexible stems that can be easily bent and buried. Here is a step-by-step guide to successfully propagate herbs through layering:
- Selecting a Suitable Stem: Choose a healthy and flexible stem from the parent herb plant. Look for a stem that is not too rigid or too woody, as it needs to be bendable enough to be buried in the soil. The chosen stem should have nodes, where leaves or buds emerge.
- Preparation and Positioning: Gently wound the selected stem by removing a small section of bark or making a shallow vertical slit just below a node. This will encourage the development of roots at the wounded area. Bury the wounded section of the stem in a small hole in the soil, leaving the remaining portion of the stem above the ground.
- Positioning and Support: Secure the buried section of the stem in place by covering it with soil or using a peg or a small stake to hold it down. Ensure that the portion of the stem left above the ground is held upright and supported by surrounding foliage or a small stake, if necessary.
- Watering and Patience: Water the soil thoroughly to keep it consistently moist, but not overly soggy. Monitor the moisture level regularly and water as needed. Be patient, as it may take several weeks or months for roots to develop from the buried section of the stem.
- New Plant Formation: After a sufficient period of time, carefully check the buried section of the stem. Look for signs of root development, such as emerging roots or resistance when gently tugging on the stem. Once roots have formed, carefully detach the new plant from the parent plant by severing it just below the rooted section.
- Transplanting and Care: Transplant the newly rooted plant into a larger container or directly into the garden. Provide the young plant with appropriate sunlight, water, and protection from harsh weather conditions. Monitor its growth and continue to care for it as you would with any other herb plant.
- Enjoying the Propagated Herbs: As the newly propagated herb plant grows and thrives, you can start enjoying its flavors, aromas, and beauty in your cooking, teas, or herbal remedies. Appreciate the satisfaction of successfully propagating herbs through layering and expanding your herb garden.
Propagation through layering offers a simple and hands-on approach to creating new herb plants without the need for special tools or complex techniques. It is a great method for propagating herbs with flexible stems, such as thyme, mint, or oregano.
Now that you have learned how to propagate herbs through layering, you can confidently experiment with this technique to expand your herb garden and enjoy the abundance of fresh herbs at your fingertips.
Propagating Herbs through Grafting
Propagating herbs through grafting is a more advanced technique that involves joining the tissues of two different plants to create a single, hybrid plant. This method is particularly useful when you want to combine the desirable traits of one herb, such as the flavor or disease resistance, with the strong root system of another herb. Here is a step-by-step guide to successfully propagate herbs through grafting:
- Selecting the Scion and Rootstock: Choose a healthy and desirable herb plant as the scion, which will provide the upper part of the grafted plant. Select another herb plant with a robust root system as the rootstock, which will provide the lower part, including the root system.
- Preparing the Scion: Take a cutting from the scion plant, ensuring it contains at least one bud or node. Trim the leaves from the lower portion of the cutting, leaving a few leaves at the top to facilitate photosynthesis.
- Preparing the Rootstock: Cut the rootstock plant at the desired height, just above the ground level. Trim away any excess branches or foliage that could interfere with the grafting process.
- Grafting the Scion onto the Rootstock: Make a slanted or V-shaped cut on the rootstock, ensuring it matches the size and shape of the scion’s cut end. Join the cut surfaces of the scion and rootstock together and secure them with grafting tape or a grafting clip. Take care to align the vascular cambium layers, which are responsible for the transportation of nutrients and water between the scion and rootstock.
- Protecting the Graft: Wrap the grafted area with a grafting compound or wax to prevent desiccation and minimize the risk of infection or diseases. This protective layer will safeguard the delicate tissues during the healing process.
- Providing Optimal Conditions: Place the grafted herb plant in a warm and humid environment, such as a greenhouse, to promote healing and encourage the fusion of the scion and rootstock. Maintain consistent moisture levels and provide suitable lighting conditions for proper growth.
- Gradual Adjustment: After the graft has successfully healed and new growth appears, gradually expose the grafted plant to outdoor conditions. Harden it off by increasing exposure to sunlight, reducing humidity levels, and acclimating it to fluctuating temperatures.
- Caring for the Grafted Plant: Provide the grafted plant with regular care, including watering, fertilizing, pruning, and protection from pests and diseases. Monitor its growth and maintain proper maintenance to ensure healthy development.
- Enjoying the Grafted Herbs: Celebrate the successful grafting process and enjoy the benefits of your newly created herb plant. Appreciate the unique combination of characteristics that the grafted herb provides, whether it be enhanced flavors, increased disease resistance, or improved vigor.
Grafting is a more advanced propagation technique that requires practice and knowledge of the herb species involved. It is commonly used for herbs like rosemary, sage, or thyme, and can yield exciting results by combining the best attributes of different herb plants.
Now that you have learned how to propagate herbs through grafting, you can explore the possibilities of creating unique and customized herb plants that showcase the best qualities of multiple varieties.
Caring for Newly Propagated Herb Plants
After successfully propagating herb plants through various methods, it is crucial to provide proper care to ensure their healthy growth and establishment. Newly propagated herb plants require special attention to help them thrive in their new environment. Here are essential care tips for caring for newly propagated herb plants:
- Watering: Adequate watering is crucial during the establishment phase. Water newly propagated herb plants regularly, keeping the soil evenly moist but not overly saturated. Monitor the moisture levels and adjust watering frequency based on the specific needs of each herb.
- Sunlight: Most herbs require ample sunlight to grow and develop their flavors and aromas. Place the newly propagated plants in a location that receives the appropriate amount of sunlight for their specific requirements. Keep in mind that some herbs, like mint or parsley, tolerate partial shade, while others, like basil or thyme, thrive in full sun.
- Fertilization: Provide nutrients to the newly propagated herb plants to support their growth. Apply a balanced fertilizer according to the instructions on the packaging or incorporate organic matter, such as compost or well-rotted manure, into the soil to enrich it. Be mindful not to over-fertilize, as it can lead to excessive foliage growth at the expense of flavor and aroma.
- Pruning: Regularly prune the newly propagated herb plants to encourage bushy growth and prevent legginess. Pinch off the tips of the stems to promote branching and remove any dead or yellowing leaves. Pruning will also help shape the plants and maintain their overall health and appearance.
- Protection from Pests: Monitor the newly propagated herb plants for any signs of pests or diseases. Inspect the leaves, stems, and soil regularly to catch any issues promptly. Use natural pest control methods, such as handpicking insects or spraying diluted neem oil, to prevent infestations and protect the plants from damage.
- Protection from Extreme Weather: Shield newly propagated herb plants from harsh weather conditions, especially if they were initially grown indoors or in a protected environment. Gradually expose them to outdoor conditions to ensure a smooth transition. Cover the plants with row covers or provide shade during hot summer days to prevent stress or sunburn.
- Support and Staking: Some herb plants, like tomato or pepper, may require support or staking once they start growing taller or producing heavy fruits. Install cages, stakes, or trellises to provide necessary support and prevent the plants from bending or breaking under their own weight.
- Regular Observation and Care: Carefully observe the newly propagated herb plants for any signs of distress or nutrient deficiencies. Look for yellowing leaves, stunted growth, or leaf discoloration, which may indicate a need for adjustments in watering, fertilization, or sunlight exposure. Give your plants regular attention and provide care accordingly.
By following these care tips, you can ensure the successful establishment and continued growth of your newly propagated herb plants. With proper watering, sunlight, nourishment, and protection, these plants will flourish and reward you with fresh, vibrant herbs for all your culinary or therapeutic needs.
Common Mistakes to Avoid in Herb Propagation
While herb propagation can be a rewarding and enjoyable process, there are certain common mistakes that can hinder the success of your propagation efforts. Being aware of these mistakes can help you avoid them and achieve better results. Here are some common mistakes to avoid in herb propagation:
- Using Poor Quality Seeds: Starting with low-quality or old seeds can significantly lower the chances of successful germination. Always choose fresh, viable seeds from reputable suppliers or save seeds from healthy, mature herb plants in your garden.
- Overwatering or Underwatering: Proper watering is crucial for the health of newly propagated herb plants. Avoid overwatering, which can lead to root rot and fungal diseases, as well as underwatering, which can stunt growth and lead to wilting. Find the right balance and adjust watering based on the specific needs of each herb.
- Skipping Step of Providing Optimal Conditions: Neglecting to provide the right growing conditions, such as appropriate temperature, humidity, and sunlight, can impede the germination, root development, or overall growth of the herb plants. Ensure that you understand the specific requirements of each herb and create an environment that supports their needs.
- Skipping Pruning or Pinching: Pruning or pinching off the tips of the stems is important for promoting branching, compact growth, and overall plant health. Neglecting this step can lead to leggy or straggly plants that are less productive and prone to pests and diseases.
- Ignoring Pest and Disease Prevention: Failing to monitor and address pest or disease issues can quickly devastate your newly propagated herb plants. Regularly inspect the plants for signs of pests or diseases, and take prompt action to prevent the infestation from spreading. Utilize organic pest control methods and maintain good plant hygiene to keep your herbs healthy.
- Transplanting Too Soon or Mishandling Roots: Rushing the process of transplanting newly propagated herb plants or mishandling the delicate roots can cause unnecessary stress and damage. Allow the plants to develop a strong root system before transplanting, and handle the roots gently to avoid any injuries that could impede their growth.
- Overcrowding: Planting the newly propagated herb plants too closely together can lead to competition for resources, poor airflow, and increased risk of diseases. Give each plant sufficient space to grow and spread out, following the recommended spacing guidelines for each herb.
- Not Adjusting Care to Specific Herb Needs: Each herb has unique requirements in terms of sunlight, water, and nutrients. Failing to adjust your care practices to suit the specific needs of each herb can result in poor growth, low yields, or even plant failure. Research and understand the specific care requirements of each herb you are propagating.
- Impatience: Successful herb propagation takes time and patience. Rushing the process or expecting immediate results can lead to disappointment. Remember that each herb has its own timeline for germination, root development, and growth. Be patient, provide consistent care, and allow nature to take its course.
By avoiding these common mistakes in herb propagation and being attentive to the specific needs of each herb, you can greatly increase your chances of success and enjoy a bountiful herb garden filled with healthy, thriving plants.
Conclusion
Congratulations! You have now learned about various methods of propagating herbs, including seed propagation, cutting propagation, division, layering, and grafting. Each method has its own advantages and considerations, allowing you to expand your herb garden and explore the realm of plant propagation.
When propagating herbs, it is crucial to choose the right method based on factors such as herb type, availability of plant materials, time and resources, skill level, and desired characteristics. By understanding these factors and making informed decisions, you can increase your chances of successful propagation.
Additionally, caring for newly propagated herb plants is essential. Pay attention to proper watering, sunlight exposure, fertilization, pruning, and protection from pests and extreme weather conditions. By providing the optimal care, your newly propagated herbs can thrive and provide you with an abundance of flavors, aromas, and beauty.
Lastly, avoid common mistakes in herb propagation, such as using poor quality seeds, overwatering or underwatering, neglecting optimal conditions, skipping pruning or pest prevention, transplanting too soon or mishandling roots, overcrowding, not adjusting care to specific herb needs, and impatience. Being aware of these mistakes and taking appropriate measures can greatly improve your propagation success.
With the knowledge and skills you have gained in herb propagation, you can now confidently expand your herb garden, experiment with different varieties, and share the joy of gardening and the benefits of fresh herbs with friends and family.
So, roll up your sleeves, get your hands dirty, and embark on this rewarding journey of herb propagation. Happy gardening!