Home>Garden Design>Landscape Design>How To Install Landscaping Lights

Landscape Design
How To Install Landscaping Lights
Modified: January 22, 2024
Looking to enhance your landscape design? Learn how to install landscaping lights and illuminate your outdoor space with this easy step-by-step guide.
(Many of the links in this article redirect to a specific reviewed product. Your purchase of these products through affiliate links helps to generate commission for Chicagolandgardening.com, at no extra cost. Learn more)
Table of Contents
- Introduction
- Choosing the Right Lighting Fixtures
- Planning and Designing Your Landscape Lighting
- Preparing Your Yard for Installation
- Selecting the Right Power Source
- Installing the Transformer
- Connecting the Wiring
- Placing and Installing the Light Fixtures
- Testing and Adjusting the Lights
- Maintenance and Troubleshooting Tips
- Conclusion
Introduction
When it comes to enhancing the beauty and functionality of your outdoor space, landscaping lights can make a significant impact. Not only do they illuminate your yard, but they also add a touch of elegance, accentuate key features, and create a welcoming ambiance for you and your guests to enjoy. Whether you want to highlight a stunning garden, create a cozy atmosphere for outdoor entertaining, or increase the security of your property, landscape lighting can help you achieve your goals.
Installing landscaping lights may seem like a daunting task, but with the right guidance and a basic understanding of the process, you can bring your vision to life. In this article, we will guide you through the steps of installing landscape lighting to transform your outdoor space into a visually stunning and functional oasis.
Before you dive in, it’s essential to plan carefully to ensure you achieve the desired effect. Consider the layout of your yard, the architectural features of your home, and the specific areas or elements you want to highlight. Determine whether you prefer a soft and subtle glow or a more dramatic effect with strategically placed lights.
Throughout this guide, we will cover everything from choosing the right lighting fixtures to preparing your yard, selecting the power source, and installing the lights themselves. We’ll even provide maintenance and troubleshooting tips to keep your outdoor lighting system operating smoothly for years to come.
So, if you’re ready to enhance your landscape with stunning lighting, let’s dive in and get started on this exciting DIY project. With a little time and effort, you’ll create a welcoming and enchanting atmosphere where you can relax and enjoy the beauty of your outdoor sanctuary.
Choosing the Right Lighting Fixtures
Selecting the appropriate lighting fixtures is an essential step in installing landscape lighting. The right fixtures can enhance the overall aesthetic appeal of your outdoor space while serving their intended purpose. Here are some factors to consider when choosing the right lighting fixtures for your landscape:
- Functionality: Think about the primary purpose of your landscape lighting. Do you want to illuminate walking paths, highlight architectural features, or create a warm ambiance? Understanding the functionality you require will help you select the right type of fixtures, such as path lights, spotlights, or well lights.
- Style: Consider the overall style and design of your outdoor space. You want your lighting fixtures to complement the existing aesthetic and blend seamlessly with your landscape. For a classic and timeless look, consider fixtures made from materials like bronze or stainless steel. If your style is more modern and contemporary, opt for sleek and minimalist designs.
- Energy Efficiency: In today’s environmentally-conscious world, energy efficiency is a crucial consideration. Look for fixtures that are LED-based, as they are not only energy-efficient but also have a longer lifespan. Additionally, consider fixtures with built-in light sensors or timers to automatically adjust the lighting and save energy.
- Weather Resistance: Since your lighting fixtures will be exposed to the elements, ensure they are durable and weather-resistant. Look for fixtures that are made from corrosion-resistant materials and have proper waterproofing to withstand rain, snow, and other weather conditions.
- Budget: Set a budget for your landscape lighting project and stick to it. Lighting fixtures come in a range of prices, so determine the maximum amount you’re willing to spend and choose fixtures that fit within your budget.
Remember to consider the specific needs of your landscape and the effect you want to achieve. Mixing and matching different types of lighting fixtures can create depth and visual interest in your outdoor space. Consult with a landscape lighting professional or visit a lighting showroom to get a better idea of the available options and to see the fixtures in action.
By taking the time to carefully choose the right lighting fixtures, you’ll ensure that your landscape lighting project not only looks beautiful but also functions effectively for years to come.
Planning and Designing Your Landscape Lighting
Before you start installing your landscape lighting, it’s crucial to plan and design the layout of your lighting system. Proper planning will ensure that your lighting fixtures are strategically placed to highlight key features of your landscape and create the desired effect. Here are some steps to help you plan and design your landscape lighting:
- Assess Your Landscape: Take a close look at your outdoor space during the day and at night to identify the areas or features you want to emphasize. It could be a beautiful tree, a charming flowerbed, or an architectural element of your home. Understanding your landscape’s unique characteristics will guide you in determining the placement and type of lighting fixtures.
- Create a Lighting Plan: Sketch out a lighting plan on paper or use a landscaping design software to visualize your ideas. Mark the areas you want to illuminate and consider how different types of lighting fixtures will work together to achieve the desired effect. Pay attention to the balance of light and shadows and think about creating focal points and layers of illumination.
- Consider Safety and Security: In addition to aesthetics, consider the safety and security aspects of your landscape lighting. Illuminate pathways and stairways to prevent accidents, and strategically place lights near entrances and windows to enhance security.
- Think about Light Temperatures: Different lighting fixtures emit light of varying temperatures, measured in Kelvins. Warmer temperatures (2700K-3000K) create a cozy and intimate atmosphere, while cooler temperatures (4000K-5000K) provide a brighter and more vibrant light. Consider the mood and ambiance you want to create and choose lighting fixtures with the appropriate temperature.
- Avoid Glare: Glare from overly bright fixtures can be unpleasant and detract from the overall effect of your landscape lighting. Opt for fixtures that have proper shielding or utilize techniques like downlighting or moonlighting to minimize glare and create a more natural and inviting atmosphere.
Don’t be afraid to experiment and adjust your lighting plan as you go. It’s often helpful to test lighting fixtures in various positions to see how they cast light and highlight different features. Taking the time to carefully plan and design your landscape lighting will ensure that the end result is visually pleasing and achieves your desired goals.
Once you have a clear lighting plan, you’ll be ready to move on to the next steps of preparing your yard for installation and selecting the right power source for your landscape lighting system.
Preparing Your Yard for Installation
Preparing your yard is a crucial step in the process of installing landscape lighting. This step ensures that your lighting system is installed properly and operates efficiently. Here are some important tasks to tackle when preparing your yard for installation:
- Clean and Clear: Before installing any lighting fixtures, clear your yard of debris, foliage, and other obstacles. Trim any overgrown branches or plants that may obstruct the light or pose a safety hazard. Make sure the area where you plan to install the fixtures is clean and free from any obstructions.
- Map Out the Wiring: Determine the path of the wiring from the transformer to each lighting fixture. Plan the most efficient route, avoiding any areas with existing underground utilities or irrigation systems. Use stakes or markers to mark the path and measure the distance to ensure you have enough wiring to reach each fixture.
- Excavate Trenches: Dig trenches along the marked path to bury the wiring. The depth of the trench should be suitable for the type of wire you are using and should conform to local building codes. Be careful not to damage any existing utilities or irrigation lines while excavating.
- Bury the Wiring: Carefully place the wiring in the trenches, ensuring it is securely positioned and not tangled or exposed. Use wire connectors or waterproof junction boxes to connect the wiring as needed. Fill the trenches with soil, covering the wiring completely.
- Prepare Mounting Surfaces: If you are using surface-mounted fixtures, prepare the mounting surfaces by cleaning them and making sure they are sturdy and flat. This will provide a stable foundation for installing the fixtures and ensure proper alignment.
- Consider Voltage Drop: If you are planning a large or extensive landscape lighting system, consider the voltage drop that may occur over long wire runs. Consult with a professional or use a voltage drop calculator to ensure that the fixtures at the end of the line receive adequate voltage for optimal performance.
Taking the time to properly prepare your yard for installation will help you avoid potential issues and make the installation process smoother. It will also ensure that your landscape lighting system is reliable and long-lasting. Once your yard is prepared, you can move on to selecting the right power source for your lighting system and installing the transformer.
Selecting the Right Power Source
Selecting the right power source for your landscape lighting system is essential to ensure proper functioning and reliability. There are several options to consider when it comes to powering your outdoor lighting. Here are the most common choices:
- Low Voltage: Low voltage lighting systems operate on 12 or 24 volts and are a popular choice for landscape lighting. They are safer to install and operate, as they use a lower voltage than traditional line voltage systems. Low voltage systems usually require a transformer to convert the standard household voltage to the desired low voltage. These systems are energy-efficient and can be easily expanded or modified.
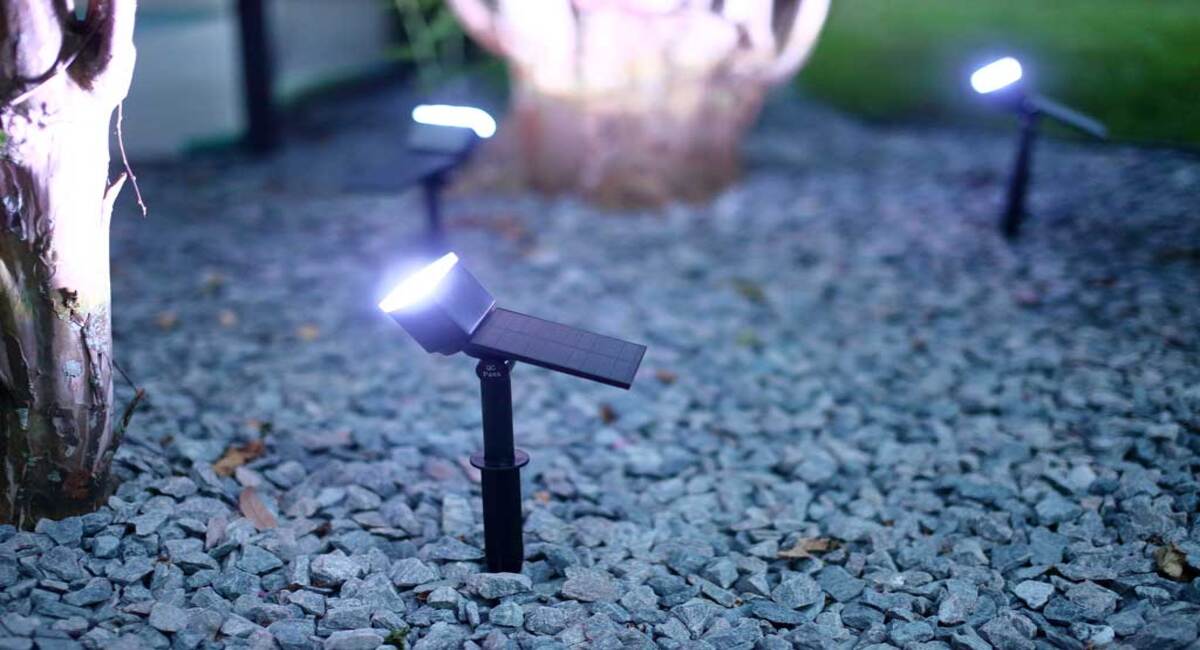
- Solar Powered: Solar-powered landscape lighting systems use the sun’s energy to charge built-in batteries during the day, which then powers the lights at night. They are environmentally friendly and don’t require any wiring or electricity. However, they may have limited brightness and reliability, as they depend on the amount of sunlight received and the capacity of the batteries. Solar-powered lights are ideal for areas with ample sunlight and for those looking for a more sustainable lighting option.
- Line Voltage: Line voltage lighting systems operate on the standard household voltage of 120 to 240 volts. They offer high brightness and are suitable for large outdoor spaces or areas that require intense illumination. Line voltage systems are generally more expensive to install and require a licensed electrician to handle the high voltage wiring. Safety precautions must be followed, including burying wires deeper and using conduit to protect the wiring.
When selecting the right power source, consider your specific needs, budget, and the complexity of your landscape lighting design. Low voltage systems are often the most practical choice for most homeowners, providing a good balance between safety, flexibility, and ease of installation and maintenance. Solar-powered options are excellent for remote areas and those seeking an eco-friendly solution. Line voltage systems are best suited for large-scale installations or when high-intensity lighting is required.
Once you’ve determined the power source that aligns with your needs, you can proceed with installing the transformer, which is an essential component for low voltage and line voltage systems. The transformer converts the power to the appropriate voltage, ensuring the safe and efficient operation of your landscape lighting system.
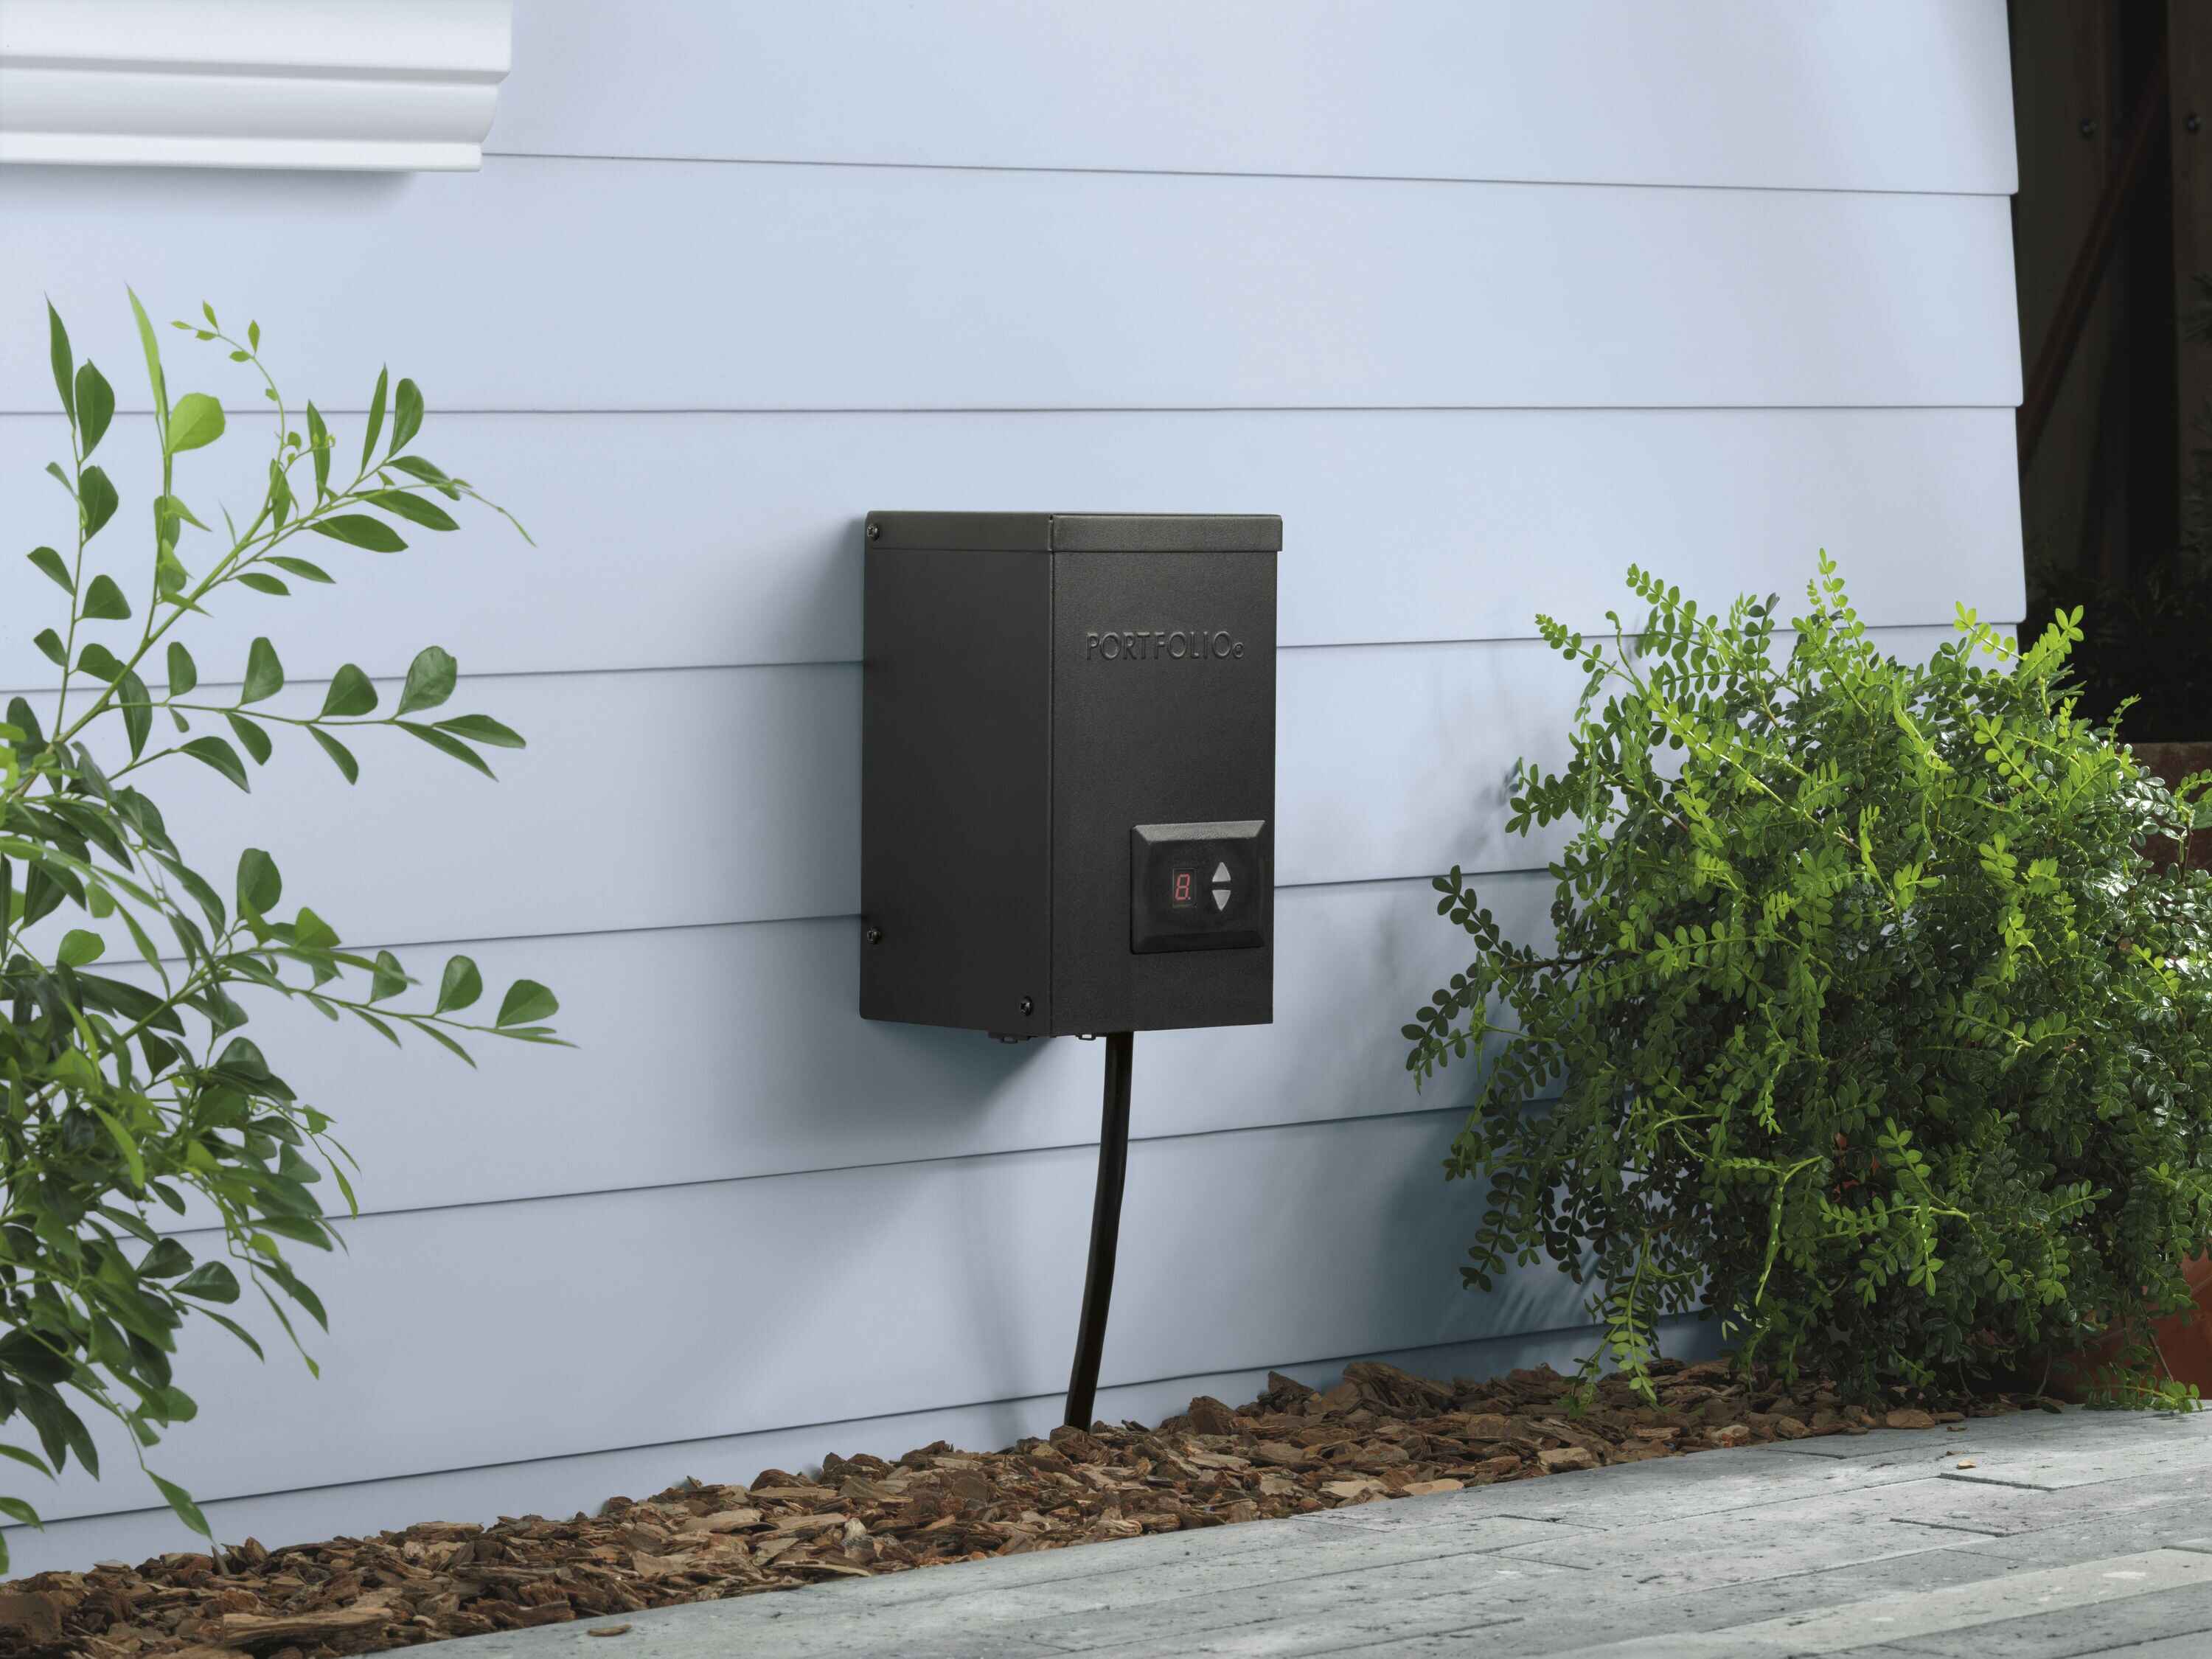
Installing the Transformer
The transformer is a vital component of your landscape lighting system, particularly for low voltage and line voltage systems. It plays a crucial role in converting the standard household voltage to the appropriate voltage required for your lighting fixtures. Here’s a step-by-step guide to installing the transformer:
- Choose a Suitable Location: Select a spot near a power source or electrical outlet where you can install the transformer. It should be easily accessible and protected from harsh weather conditions.
- Mounting the Transformer: Although transformers can be mounted on a wall or a post, it’s important to consult the manufacturer’s instructions for specific installation guidelines. Ensure that the mounting surface is sturdy and level to support the weight of the transformer.
- Wiring Connection: Carefully read the manufacturer’s instructions for wiring connections and follow them precisely. Disconnect the power supply before making any electrical connections. Connect the supply wires from the power source to the appropriate terminals on the transformer, ensuring that the wiring is secure.
- Grounding: Proper grounding is essential for safety in any electrical installation. Follow the manufacturer’s instructions to connect the grounding wire to the transformer and ensure it is securely grounded according to local electrical codes.
- Testing: Once the wiring is complete, restore the power supply and test the transformer to ensure it is functioning correctly. Use a multimeter to verify that the output voltage is within the specified range. If everything checks out, proceed to the next step.
- Timer or Photocell Installation: If your transformer has a built-in timer or photocell, you may want to install them at this stage. Follow the manufacturer’s instructions to set the timer or adjust the sensitivity of the photocell to control the operation of your landscape lighting system.
- Secure the Wiring: Once the transformer is installed and tested, secure the wiring using appropriate clips or clamps to keep it organized and protected.
- Transformer Cover: If your transformer has a cover, ensure that it is properly installed to protect it from the elements and ensure longevity.
It’s crucial to consult the manufacturer’s instructions specific to your transformer model to ensure proper installation and operation. If you’re unsure about any aspect of the installation process, it’s recommended to seek the assistance of a professional electrician or a landscaping professional who has experience with lighting installations.
With the transformer installed and functioning correctly, you are now ready to move on to connecting the wiring and installing the light fixtures throughout your landscape.
Connecting the Wiring
Connecting the wiring is a crucial step in the installation of your landscape lighting system. Properly connecting the wires ensures that the current flows smoothly and reaches each lighting fixture. Here’s a step-by-step guide to connecting the wiring:
- Identify and Prepare the Wiring: Identify the main wiring coming from the transformer and the individual wires leading to each lighting fixture. Ensure that the wires are free from any damage or cuts. If needed, trim the wires to the appropriate length, leaving enough slack for easy connection.
- Strip the Wires: Use wire strippers to carefully remove the insulation from the ends of the wires, exposing a sufficient length of bare wire for a secure connection.
- Connect the Wires: Use waterproof wire connectors or twist-on wire connectors to join the wires together. Align the exposed sections of the wires and twist the connectors clockwise until they are tight and secure. Make sure there is good contact between the wires to ensure a proper connection.
- Waterproofing the Connections: Protect the connected wires by applying silicone-filled wire nuts or heat shrink tubing over the wire connections. This step helps to prevent moisture from entering the connections and causing damage. Use electrical tape to secure the waterproofing materials in place.
- Bury the Wiring: If you have overhead wiring, secure it to posts or other structures using clips or clamps. For underground wiring, bury it in a trench, ensuring that it is deep enough to meet local codes and regulations. Fill the trench with soil, ensuring the wiring is fully covered and protected.
- Test the Connections: Before proceeding further, it is essential to test the connections to ensure they are secure and the system is functioning correctly. Restore the power supply and use a voltmeter to check the voltage at each connection point.
- Secure and Organize the Wiring: Once the connections are tested and confirmed, secure the wiring along its path using clips or straps to keep it organized and protect it from any potential damage.
It is crucial to follow electrical codes and guidelines during the wiring connection process. If you are uncertain about any step or aspect of the wiring connection, it is strongly advisable to consult with a professional electrician who can ensure a safe and proper installation.
With the wiring successfully connected, you are now ready to move forward with placing and installing the light fixtures in your landscape.
Placing and Installing the Light Fixtures
Placing and installing the light fixtures is the exciting stage of your landscape lighting project. Proper placement and installation of the fixtures will ensure that they illuminate your desired areas effectively and enhance the overall aesthetic appeal of your outdoor space. Follow these steps to place and install your light fixtures:
- Refer to Your Lighting Plan: Review your lighting plan and refer to the marked areas to determine the exact placement of each light fixture. Consider the angle and direction of the light to achieve the desired effect.
- Position the Fixtures: Place each fixture in the designated spot, ensuring that it is securely positioned and aligned correctly. Make any necessary adjustments to achieve your desired lighting effect.
- Mounting Options: Depending on the type of fixtures you have chosen, there are different mounting options available, such as stakes, mounts, or brackets. Follow the manufacturer’s instructions to properly install and secure each fixture.
- Wiring Connections: Connect the low voltage wiring from the transformer to each light fixture. Ensure that the connections are tight and secure, using waterproof connectors or other recommended methods.
- Protection and Imbedding: If required, protect and bury the wiring utilized for above-ground fixtures by using conduit or protective covers. Ensure the wiring is buried at the proper depth according to local electrical codes and regulations.
- Proper Angles and Levels: Ensure that each fixture is aimed at the desired area and positioned at the correct angle for optimal illumination. Use a level and adjustability features on the fixture to ensure it is straight and aligned properly.
- Test the Lights: Once all fixtures are installed, restore the power supply and test each light to confirm that it is working as expected. Make any necessary adjustments to achieve the desired lighting effect.
- Secure the Fixtures: Securely tighten any screws or fittings on the fixtures to ensure they are stable and fixed in place. This will minimize any potential for movement or damage due to weather or other external factors.
Take your time during this stage to ensure that each light fixture is positioned correctly and installed securely. Step back and assess the overall effect as you go, making any adjustments necessary to achieve your desired lighting design.
With the light fixtures successfully placed and installed, the next step is to test and adjust the lights to ensure they create the desired ambiance and effect in your outdoor space.
Testing and Adjusting the Lights
Testing and adjusting the lights is a crucial step in the installation of your landscape lighting system. This stage allows you to ensure that the lights are functioning correctly and create the desired effect in your outdoor space. Follow these steps to test and adjust your lights:
- Turn On the Power: Restore power to the landscape lighting system by turning on the appropriate switch or breaker.
- Observe the Lighting Effect: Step back and observe the lighting effect in your outdoor space. Pay attention to the intensity, direction, and coverage of light. Take note of any areas that may need more or less illumination.
- Make Adjustments: Based on your observations, make any necessary adjustments to the positioning and direction of the lights. Tilt and rotate the fixtures as needed to achieve the desired lighting effect.
- Create Focal Points: Consider the focal points in your landscape and adjust the lights accordingly. Highlight architectural features, plants, or sculptures to create visual interest and a focal point in your outdoor space.
- Add Ambiance: Experiment with different lighting intensities and warm or cool tones to create the desired ambiance. Adjust the lighting levels and colors to set the mood and enhance the atmosphere.
- Test Different Times of the Day: Observe the lighting effect during different times of the day to see how it changes with natural light. Adjust the lighting accordingly to ensure it complements the natural surroundings and creates a cohesive look.
- Consider Lighting Zones: Create different lighting zones within your outdoor space to accommodate different activities and moods. For instance, brighter lighting near seating areas and dimmer lighting in garden areas.
- Inspect for Glare: Regularly inspect the lights for glare and make necessary adjustments. Use glare shields, lenses, or repositioning to minimize glare and create a more comfortable lighting experience.
Take your time during the testing and adjustment process to ensure that the lights are positioned correctly and create the desired lighting effect. Experiment with different settings and angles to find the perfect balance of light and shadow in your outdoor space.
By testing and adjusting the lights, you can fine-tune your landscape lighting system to truly transform your outdoor space into a visually stunning and inviting oasis.
Maintenance and Troubleshooting Tips
Proper maintenance of your landscape lighting system is essential to ensure its longevity and optimal performance. Regular upkeep and troubleshooting can help you address any issues promptly and keep your lights shining beautifully. Here are some valuable maintenance and troubleshooting tips to keep in mind:
- Clean the Light Fixtures: Regularly clean the light fixtures to remove any dirt, debris, or buildup that may affect the quality of the light. Use a mild detergent and a soft cloth to gently wipe the fixtures, ensuring the power is turned off before cleaning.
- Inspect and Replace Bulbs: Periodically inspect the bulbs and replace any that are burnt out or not functioning properly. Use bulbs specifically designed for outdoor use and check the wattage to ensure compatibility.
- Check and Secure Wiring Connections: Regularly inspect the wiring connections to ensure they are tight and secure. Loose connections can lead to flickering lights or interruptions in the power supply. If necessary, rewire or resecure the connections as needed.
- Trim Surrounding Vegetation: Trim any overgrown plants or trees that may obstruct the light fixtures or create shadows where you don’t want them. This will help maintain the desired lighting effect and prevent potential damage to the fixtures.
- Inspect for Damage: Routinely inspect the light fixtures, wiring, and transformer for any signs of damage or wear. Look for cracks, rust, exposed wiring, or other issues that may compromise the safety or functionality of the system. Address any damage promptly to avoid further problems.
- Adjust Lighting Angles: Over time, fixtures may shift or become misaligned. Regularly check and readjust the lighting angles to maintain the desired illumination and ensure proper coverage of your outdoor space.
- Address Dimming or Flickering Lights: If you notice dimming or flickering lights, check the transformer and wiring connections. Ensure the transformer is properly sized for the load and that the connections are secure. If the issue persists, consult with a professional electrician to identify and resolve the problem.
- Consider Seasonal Adjustments: Depending on the changing seasons and foliage growth, you may need to make adjustments to the lighting. Trim or relocate fixtures to accommodate new growth and maintain the desired lighting effect.
- Consult a Professional: If you encounter any major issues or are unsure about troubleshooting steps, it’s always wise to consult a professional landscape lighting specialist or electrician who can provide expert guidance and assistance.
By following these maintenance and troubleshooting tips, you can keep your landscape lighting system in top condition and enjoy its beauty and functionality for years to come. Regular upkeep and prompt troubleshooting will help you address any issues and ensure that your outdoor space remains illuminated and inviting.
Conclusion
Installing landscape lighting can transform your outdoor space into a stunning and functional paradise. By following the steps outlined in this guide, you can successfully install a landscape lighting system that enhances the beauty of your yard and provides a warm and inviting ambiance.
Choosing the right lighting fixtures, planning and designing the layout, preparing your yard for installation, selecting the appropriate power source, and connecting the wiring are all vital steps in the process. Remember to test and adjust the lights to achieve the desired effect and maintain the system regularly to ensure its longevity and optimal performance.
Whether you want to highlight specific features, create an inviting atmosphere for outdoor gatherings, or enhance the safety and security of your property, landscape lighting offers a myriad of benefits. It adds depth, visual interest, and a touch of elegance to your outdoor space, allowing you to enjoy the beauty of your landscapes day or night.
While installing landscape lighting is a DIY project that requires careful planning and execution, consulting with professionals, such as landscape lighting specialists or electricians, can provide valuable guidance and assistance if needed.
Now that you have the knowledge and tools to install your landscape lighting system, bring your vision to life and create an outdoor oasis that showcases the beauty and functionality of your outdoor space. With a little effort and creativity, you’ll enjoy the enchanting glow of your landscape lighting for years to come.