Home>Garden Design>Landscape Design>How To Move Landscaping Rocks


Landscape Design
How To Move Landscaping Rocks
Modified: January 22, 2024
Learn how to efficiently move landscaping rocks with expert tips and techniques for a flawless landscape design.
(Many of the links in this article redirect to a specific reviewed product. Your purchase of these products through affiliate links helps to generate commission for Chicagolandgardening.com, at no extra cost. Learn more)
Table of Contents
Introduction
Landscaping rocks can add a touch of elegance and natural beauty to any outdoor space. Whether you’re looking to create a stunning garden feature or simply want to add some dimension to your yard, knowing how to move landscaping rocks is essential. However, moving these heavy objects requires careful planning and the right tools. In this article, we will guide you through the steps to successfully move landscaping rocks and transform your outdoor space.
Moving landscaping rocks may seem like a daunting task, but with the right approach and tools, it can be accomplished efficiently and safely. Whether you’re relocating the rocks within your garden or transporting them to a different area, proper preparation and technique are crucial.
Before you begin the process of moving landscaping rocks, it’s important to gather the necessary equipment and tools. These can include a sturdy wheelbarrow, lifting straps or slings, shovels, a dolly or hand truck, safety goggles, work gloves, and a measuring tape. Ensuring you have the right tools on hand will make the task easier and more manageable.
Next, you’ll need to assess the area where the rocks are currently located and mark the new location where you want to place them. This will help you determine the best route for moving the rocks and ensure they are positioned exactly as you envision in the new area. Take measurements and consider any landscape design plans you have in mind.
Once the area is assessed and marked, it’s time to clear the surrounding space. Remove any plants, debris, or other obstacles that may hinder the smooth transportation of the rocks. Clearing the area will also help prevent any damage to the surrounding vegetation or structures during the moving process.
With the area cleared, it’s time to begin the actual process of lifting and moving the rocks. This can be physically demanding, so it’s important to use proper lifting techniques and ask for assistance if needed. Utilize lifting straps or slings to secure the rocks and distribute the weight evenly, reducing the risk of injury or strain.
Equipment and Tools Needed
Before you start moving landscaping rocks, it’s essential to gather the necessary equipment and tools. Having the right tools will make the process easier and more efficient, ensuring the safety of both yourself and the rocks. Here are the essential equipment and tools you’ll need:
- Sturdy Wheelbarrow: A sturdy wheelbarrow is crucial for transporting rocks. Opt for a heavy-duty one that can handle the weight of the rocks and maneuver easily on different terrains.
- Lifting Straps or Slings: These are invaluable tools for lifting and moving heavy rocks. They help distribute the weight evenly and provide a secure grip, reducing the risk of injury or strain.
- Shovels: Shovels are necessary for clearing debris and creating a smooth path for moving the rocks. Have both a flat shovel and a pointed shovel on hand for different tasks.
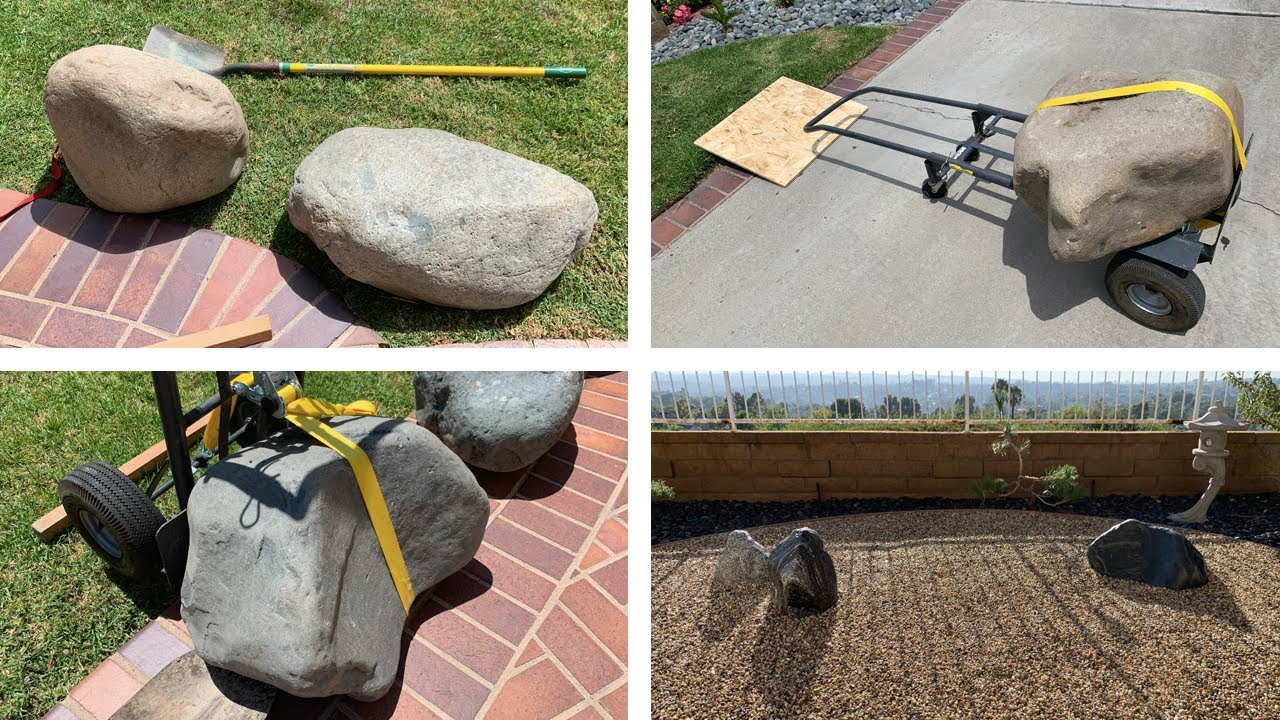
- Dolly or Hand Truck: A dolly or hand truck can be extremely useful for transporting larger rocks. It provides stability and makes it easier to maneuver the rocks, especially over uneven terrain.
- Safety Goggles: Safety goggles are essential to protect your eyes from flying debris or particles during the moving process. Always prioritize safety and wear goggles throughout the entire task.
- Work Gloves: Thick work gloves will protect your hands from cuts, scratches, and blisters. Choose gloves that provide a good grip and allow for dexterity to handle the rocks effectively.
- Measuring Tape: A measuring tape will come in handy for taking accurate measurements of the rocks and the new location where you plan to place them. This will ensure proper positioning and alignment in the new area.
By having these essential tools and equipment ready, you’ll be well-prepared to tackle the task of moving landscaping rocks. Remember to use the proper safety gear and always prioritize personal safety throughout the entire process.
Step 1: Preparation
Before you begin the process of moving landscaping rocks, it’s essential to prepare adequately. Proper preparation will make the task smoother and more efficient. Here are the key steps to follow during the preparation phase:
- Gather Your Tools: Ensure you have all the necessary equipment and tools mentioned earlier in this article. Having them on hand will save you time during the process.
- Assess the Area: Take a thorough look at the area where the rocks are currently located and the new location where you plan to place them. Measure the dimensions of the rocks and note any obstacles or potential challenges in the path of the move.
- Mark the New Location: Use a measuring tape and stakes to mark the exact position where you want to place the rocks in the new area. This will help you visualize the final result and plan your approach accordingly.
- Create a Clear Path: Clear any plants, debris, or other obstacles along the route between the current and new location of the rocks. This will prevent any tripping hazards and ensure a smoother and safer moving process.
- Enlist the Help of Others: Moving landscaping rocks can be physically demanding and potentially dangerous. It’s highly recommended to have at least one other person to assist you. This will not only make the task easier but also reduce the risk of injury.
- Warm-Up and Stretch: Before you start lifting and moving the rocks, take a few minutes to warm up your muscles and stretch. This will help prevent any strain or injuries during the process.
By following these preparation steps, you will ensure that you have everything you need and have taken the necessary precautions to move the landscaping rocks efficiently and safely. Proper preparation will set the stage for the next steps of the process, allowing you to successfully relocate the rocks to their new location.
Step 2: Assessing and Marking the Area
Once you have gathered your tools and completed the necessary preparations, the next step in moving landscaping rocks is to assess the area and mark the new location. This step is crucial in ensuring the smooth and accurate relocation of the rocks. Here’s what you need to do:
- Measure and Take Note: Use a measuring tape to determine the dimensions of the rocks. This will help you plan the best approach for moving them and ensure they fit properly in the new location.
- Consider Landscape Design: Take into account your landscape design plans and how the rocks will fit within the overall layout. Visualize the positioning and arrangement of the rocks to create an aesthetically pleasing environment.
- Mark the New Location: Use stakes or flags to mark the exact spot where you want to place the rocks in the new area. This will serve as a reference point and help guide you during the moving process.
- Ensure Proper Alignment: Check the alignment of the rocks with any existing landscaping features or structures. Aim for consistency and cohesion within your outdoor space.
- Consider Accessibility: Assess the accessibility of the new location. Determine the best route and make note of any potential obstacles or challenges you may encounter along the way.
- Take Safety Precautions: While assessing and marking the area, prioritize safety. Be aware of any potential hazards or unstable ground that may pose a risk during the moving process.
By taking the time to assess the area and mark the new location, you will have a clear plan in place for moving the landscaping rocks. This step helps ensure that the rocks are positioned accurately, align with your landscape design, and enhance the overall aesthetics of your outdoor space.
Step 3: Clearing the Surrounding Area
Before you begin the actual process of moving the landscaping rocks, it’s important to clear the surrounding area. Clearing the path and removing any obstacles will make it easier to transport the rocks and minimize the risk of damage. Follow these steps to ensure a smooth moving process:
- Remove Plants and Vegetation: Clear any plants, grass, or shrubs that may be in the way of the rock relocation. Use a shovel or gardening tools to carefully uproot any vegetation, ensuring you don’t cause unnecessary damage to their roots.
- Clear Debris and Rocks: Remove any loose debris, rocks, or branches in the vicinity of the rocks and along the path you plan to take. This will prevent trip hazards and provide a clean and safe surface for the rocks to be moved across.
- Trim Overhanging Branches: If there are any overhanging branches that might obstruct the movement of the rocks, trim them back. This will create more headroom and prevent branches from getting tangled or damaged during the process.
- Protect Surrounding Structures: If there are any nearby structures or delicate features in the vicinity, cover them with a tarp or protective material to minimize the risk of accidental damage during the moving process.
- Inspect the Path: Take a careful look at the path you’ll be traversing. Check for any uneven ground, potholes, or other potential hazards that could make it challenging to move the rocks safely. Address these issues beforehand to ensure a smooth and safe journey.
- Keep Safety in Mind: Throughout the clearing process, prioritize your safety and wear appropriate protective gear, such as gloves and safety goggles. Be mindful of your surroundings and take necessary precautions to minimize the risk of injury.
By thoroughly clearing the surrounding area, you’ll create a safe and obstacle-free environment for moving the landscaping rocks. This step ensures that the rocks can be transported smoothly without hindrance and that both the rocks and the surrounding vegetation or structures remain unharmed.
Step 4: Lifting and Moving the Rocks
With the preparation and clearing steps completed, it’s time to tackle the task of lifting and moving the landscaping rocks. This step requires proper technique and caution to ensure the safety of everyone involved. Follow these guidelines to lift and move the rocks efficiently:
- Assess the Weight: Before attempting to lift a rock, assess its weight to determine if you can safely handle it. If a rock is too heavy, ask for assistance or consider using additional equipment like a dolly or hand truck.
- Use Proper Lifting Technique: When lifting a rock, remember to bend at your knees, keep your back straight, and use the strength of your legs to lift. Avoid twisting your body while lifting as this can strain your back muscles.
- Use Lifting Straps or Slings: If the rocks are particularly heavy, use lifting straps or slings to distribute the weight evenly and provide a secure grip. This will reduce the strain on your body and make the lifting process easier.
- Move Slowly and Steadily: Take your time when moving the rocks and avoid rushing. Move with a slow and steady pace to maintain control of the rock and prevent any accidents or injuries.
- Communicate with Your Helpers: If you have others assisting you, communicate clearly with them throughout the process. Use verbal cues, signals, or hand motions to coordinate the lifting and moving of the rocks.
- Utilize Equipment: If available, use a wheelbarrow, dolly, or hand truck to transport the rocks. These tools will provide stability and ease in maneuvering the rocks, especially over uneven terrain.
- Take Breaks as Needed: Moving rocks can be physically demanding, so listen to your body and take breaks as necessary. Hydrate and rest to prevent fatigue or strain during the moving process.
Remember, safety should be your top priority when lifting and moving the landscaping rocks. Use proper lifting techniques, wear protective gear, and work at a pace that is comfortable for you. With the right approach and care, you can successfully relocate the rocks to their new location.
Step 5: Placing the Rocks in the New Location
Now that you’ve successfully lifted and moved the landscaping rocks, it’s time to place them in their new location. This step is crucial in achieving the desired aesthetic and functional outcome. Follow these steps to properly place the rocks in the new area:
- Refer to Your Marked Location: Use the stakes or flags you placed earlier as a reference point for positioning the rocks. Align them with the marked location to ensure they are placed correctly.
- Consider Placement Options: Think about the best arrangement for the rocks. Experiment with different orientations and groupings to create a visually appealing and harmonious look in your outdoor space.
- Ensure Stability: Place the base of each rock firmly on the ground or on a stable surface. Ensure that the rocks are securely positioned and won’t easily shift or topple over.
- Utilize Backfill Material: If necessary, use backfill material, such as sand or gravel, to secure the rocks in place and provide stability. This will help prevent shifting or sinking over time.
- Pay Attention to Heights and Levels: If you have multiple rocks of varying heights, consider the overall balance and visual appeal. Arrange the rocks in a way that maintains a natural flow and avoids awkward height variations.
- Step Back and Evaluate: Once the rocks are in place, step back and evaluate the overall effect. Make any necessary adjustments to ensure that the rocks enhance the surrounding landscape and complement other features.
- Take Pride in Your Work: Admire your newly placed landscaping rocks and take pride in the transformation you’ve accomplished. It’s a testament to your hard work and attention to detail.
By following these steps, you can create a visually appealing and harmonious arrangement of landscaping rocks in their new location. Remember to take your time and consider the overall design aesthetic to ensure that the rocks enhance the beauty of your outdoor space.
Step 6: Finishing Touches and Clean-up
As you near the end of the process of moving landscaping rocks, it’s essential to focus on the finishing touches and clean-up. This step ensures that your outdoor space looks polished and tidy. Follow these steps to complete the job:
- Remove Excess Debris: Clean up any debris and dirt that may have accumulated during the moving process. Use a broom, rake, or leaf blower to clear the area around the rocks and create a clean appearance.
- Trim and Prune: Take the opportunity to trim and prune any plants or shrubs in the area. This will not only enhance the overall aesthetics but also prevent any overgrowth from interfering with the rocks in the future.
- Level and Adjust: Check that all the rocks are properly aligned and leveled. Make any necessary adjustments to ensure a cohesive and aesthetically pleasing arrangement.
- Add Mulch or Ground Cover: Consider adding mulch or ground cover around the base of the rocks. This will enhance the visual appeal and help prevent weed growth and erosion in the surrounding area.
- Inspect for Safety: Take a final walk around the area and inspect for any safety hazards. Ensure that the rocks are secure, the path is clear, and there are no sharp edges or tripping hazards.
- Enjoy Your New Landscape: Step back and appreciate the transformation you’ve achieved. Take a moment to relax in your newly beautified outdoor space and enjoy the fruits of your hard work.
By following these final steps, you’ll provide the finishing touches to the landscaping rock relocation project. A well-maintained and clean outdoor space will not only showcase the beauty of the rocks but also create a welcoming environment for you and your guests to enjoy.
Conclusion
Moving landscaping rocks may seem like a challenging task, but with careful planning, the right tools, and some assistance, it can be accomplished successfully. By following the steps outlined in this guide, you can safely and efficiently move these heavy objects to create a stunning and harmonious outdoor space.
From the initial preparation and assessment to the lifting, placement, and finishing touches, each step is essential in ensuring a successful rock relocation. Gathering the proper tools, clearing the surrounding area, and carefully lifting and moving the rocks are critical for both your safety and the integrity of the rocks.
Remember to consider the aesthetics and functionality of your outdoor space when placing the rocks in their new location. Take the time to align and level them, and make any necessary adjustments to achieve the desired visual effect. Don’t forget to complete the project by cleaning up the area and adding finishing touches such as mulch or ground cover.
Throughout the entire process, prioritize safety, ask for assistance when needed, and take breaks to prevent fatigue or strain. Moving landscaping rocks requires physical exertion, so it’s important to listen to your body and take necessary precautions to avoid injuries.
By following these steps, you can successfully move landscaping rocks and transform your outdoor space into a beautiful and captivating landscape. So, grab your tools, gather some helping hands, and get ready to create an outdoor oasis that you will be proud of for years to come!


