Home>Gardening Techniques>DIY Projects>How To Set Up A Drip Irrigation System
DIY Projects
How To Set Up A Drip Irrigation System
Modified: January 22, 2024
Learn how to set up a drip irrigation system with easy DIY projects. Save water and maintain your garden effortlessly.
(Many of the links in this article redirect to a specific reviewed product. Your purchase of these products through affiliate links helps to generate commission for Chicagolandgardening.com, at no extra cost. Learn more)
Table of Contents
- Introduction
- Benefits of Drip Irrigation
- Components of a Drip Irrigation System
- Step 1: Planning the System
- Step 2: Gathering the Necessary Materials
- Step 3: Preparing the Area
- Step 4: Assembling the Mainline
- Step 5: Installing the Drip Tubing
- Step 6: Adding Emitters or Drip Lines
- Step 7: Setting Up a Timer or Control System
- Step 8: Flushing and Testing the System
- Step 9: Adjusting Water Flow and Pressure
- Step 10: Maintenance Tips
- Conclusion
Introduction
Welcome to the world of DIY projects! If you are an avid gardener or simply looking to enhance your outdoor space, setting up a drip irrigation system is a must-know skill. Drip irrigation is a method of providing water directly to the root zone of plants, ensuring efficient water usage and promoting healthier growth. Whether you have a small garden, a vegetable patch, or a sprawling landscape, a drip irrigation system can make a significant difference in maintaining a thriving and vibrant space.
In this article, we will guide you through the process of setting up your own drip irrigation system, step by step. From planning and gathering materials to installation and maintenance, we’ll cover it all. You don’t have to be a professional landscaper or a plumbing expert to tackle this project. With a little bit of knowledge and the right tools, you can create an efficient and customized watering system that suits the unique needs of your plants.
With the increasing emphasis on sustainable living and water conservation, drip irrigation is gaining popularity among gardening enthusiasts and homeowners alike. This irrigation method is not only more environmentally friendly, but it also helps save water and reduces your utility bills. By delivering water directly to the roots, drip irrigation minimizes evaporation and runoff, ensuring that every drop goes where it is needed the most.
Beyond water conservation, a drip irrigation system offers a range of benefits. It helps prevent weeds by delivering water only to the plants you want to nourish, reducing the growth of unwanted vegetation. Additionally, by avoiding overhead watering, drip irrigation minimizes the risk of diseases caused by damp foliage. It also allows for precise control over water delivery, ensuring that different types of plants receive the appropriate amount of hydration for optimal growth.
No matter the size of your gardening space or your level of expertise, setting up a drip irrigation system is a worthwhile endeavor. Let’s dive into the details of planning, installation, and maintenance to help you get started on this exciting DIY project.
Benefits of Drip Irrigation
Drip irrigation offers a multitude of benefits that make it a preferred choice for gardeners and homeowners. Whether you have a small garden or a large landscape, understanding the advantages of drip irrigation will help you appreciate its value in creating a thriving and sustainable outdoor space.
1. Water Efficiency: Drip irrigation is incredibly efficient when it comes to water usage. By delivering water directly to the root zone of plants, it minimizes evaporation and runoff, ensuring that water is used efficiently and effectively. This can result in water savings of up to 50% compared to traditional sprinkler systems.
2. Precision Watering: With drip irrigation, you have precise control over water distribution. Different plants have different water requirements, and drip irrigation allows you to tailor the watering to meet the specific needs of each plant. This promotes healthier growth and prevents overwatering or underwatering.
3. Weed Control: By delivering water directly to the plants you want to nourish, drip irrigation helps reduce weed growth. Unlike overhead sprinklers that can inadvertently water surrounding weeds, drip irrigation focuses solely on the desired plants, minimizing the growth of unwanted vegetation.
4. Disease Prevention: Overhead watering methods can create an environment for diseases to thrive, as the foliage remains wet for long periods. Drip irrigation keeps the foliage dry by delivering water directly to the roots, reducing the risk of leaf diseases and fungal growth.
5. Time and Labor Savings: Once set up, a drip irrigation system requires minimal effort to operate. Unlike traditional watering methods that require manual watering or moving sprinklers around the garden, drip irrigation can be automated with timers. This frees up your time and ensures your plants are consistently watered, even when you’re away.
6. Improved Plant Health and Growth: By providing water directly to the root zone, plants receive the necessary hydration for optimal health and growth. The controlled delivery of water also prevents soil erosion and nutrient loss, allowing plants to absorb essential nutrients more efficiently.
7. Environmentally Friendly: Drip irrigation aligns with eco-friendly practices by reducing water waste. It helps conserve water resources and reduces the strain on local water supplies. Additionally, it minimizes the need for chemical herbicides as weeds are naturally suppressed by targeted watering.
With its water-saving features, precision control, and numerous other benefits, drip irrigation proves to be a smart and sustainable choice for any gardener or homeowner. Let’s now explore the essential components required for setting up a drip irrigation system.
Components of a Drip Irrigation System
To set up a successful drip irrigation system, it’s important to understand the various components involved. Each component plays a crucial role in delivering water efficiently to your plants. Here are the main components you’ll need:
1. Water Source: The water source is where your system will draw water from. It can be a garden hose, a faucet, or a dedicated irrigation line connected to your main water supply. Make sure you have a reliable and accessible water source for your system.
2. Backflow Preventer: A backflow preventer is a crucial component that ensures contamination does not occur between your irrigation system and the main water supply. It prevents water from flowing back into the main water source, keeping your water supply safe and clean.
3. Pressure Regulator: A pressure regulator helps control the water pressure within your drip irrigation system. Different plants have different pressure requirements, and a regulator ensures that the pressure remains within the optimal range, preventing damage to the system and ensuring even water distribution.
4. Filters: Filters help remove debris, sediment, and particles from the water, preventing clogging and maximizing the lifespan of your drip irrigation system. Common types of filters include disc filters, screen filters, and media filters. Choose a filter that suits the water quality in your area.
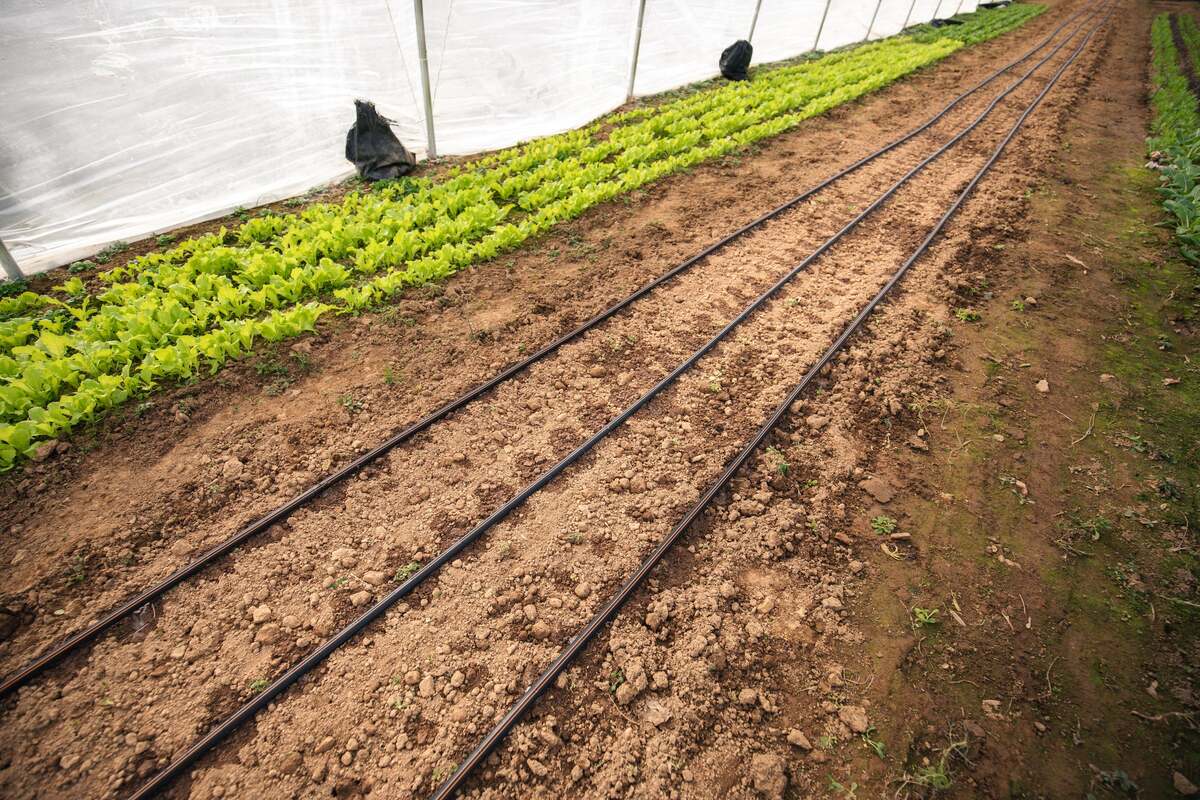
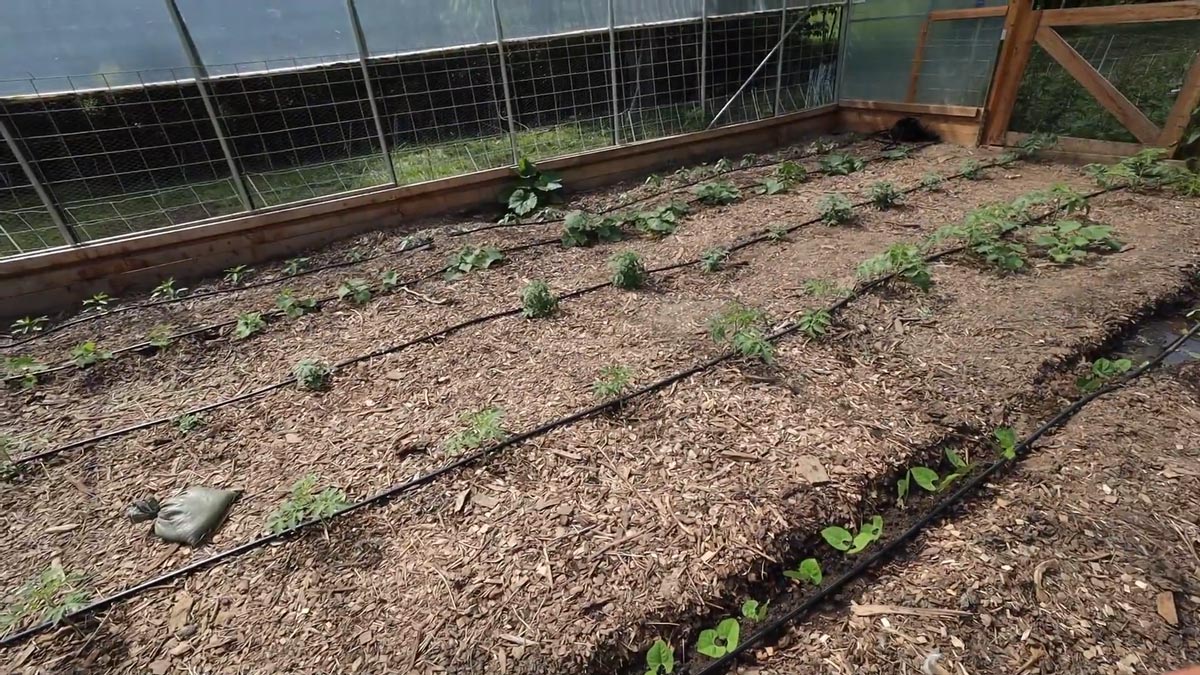
5. Mainline Tubing: The mainline tubing is the backbone of your drip irrigation system. It carries water from the water source to the different sections of your garden. Use durable and UV-resistant tubing to ensure long-lasting performance. The mainline tubing can be buried underground or placed above ground, depending on your preference.
6. Distribution Tubing: The distribution tubing or lateral lines are smaller diameter tubes connected to the mainline and run along the rows or beds of your plants. These tubes distribute water to individual plants or groups of plants. They can be easily cut and customized to fit the layout of your garden.
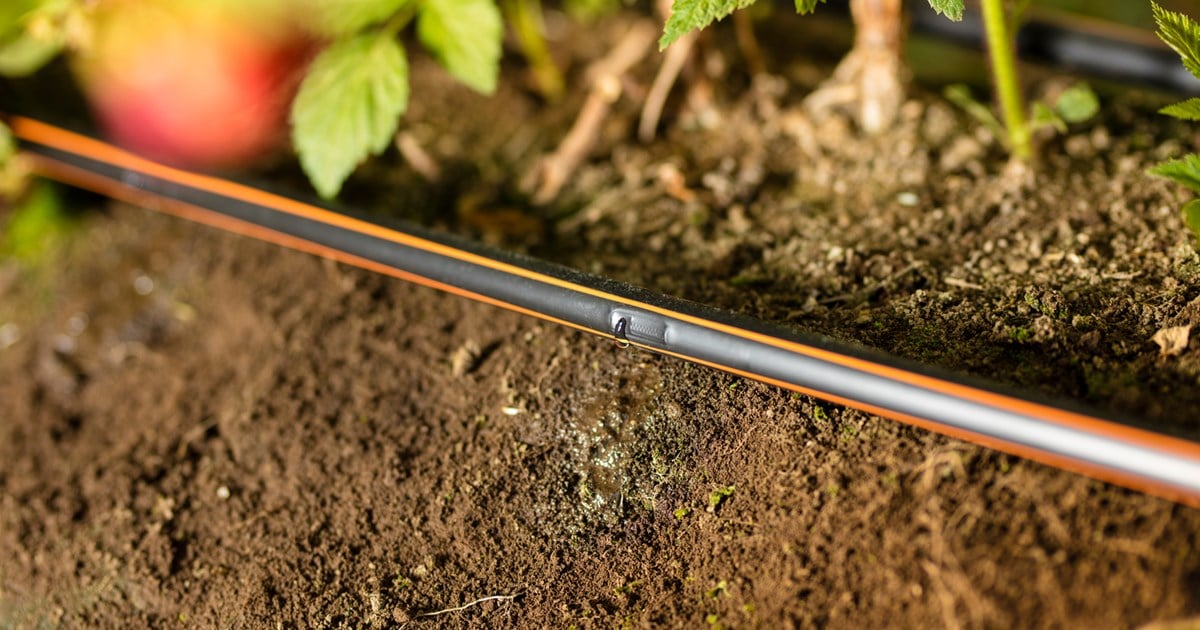
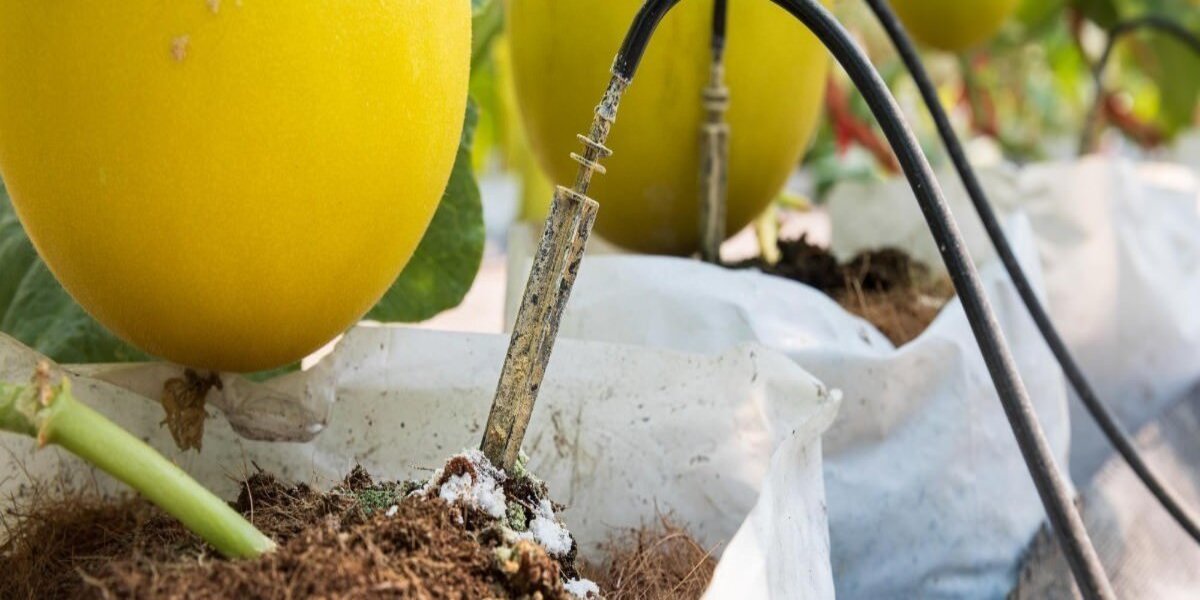
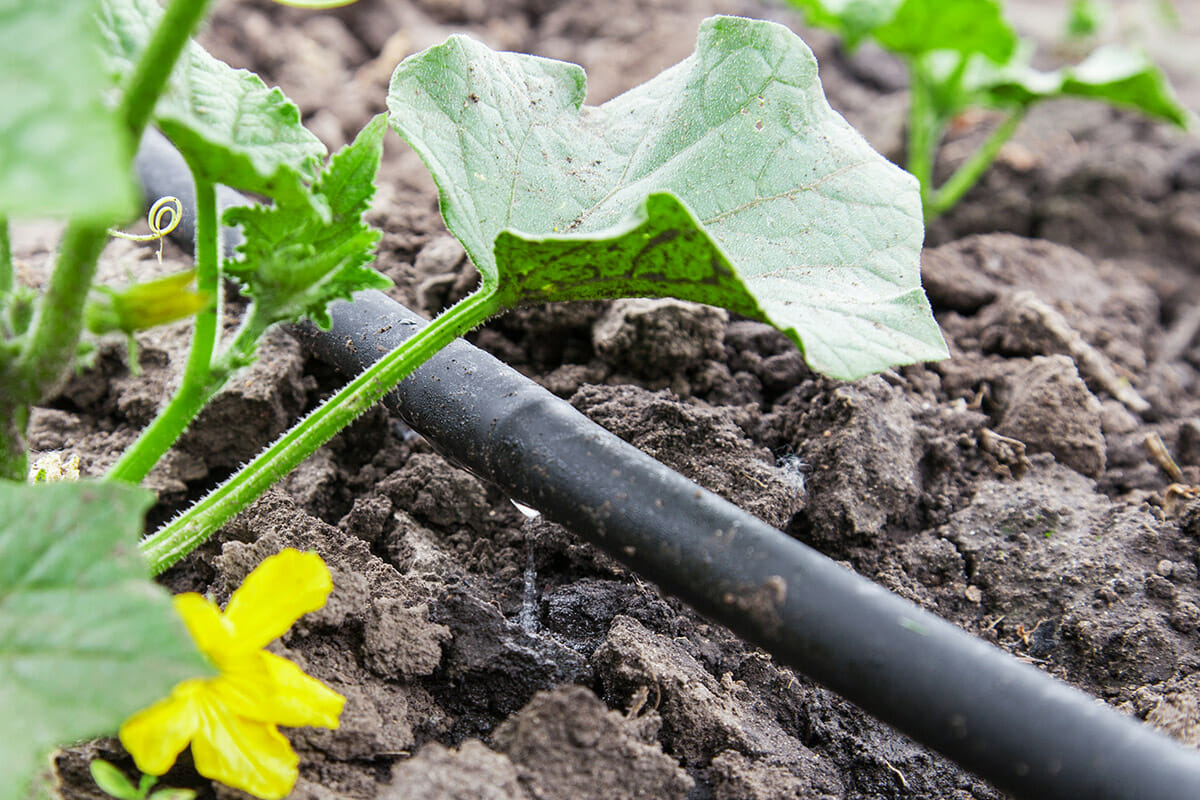
7. Emitters or Drip Lines: Emitters or drip lines deliver water directly to the root zone of plants. There are various types of emitters, including drip emitters, micro-sprinklers, and soaker hoses. Choose the type of emitter that suits your plants and watering needs.
8. Fittings and Connectors: Fittings and connectors are used to join different sections of tubing, connect emitters, and create custom configurations. Common types of fittings include couplings, tees, elbows, and end caps. Make sure to use compatible fittings for your specific tubing size and type.
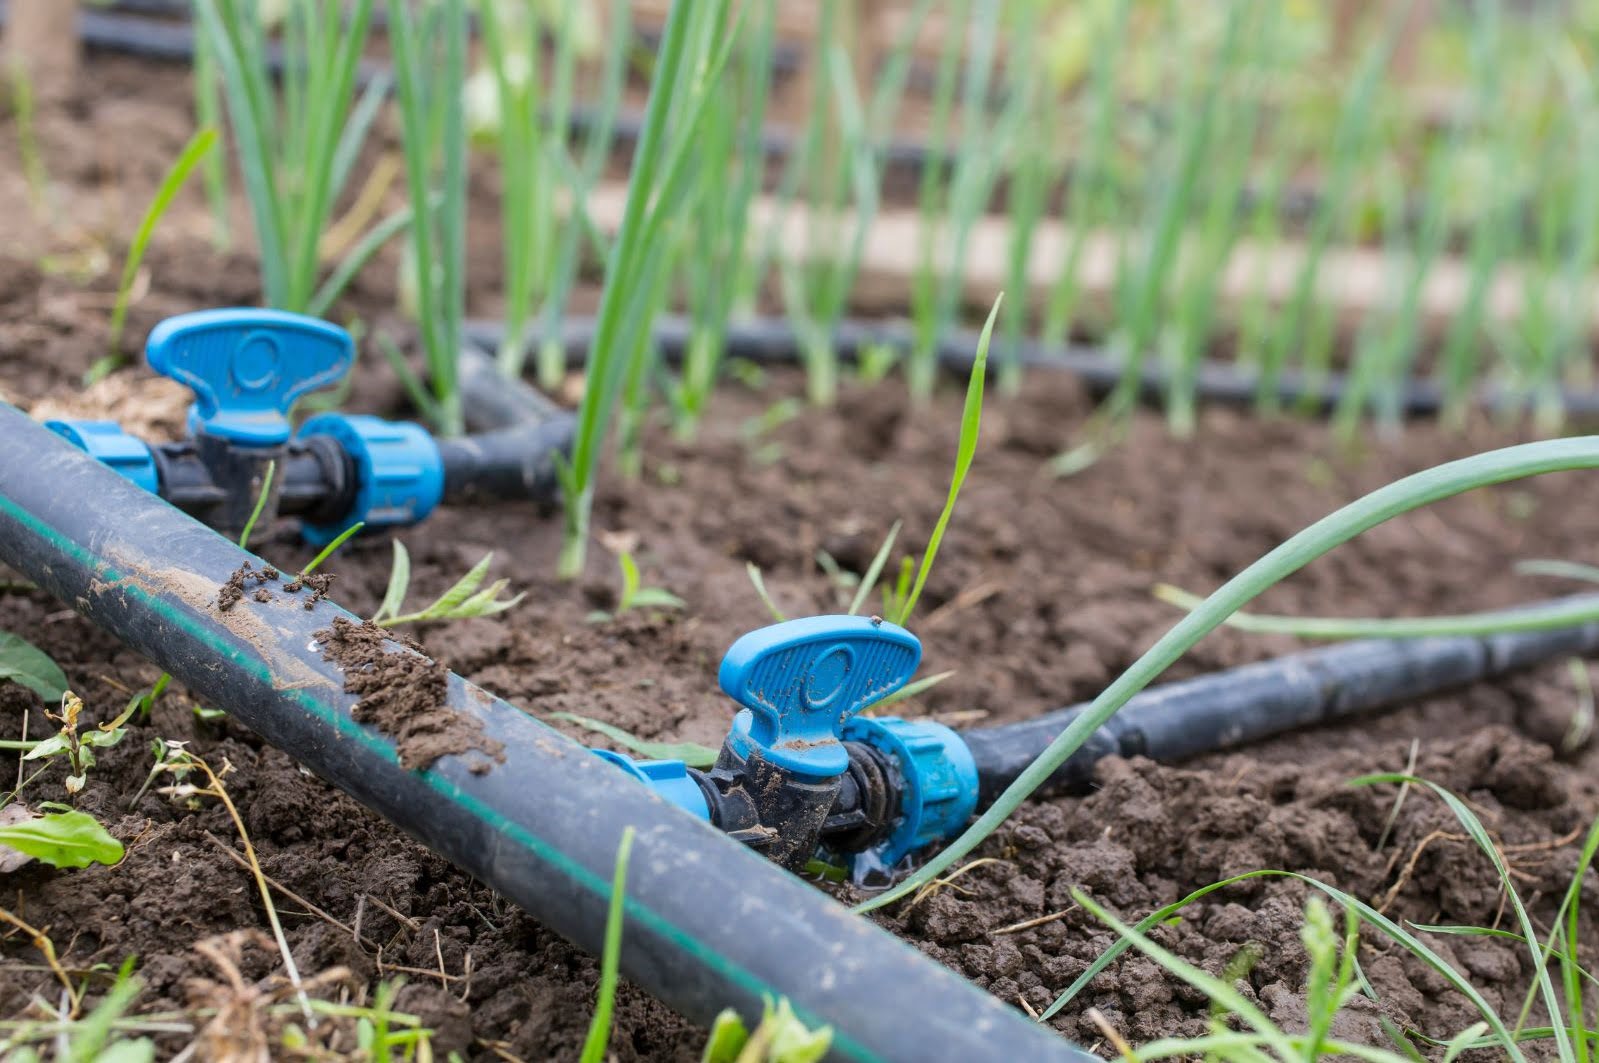
9. Valves: Valves are used to control the flow of water within your drip irrigation system. They enable you to shut off specific sections or adjust the water flow to different areas of your garden. Install valves strategically for convenient access and control.
10. Timer or Control System: A timer or control system allows you to automate your irrigation schedule. It turns the system on and off at pre-set times, ensuring your plants receive water consistently. Timers can be battery-operated, solar-powered, or connected to your home’s irrigation controller.
By understanding the various components of a drip irrigation system, you can choose the right materials and set up an efficient and effective watering system for your garden. Now, let’s move on to the step-by-step process of planning your drip irrigation system.
Step 1: Planning the System
Before you start setting up your drip irrigation system, it’s important to plan and design it properly. Taking the time to plan will ensure that you have a well-organized system tailored to meet the specific needs of your garden. Here are the key steps to consider during the planning phase:
1. Assess Your Garden: Evaluate your garden’s layout and size, taking note of any existing plants, flower beds, or areas that require irrigation. Determine the water requirements of different plants and group them based on their watering needs.
2. Determine Water Source and Pressure: Identify the closest water source and evaluate the water pressure. This will help determine if you need additional equipment like a pressure regulator to ensure optimal water flow through the system.
3. Map Out the Layout: Create a rough sketch or map of your garden, marking the location of plants, flower beds, and other areas that require irrigation. Consider the terrain, sun exposure, and any obstacles that may affect the placement of irrigation lines.
4. Calculate Watering Zones: Divide your garden into watering zones based on the water requirements of the plants. Plants with similar water needs should be grouped together in the same zone to ensure efficient water distribution.
5. Measure and Calculate Irrigation Needs: Calculate the water needs of each zone by measuring the square footage and consulting plant-specific watering guidelines. This will help determine the flow rate and the number of emitters required for each zone.
6. Consider Drip Irrigation System Components: Determine the type of emitters, tubing, and fittings you will need based on your plants’ water requirements, soil type, and garden layout. Take into account the pressure regulator, filters, and other components necessary for the system.
7. Plan for Future Expansion: Anticipate any future garden expansion or changes and include them in your planning. Leaving room for expansion will make it easier to incorporate additional plants or irrigation lines later on without disrupting the existing system.
8. Budget and Materials List: Create a budget and make a materials list based on your planned layout and required components. Consider the cost of tubing, emitters, fittings, and any additional equipment needed to complete your drip irrigation system.
9. Consultation and Research: If you’re unsure about certain aspects of your system, consult with gardening experts or research online resources to gain a better understanding. Gathering information and seeking advice will ensure that your system is well-designed and meets your garden’s specific needs.
By following these steps and taking the time to thoroughly plan your drip irrigation system, you’ll be setting yourself up for a successful installation. Next, we’ll move on to gathering the necessary materials for your project.
Step 2: Gathering the Necessary Materials
Once you have planned your drip irrigation system, the next step is to gather all the necessary materials and tools. Having everything on hand before starting the installation process will ensure a smooth and efficient workflow. Here are the key materials you’ll need:
1. Mainline Tubing: Purchase the mainline tubing in the required length, depending on the layout of your garden. Choose a durable and UV-resistant tubing that can withstand outdoor conditions.
2. Distribution Tubing: Purchase distribution tubing to connect the mainline to individual plants or groups of plants. Consider the length and diameter needed for your specific garden layout.
3. Emitters or Drip Lines: Depending on your watering needs and plant requirements, select the appropriate emitters or drip lines. This could include drip emitters, micro-sprinklers, or soaker hoses.
4. Fittings and Connectors: Gather a variety of fittings and connectors to join different sections of tubing, connect emitters, and create custom configurations. Make sure you have the right size and type of fittings for your specific tubing.
5. Valves: Depending on the size and complexity of your system, you may need valves to control water flow to different areas or zones of your garden. Consider installing valves at strategic points for easy access and control.
6. Filter(s): Install filters to prevent clogging and ensure the longevity of your system. Consider the water quality in your area and choose filters that are suitable for your specific needs.
7. Backflow Preventer: Include a backflow preventer to protect your main water supply from contamination. Ensure it meets local regulations and is installed correctly.
8. Pressure Regulator: If your water source has high water pressure, install a pressure regulator to maintain optimal pressure throughout the system. This will prevent damage to the tubing and ensure consistent water distribution.
9. Timer or Control System: Decide on a timer or control system to automate your irrigation schedule. Choose a timer that suits your needs and is compatible with your irrigation setup.
10. Tools: Gather tools such as a shovel, utility knife, pipe cutter, hole punch, and adjustable wrench. These will come in handy during the installation process.
11. Miscellaneous Items: Don’t forget to gather items like stakes, clips, and wire ties to secure and support the tubing and emitters in your garden.
Make a comprehensive list of all the materials you need and purchase them ahead of time. This will save you time and ensure that you have everything you need to complete the installation process without unnecessary delays.
With all the necessary materials at hand, you’re ready to move on to the next step in setting up your drip irrigation system: preparing the area for installation.
Step 3: Preparing the Area
Before you start installing your drip irrigation system, it’s essential to prepare the area to ensure a smooth and successful installation process. Proper preparation will help prevent any obstacles or disruptions that may arise during the installation. Follow these steps to prepare the area:
1. Clear the Area: Remove any debris, weeds, rocks, or other obstructions from the area where the irrigation system will be installed. Clearing the area will provide a clean and unobstructed space for laying out the tubing and emitters.
2. Mark the Pathways: Use stakes or flags to mark the pathways or desired layout of the mainline and distribution tubing. This will give you a clear visual guide and help you navigate the installation process more efficiently.
3. Measure and Cut Tubing: Measure and cut the mainline and distribution tubing sections according to your planned layout. Use a pipe cutter or utility knife to make clean and precise cuts.
4. Lay Out the Tubing: Lay out the mainline and distribution tubing along the marked pathways. Make sure the tubing is properly aligned and positioned to reach all the desired plants or zones in your garden.
5. Bury or Secure Tubing: Depending on your preference and the aesthetics of your garden, decide whether you want to bury the tubing underground or secure it above the ground. If burying, dig shallow trenches along the marked pathways to place the tubing. If securing above ground, use stakes or clips to hold the tubing in place.
6. Connect Tubing and Fittings: Connect the tubing sections using the appropriate fittings and connectors. Ensure a secure and watertight connection between each section to prevent any leaks or water wastage.
7. Install the Backflow Preventer: Install the backflow preventer at the junction where the mainline connects to the water source. Follow the manufacturer’s instructions to ensure it is properly installed.
8. Install the Pressure Regulator: Install the pressure regulator in the mainline to control the water pressure within the system. Adjust the pressure regulator according to the specific needs of your plants.
9. Check for Obstructions: Before proceeding further, check for any potential obstructions or hazards such as tree roots, rocks, or other utilities that may interfere with the tubing or emitter placement. Make any necessary adjustments or modifications as needed.
By properly preparing the area, you’ll create a solid foundation for your drip irrigation system. This will ensure a more efficient installation process and minimize any potential issues that can arise during the setup. With the area prepared, you’re ready to move on to the next step: assembling the mainline for your drip irrigation system.
Step 4: Assembling the Mainline
Assembling the mainline for your drip irrigation system is a critical step in the installation process. The mainline serves as the backbone of your system, delivering water from the water source to the different sections of your garden. Follow these steps to ensure a proper assembly of the mainline:
1. Connect the Water Source: Start by connecting the mainline tubing to the water source. If using a faucet, attach a hose connector to the faucet and connect it to the mainline. If connecting to a dedicated irrigation line, use the appropriate valve and connector to make the connection.
2. Lay Out the Mainline Tubing: Lay out the mainline tubing along the designated pathways in your garden. Make sure to follow the marked pathways or layout plan you created during the planning phase.
3. Cut the Tubing: Use a pipe cutter or a utility knife to make clean and precise cuts on the mainline tubing. Cut the tubing according to the desired length or the dimensions of your garden layout.
4. Attach Fittings: Install fittings on the ends of the mainline tubing to secure them and prevent leaks. Depending on the specific fittings you are using, follow the manufacturer’s instructions to properly attach them.
5. Connect Multiple Sections: If your mainline tubing requires multiple sections, use connectors to join them together. Ensure a tight and secure connection to prevent any water leakage.
6. Install Valves: If you have planned to incorporate valves into your drip irrigation system, now is the time to install them on the mainline tubing. Valves will allow you to control the water flow to different zones or areas in your garden.
7. Install the Pressure Regulator: If you haven’t installed the pressure regulator in the previous step, now is the time to do so. Attach the pressure regulator to the mainline tubing to control the water pressure as needed.
8. Secure the Mainline Tubing: Ensure that the mainline tubing is securely held in place along the marked pathways. Use stakes, clips, or other securing methods to keep the tubing in position and prevent any movement or displacement.
9. Test for Leaks: Before proceeding further with the installation, it’s crucial to test the mainline for any leaks. Turn on the water source and inspect the entire length of the mainline tubing for any signs of water leakage. If you notice any leaks, tighten the fittings or make any necessary adjustments to ensure a watertight connection.
By properly assembling the mainline, you are one step closer to having a functional drip irrigation system in your garden. Once the mainline is assembled and tested for leaks, you can move on to the next step: installing the drip tubing.
Step 5: Installing the Drip Tubing
After assembling the mainline for your drip irrigation system, the next step is to install the drip tubing. The drip tubing delivers water directly to the plants or specific areas in your garden. Follow these steps to properly install the drip tubing:
1. Determine the Placement: Identify the areas or specific plants that require water and determine where the drip tubing needs to be installed. Consider the water requirements and spacing recommendations for each plant.
2. Lay Out the Drip Tubing: Lay out the drip tubing along the designated areas, making sure it reaches the plants or areas that need watering. Place the tubing close to the plants, ensuring that it is within the root zone.
3. Cut the Drip Tubing: Use a pipe cutter or a utility knife to cut the drip tubing to the desired lengths. Make clean and precise cuts to ensure a proper fit for each section of the tubing.
4. Attach Fittings: Install fittings, such as connectors or couplings, to join different sections of the drip tubing. Use the appropriate fittings for your specific tubing size and type.
5. Install Emitters: Depending on your plant’s water requirements, install emitters along the drip tubing at designated intervals. Use drip emitters, micro-sprinklers, or soaker hoses, selecting the type that best suits your plants’ needs.
6. Secure the Drip Tubing: Use stakes, clips, or wire ties to secure the drip tubing in place. Ensure that the tubing is secure and doesn’t move or get disturbed during regular maintenance or watering.
7. Connect the Drip Tubing to the Mainline: Attach the drip tubing to the mainline using the appropriate connectors. Ensure a tight and secure connection to prevent any leaks or water wastage.
8. Test for Leaks: Before proceeding further, test the drip tubing for any leaks. Turn on the water source and check the entire length of the drip tubing, including the emitters, for any signs of leakage. If you detect any leaks, adjust the fittings or connections as needed.
9. Adjust Emitters: After testing for leaks, ensure that the emitters are properly positioned near the plants. Make any necessary adjustments to ensure optimal water delivery to the roots of each plant.
10. Check Water Flow: Once everything is in place, check the water flow through the emitters. Ensure that the water is evenly distributed and reaches the desired plants or areas in your garden.
By following these steps, you’ll successfully install the drip tubing for your irrigation system. Proper installation of the drip tubing ensures efficient and targeted water delivery, promoting healthy plant growth. Next, we’ll move on to the next step: adding emitters or drip lines.
Step 6: Adding Emitters or Drip Lines
Adding emitters or drip lines is a crucial step in setting up your drip irrigation system. Emitters deliver water directly to the root zones of plants, ensuring efficient and targeted hydration. Follow these steps to properly add emitters or drip lines to your system:
1. Determine Emitter Placement: Evaluate the water requirements of your plants and determine the spacing and placement of emitters or drip lines. Consider factors such as plant size, water needs, and spacing guidelines provided by the manufacturer.
2. Install Emitters: For individual plants or smaller areas, use individual drip emitters. Insert the emitters directly into the mainline or distribution tubing near the base of the plants. Ensure a secure and watertight connection.
3. Use Micro-Sprinklers for Larger Areas: If you have larger areas or groups of plants to irrigate, consider using micro-sprinklers. Install the micro-sprinklers along the mainline or distribution tubing, positioning them in locations that provide optimal coverage for the plants.
4. Consider Soaker Hoses: Soaker hoses are a great option for watering rows of plants or larger beds. Lay the soaker hoses along the base of the plants, ensuring they are in contact with the soil. Secure the soaker hoses to prevent movement during watering.
5. Adjust Emitter Flow: If your emitters or drip lines have adjustable flow rates, fine-tune the water flow based on the specific needs of each plant. Optimize the flow rate to ensure sufficient hydration without wasting water.
6. Test the System: Run water through the emitters or drip lines and check for any clogs or blockages. Ensure that the water is reaching the plants and cover the area with a thin layer of mulch to help maintain moisture and reduce weed growth.
7. Monitor Water Distribution: Regularly monitor the water distribution by observing the emitters or drip lines in action. Ensure that the water is evenly distributed and reaching all plants within the designated areas.
8. Adjust as Needed: Throughout the growing season, monitor your plants’ water needs and make any necessary adjustments to the emitter placement or flow rates. Conditions may change over time, requiring modifications in the irrigation system to accommodate the evolving needs of your plants.
By carefully adding emitters or drip lines, you’re ensuring that each plant receives the necessary amount of water for optimal growth and health. Attention to detail and regular monitoring will help you maintain an efficient and effective drip irrigation system. Next, we’ll move on to step 7: setting up a timer or control system for automation.
Step 7: Setting Up a Timer or Control System
Setting up a timer or control system for your drip irrigation system is a game-changer as it allows for automated and hassle-free watering. With a timer or control system, you can ensure that your plants receive consistent and adequate hydration without the need for manual intervention. Follow these steps to set up a timer or control system:
1. Choose the Right Timer: Select a timer that suits your specific needs and irrigation setup. Consider whether you prefer a battery-operated, solar-powered, or Wi-Fi-enabled timer, depending on your accessibility and preferences.
2. Locate a Convenient Spot: Find a suitable location near your water source to mount or install the timer. Ensure that it is protected from the elements and easily accessible for programming and maintenance.
3. Connect the Timer: Follow the manufacturer’s instructions to connect the timer to your water source and mainline tubing. Ensure a secure and watertight connection to prevent any leaks or water wastage.
4. Program the Timer: Set the desired watering schedule on the timer by specifying the days, duration, and frequency of watering for each zone or area. Consider the water requirements and the specific needs of your plants.
5. Test the Timer: Run a few test cycles to ensure that the timer is functioning correctly. Verify that the water is being distributed as per the programmed schedule and that all zones or areas are being watered correctly.
6. Make Adjustments as Needed: Monitor your plants’ response to the automated watering and make adjustments to the timer settings as necessary. Fine-tune the watering schedule to match any changes in the weather or the specific needs of your plants throughout the growing season.
7. Consider Rain and Soil Moisture Sensors: To further optimize water usage, consider installing a rain sensor or a soil moisture sensor. These sensors can suspend watering during periods of rain or when the soil already has sufficient moisture, preventing water waste.
8. Regularly Maintain and Check the Timer: Regularly check the timer to ensure it is functioning correctly and is not damaged. Replace batteries if necessary, clean the interface, and update the programming as required.
By setting up a timer or control system, you’re taking advantage of automation to simplify your watering routine and ensure consistent care for your plants. You’ll have peace of mind knowing that your drip irrigation system is operating efficiently, delivering water when and where it’s needed most. Finally, we’ll move on to step 8: flushing and testing the system.
Step 8: Flushing and Testing the System
Flushing and testing your drip irrigation system is an essential step before fully relying on it to provide water to your plants. This step helps remove any debris or sediment that may have accumulated during the installation process and ensures that the system is functioning as intended. Follow these steps to flush and test your system:
1. Begin with the Water Source: Turn on the water source and let water flow through the system for a few minutes to flush out any debris or impurities. This will help prevent clogs and ensure a clean water supply.
2. Verify Flow and Coverage: Observe the flow of water through the emitters or drip lines to ensure that each plant or area is receiving adequate coverage. Look for any signs of leaks or uneven distribution.
3. Check Emitters and Drip Lines: Examine each emitter or drip line to ensure that water is being delivered properly. Adjust the flow rate or reposition any emitters that are not delivering water as desired.
4. Inspect the Mainline and Tubing: Check the mainline tubing and distribution tubing for any leaks, loose connections, or signs of damage. Tighten fittings or replace any damaged sections, if necessary.
5. Monitor for Breakages and Blockages: Keep an eye out for any breakages or blockages in the tubing. Look for kinks, punctures, or areas where the flow of water may be obstructed. Correct any issues to maintain efficient water delivery.
6. Measure Water Output: Use a measuring cup or a rain gauge to measure the amount of water being delivered by the emitters or drip lines over a specific time period. This will help ensure that your plants are receiving the desired amount of hydration.
7. Adjust as Needed: Based on your observations and the specific needs of your plants, make any necessary adjustments to the system. This may involve repositioning emitters, increasing or decreasing flow rates, or adjusting the timer settings.
8. Regular Maintenance: Make a habit of regularly maintaining and checking your drip irrigation system. Clean the emitters or drip lines as needed and flush the system periodically to remove any accumulated debris.
By flushing and testing your drip irrigation system, you’re ensuring that it is functioning optimally and providing the necessary water to your plants. Regular maintenance and monitoring will help identify and address any issues promptly, allowing your plants to thrive. Now that you’ve completed testing, you’re ready for step 9: adjusting water flow and pressure.
Step 9: Adjusting Water Flow and Pressure
Adjusting the water flow and pressure of your drip irrigation system is crucial to ensure that each plant receives the optimal amount of water. By fine-tuning the flow and pressure, you can address any variations in your garden, such as different water requirements or uneven terrain. Follow these steps to adjust the water flow and pressure:
1. Assess the Water Needs: Evaluate the water requirements of each plant or zone in your garden. Consider factors such as plant size, soil type, and sun exposure to determine the appropriate amount of water needed.
2. Locate the Pressure Regulator: Identify the location of the pressure regulator in your system. The pressure regulator controls the water pressure and ensures that it remains within the desired range throughout the system.
3. Increase or Decrease Pressure: If you find that the water flow is inadequate, adjust the pressure regulator to increase the water pressure. Conversely, if the water flow is too powerful, reduce the pressure to reduce the flow rate.
4. Monitor the Flow Rate: Observe the flow rate of water through the emitters or drip lines. Ensure that the flow rate is consistent and matches the water requirements of the plants. Adjust the pressure regulator as needed to achieve the desired flow rate.
5. Fine-tune Individual Emitters: For plants with specific water requirements, such as different types of vegetables or delicate flowers, adjust the flow rate of the individual emitters. Some emitters have adjustable flow control, while others may require the installation of separate flow control devices.
6. Check for Leakages: While adjusting the water flow and pressure, pay close attention to any signs of leakages. Monitor the system for any leaks, especially at connections or fittings. Repair or replace any damaged components to maintain efficiency.
7. Regularly Monitor and Adjust: Continuously monitor the water flow and pressure of your drip irrigation system. Check for any changes in the flow rate or pressure due to system wear and tear, clogs, or other factors. Make adjustments as necessary to ensure optimal water distribution.
8. Consider Water-Saving Measures: In addition to adjusting the water flow and pressure, explore water-saving measures such as using moisture sensors or rain sensors. These devices can automatically adjust the system’s watering schedule based on soil moisture levels or rainfall, reducing water waste.
By adjusting the water flow and pressure of your drip irrigation system, you can create a customized watering solution that suits the unique needs of each plant. Regular monitoring and fine-tuning will help optimize water usage and promote healthy plant growth. Finally, we’ll move on to the last step: maintenance tips to keep your drip irrigation system in top shape.
Step 10: Maintenance Tips
Maintaining your drip irrigation system is essential to ensure its long-term performance and effectiveness. Regular maintenance will help prevent issues such as clogging, leaks, and system malfunctions. Follow these maintenance tips to keep your drip irrigation system in top shape:
1. Regularly Inspect the System: Periodically check the entire system for any signs of damage, leaks, or clogs. Inspect the mainline tubing, distribution tubing, emitters, and fittings. Address any issues promptly to prevent further damage.
2. Clean and Flush the System: Flush the system regularly to remove any debris or sediment that may have accumulated in the tubing or emitters. Use a cleaning solution or vinegar to clear any clogs or mineral deposits.
3. Replace Damaged Parts: If you notice any damaged or worn-out components, such as cracked tubing or faulty emitters, replace them immediately. Ensure that all fittings and connectors are secure and watertight.
4. Adjust as Plant Needs Change: As plants grow and their water requirements change, make adjustments to the system to ensure proper water distribution. Reposition emitters or add new ones as needed to maintain optimal watering.
5. Mulch Around Plants: Apply a layer of organic mulch around the base of your plants. Mulch helps retain moisture, reduces weed growth, and protects the drip tubing from direct sunlight or damage.
6. Monitor for Clogs: Regularly check for any clogs or blockages in the system by examining the emitters or drip lines. Clear any obstructions to ensure proper water flow.
7. Adjust Timer Settings: Review and adjust the timer settings as the seasons change. Shorter watering durations and less frequent schedules may be needed during cooler months or periods of increased rainfall.
8. Consider Winterization: If you live in an area with freezing temperatures, take steps to properly winterize your drip irrigation system. Drain the system and protect any exposed components to prevent damage from freezing and thawing.
9. Regularly Check Water Output: Monitor the water output of the emitters or drip lines to ensure that each plant is receiving sufficient water. Adjust flow rates or replace faulty emitters to maintain proper hydration.
10. Stay Proactive with Maintenance: Regularly scheduling maintenance tasks and being proactive in addressing any issues will help prevent costly repairs and ensure the long-term effectiveness of your drip irrigation system.
By following these maintenance tips, you can keep your drip irrigation system running efficiently and effectively. Regular inspections, cleaning, and mindful adjustments will contribute to healthier plants and a thriving garden. With proper maintenance, your drip irrigation system will continue to provide the water your plants need for successful growth and yield.
Conclusion
Congratulations! You have now completed the journey of setting up your own drip irrigation system. By following the step-by-step process, you have gained the knowledge and skills to create an efficient and customized watering solution for your garden. Drip irrigation offers many benefits, including water efficiency, precise watering control, weed prevention, and disease reduction.
Remember to plan your system carefully, gather all the necessary materials, prepare the area, assemble the mainline, install the drip tubing, add emitters or drip lines, set up a timer or control system, flush and test the system, adjust water flow and pressure, and perform regular maintenance.
With your drip irrigation system in place, you can enjoy the convenience of automated watering, knowing that your plants are receiving the right amount of water directly to their root zones. Regularly monitor and maintain the system to address any issues promptly and ensure its continued efficiency.
Whether you have a small garden, a vegetable patch, or an extensive landscape, implementing a drip irrigation system is a valuable investment. It promotes water conservation, helps your plants thrive, and enhances the overall health and beauty of your outdoor space.
So, put your newfound knowledge into action, adapt the information to meet your specific needs, and watch as your garden flourishes with the power of a well-designed drip irrigation system. Enjoy the benefits of efficient watering, healthier plants, and the pride of accomplishing this DIY project.