Home>Gardening Techniques>DIY Projects>How To Build A Geodesic Dome Greenhouse

DIY Projects
How To Build A Geodesic Dome Greenhouse
Modified: January 22, 2024
Learn how to build a stunning geodesic dome greenhouse with this DIY project guide. Transform your backyard into an eco-friendly oasis with step-by-step instructions.
(Many of the links in this article redirect to a specific reviewed product. Your purchase of these products through affiliate links helps to generate commission for Chicagolandgardening.com, at no extra cost. Learn more)
Table of Contents
- Introduction
- What is a Geodesic Dome Greenhouse?
- Benefits of a Geodesic Dome Greenhouse
- Materials Required
- Step 1: Site Selection and Preparation
- Step 2: Building the Foundation
- Step 3: Assembling the Dome Structure
- Step 4: Installing the Plastic Covering
- Step 5: Ventilation and Temperature Control
- Step 6: Interior Setup and Planting
- Maintenance and Care Tips
- Conclusion
Introduction
Welcome to the world of DIY projects! If you’re a gardening enthusiast looking to take your hobby to the next level, building a geodesic dome greenhouse could be the perfect project for you. In this article, we will guide you through the step-by-step process of constructing your very own geodesic dome greenhouse, helping you create an ideal environment for nurturing plants.
A geodesic dome greenhouse is a unique and innovative structure that offers numerous benefits for both amateur and professional gardeners. Its geodesic design, inspired by natural forms and mathematical principles, provides exceptional strength and durability. This type of greenhouse is not only aesthetically pleasing but also highly efficient in terms of temperature regulation and space utilization.
Building a geodesic dome greenhouse is a rewarding DIY project that allows you to customize the size, design, and layout according to your specific needs. It offers a versatile space to grow a wide variety of plants throughout the year, regardless of the weather conditions outside. Whether you dream of cultivating your own organic vegetables, experimenting with exotic tropical plants, or simply extending your gardening season, a geodesic dome greenhouse can turn that dream into a reality.
In this comprehensive guide, we will walk you through each step of the construction process, from site selection and preparation to installing the plastic covering and setting up the interior. We will also provide tips on maintaining and caring for your greenhouse to ensure optimal plant growth and longevity of the structure.
So, if you’re ready to embark on an exciting DIY journey and create a sanctuary for your plants, let’s dive into the world of geodesic dome greenhouses. Get your tools ready, channel your inner architect, and let’s make your greenhouse dreams come true!
What is a Geodesic Dome Greenhouse?
A geodesic dome greenhouse is a unique type of greenhouse structure that is constructed using interconnected triangles to form a spherical shape. Inspired by the principles of geodesic geometry, these domes are known for their exceptional strength and durability. The design was popularized by Buckminster Fuller, an American architect and inventor, who believed that the geodesic dome was the most efficient and structurally sound way to enclose space.
Geodesic domes are made up of a network of struts, typically made from metal or PVC, that are connected at nodes or joints. This geometric pattern distributes stress evenly throughout the structure, allowing it to withstand extreme weather conditions such as strong winds and heavy snow loads. The spherical shape of the dome also maximizes interior space and helps to maintain a consistent temperature and airflow.
One key advantage of a geodesic dome greenhouse is its energy efficiency. The dome shape allows for more even distribution of heat and reduces the overall energy consumption needed for heating and cooling. The triangle panels of the dome provide ample surface area for sunlight to enter, ensuring optimal light exposure for plant growth.
Another benefit of a geodesic dome greenhouse is its versatility. The dome shape creates a spacious interior with no internal supports, allowing for maximum use of space. This makes it suitable for a wide range of gardening activities, from growing vegetables, flowers, and herbs to creating a tropical oasis filled with exotic plants. The unique shape and design of the dome also create a visually stunning feature in any garden or backyard.
Geodesic domes are designed to be customizable and scalable, meaning you can adjust the size and shape to fit your specific needs and available space. Whether you have a small backyard or a large property, a geodesic dome greenhouse can be tailored to meet your requirements. It offers a flexible and sustainable solution for year-round gardening, allowing you to extend your growing season and experiment with different types of plants.
In the next sections, we will guide you through the process of building a geodesic dome greenhouse, from choosing the right materials to setting up the interior. So, let’s get started and turn your vision of a geodesic dome greenhouse into a reality!
Benefits of a Geodesic Dome Greenhouse
A geodesic dome greenhouse offers a multitude of benefits for gardeners of all levels of experience. Whether you’re a beginner or a seasoned green thumb, here are some key advantages to consider:
- Strength and Durability: The geodesic design of the dome provides exceptional strength and stability, allowing it to withstand harsh weather conditions such as high winds and heavy snow loads. The interconnected triangles and spherical shape distribute stress evenly throughout the structure, making it structurally sound and long-lasting.
- Energy Efficiency: The dome shape of a geodesic greenhouse maximizes space and enhances energy efficiency. The unique design allows for better air circulation and distribution of heat, reducing the need for excessive heating and cooling. This not only saves energy but also helps to maintain a consistent temperature, creating an ideal environment for plant growth.
- Optimal Light Exposure: The triangular panels of a geodesic dome greenhouse provide ample surface area for sunlight to enter the structure from multiple angles. This ensures that plants receive sufficient light throughout the day, promoting healthy growth and photosynthesis. The shape of the dome also minimizes shadowing, allowing for more even light distribution.
- Space Utilization: Geodesic domes offer a spacious interior with no internal supports, maximizing the use of space for growing plants. The absence of support structures allows for flexibility in layout and arrangement, making it easier to optimize the available space. This means you can grow more plants in a smaller area compared to traditional greenhouse designs.
- Versatility: A geodesic dome greenhouse is highly versatile and can accommodate a wide variety of plants. The controlled environment inside the dome provides the perfect conditions for growing vegetables, herbs, flowers, or even creating a tropical garden with exotic plants. The design also allows for vertical gardening, making efficient use of vertical space.
- Visual Appeal: With its unique and futuristic design, a geodesic dome greenhouse adds a visually stunning element to any garden or backyard. The symmetrical shape and transparent covering create an attractive feature that can enhance the overall aesthetics of your outdoor space.
- Year-Round Gardening: One of the greatest advantages of a geodesic dome greenhouse is the ability to extend the growing season and cultivate plants year-round. The controlled environment inside the dome allows you to create a microclimate that protects plants from extreme temperatures, frost, and pests, enabling you to enjoy fresh harvests throughout the year.
These are just a few of the many benefits that a geodesic dome greenhouse provides. Now that you understand the advantages, let’s move on to the materials required and the step-by-step process of building your own geodesic dome greenhouse.
Materials Required
Before starting the construction of your geodesic dome greenhouse, it’s important to gather all the necessary materials. Here is a list of the key components you will need:
- Geodesic Dome Kit: To simplify the construction process, you can purchase a geodesic dome greenhouse kit, which includes all the necessary struts, connectors, and hardware. These kits are available in various sizes and materials, such as metal or PVC. Ensure that the kit you choose is suited for a greenhouse application.
- Covering Material: You will need a strong and durable covering material to enclose the dome structure. Common options include greenhouse-grade polyethylene plastic, polycarbonate panels, or greenhouse film. Consider factors such as light transmission, insulation properties, and longevity when selecting the covering material.
- Foundation Materials: Depending on your site and personal preference, you may need materials to create a foundation for your geodesic dome greenhouse. This can include options such as concrete footings, pressure-treated lumber, cinder blocks, or gravel.
- Tools: Gather a set of basic hand tools, such as a hammer, screwdriver, wrench, and pliers, to assemble the dome structure. Additionally, you may need a ladder, tape measure, level, and a mallet for the construction process.
- Additional Components: Consider any additional components you may need, based on your specific requirements. This can include items such as ventilation systems, watering systems, shelving, growing containers, and insulation materials. Research and plan these components based on your intended use of the greenhouse.
- Personal Protective Equipment (PPE): Ensure you have suitable PPE, such as gloves, safety glasses, and appropriate clothing, to protect yourself during the construction process.
It’s always a good idea to check with the specific manufacturer or supplier of the geodesic dome kit for any additional materials or tools required. Additionally, consider any local building codes or regulations that may impact your choice of materials or construction process.
By gathering all the necessary materials beforehand, you’ll be well-prepared and ready to start constructing your geodesic dome greenhouse. In the next section, we will guide you through the step-by-step process of selecting the right site and preparing it for the construction of your greenhouse.
Step 1: Site Selection and Preparation
Choosing the right site and preparing it properly is crucial for the success of your geodesic dome greenhouse. Follow these steps to ensure a suitable location:
- Sun Exposure: Select a site that receives plenty of sunlight throughout the day. Ideally, the greenhouse should have direct sun exposure for at least 6-8 hours daily. Avoid areas that are heavily shaded by buildings, trees, or other structures that may obstruct sunlight.
- Soil Drainage: Ensure that the site has good soil drainage to prevent waterlogging. Avoid low-lying areas or spots where water tends to accumulate. Proper drainage will help prevent root rot and other water-related plant diseases.
- Access to Water and Electricity: Consider the proximity of a water source for irrigation purposes and access to electricity for powering any necessary equipment, such as fans or heaters. Having these utilities nearby will make it easier to maintain and manage your greenhouse properly.
- Wind Protection: Take into account the prevailing wind direction in your area. It is beneficial to position the greenhouse away from strong winds or provide windbreaks, such as hedges or fences, to shield the structure. This will help reduce the risk of damage to the greenhouse and minimize heat loss due to wind-chill.
- Local Regulations: Check with your local municipality or homeowner’s association to understand any regulations or permits required for building a greenhouse. Some areas may have specific rules regarding setbacks, size limitations, or even the use of certain materials. Adhering to these regulations will ensure a smooth construction process and avoid any potential conflicts in the future.
- Clear the Site: Prepare the selected site by removing any vegetation, rocks, or debris. Ensure the area is level and free from obstructions that may hinder the construction process. This will provide a clean and stable foundation for your geodesic dome greenhouse.
- Mark the Footprint: Use stakes or spray paint to mark out the exact dimensions of the greenhouse on the ground. This will help visualize the space and ensure accurate positioning of the structure. Double-check the dimensions to ensure alignment with the chosen size of the geodesic dome kit.
By carefully selecting and preparing the site, you’ll create an ideal foundation for the construction of your geodesic dome greenhouse. Once the site is ready, you can proceed to the next step: building the foundation.
Step 2: Building the Foundation
The foundation plays a crucial role in providing stability and support for your geodesic dome greenhouse. Follow these steps to build a solid foundation:
- Choose the Foundation Type: Depending on your preferences, available resources, and local regulations, choose a suitable foundation type. Common options include concrete footings, pressure-treated lumber, cinder blocks, or gravel. Ensure that the chosen foundation type is suitable for the size and weight of your geodesic dome greenhouse.
- Excavate the Area: Clear the marked area and excavate the ground as needed for the foundation. Dig to a depth that allows for stability and proper drainage. Use a shovel or a small excavator to remove any grass, roots, or rocks.
- Level the Ground: Ensure that the excavated area is level and even. Use a level and a straight board or a laser level to check for any slopes or unevenness. This step is essential for maintaining the structural integrity of the foundation and ensuring stability for the greenhouse.
- Create Footings or Frame: Depending on the chosen foundation type, create footings, or assemble a frame using pressure-treated lumber or other suitable materials. Follow the appropriate building techniques and refer to local building codes to ensure the foundation is strong and durable.
- Anchor the Foundation: Secure the foundation to the ground to prevent shifting or movement. This can be done by attaching brackets, stakes, or anchor bolts into the footings or frame. Ensure that the anchoring system provides sufficient stability to withstand any potential lateral forces.
- Check for Level and Square: Double-check the levelness and squareness of the foundation. This will ensure that the geodesic dome greenhouse sits evenly on the foundation and that the structure will be properly aligned.
- Allow Time for Curing: If you’ve chosen a concrete foundation, allow sufficient time for the concrete to cure or set before proceeding with the construction of the geodesic dome greenhouse. Follow the manufacturer’s instructions to ensure that the foundation is fully cured and ready to support the structure.
Building a strong and stable foundation is essential for the long-term success and structural integrity of your geodesic dome greenhouse. Once the foundation is ready, you can move on to the next step: assembling the dome structure.
Step 3: Assembling the Dome Structure
Once the foundation is in place, it’s time to start assembling the geodesic dome structure of your greenhouse. Follow these steps to successfully build the dome:
- Organize the Materials: Lay out all the components of your geodesic dome kit and organize them according to their shapes and sizes. This will make it easier to locate the necessary pieces during the assembly process.
- Identify the Pattern: Each geodesic dome kit has a specific pattern or configuration that determines how the struts and connectors fit together. Refer to the instructions provided by the manufacturer to identify the pattern and understand how the different elements should be connected.
- Start with the Base: Begin assembling the dome from the base or bottom tier. Connect the struts and connectors as per the pattern, ensuring a secure fit. Use the appropriate tools, such as a screwdriver or wrench, to tighten the connectors and make them stable.
- Proceed to the Upper Tiers: Once the base is assembled, begin adding the upper tiers of the dome. Follow the pattern and sequence specified by the manufacturer, connecting the struts correctly to achieve the desired shape. Take your time to ensure precision and accuracy in the assembly process.
- Double-Check Connections: After each tier is added, double-check all the connections to ensure they are secure and properly aligned. This step is crucial for maintaining the structural integrity of the dome and avoiding any weak points or instability.
- Work from the Inside Out: As the dome structure grows, it may become challenging to reach the interior parts. To make it easier, work from the inside out, gradually moving towards the outer struts and connectors. This will allow for easier access and a more efficient assembly process.
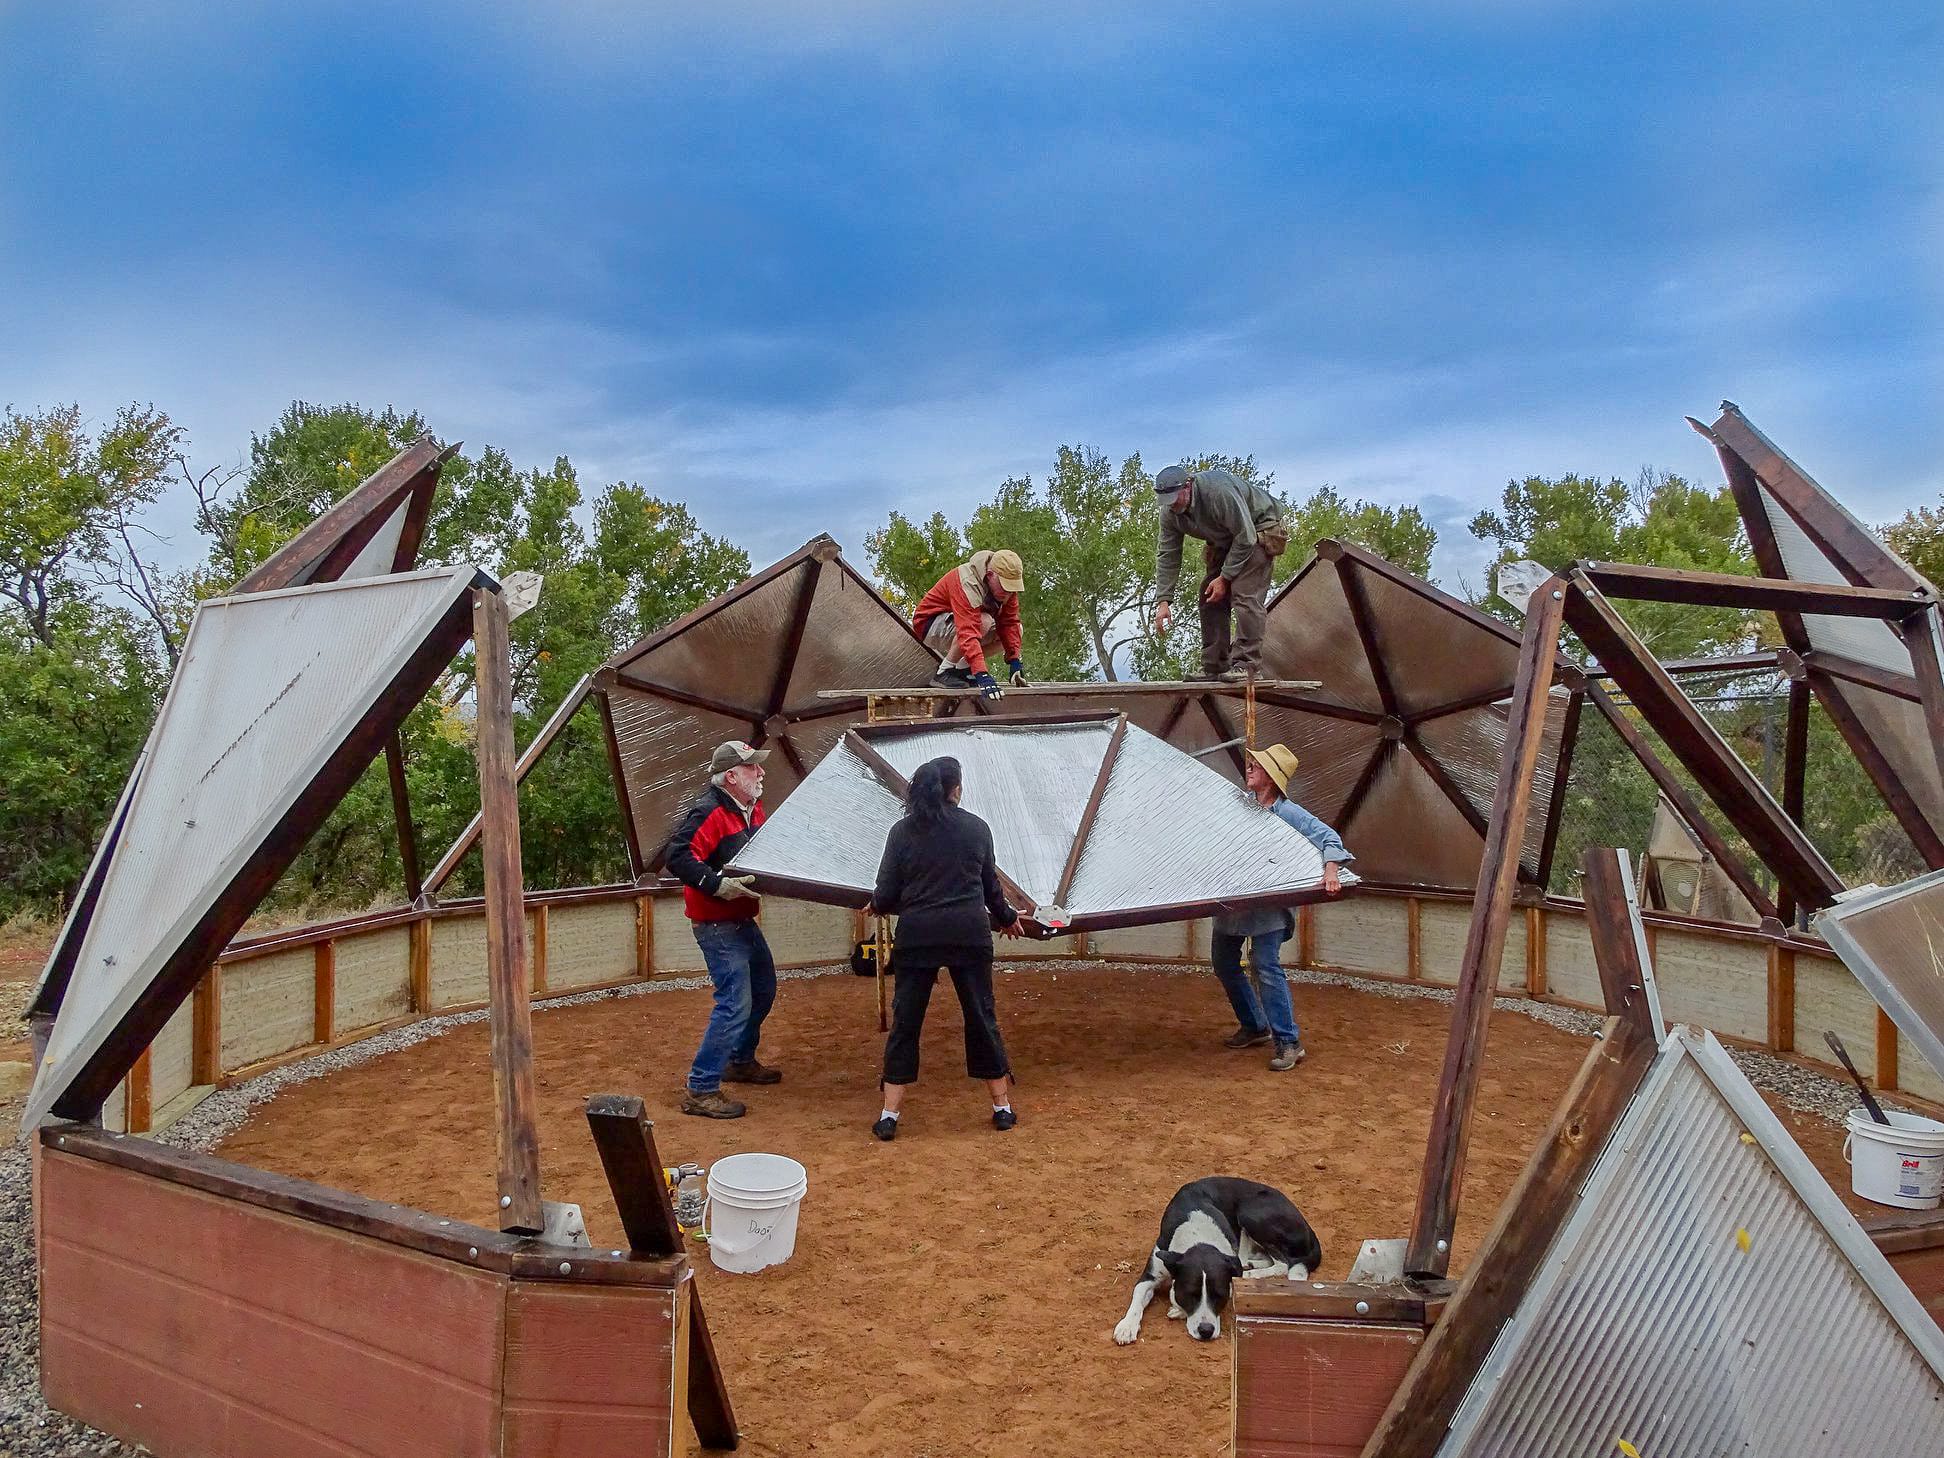
- Follow Safety Precautions: During the assembly process, prioritize safety by following proper lifting techniques, using ladders safely, and wearing appropriate personal protective equipment (PPE) such as gloves and safety glasses. Take breaks as needed and avoid rushing the assembly to ensure a safe and successful construction process.
- Ask for Assistance if Needed: If the assembly process becomes challenging or you require assistance, don’t hesitate to ask for help. Enlist the support of family members, friends, or fellow gardening enthusiasts who can lend a hand and make the process more enjoyable and efficient.
- Ensure Stability and Structural Integrity: Once the dome structure is fully assembled, check for stability and structural integrity. Shake or gently push the structure to ensure that it is well-anchored to the foundation and does not wobble or shift. If necessary, reinforce the connections or make adjustments to improve stability.
By carefully following these steps, you’ll successfully assemble the dome structure of your geodesic dome greenhouse. Next, we will move on to the next step: installing the plastic covering to enclose the greenhouse.
Step 4: Installing the Plastic Covering
With the dome structure assembled, it’s time to install the plastic covering to enclose your geodesic dome greenhouse. Follow these steps to effectively install the covering:
- Choose the Covering Material: Select your preferred covering material, such as greenhouse-grade polyethylene plastic, polycarbonate panels, or greenhouse film. Ensure that the material is suitable for your specific climate and provides adequate light transmission and insulation properties.
- Prepare the Covering: Lay out the plastic covering in a clean and open area, allowing it to acclimate to the temperature and stretch slightly if necessary. Check the dimensions to ensure it is sized correctly for your geodesic dome greenhouse.
- Start at the Base: Begin the installation process at the base of the greenhouse. Secure one end of the covering material to the base or foundation using appropriate fasteners, such as clips or nails. Ensure that it is tight and evenly stretched to prevent sagging or bunching.
- Work Your Way Up: Gradually work your way up the dome, securing the covering material to the frame as you go. Use additional fasteners or adhesive tape to hold the plastic in place, especially at critical points such as the apex and corners of the dome. Smooth out any wrinkles or folds to achieve a neat and taut appearance.
- Ensure Proper Ventilation: As you install the plastic covering, create appropriate ventilation openings to allow for airflow. These can be achieved by leaving gaps or openings in the covering material or by installing vents or windows in strategic locations. Proper ventilation is crucial for regulating temperature and preventing excess humidity inside the greenhouse.
- Seal and Fasten Edges: Pay close attention to the edges of the covering material to ensure a secure and watertight seal. Use high-quality tape, such as greenhouse repair tape, to seal any seams or gaps and prevent water infiltration. Double-check the edges to ensure the covering is firmly attached to the dome structure.
- Trim Excess Material: Once the covering is securely fastened, trim any excess material, taking care not to cut too close to the frame. Leave a small margin of overlap to ensure proper coverage and eliminate any potential gaps that may compromise the integrity of the greenhouse.
- Inspect the Installation: After completing the installation, inspect the overall coverage and tightness of the plastic. Check for any tears, loose areas, or potential weak points that may need reinforcement. Make any necessary adjustments or repairs to ensure the longevity and effectiveness of the covering.
By following these steps, you’ll successfully install the plastic covering to enclose your geodesic dome greenhouse, creating a controlled and protected environment for your plants. Next, let’s move on to step 5: ventilation and temperature control within the greenhouse.
Step 5: Ventilation and Temperature Control
Proper ventilation and temperature control are essential for maintaining a healthy and thriving environment inside your geodesic dome greenhouse. Here are some important steps to ensure optimal airflow and temperature regulation:
- Install Vents or Windows: Consider installing vents or windows in strategic locations around the greenhouse, such as the apex or sidewalls. These openings allow for fresh air exchange and promote natural ventilation. It’s important to have adjustable vents or windows to regulate airflow based on temperature and humidity levels.
- Automatic Ventilation Systems: For more precise control, consider using automatic ventilation systems. These can be thermostatically controlled or connected to sensors that measure temperature and humidity. They can automatically open and close vents or windows, ensuring proper airflow without the need for manual adjustment.
- Circulation Fans: Install circulation fans inside the greenhouse to promote air movement. These fans help distribute heat, humidity, and fresh air evenly throughout the space. They also help prevent stagnant air and discourage the growth of mold or fungal diseases.
- Shade Cloth: During hot summer months, excessive sunlight can raise temperatures inside the greenhouse. Install shade cloth or use shade paint on the exterior of the greenhouse to reduce the intensity of the sunlight and prevent overheating. This will help maintain optimal temperature levels for plant growth.
- Temperature Monitoring: Use a thermometer or temperature monitoring system to regularly check the temperature inside the greenhouse. This will help you identify any potential fluctuations or extremes. Maintain the temperature within the optimal range for your specific plants by adjusting ventilation, shading, or using additional heating or cooling methods as needed.
- Additional Heating: In colder climates or during winter months, consider adding supplemental heating to maintain a consistent temperature inside the greenhouse. This can include options such as electric heaters, propane heaters, or radiant heating systems. Ensure that any heating systems are safe, energy-efficient, and suitable for greenhouse use.
- Humidity Control: Monitor and control humidity levels inside the greenhouse to prevent excess moisture, which can lead to disease and fungal issues. Use a humidity gauge or hygrometer to monitor humidity levels and consider using dehumidifiers or fans to maintain optimal humidity for your specific plants.
- Regular Air Exchange: Open vents or windows periodically to allow for fresh air exchange, especially during mild weather conditions. This helps replenish carbon dioxide levels and expel any stagnant or stale air. Regular air exchange also minimizes the risk of pests or diseases by reducing humidity and promoting a healthy environment.
By implementing proper ventilation and temperature control measures, you’ll create a favorable environment inside your geodesic dome greenhouse, promoting optimal plant growth and reducing the risk of plant stress or disease. Next, we’ll move on to step 6: setting up the interior of your greenhouse and getting ready for planting.
Step 6: Interior Setup and Planting
With the geodesic dome greenhouse constructed and all the necessary ventilation and temperature control measures in place, it’s time to set up the interior and start planting. Follow these steps to create an organized and functional space:
- Plan the Layout: Consider the layout of your greenhouse and determine the best arrangement for your plants. Take into account the specific needs of each plant, such as sunlight requirements, spacing, and accessibility for watering and maintenance.
- Shelving and Benches: Install shelving or benches to make efficient use of vertical space and provide a platform for your plants. Choose materials that are durable, easy to clean, and suitable for a greenhouse environment, such as stainless steel or treated wood.
- Potting Stations: Set up potting stations for planting and transplanting. Include a work surface, potting soil, pots, and tools such as trowels and watering cans. Keep these stations organized and well-stocked for easy access during planting and maintenance activities.
- Irrigation System: Consider installing an irrigation system to provide consistent and efficient water distribution to your plants. Options include drip irrigation, soaker hoses, or misting systems. Ensure that the system is well-maintained and properly adjusted for the specific watering needs of your plants.
- Organize Planting Areas: Group plants with similar water and lighting requirements together. This will make it easier to monitor and adjust their care. Label each planting area with the names or varieties of the plants to help keep track of their progress and maintenance needs.
- Monitoring and Maintenance Tools: Keep essential tools on hand for monitoring and maintaining your greenhouse. This can include a thermometer, moisture meter, pruning shears, and a notebook or digital device for recording observations and tracking plant growth.
- Implement Pest Control Measures: Regularly monitor for pests and disease, and implement appropriate pest control measures. This can include physical barriers, such as insect netting or sticky traps, as well as organic pest control methods like companion planting, beneficial insects, and natural insecticides.
- Implement Lighting: If your greenhouse does not receive adequate natural light, consider supplementing it with artificial lighting. Install grow lights that provide the specific light spectrum required for optimal plant growth. Adjust the positioning and duration of the lights according to the light requirements of your plants.
- Maintain a Clean and Organized Space: Regularly clean and tidy your greenhouse to maintain a healthy environment for your plants. Remove any fallen leaves or plant debris, sanitize tools, and keep pathways clear. This will help prevent the buildup of pests, diseases, and tripping hazards.
- Monitor and Adjust: Continuously monitor the growth and health of your plants. Observe any signs of stress, nutrient deficiencies, or pests. Make necessary adjustments to watering, lighting, and other environmental factors to ensure the best possible conditions for your plants.
By following these steps, you’ll create an organized, efficient, and productive interior space in your geodesic dome greenhouse. This will provide the ideal environment for your plants to thrive and will make the process of gardening and harvesting a joyous and rewarding experience. With the interior setup complete, you’re now ready to enjoy the fruitful results of your hard work and dedication.
Maintenance and Care Tips
Maintaining and caring for your geodesic dome greenhouse is essential to ensure the long-term success of your plants and the structural integrity of the greenhouse itself. Here are some important tips to help you maintain and care for your greenhouse:
- Regular Inspections: Conduct regular inspections of the greenhouse to check for any signs of damage, wear and tear, or potential issues. Look for leaks, loose connections, or areas that may need reinforcement. Address any problems promptly to avoid further damage.
- Cleanliness and Sanitation: Keep your greenhouse clean and free of debris. Regularly sweep the floor, remove fallen leaves, and sanitize tools and equipment. This helps prevent the buildup of pests, diseases, and fungal growth. Use plant-safe cleaning agents to maintain a hygienic environment.
- Watering: Water your plants consistently and appropriately based on their specific needs. Avoid overwatering, as excessive moisture can lead to root rot and other water-related issues. Consider using a drip irrigation system or self-watering containers to ensure efficient and controlled watering.
- Fertilization: Provide necessary nutrients to your plants through regular fertilization. Use organic or slow-release fertilizers to avoid overloading the soil with excessive nutrients. Follow the manufacturer’s instructions or consult with a gardening expert to determine the appropriate type and frequency of fertilization for your plants.
- Pest and Disease Control: Monitor your plants regularly for any signs of pests or diseases. Implement integrated pest management strategies, such as using beneficial insects, companion planting, and organic pest control methods. Act promptly at the first sign of pest or disease infestation to prevent further spread and damage.
- Proper Pruning and Training: Prune and train your plants as necessary to maintain their shape, control their growth, and improve airflow within the greenhouse. Regularly remove dead or diseased plant parts to prevent the spread of diseases and promote healthy plant growth.
- Climate Monitoring: Continuously monitor the temperature, humidity, and light levels inside your greenhouse. Use appropriate instruments, such as thermometers and hygrometers, to track these factors. Make necessary adjustments to ventilation, shading, and temperature control systems to maintain the ideal climate for your plants.
- Seasonal Adjustments: Adapt your greenhouse practices and routines based on the changing seasons. Pay attention to temperature fluctuations, daylight hours, and humidity levels. Adjust the lighting, ventilation, and watering to accommodate the specific needs of your plants during different seasons.
- Plant Rotation: Practice crop rotation to prevent the buildup of pests and diseases in the soil. Rotate plantings, especially if you grow the same type of plants repeatedly. This helps maintain soil health and reduces the risk of nutrient depletion and pest infestations.
- Continuing Education: Keep learning and staying updated with the latest gardening techniques, tips, and research. Attend workshops, read books, and connect with fellow gardeners to broaden your knowledge and improve your skills as a greenhouse gardener.
By following these maintenance and care tips, you’ll create an environment that promotes healthy plant growth, ensures the longevity of your geodesic dome greenhouse, and allows you to enjoy successful gardening for years to come.
Conclusion
Congratulations! You have reached the end of our guide on how to build a geodesic dome greenhouse. By following the steps outlined in this article, you have acquired the knowledge and guidance needed to embark on a fulfilling DIY project that will transform your gardening experience.
A geodesic dome greenhouse offers numerous benefits, including strength and durability, energy efficiency, optimal light exposure, space utilization, versatility, and year-round gardening possibilities. With careful site selection, proper foundation construction, and meticulous assembly of the dome structure, your greenhouse will provide a robust and controlled environment for your plants.
Remember to prioritize ventilation and temperature control within the greenhouse. Installing vents, using circulation fans, and implementing shading techniques will ensure appropriate airflow and prevent overheating. Additionally, maintaining cleanliness, monitoring humidity levels, and practicing proper watering and fertilization techniques are vital for the health and growth of your plants.
Regular maintenance and care, such as inspections, sanitation, pest control, and climate monitoring, will help sustain your geodesic dome greenhouse over time. Continually evaluate and make adjustments based on the changing seasons and the needs of your plants. By staying informed and willing to adapt, you will create an environment that nurtures thriving plants and a garden you can be proud of.
We hope this guide has inspired you to embark on the exciting journey of building and maintaining your own geodesic dome greenhouse. Get ready to witness the joy of growing an abundance of plants, exploring new varieties, and experiencing the rewards of your hard work and dedication.
So, grab your tools, gather your materials, and let’s get started on creating a thriving and beautiful geodesic dome greenhouse that will become the centerpiece of your gardening adventure.
