Home>Gardening Techniques>DIY Projects>How To Build A Greenhouse With PVC Pipe
DIY Projects
How To Build A Greenhouse With PVC Pipe
Modified: January 22, 2024
Learn how to build a greenhouse with PVC pipe in this comprehensive DIY project guide. Create your own sustainable oasis and grow your own produce.
(Many of the links in this article redirect to a specific reviewed product. Your purchase of these products through affiliate links helps to generate commission for Chicagolandgardening.com, at no extra cost. Learn more)
Table of Contents
- Introduction
- Materials Needed
- Step 1: Designing the Greenhouse
- Step 2: Gathering the PVC Pipes and Fittings
- Step 3: Cutting and Assembling the PVC Frame
- Step 4: Creating the Base and Foundation
- Step 5: Covering the Greenhouse with Plastic
- Step 6: Installing the Doors and Vents
- Step 7: Adding Shelving and Planting Beds
- Step 8: Maintaining and Caring for the Greenhouse
- Conclusion
Introduction
Welcome to the world of DIY greenhouse projects! Building a greenhouse with PVC pipe is a cost-effective and practical way to extend your gardening season and protect your plants from harsh weather conditions. Whether you’re a seasoned gardener or a beginner, constructing your own greenhouse can be a rewarding and fulfilling experience.
In this article, we will guide you through the step-by-step process of building a greenhouse using PVC pipes. This versatile and lightweight material is easy to work with, making it an ideal choice for DIY projects. With some basic tools and materials, you’ll be able to create a functional and efficient greenhouse to nurture your plants throughout the year.
A greenhouse provides a controlled environment for your plants, allowing you to regulate temperature, humidity, and lighting. This enables you to grow a wider variety of plants, extend the growing season, and protect crops from pests and diseases. Whether you’re interested in growing flowers, herbs, fruits, or vegetables, a greenhouse will provide the perfect conditions to maximize their growth and yield.
Building a greenhouse with PVC pipe offers several advantages. Firstly, PVC is affordable and readily available at most home improvement stores, making it a budget-friendly option. Additionally, PVC is lightweight, making it easy to transport and work with. Its flexibility also allows for customization and adjustments to suit your specific needs and available space.
Before we delve into the details, it’s important to emphasize safety. Always ensure that you work in a safe and well-ventilated area, wear appropriate protective gear, and use tools responsibly. Now, let’s gather the materials needed to get started on your DIY PVC greenhouse project!
Materials Needed
Before you begin building your greenhouse with PVC pipe, gather the following materials:
- PVC Pipes: The main component of your greenhouse frame, you will need several lengths of PVC pipes in various sizes. Opt for schedule 40 or 80 PVC pipes, as they are durable and weather-resistant. The specific lengths and quantities will depend on the size and design of your greenhouse.
- PVC Fittings: These connectors will allow you to join the PVC pipes together to form the frame. Common fittings include elbows, tees, cross fittings, and connectors for creating doors and vents. Make sure to choose fittings that match the size of your PVC pipes.
- Plastic Sheeting: This will serve as the cover for your greenhouse, allowing sunlight to enter while protecting your plants from the elements. Look for UV-protected greenhouse plastic or polyethylene sheeting with a thickness of at least 6 mil for durability.
- Fasteners: Secure your PVC frame with screws, nails, or cable ties. Additionally, you may need brackets, clamps, or adhesive for attaching the plastic sheeting to the frame.
- Foundation Materials: Depending on your preference and the available space, you can choose to build your greenhouse on a concrete foundation, wooden frame, or directly on the ground. Ensure you have the necessary materials for the chosen foundation type.
- Doors and Vents: Decide on the number and style of doors and vents you want for your greenhouse. You can use PVC pipes and fittings to create these openings or repurpose existing materials.
- Tools: To assemble your greenhouse, you will need basic tools such as a hacksaw or PVC pipe cutter for cutting the pipes, a screwdriver or drill for fastening the PVC fittings and plastic sheeting, measuring tape, level, and a utility knife for trimming the plastic sheeting.
- Add-Ons: Depending on your needs and preferences, you may want to consider additional features such as shelves, benches, irrigation systems, and lighting for your greenhouse. Make sure to gather the necessary materials for these add-ons.
Once you have gathered all the materials needed, you are ready to move on to the next step: designing your greenhouse.
Step 1: Designing the Greenhouse
Before diving into the construction process, it’s essential to spend some time planning and designing your greenhouse. This will ensure that you create a structure that meets your specific needs and maximizes the potential of your gardening endeavors. Follow these steps to design your PVC pipe greenhouse:
- Determine the Size: Measure the available space in your garden or backyard to determine the optimal size for your greenhouse. Consider the types of plants you plan to grow and how much space they will require. Keep in mind that a larger greenhouse will provide more room for plants but may require additional materials and maintenance.
- Select the Shape: Decide on the shape of your greenhouse. Common options include a traditional rectangular shape, a sloped roof for better water drainage, or a hoop-style greenhouse for increased stability and cost-effectiveness.
- Analyze the Sun Exposure: Assess the amount of sunlight your chosen location receives throughout the day and how it changes during different seasons. Ideally, your greenhouse should be positioned to receive maximum sunlight exposure for optimal plant growth.
- Consider Ventilation: Adequate airflow is crucial for the health of your plants. Plan for doors, windows, or vents that can be opened and closed as needed to regulate temperature, humidity, and airflow.
- Assess the Foundation: Decide on the type of foundation you prefer, considering factors such as stability, drainage, and convenience. A concrete foundation offers stability, while a wooden frame provides flexibility. Alternatively, you can build directly on the ground if the soil conditions allow.
- Plan Access: Determine how you will enter and exit the greenhouse. Consider the number and location of doors based on the layout of your garden and potential foot traffic.
- Sketch Your Design: Once you have considered all these aspects, sketch your greenhouse design on paper or use design software. Include measurements, the location of doors and vents, and any additional features you plan to incorporate.
By carefully designing your greenhouse, you will have a clear roadmap for the construction process. This will help you gather the necessary materials and ensure that your greenhouse meets your expectations. With your design in hand, it’s time to move on to the next step: gathering the PVC pipes and fittings.
Step 2: Gathering the PVC Pipes and Fittings
Now that you have a clear design for your PVC pipe greenhouse, it’s time to gather the necessary PVC pipes and fittings to construct the frame. Follow these steps to ensure you have everything you need:
- Refer to Your Design: Take a look at your greenhouse design and make note of the dimensions and lengths of PVC pipes required for each section. Consider the number of vertical supports, horizontal beams, and any additional framing elements.
- Calculate PVC Pipe Lengths: Based on your design, calculate the lengths of PVC pipes required for each section. Take into account any connectors or fittings that will be attached to the pipes, ensuring that you allow for proper positioning and stability.
- Choose the Right PVC Pipe Diameter: Consider the size and weight of your greenhouse when selecting the diameter of the PVC pipes. Thicker pipes provide more stability and strength, but they may be heavier and more expensive. Select a diameter that can adequately support the weight of the plastic covering and withstand wind and other weather conditions.
- Purchase PVC Pipes and Fittings: Visit your local home improvement store or hardware store to purchase the required PVC pipes and fittings. Make sure to double-check your measurements and quantities to ensure you have enough materials. Opt for high-quality, schedule 40 or 80 PVC pipes and fittings to ensure durability and longevity.
- Consider Additional Supports: Depending on the size and shape of your greenhouse, you may need additional support materials such as wooden stakes or metal poles. These can be used to reinforce the PVC frame and provide extra stability.
- Check for Compatibility: Before finalizing your purchase, ensure that all the PVC pipes and fittings are compatible and can be securely connected. Double-check the measurements to avoid any discrepancies or issues during the construction process.
Gathering the necessary PVC pipes and fittings is a critical step in building your greenhouse. Take the time to thoroughly plan and gather all the materials needed, as this will streamline the construction process and ensure a successful outcome. With your PVC pipes and fittings in hand, you are ready to move on to the next step: cutting and assembling the PVC frame.
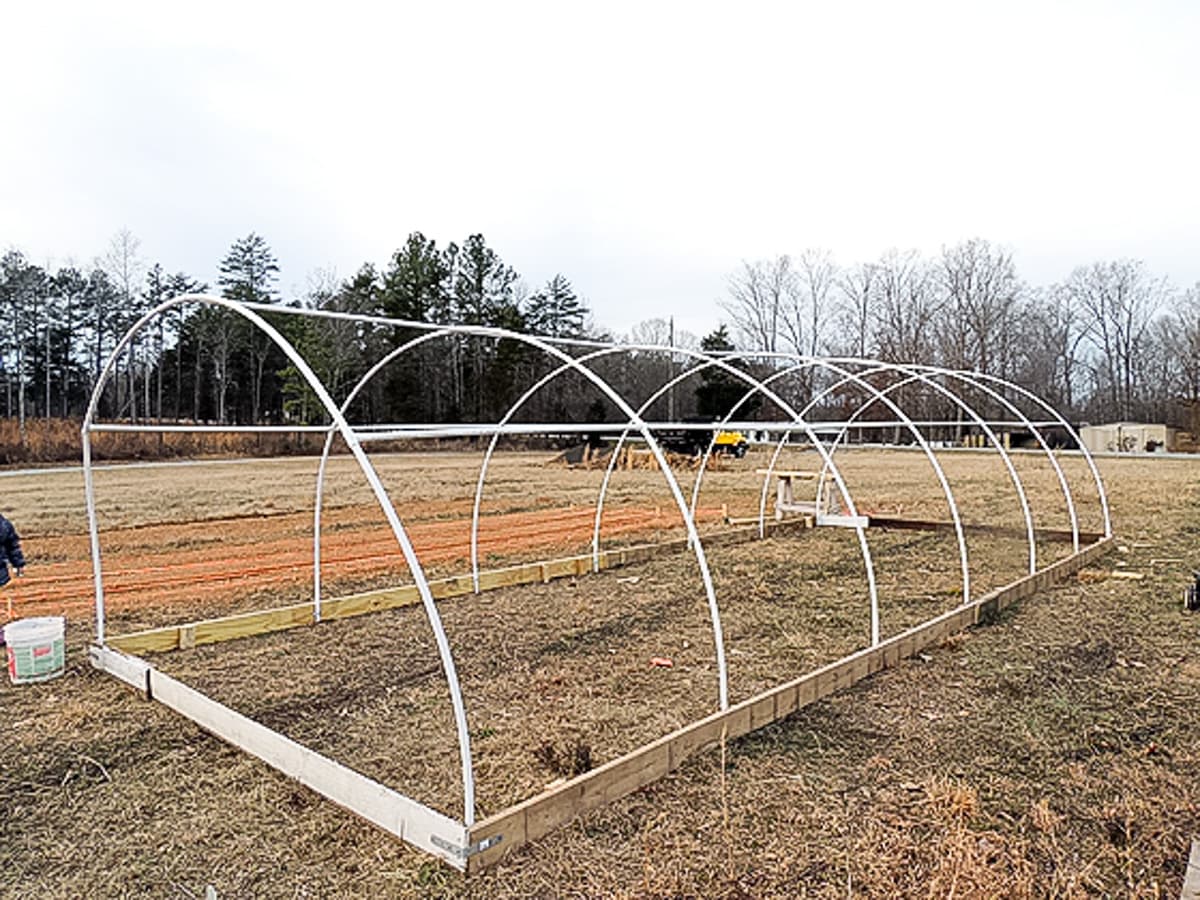
Step 3: Cutting and Assembling the PVC Frame
With all the necessary PVC pipes and fittings gathered, it’s time to move on to the exciting part of building your greenhouse: cutting and assembling the PVC frame. Follow these steps to create a sturdy and functional greenhouse structure:
- Prepare Your Work Area: Find a clean and well-lit area where you can comfortably work on cutting and assembling the PVC pipes. Clear any debris or obstacles that may hinder the construction process.
- Measure and Mark: Refer to your greenhouse design and carefully measure and mark the lengths of the PVC pipes according to the dimensions specified in your plan. Use a measuring tape and a marker or pencil to make accurate marks.
- Cut the PVC Pipes: Using a hacksaw or a PVC pipe cutter, carefully cut the PVC pipes according to the marked measurements. Ensure that your cuts are straight and clean for a proper fit. Take your time and be cautious during this step to avoid any accidents.
- Test Fit the Pipes: As you cut each PVC pipe, test fit them together with the PVC fittings to ensure they align properly and create the desired frame shape. Make any adjustments as necessary to ensure a snug fit.
- Assemble the Frame: Once you have all the PVC pipes cut to the correct lengths and test fitted with the fittings, begin assembling the frame according to your greenhouse design. Start with the base and work your way up, attaching the horizontal beams and vertical supports. Use PVC cement or adhesive if desired for added stability.
- Check for Squareness: As you assemble the PVC frame, periodically check for squareness using a carpenter’s square or a diagonal measurement. This will help ensure that your greenhouse frame is level and properly aligned.
- Secure the Joints: Once the frame is fully assembled, secure the PVC pipes and fittings together using appropriate fasteners such as screws, nails, or cable ties. This will ensure that the frame remains stable and sturdy.
Take your time during the cutting and assembling process to ensure that your PVC frame is accurately constructed. Mistakes made at this stage can lead to issues down the line. With the PVC frame in place, you’re now ready to move on to the next step: creating the base and foundation for your greenhouse.
Step 4: Creating the Base and Foundation
With the PVC frame assembled, it’s time to focus on creating a solid base and foundation for your greenhouse. A sturdy base will provide stability and support for your structure, ensuring its longevity. Follow these steps to create the base and foundation:
- Choose the Base Material: Depending on your specific needs and preferences, decide on the type of base material for your greenhouse. Common options include concrete, wood, or directly on the ground. Consider factors such as stability, drainage, and convenience.
- Prepare the Ground: If you decide to build your greenhouse directly on the ground, prepare the area by removing any vegetation, rocks, or debris. Level the ground and ensure it is compacted to provide a solid foundation.
- Build a Wooden Frame: If you prefer a wooden base, construct a sturdy frame using pressure-treated lumber. Measure and cut the boards to match the dimensions of your greenhouse, and secure them together using screws or nails.
- Create a Concrete Foundation: For a more permanent and durable base, consider pouring a concrete foundation. Dig a trench slightly wider and longer than the dimensions of your greenhouse. Install form boards around the perimeter and fill the area with a concrete mix. Smooth the surface and ensure it is level using a long straightedge or a level.
- Attach the PVC Frame to the Base: Once your base or foundation is ready, secure the PVC frame to it using appropriate fasteners such as screws, nails, or brackets. This will anchor the frame to the base, providing additional stability.
- Check for Levelness: After attaching the PVC frame to the base, use a level to ensure that the greenhouse is level and properly aligned. Make any necessary adjustments to ensure a balanced structure.
- Consider Drainage: For proper drainage, create a slight slope in the base or foundation to allow water to flow away from the greenhouse. This will prevent water buildup and potential damage to the structure or plants.
By creating a solid base and foundation for your greenhouse, you will ensure its stability and longevity. Take the time to carefully plan and construct the base according to your specific needs and preferences. With the base in place, you’re now ready to move on to the next step: covering the greenhouse with plastic.
Step 5: Covering the Greenhouse with Plastic
Now that you have your PVC frame assembled and secured to the base, it’s time to cover your greenhouse with plastic sheeting. The plastic will serve as a protective barrier, allowing sunlight to enter and creating a controlled environment for your plants. Follow these steps to properly cover your greenhouse:
- Measure and Cut the Plastic: Start by measuring the dimensions of your PVC frame. Add a few inches to each measurement to ensure proper coverage. Using a utility knife or scissors, carefully cut the plastic sheeting according to the measured dimensions.
- Secure the Plastic: Begin by draping the cut plastic sheeting over the PVC frame. Make sure it is centered and evenly distributed. Use clamps, brackets, or adhesive to secure the plastic to the frame. Work systematically, securing one side at a time to prevent wrinkles or sagging.
- Tighten and Smooth: As you secure the plastic, ensure it is taut and smooth, without any significant wrinkles. Pull the plastic snugly and use clamps or fasteners to keep it in place. Smooth out any minor wrinkles or creases with your hands.
- Trim Excess Plastic: Trim any excess plastic using a utility knife or scissors. Be careful not to cut too close to the frame, leaving a small overhang of plastic to ensure proper coverage and attachment.
- Create Openings: Using a utility knife, carefully cut openings for doors, vents, and any other necessary access points. Reinforce these openings with additional plastic or PVC pipe fittings to prevent tearing or fraying.
- Consider Ventilation: Depending on the design of your greenhouse, consider adding windows or vents for proper ventilation. These can be made by cutting additional openings in the plastic sheeting and attaching vents made from PVC pipes and fittings.
- Inspect and Secure: Once the plastic is securely in place, inspect the entire greenhouse to ensure there are no loose or poorly secured areas. Make any necessary adjustments or reinforcements to ensure the plastic stays securely attached.
Properly covering your greenhouse with plastic is essential for creating a controlled and protected environment for your plants. Take your time during this step, ensuring the plastic is secure, taut, and properly attached to the frame. With the greenhouse covered, you’re now ready to move on to the next step: installing the doors and vents.
Step 6: Installing the Doors and Vents
As you continue to build your PVC pipe greenhouse, it’s time to install the doors and vents. These openings are essential for proper airflow, temperature regulation, and easy access to your plants. Follow these steps to install the doors and vents in your greenhouse:
- Plan the Placement: Based on your greenhouse design and layout, determine the ideal locations for doors and vents. Consider factors such as sunlight exposure, airflow, and ease of access.
- Measure and Mark: Use a measuring tape and a marker or pencil to measure and mark the dimensions of the doors and vents on the plastic sheeting.
- Cut Openings: Using a utility knife or scissors, carefully cut the marked openings for the doors and vents. Take your time and cut along the marked lines, ensuring smooth and clean cuts.
- Add Door Frames: If desired, construct door frames using PVC pipes and fittings. Measure and cut the necessary PVC pipes to create the frame, and use PVC adhesive or brackets to secure them to the plastic sheeting.
- Attach Doors and Vents: Install the doors and vents in their designated openings. Use hinges and screws to attach doors, allowing for easy opening and closing. For vents, use PVC pipe fittings to create flaps or adjustable openings.
- Secure and Seal: Inspect the doors and vents, ensuring they are securely attached and sealed. Use additional PVC pipe fittings or adhesive to reinforce the connections and prevent any air leaks.
- Test Functionality: Open and close the doors and vents to ensure they operate smoothly. Make any necessary adjustments or repairs to ensure proper functionality.
- Consider Additional Features: Depending on your needs and preferences, you may want to add features such as window screens, insect netting, or automatic openers for the vents. Consider these options and install them as desired.
Properly installing the doors and vents in your greenhouse is crucial for maintaining a healthy and thriving environment for your plants. Take your time during this step, ensuring that the openings are properly marked, cut, and installed. With the doors and vents in place, you’re now ready to move on to the next step: adding shelving and planting beds.
Step 7: Adding Shelving and Planting Beds
As your DIY PVC pipe greenhouse nears completion, it’s time to focus on organizing the space and creating a suitable environment for your plants. Adding shelving and planting beds will maximize your growing area and provide efficient use of space. Follow these steps to add shelving and planting beds to your greenhouse:
- Assess the Available Space: Evaluate the dimensions of your greenhouse and determine the best areas for shelving and planting beds. Consider factors such as sunlight exposure, accessibility, and the types of plants you plan to grow.
- Choose Shelving Options: Depending on your needs, budget, and available materials, select the type of shelving that suits your greenhouse. Options include freestanding wire shelves, built-in wooden shelves, or repurposed materials such as pallets or cinder blocks.
- Measure and Install Shelving: Measure the dimensions of your selected shelving and mark the appropriate spots within the greenhouse. Install the shelving according to the manufacturer’s instructions or using suitable fasteners such as screws or brackets.
- Create Planting Beds: Determine the size and height of the planting beds that will fit within your greenhouse. Consider factors such as drainage and accessibility for watering and maintenance. Use materials such as wood, bricks, or pallets to construct raised beds.
- Prepare Planting Medium: Fill the planting beds with a suitable growing medium, such as a blend of garden soil, compost, and organic matter. Ensure that the medium is loose, well-draining, and nutrient-rich to support healthy plant growth.
- Arrange Shelving and Planting Beds: Organize the shelving and planting beds within the greenhouse in a way that optimizes space and allows for easy access. Consider the height and spacing between shelves to accommodate different plant heights and growing requirements.
- Label and Organize: Label the different shelving units and planting beds for easy identification. Organize your plants according to their needs, grouping together those with similar watering and light requirements.
- Consider Additional Features: Depending on your gardening preferences, you may want to incorporate features like drip irrigation systems, grow lights, or temperature and humidity monitors. Evaluate these options and install them as desired.
Adding shelving and planting beds to your greenhouse will create a well-organized and efficient space for your plants. Take your time during this step, considering the layout and functionality of the greenhouse. With the shelving and planting beds in place, you’re now ready to move on to the final step: maintaining and caring for your PVC pipe greenhouse.
Step 8: Maintaining and Caring for the Greenhouse
Congratulations on completing your DIY PVC pipe greenhouse! Now that your structure is built, it’s important to properly maintain and care for it to ensure the health and productivity of your plants. Follow these steps to maintain and care for your greenhouse:
- Monitor Temperature and Humidity: Regularly check and maintain the temperature and humidity levels inside the greenhouse. Use a thermometer and hygrometer to monitor these factors and make necessary adjustments to provide the optimal growing conditions for your plants.
- Watering and Irrigation: Develop an appropriate watering schedule based on the needs of your plants. Consider using a drip irrigation system or a watering can with a long spout for efficient and targeted watering. Avoid both overwatering and underwatering your plants.
- Pest and Disease Control: Regularly inspect your plants for signs of pests or diseases. Implement preventive measures such as regular cleaning, proper plant spacing, and organic pest control methods to keep your plants healthy.
- Ventilation: Keep a careful eye on the greenhouse ventilation. Open doors, vents, or windows during warm days to allow fresh air circulation. This helps prevent excess humidity and encourages proper plant growth.
- Weed Control: Stay on top of weed growth within your greenhouse. Removing weeds promptly will prevent competition for nutrients and reduce the risk of pests and diseases. Use organic weed control methods to maintain a healthy environment for your plants.
- Maintain Cleanliness: Regularly clean your greenhouse to prevent the buildup of debris, dirt, and disease-causing organisms. Sweep the floor, remove fallen leaves, and wash surfaces with a mild solution of water and vinegar or a mild detergent.
- Pruning and Training: Regularly prune your plants to remove dead or diseased parts, promote healthy growth, and maintain the desired shape. Train vining plants to grow along the trellises or supports to maximize space and encourage proper airflow.
- Fertilization: Assess the nutrient needs of your plants and apply organic fertilizers or compost as necessary. Follow recommended guidelines for fertilizing different types of plants and be mindful of the specific nutrient requirements.
- Seasonal Adjustments: Make necessary adjustments to your greenhouse as the seasons change. Insulate the structure during colder months and provide shade during hot summers to ensure a stable and comfortable environment for your plants.
Maintaining and caring for your greenhouse is an ongoing process. Regular attention and care will help create an optimal environment for your plants and maximize their growth and productivity. Enjoy the results of your hard work and continue to fine-tune your gardening practices within your DIY PVC pipe greenhouse.
Conclusion
Congratulations on completing your DIY PVC pipe greenhouse! By following the step-by-step process outlined in this guide, you have successfully built a cost-effective and practical structure to extend your gardening season and protect your plants.
Throughout this project, you learned how to design your greenhouse, gather the necessary materials, cut and assemble the PVC frame, create a solid base and foundation, cover the structure with plastic sheeting, install doors and vents, add shelving and planting beds, and maintain and care for your greenhouse for optimal plant growth.
Your DIY greenhouse will provide a controlled environment for your plants, allowing you to grow a wider variety of crops, extend the growing season, and protect against pests and inclement weather. Whether you’re interested in growing flowers, herbs, fruits, or vegetables, your greenhouse will be a sanctuary for your plants to thrive.
Remember that proper maintenance and care are essential to the success of your greenhouse. Regularly monitor temperature, humidity, watering, pest control, and cleanliness to ensure optimal growing conditions for your plants.
Enjoy the fruits of your labor as you watch your plants flourish in your own handcrafted greenhouse. Spend peaceful hours tending to your garden, experimenting with new plants, and reaping the benefits of a greenhouse environment that you created yourself.
Now that you have the knowledge and experience of building a greenhouse with PVC pipe, you can share your newfound expertise with others and inspire them to embark on their own DIY projects. Happy gardening!