Home>Gardening Techniques>DIY Projects>How To Add Drip Irrigation Lines
DIY Projects
How To Add Drip Irrigation Lines
Modified: February 9, 2024
Learn how to easily add drip irrigation lines to your DIY projects and save water in the process. Step-by-step guide for beginners.
(Many of the links in this article redirect to a specific reviewed product. Your purchase of these products through affiliate links helps to generate commission for Chicagolandgardening.com, at no extra cost. Learn more)
Table of Contents
Introduction
Welcome to the world of DIY projects! If you have a green thumb and a passion for gardening, then you’re in the right place. In this article, we’ll explore the wonderful world of drip irrigation and how you can add drip irrigation lines to your garden to simplify your watering routine and help your plants thrive.
Drip irrigation is a highly efficient and water-saving method of delivering water directly to the roots of your plants. Unlike traditional sprinkler systems that can waste water through evaporation or runoff, drip irrigation delivers water slowly and directly where it is needed most.
The benefits of drip irrigation are plentiful. Not only does it provide targeted watering, but it also helps to reduce weed growth and prevent diseases by keeping the foliage dry. With a drip irrigation system, you can customize the water flow for each plant, ensuring that every one of them receives the right amount of water for optimal growth.
In addition to being water-efficient, drip irrigation is also a time-saving solution. Once installed, it takes care of the watering for you, allowing you to spend more time enjoying your garden and less time lugging around hoses or watering cans.
Installing drip irrigation lines may seem like a daunting task, but fear not! With a little bit of planning and some basic tools, you’ll be well on your way to enjoying the benefits of this efficient watering method.
In the following sections, we’ll guide you through the process of choosing the right drip irrigation system, gathering the necessary tools and materials, planning your system layout, and installing the main water line and drip irrigation lines. We’ll also provide tips for testing, adjusting, and maintaining your system to ensure its optimal performance.
So, grab your gardening gloves and let’s dive into the world of drip irrigation. Your plants will thank you!
Benefits of Drip Irrigation
Drip irrigation offers numerous advantages that make it a popular choice for gardeners and homeowners. Let’s explore some of the key benefits of using drip irrigation in your garden:
- Water Efficiency: Drip irrigation delivers water directly to the roots of your plants, minimizing water loss due to evaporation and runoff. This targeted approach ensures that water is used efficiently and effectively, resulting in water savings of up to 50% compared to traditional watering methods.
- Customizable Watering: With drip irrigation, you have the flexibility to customize the water flow for each individual plant or group of plants. This allows you to cater to the specific water needs of different plant varieties, ensuring optimal growth and avoiding over or under-watering.
- Reduced Weed Growth: Drip irrigation delivers water directly to the plant’s root zone, keeping the soil surface dry. This helps to suppress weed growth, as weeds require moisture to thrive. By reducing weed competition, your plants have a better chance of flourishing.
- Prevents Disease: Unlike traditional sprinkler systems that wet the foliage, drip irrigation keeps the plant leaves dry. This minimizes the risk of fungal diseases, as many plant diseases thrive in moist conditions. By keeping the foliage dry, drip irrigation helps to prevent the spread of diseases and promotes healthier plants.
- Time-Saving: Once installed, drip irrigation takes care of the watering for you. You no longer need to spend your valuable time manually watering your garden. This allows you to focus on other gardening tasks or simply sit back and relax while your plants receive the precise amount of water they need.
- Less Soil Erosion: Drip irrigation delivers water slowly and evenly, allowing it to be absorbed by the soil without causing excessive runoff. This helps to reduce soil erosion, ensuring that your garden soil stays intact and your plants’ root systems remain protected.
- Cost-Effective: While the initial setup cost of a drip irrigation system may be higher than traditional sprinkler systems, the long-term benefits and savings outweigh the upfront investment. The water-saving capabilities of drip irrigation can lead to reduced water bills over time, making it a cost-effective solution for watering your garden.
These are just a few of the many benefits that drip irrigation has to offer. By implementing this efficient watering method, you can promote healthier plants, conserve water, save time, and enjoy a flourishing garden all season long.
Choosing the Right Drip Irrigation System
When it comes to choosing the right drip irrigation system for your garden, there are a few factors to consider. Here are some tips to help you select the most suitable system:
- Water Requirements: Assess the water requirements of your plants. Some plants need more water, while others require less. Consider the specific needs of your garden and choose a drip irrigation system that allows you to customize the water flow for different plant varieties.
- Garden Size and Layout: Take into account the size and layout of your garden. If you have a small garden with a few plants, a simple and compact drip irrigation system may be sufficient. However, for larger gardens or complex layouts, you may need a system with multiple lines and zones to ensure uniform watering.
- Pressure and Flow Rate: Check the water pressure and flow rate of your outdoor faucet. Different drip irrigation systems have specific pressure and flow rate requirements. Make sure the system you choose is compatible with your water supply to ensure optimal performance.
- Emitters and Drippers: Consider the types of emitters and drippers available with the drip irrigation system. Emitters come in different flow rates, from low to high. Select the appropriate emitter based on the water needs of your plants. Drippers can be placed at the base of individual plants or directly into the soil. Choose the option that best suits your garden and plant arrangement.
- Timer and Automation: Decide if you want to incorporate a timer or automation system into your drip irrigation setup. Timers allow you to schedule watering times and duration, providing a hands-free approach to irrigation. Automation systems can sense soil moisture levels and adjust watering accordingly, maximizing water efficiency.
- Budget: Consider your budget when selecting a drip irrigation system. There are a variety of systems available, ranging from basic DIY kits to more advanced professional-grade setups. Determine your budget and choose a system that meets your needs without breaking the bank.
Remember to research different brands and read reviews to ensure you select a reliable and durable drip irrigation system. It’s also a good idea to consult with gardening experts or visit your local garden center for recommendations based on your specific requirements.
By taking these factors into consideration, you can choose a drip irrigation system that aligns with the needs of your garden and plants, providing efficient and effective watering for a thriving and beautiful landscape.
Gathering the Necessary Tools and Materials
Before you begin installing your drip irrigation system, it’s important to gather all the necessary tools and materials. Having everything on hand will streamline the installation process and ensure a smooth workflow. Here’s a list of the essential items you’ll need:
- Drip Irrigation Kit: Purchase a drip irrigation kit that suits the size and layout of your garden. Kits typically include tubing, connectors, emitters, and other essential components. Look for a kit that meets your specific requirements and includes all the necessary parts.
- Tubing: Drip irrigation systems rely on tubing to carry water from the water source to the plants. You’ll need to choose the appropriate size and length of tubing based on your garden layout. The most common sizes are ½ inch and ¼ inch tubing.
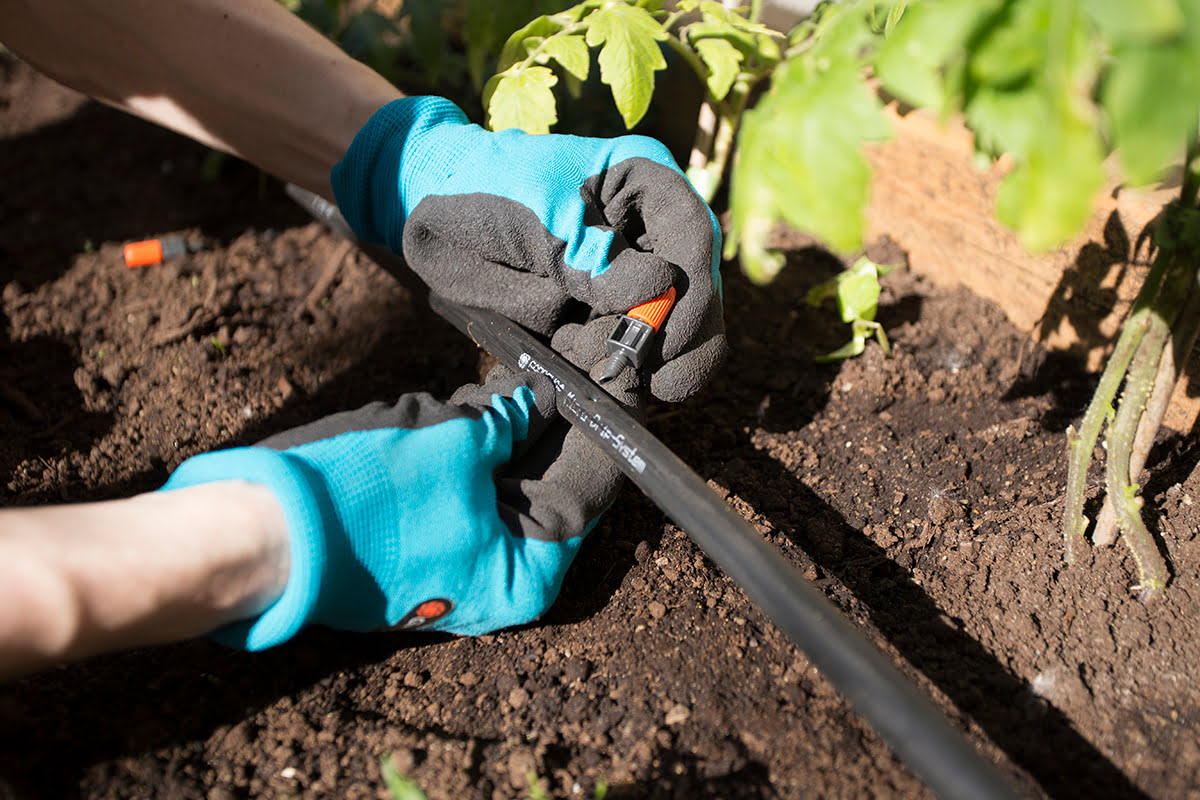
- Connectors and Fittings: Connectors and fittings are used to join sections of tubing, redirect the flow, and connect emitters. Make sure to have enough connectors and fittings to accommodate your design and layout.
- Emitters and Drippers: Emitters and drippers deliver water directly to the plants. Select the appropriate types and quantities based on your plant’s water requirements and spacing. Some emitters and drippers are adjustable, allowing you to customize the flow rate.
- Punching Tool or Hole Punch: A punching tool or hole punch is used to create holes in the tubing for the insertion of emitters and drippers. Make sure to have a tool that is compatible with the size of your tubing.
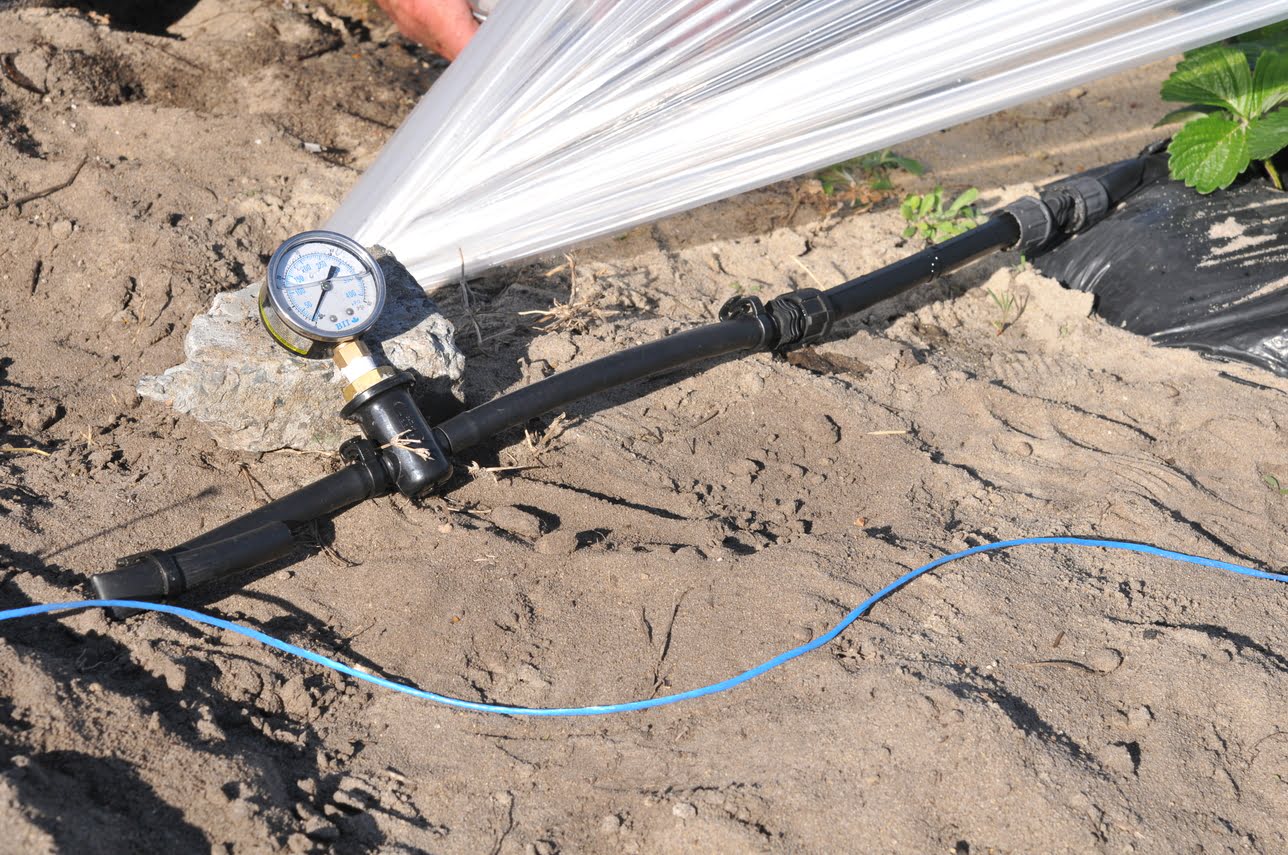
- Pressure Regulator: A pressure regulator helps control the water pressure in your drip irrigation system. It ensures that the pressure remains at an optimal level, preventing damage to the tubing and ensuring even water distribution.
- Filter: A filter is used to remove debris and impurities from the water, preventing clogging of the system. It’s essential to have a filter installed to keep your drip irrigation system running smoothly.
- End Caps and Plugs: End caps and plugs are used to seal off the tubing and prevent water from escaping. They are essential for terminating the ends of the tubing or closing off unused lines.
- Scissors or Utility Knife: Scissors or a utility knife will be handy for cutting the tubing to the desired lengths. Make sure to have a sharp pair of scissors or a knife for clean and precise cuts.
- Teflon Tape: Teflon tape is used to create a watertight seal when connecting fittings and components. Wrap the threads of connectors with Teflon tape to prevent leaks.
It’s also a good idea to have a measuring tape, a notepad for taking measurements and making notes, and a diagram of your garden layout. These additional items will assist in planning and designing your drip irrigation system.
By gathering all the necessary tools and materials before you start, you’ll save time and ensure a smooth installation process. Now that you have everything you need, it’s time to plan and design your drip irrigation system.
Planning Your Drip Irrigation System
Before you start installing your drip irrigation system, it’s crucial to spend some time planning and designing your layout. Careful planning will ensure that your system meets the specific needs of your garden and plants. Here are the key steps to follow when planning your drip irrigation system:
- Assess Your Garden: Take a close look at your garden to identify the planting areas, types of plants, and specific water needs. Consider any slopes, obstacles, or areas that require extra attention when determining the placement and design of your drip irrigation system.
- Create a Garden Layout: Sketch out a garden layout on paper or use a garden planning software to map out the different sections and plants in your garden. This will help you visualize the placement of your drip irrigation lines and ensure even coverage.
- Determine Water Source: Identify the water source for your drip irrigation system. This could be an outdoor faucet, rain barrel, or well. Make sure the water source is easily accessible and has the necessary water pressure and flow rate to support your system.
- Divide into Zones: Divide your garden into zones based on the water needs of your plants. Group plants with similar water requirements together. This will allow you to adjust the water flow and watering schedule for each zone and promote efficient water usage.
- Measure and Calculate: Measure the dimensions of your garden and each zone to determine the length of tubing and number of emitters needed. Consider the spacing requirements for your plants and ensure that the tubing can reach every plant within a zone.
- Plan Main Water Line: Map out the route for your main water line, which will connect the water source to the different zones. Consider the most direct and efficient path, while also taking into account any obstacles or areas where the line needs to be elevated.
- Design Drip Lines: Determine how your drip lines will run within each zone. Consider the spacing between plants, the number of emitters needed, and the best route for the tubing to ensure adequate coverage. Make note of where you will place connectors, drippers, and any branching lines.
- Consider Future Expansion: Plan for future expansion or modifications to your drip irrigation system. Leave room to add additional zones or plants if needed. Having the flexibility to expand your system will make it easier to adapt to changes in your garden.
- Take Notes and Draw Diagrams: As you plan your drip irrigation system, take detailed notes and draw diagrams to reference during the installation process. This will help you stay organized and ensure that you don’t miss any important steps or components.
By taking the time to plan your drip irrigation system, you’ll have a clear understanding of how to proceed with the installation process. Planning will also help you avoid any potential obstacles or challenges along the way. Now that you have a comprehensive plan in place, you’re ready to start installing the main water line for your drip irrigation system.
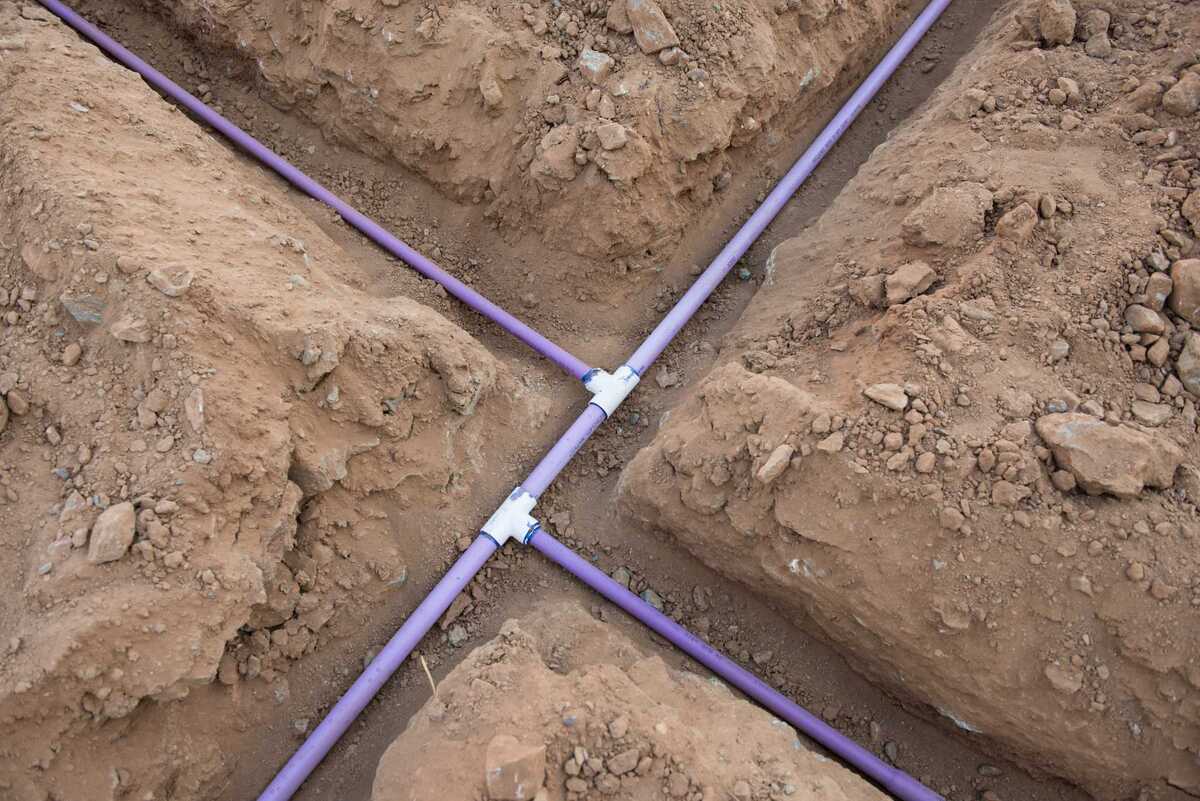
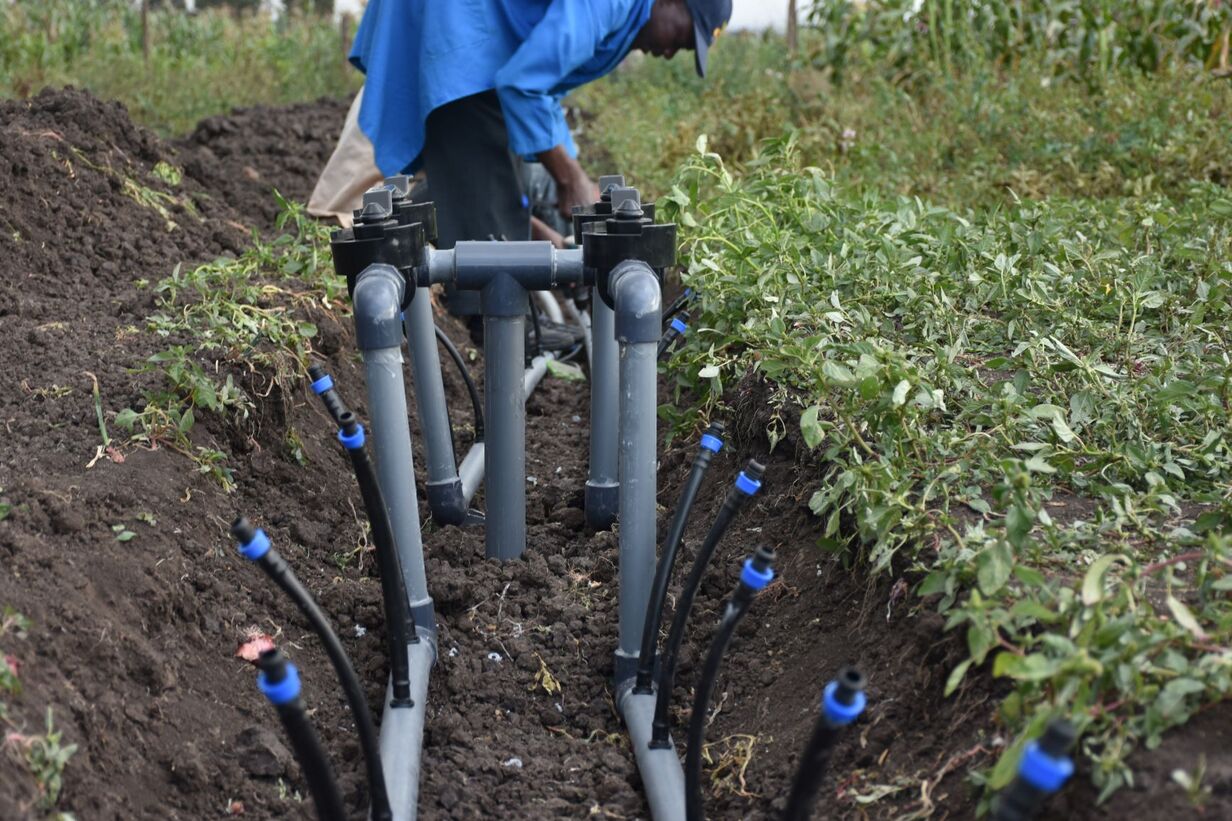
Installing a Main Water Line
The main water line is a crucial component of your drip irrigation system, as it connects the water source to the different zones in your garden. Installing a main water line requires careful planning and precision to ensure efficient water flow and proper functionality. Here are the steps to follow when installing a main water line:
- Locate the Water Source: Determine the location of your water source, whether it’s an outdoor faucet, rain barrel, or well. Ensure that the water source has the necessary water pressure and flow rate to support your drip irrigation system.
- Measure and Cut the Tubing: Measure the distance from the water source to the starting point of your drip system and cut the main tubing accordingly. Use a sharp pair of scissors or a utility knife to make a clean cut.
- Attach a Filter and Pressure Regulator: Connect a filter and a pressure regulator to the main tubing. The filter will remove any debris or impurities from the water, while the pressure regulator will maintain a consistent water pressure throughout the system.
- Connect the Main Tubing to the Water Source: Securely attach one end of the main tubing to the water source using a connector or adapter. Ensure a tight fit to prevent any leaks or water loss.
- Lay Out the Main Tubing: Carefully position and lay out the main tubing along the planned route. Avoid sharp bends or kinks in the tubing, as this can negatively impact water flow. Use stakes or clips to secure the tubing in place, if necessary.
- Attach Drip Lines and Branching Tubing: As you lay out the main tubing, attach drip lines or branching tubing to the main line at designated points. These lines will distribute the water to the different zones and plants in your garden. Use connectors to secure the drip lines in place.
- Install End Caps and Plugs: Once the main tubing and drip lines are in place, install end caps or plugs at the ends of each line to prevent water from leaking out. This ensures that all the water flows through the emitters and drippers as intended.
- Flush the System: Before connecting the main water line to the water source, flush the system to remove any dirt or debris. Open the water source briefly to allow water to flow through the tubing and flush out any impurities.
- Connect the Main Water Line: Finally, connect the other end of the main tubing to the water source, ensuring a secure and watertight connection. Double-check all the connections along the main line to make sure they are tightly fitted and leak-free.
Proper installation of the main water line is essential for the overall functionality and performance of your drip irrigation system. Take your time to ensure accurate measurements, secure connections, and a well-planned layout. With the main water line in place, you’re now ready to install the drip irrigation lines in each zone of your garden.
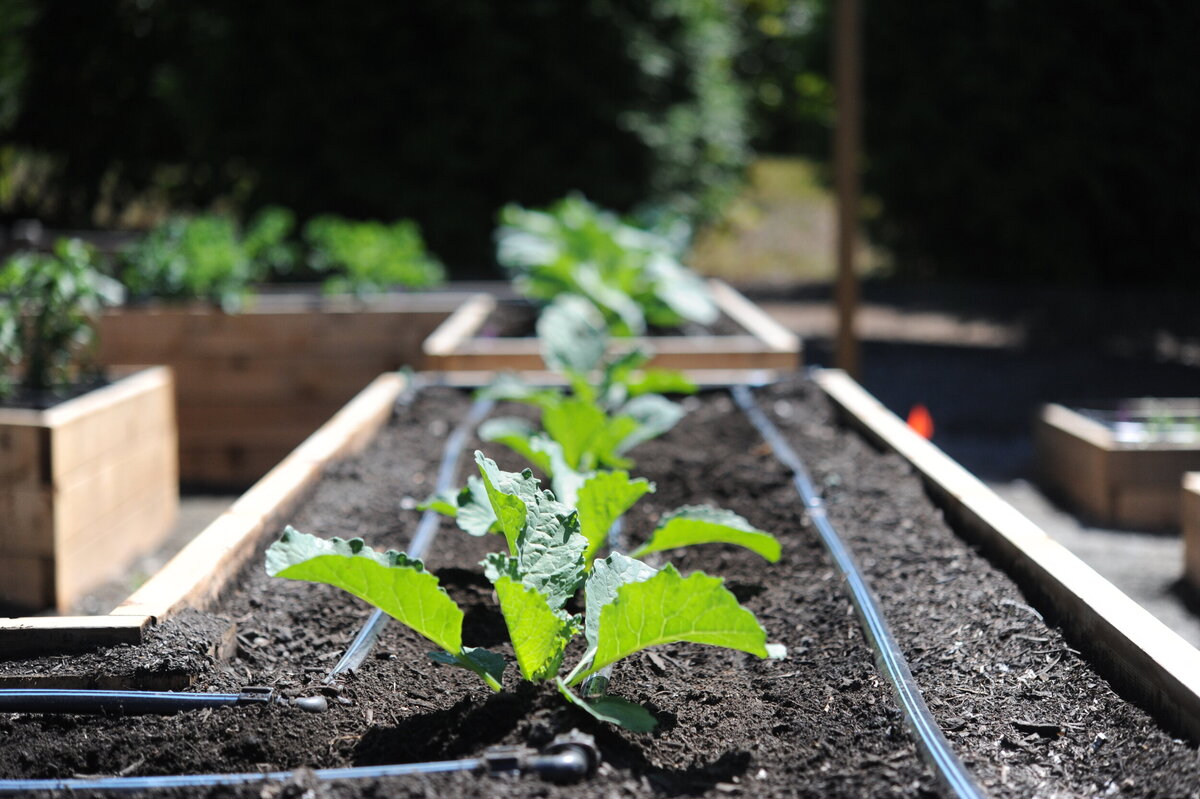
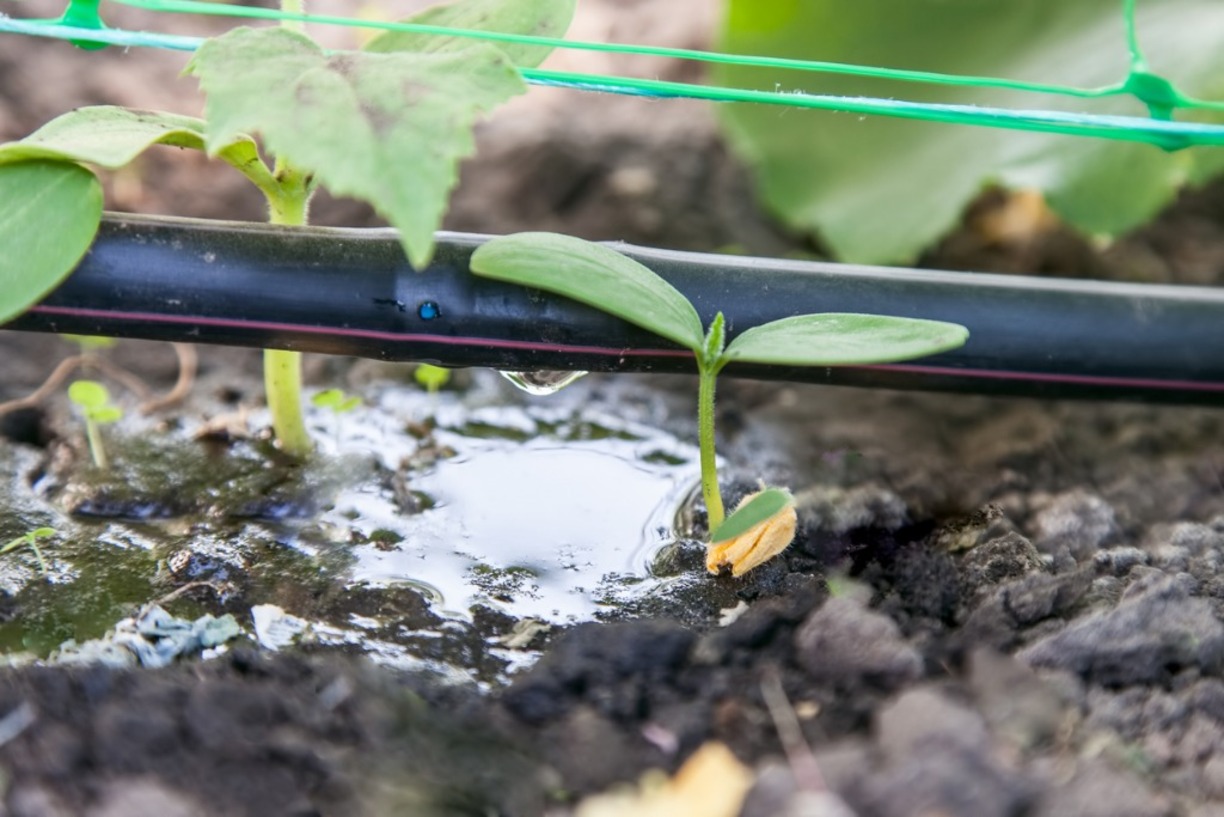
Installing Drip Irrigation Lines
Now that you have successfully installed the main water line for your drip irrigation system, it’s time to move on to installing the drip irrigation lines in each zone of your garden. This step is crucial as it ensures precise and targeted watering for your plants. Here’s a step-by-step guide for installing the drip irrigation lines:
- Plan the Drip Line Layout: Refer to your garden layout and plan the placement of the drip lines within each zone. Consider the spacing requirements for your plants and arrange the lines accordingly to provide even coverage.
- Measure and Cut the Drip Tubing: Measure the required length of drip tubing for each section of the zone. Use sharp scissors or a utility knife to make clean cuts. Be mindful of ensuring the tubing can reach each plant within the zone.
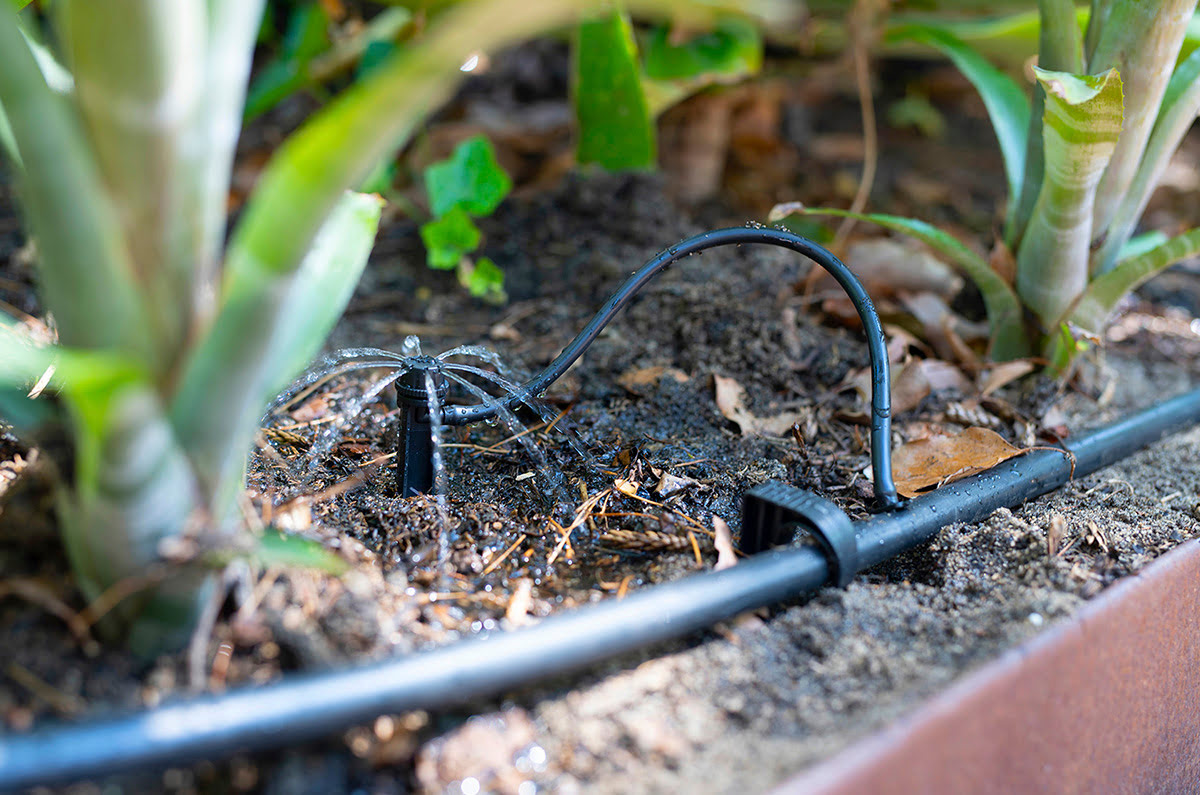
- Create Holes for Drippers or Emitters: Use a punching tool or hole punch to create small holes in the drip tubing where the drippers or emitters will be placed. Ensure the holes are the appropriate size for a snug fit.
- Insert Drippers or Emitters: Insert the drippers or emitters into the holes you created in the drip tubing. Push them in firmly to ensure a secure fit and prevent any drips or leaks.
- Connect Drip Tubing Sections: Use connectors to join different sections of drip tubing together, ensuring a secure connection. This will allow for continuous water flow throughout the zone and prevent any water loss.
- Lay the Drip Tubing: Carefully position and lay the drip tubing along the planned route, ensuring it reaches each plant within the zone. Use stakes or clips to secure the tubing in place if necessary.
- Attach End Caps or Plugs: At the end of each drip tubing section, attach end caps or plugs to prevent water from escaping. This directs all the water flow to the drippers or emitters and ensures proper watering.
- Test the System: Turn on the water source to test the drip irrigation lines. Check for any leaks, uneven watering, or clogged emitters. Adjust the flow rate of the drippers or emitters as needed to ensure each plant receives the appropriate amount of water.
- Make Adjustments if Necessary: Walk through your garden and make any necessary adjustments to the placement of the drip lines or the position of the emitters. Ensure that every plant within the zone is adequately covered with water.
- Monitor the System: Regularly inspect your drip irrigation system for any signs of issues or changes in water flow. Check the emitters or drippers for clogs and replace or clean them as needed. Monitor plant health and adjust watering as necessary.
By following these steps, you can properly install the drip irrigation lines in your garden and ensure optimal watering for your plants. Take the time to measure and plan carefully, and be attentive to the needs of each plant within the zone. With the drip irrigation lines in place, your garden will be well-equipped for efficient and targeted watering.
Testing and Adjusting the System
Once you have installed your drip irrigation system, it’s important to test and adjust the system to ensure it is functioning optimally. This step is crucial for maximizing water efficiency and ensuring that your plants receive the correct amount of water. Here’s a step-by-step guide on how to test and adjust your drip irrigation system:
- Turn on the Water: Start by turning on the water source for your drip irrigation system. Allow the water to flow through the system and observe the water distribution in each zone.
- Check for Leaks: Inspect the entire system for any leaks, including connections, fittings, and emitters. Look closely for any signs of water escaping or dripping where it shouldn’t be. Address any leaks immediately by tightening connections or replacing faulty parts.
- Observe Water Distribution: Watch how the water is being distributed by the emitters or drippers. Ensure that each plant is receiving adequate water and there are no areas of over or under-watering. Adjust the flow rate or positioning of the emitters if necessary.
- Monitor Soil Moisture: Check the soil moisture levels around your plants during and after the watering cycle. Use a moisture meter or simply dig a small hole to determine moisture depth. Adjust the watering schedule or duration if the soil is too dry or too wet.
- Check for Clogged Emitters: Inspect the emitters or drippers for any signs of clogging. Small debris or sediment can accumulate and block the flow of water. Clean or replace any clogged emitters to ensure uniform water distribution.
- Assess Plant Health: Monitor the health of your plants over time. Look for signs of over or under-watering, such as wilting or yellowing leaves. Adjust the watering schedule or the positioning of emitters based on the specific needs of your plants.
- Make Adjustments: Based on your observations, make any necessary adjustments to your drip irrigation system. This may include changing the flow rate of emitters, repositioning lines for better coverage, or adding additional emitters to areas with greater water needs.
- Regular Maintenance: Schedule regular maintenance for your drip irrigation system. This includes checking for leaks, cleaning emitters or drippers, and replacing any worn-out components. Regular maintenance will help ensure the longevity and efficiency of your system.
- Monitor Water Usage: Keep track of your water usage to assess the effectiveness of your drip irrigation system. Compare your water bills before and after installation to determine if there are any significant savings. Adjust your watering schedule or system design if necessary to achieve optimal water efficiency.
By thoroughly testing and adjusting your drip irrigation system, you can fine-tune the watering process and ensure that your plants receive the appropriate amount of water. Regular monitoring and maintenance will keep your system running efficiently, ultimately leading to healthier plants and a successful garden.
Maintenance and Troubleshooting Tips
Maintaining your drip irrigation system is essential for keeping it in top shape and ensuring that it continues to function efficiently. Additionally, being aware of common troubleshooting issues will help you swiftly address any problems. Here are some maintenance and troubleshooting tips to help you keep your drip irrigation system running smoothly:
- Regular Inspection: Conduct regular inspections of your drip irrigation system to check for leaks, clogs, or damaged components. Inspect tubing, fittings, connectors, and emitters to ensure they are in good condition.
- Clean Emitters or Drippers: Clogged emitters or drippers can disrupt water flow. Regularly check and clean them to remove any debris or sediment that may accumulate. Use a small brush or pin to gently unclog any blocked openings.
- Replace Worn-out Components: Over time, components of your drip irrigation system may wear out or deteriorate. Inspect and replace any worn-out tubing, connectors, or emitters to maintain optimal performance.
- Adjustment for Plant Growth: As your plants grow, the water requirements may change. Regularly assess and adjust the placement, flow rate, or number of emitters to ensure that each plant receives adequate water.
- Monitor Water Pressure: Regularly check the water pressure of your system. Low water pressure may result in inadequate watering, while high pressure can damage the system. Use a pressure gauge to ensure the pressure is within the recommended range for your drip irrigation system.
- Removal of Weeds or Blockages: Weeds or other external factors can obstruct the flow of water. Ensure that the area around the emitters or drippers is free from weeds or debris to maintain uninterrupted water flow.
- Protect from Freezing Temperatures: In colder climates, it’s crucial to protect your drip irrigation system from freezing temperatures. Drain the system before winter or insulate the tubing to prevent damage caused by freezing water.
- Monitor Soil Moisture: Regularly check the moisture level in the soil to ensure that your watering schedule aligns with the needs of your plants. Overwatering can lead to root rot, while underwatering can result in stressed and unhealthy plants.
- Adjust Watering Schedule: Be mindful of changes in weather conditions. Adjust the watering schedule accordingly, increasing or decreasing the frequency or duration of watering to accommodate variations in temperature, rainfall, or plant growth.
- Document System Modifications: If you make any changes or modifications to your drip irrigation system, document them for future reference. This will help streamline maintenance and troubleshooting efforts if issues arise.
By regularly maintaining and promptly troubleshooting any issues, you can ensure the efficient operation of your drip irrigation system. Regular inspections, cleaning, and adjustments will help extend the lifespan of your system and promote healthy, flourishing plants in your garden.
Conclusion
Congratulations on successfully installing your drip irrigation system! By incorporating drip irrigation into your garden, you’ve taken a significant step towards water efficiency, plant health, and a thriving outdoor space. Drip irrigation offers numerous benefits, including targeted watering, reduced weed growth, prevention of diseases, and time-saving convenience.
Throughout this guide, we’ve covered essential aspects of adding drip irrigation lines to your garden, from choosing the right system and gathering the necessary tools to planning, installation, and maintenance. By following these steps and incorporating best practices, your plants will receive the right amount of water directly to their roots, leading to healthier growth and improved nutrient uptake.
Remember to regularly test and adjust your system, ensuring even watering and addressing any maintenance issues that may arise. Monitor your plants’ health and make any necessary modifications to optimize their growing conditions. With proper care and maintenance, your drip irrigation system will continue to deliver efficient and effective watering for seasons to come.
Enjoy the benefits of your drip irrigation system and take pride in creating a water-efficient and vibrant garden. Sit back, relax, and relish the joy of watching your plants flourish with minimal effort on your part. Happy gardening!