Home>Types of Gardening>Edible Gardening>How To Prepare Avocado Seed For Planting
Edible Gardening
How To Prepare Avocado Seed For Planting
Modified: February 9, 2024
Learn how to prepare avocado seeds for planting in your edible garden. Get step-by-step instructions and tips for successful seed propagation.
(Many of the links in this article redirect to a specific reviewed product. Your purchase of these products through affiliate links helps to generate commission for Chicagolandgardening.com, at no extra cost. Learn more)
Table of Contents
Introduction
Welcome to the world of edible gardening! Growing your own fruits and vegetables can be a rewarding and fulfilling experience. Not only does it allow you to have control over the quality of the food you consume, but it also connects you to nature and promotes sustainable living.
One popular and versatile plant to grow in your edible garden is the avocado tree. Avocados are not only delicious and nutritious but also offer numerous health benefits. They are rich in healthy fats, fiber, vitamins, and minerals that promote heart health, lower cholesterol levels, and support brain function.
If you’re an avocado lover and want to take your gardening skills to the next level, why not try growing an avocado tree from seed? This can be a fun and educational project that allows you to witness the fascinating process of plant growth from start to finish.
In this guide, we will walk you through the step-by-step process of preparing an avocado seed for planting. By following these instructions, you’ll increase your chances of success and ensure that your avocado seedling grows healthy and strong.
Whether you’re a seasoned gardener or a beginner, this guide will provide you with all the information you need to get started on your avocado-growing journey. So, grab your gardening tools and let’s dive in!
Step 1: Removing the seed from the avocado
The first step in preparing an avocado seed for planting is to carefully remove it from the fruit. Choose a ripe avocado with a dark skin color and gently cut it in half lengthwise using a sharp knife. Be cautious and avoid cutting into the seed.
Next, twist the two halves of the avocado in opposite directions to separate them. You will notice that the seed is lodged in one half of the fruit. Take a spoon and carefully scoop out the seed, ensuring that you don’t damage it in the process.
Once you’ve successfully removed the seed, use a paper towel or a gentle cloth to wipe away any excess avocado flesh from its surface. It’s essential to keep the seed clean, as any remaining fruit residue can lead to mold or fungal growth during the germination process.
Remember, avocado seeds are fragile, so handle them with care to avoid any accidental damage. If you accidentally nick or cut the seed, it’s still possible to attempt germination, but the chances of success may be reduced.
Once you have removed the seed and cleaned it thoroughly, you’re ready to move on to the next step of the process: preparing the seed for planting.
Step 2: Cleaning the seed
After removing the avocado seed from the fruit, it’s important to clean it properly before proceeding with the planting process. Cleaning the seed helps prevent the growth of bacteria, fungi, or other harmful microorganisms that could hinder its germination and growth.
Start by rinsing the seed under running water to remove any remaining avocado flesh. Gently rub the seed with your fingers, ensuring that all the flesh is removed. Be careful not to scrub too vigorously, as this could damage the seed.
Once you have rinsed off the flesh, fill a bowl or container with lukewarm water. Place the avocado seed in the water and let it soak for about 10 minutes. This soaking process helps soften the outer layer of the seed, making it easier for the root to penetrate and initiate germination.
After soaking, take a clean towel and pat the seed dry. Make sure to remove any excess moisture, as a damp seed may lead to mold or rot. Be gentle during the drying process to avoid damaging the seed.
Inspect the seed for any cracks or damage. If you notice any cracks, it’s advisable to discard the seed, as it may not be viable for germination. A healthy avocado seed should have a smooth, intact surface.
Once the seed is clean and dry, you can move on to the next step: preparing it for planting.
Step 3: Preparing the seed for planting
Now that you have a clean and dry avocado seed, it’s time to prepare it for planting. This step is crucial as it enhances the seed’s chances of successful germination and healthy growth.
First, take a look at the seed and identify its top and bottom ends. The top end typically has a slightly pointed shape, while the bottom end is flatter. The pointed end is where the stem will emerge, and the flatter end is where the roots will develop.
Using a sharp knife, carefully remove a thin layer of the brown seed skin at the bottom end. This will help the roots penetrate the seed more easily and encourage better root development. Be cautious not to damage the seed; a gentle scraping motion should suffice.
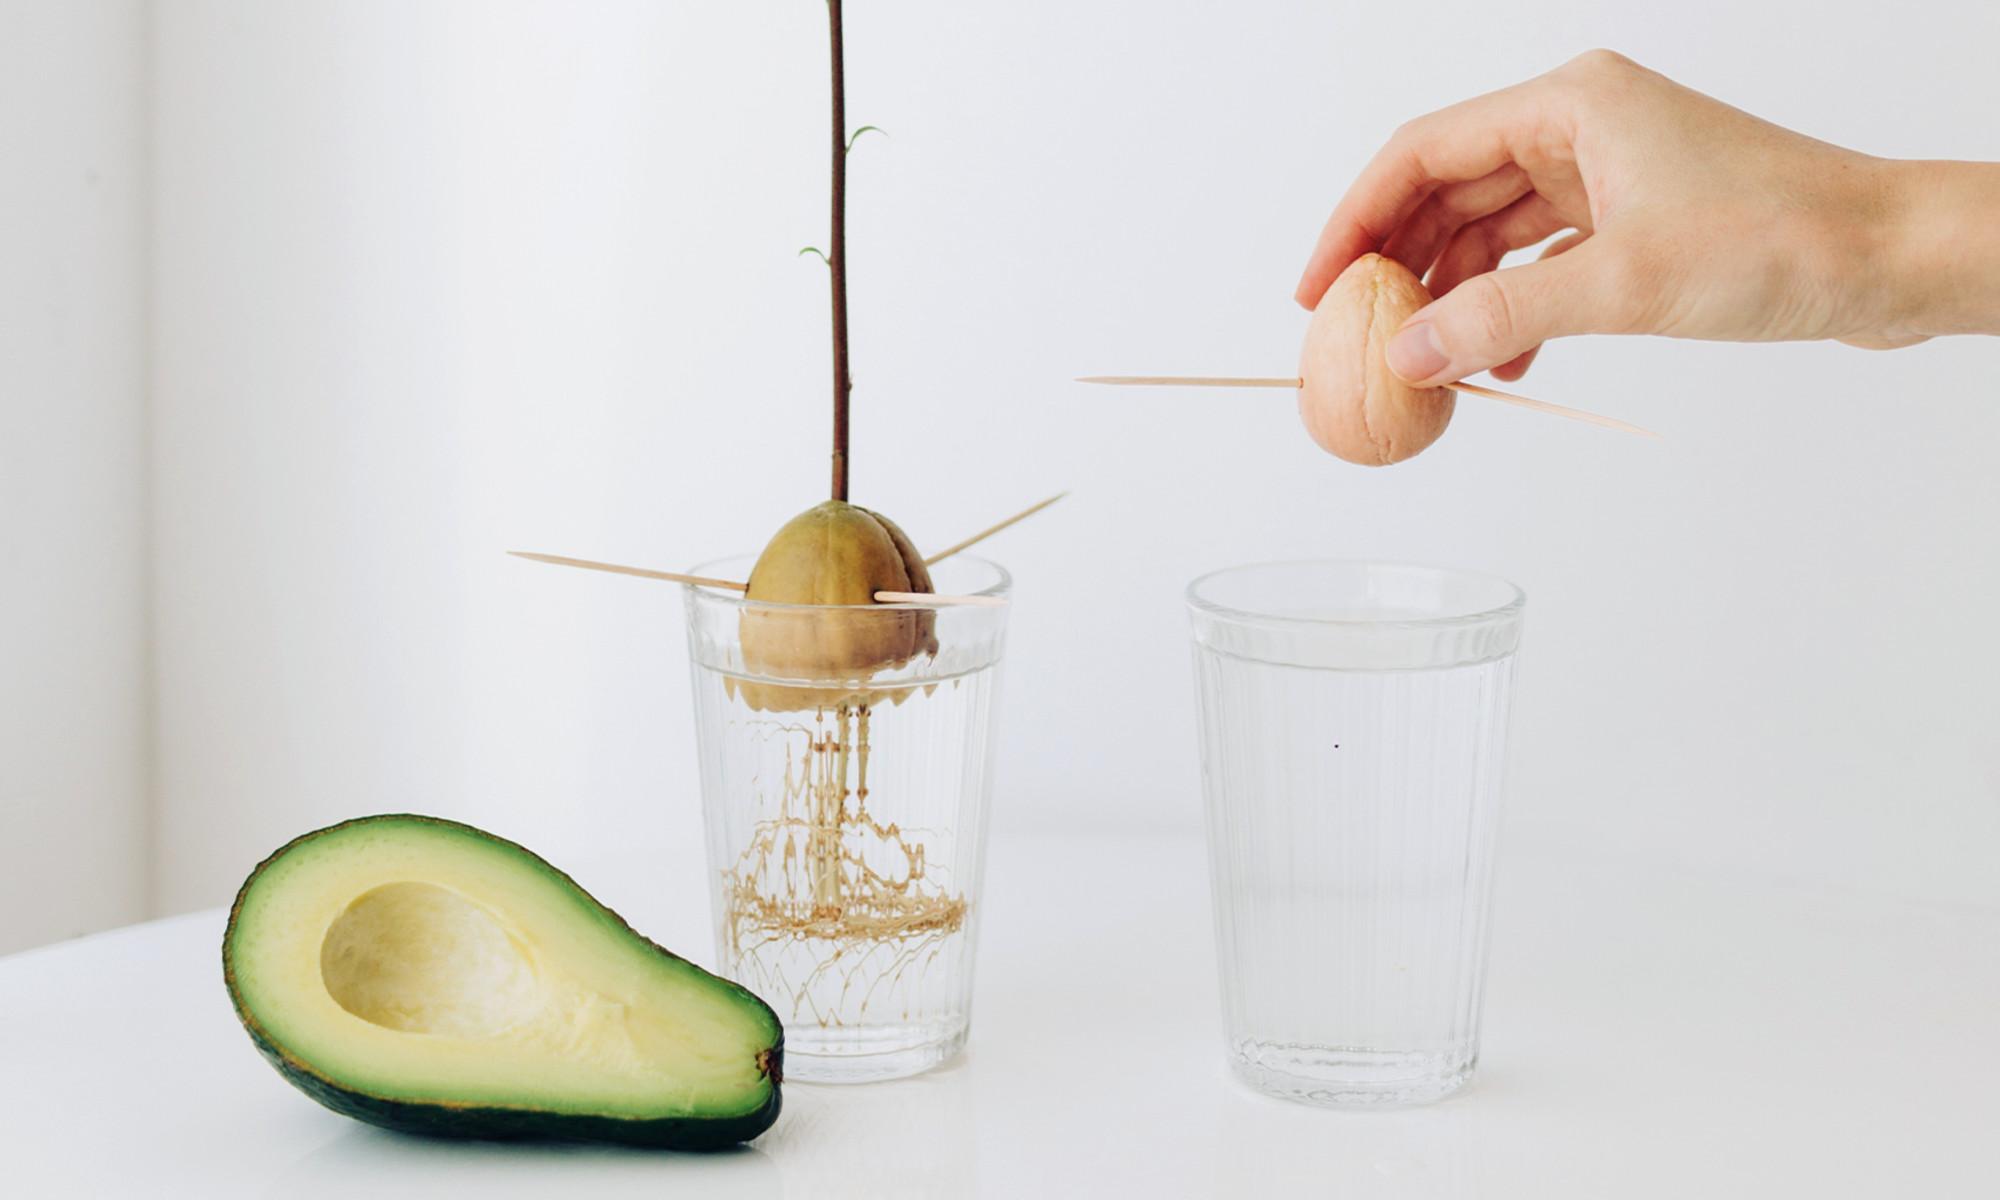
Some gardeners recommend further enhancing the seed’s chances of germination by gently piercing the outer seed coat with a toothpick or small knife. This step is optional but may aid in the seed’s ability to absorb moisture and initiate sprouting. If you decide to do this, make a small hole in the seed’s lateral side, about a quarter-inch deep.
Next, moisten a paper towel or a clean cloth and wrap the seed in it. Place the wrapped seed in a plastic bag or a sealed container to create a humid environment. Ensure that the paper towel remains damp but not soaking wet. This controlled moisture will help the seed prepare for germination.
Find a warm spot in your home where the seed can be left undisturbed for about two to six weeks. The ideal temperature for avocado seed germination is around 70°F (21°C). Check the paper towel regularly to maintain moisture levels and monitor the progress of the seed.
During this time, the seed will begin to crack open, and a small stem should emerge from the top. This is a sign that the seed is ready for the next stage of growth. Once the stem measures around six inches in length, your avocado seed is ready to be planted.
Step 4: Choosing a pot and soil
Now that your avocado seed has sprouted, it’s time to select a suitable pot and soil for planting. Choosing the right pot and providing the appropriate soil conditions are essential for the seedling’s growth and development.
When it comes to selecting a pot, opt for one that is at least 10-12 inches in diameter and has drainage holes at the bottom. This will ensure proper drainage and prevent waterlogging, which can lead to root rot. It’s also a good idea to choose a pot with a depth that allows the seedling’s roots to spread out comfortably.
As for the soil, avocados thrive in well-draining, nutrient-rich soil. You can use a pre-made potting mix formulated specifically for container gardening or create your own blend. A recommended homemade mixture is equal parts potting soil, compost, and perlite or vermiculite to promote drainage.
Before planting, moisten the soil slightly to make it easier to work with. Fill the pot about three-quarters full with the prepared soil mixture, leaving enough space to accommodate the growing seedling.
Now, it’s time to transfer the sprouted avocado seed to its new home.
Gently remove the seed from the paper towel or cloth, being careful not to damage the delicate emerging stem. Place the seed in the center of the pot, with the sprouted top facing upward. The bottom of the seed should be slightly submerged in the soil.
Adjust the position of the seed, if necessary, so that the top portion is level with or just above the soil surface. Avoid burying the seed too deep, as this may hinder proper growth.
Once the seed is in position, carefully fill the remaining space in the pot with the prepared soil mixture. Be gentle to avoid disturbing the delicate root system.
Now that the avocado seed is planted, it’s time to move on to the next step: caring for the seedling.
Step 5: Planting the avocado seed
With the avocado seed successfully placed in its pot, it’s time to focus on the next step: planting the seed. This step involves providing the proper care and conditions to promote the growth and development of the avocado seedling.
First, find a sunny location for your avocado seedling. Avocados thrive in full sun, so choose a spot that receives at least six to eight hours of direct sunlight each day. If you’re growing the seedling indoors, consider placing it near a south-facing window or using grow lights to supplement the natural light.
Avocado trees prefer consistent moisture, but they don’t tolerate waterlogged soil. Water the seedling regularly, aiming to keep the soil slightly moist. Avoid overwatering, as this can lead to root rot. Allow the top inch of soil to dry out between waterings to prevent waterlogged roots.
As the seedling grows, it will begin to develop leaves. It’s crucial to provide adequate air circulation to prevent fungal diseases. Avoid overcrowding the pot with other plants and ensure that the surrounding environment is well-ventilated.
Fertilization is also important for the healthy growth of avocado seedlings. As the seedling reaches about six inches in height, you can start fertilizing it. Choose a balanced organic fertilizer and follow the manufacturer’s instructions for application rates and frequency. Be careful not to overfertilize, as this can damage the young plant.
During the early stages, the seedling may benefit from some support. Gently insert a stake or a bamboo stick into the pot near the seedling and tie it loosely using soft garden twine. This will provide stability to prevent the seedling from bending or breaking under its weight.
Keep an eye on the appearance of the plant. If you notice any pest infestations or signs of disease, take prompt action to address the issue. Regularly inspect the leaves, stems, and soil for any abnormalities or pests.
Lastly, be patient. Avocado trees are slow-growing, and it may take several years before your seedling matures enough to produce fruit. But with the right care and attention, you’ll be rewarded with a beautiful and fruitful avocado tree.
Step 6: Caring for the seedling
Now that your avocado seedling is planted, it’s important to provide it with proper care to ensure its healthy growth and development. Caring for the seedling involves attention to watering, pruning, and monitoring its overall health.
Water is essential for the growth of your avocado seedling. Keep the soil evenly moist, but not waterlogged. Aim to water the plant whenever the top inch of soil feels dry to the touch. Be mindful of fluctuations in temperature and adjust the watering frequency accordingly.
Regular pruning is necessary to encourage branching and a more compact shape. Once the seedling has reached a height of around 12 inches, pinch off the top few leaves to encourage lateral growth. This will help the seedling develop a bushier form.
Monitoring the overall health of your seedling is crucial. Check the leaves regularly for signs of discoloration, pests, or disease. If you notice any issues, take immediate action to address the problem. This may involve applying organic pest control methods or seeking expert advice.
As your avocado seedling continues to grow, it will require more nutrients to support its development. Consider fertilizing the plant every two to three months with a well-balanced organic fertilizer. Follow the instructions on the packaging for application rates and methods.
Avocado trees are tropical plants, and they prefer warm temperatures. Ensure that the seedling is kept in an environment between 60°F to 85°F (15°C to 29°C). Avoid exposing the plant to frost or extreme temperature fluctuations, as this can harm its growth.
It’s also important to provide adequate sunlight for your seedling. Place it in a location that receives full sun for at least six to eight hours a day. If you’re growing the seedling indoors, ensure it receives sufficient bright light through a south-facing window or use grow lights to supplement natural light.
Lastly, observe the growth of your avocado seedling and enjoy the process. It may take several years for the plant to mature and produce fruit, and during this time, it will go through various growth stages. Be patient and continue to provide it with the care it needs.
With regular care and attention, your avocado seedling will thrive and reward you with its lush foliage and, eventually, delicious fruits.
Step 7: Transferring the seedling to a larger pot or the ground
As your avocado seedling continues to grow, it will eventually outgrow its current pot. At this stage, it’s time to consider transferring the seedling to a larger pot or planting it in the ground, depending on your gardening preferences and available space.
If you choose to transfer the seedling to a larger pot, select a container that is at least 20 inches in diameter and has drainage holes. Fill the new pot with a well-draining potting mix, similar to the one used during initial planting. Gently remove the seedling from its current pot, being careful not to damage the roots, and place it in the center of the new pot. Fill the remaining space with fresh soil, ensuring that the top of the root ball is level with the surface of the potting mix.
Alternatively, if you have a suitable outdoor space, you can opt to plant the seedling directly in the ground. Choose a location that provides full sun exposure and has well-drained soil. Dig a hole that is twice as wide and deep as the root ball of the seedling. Carefully remove the seedling from its pot, being mindful of the root system, and place it in the hole. Backfill the hole with soil, ensuring that the top of the root ball is level with the ground surface. Gently firm the soil around the base of the seedling.
After transplanting, water the seedling thoroughly to help it settle into its new environment. Continue to provide regular watering, adjusting the frequency based on weather conditions. As the seedling grows, you may need to provide support in the form of stakes or ties to help it withstand strong winds.
As your avocado tree matures, it’s important to continue monitoring its health and providing appropriate care. Regularly check for signs of pest infestations, diseases, or nutrient deficiencies. Prune the tree as needed to maintain its shape and remove any damaged or dead branches.
Remember that avocado trees can take several years to reach maturity and produce fruit. However, with proper care, patience, and the right growing conditions, your avocado seedling has the potential to become a fruitful and beautiful addition to your garden or landscape.
Conclusion
Congratulations! You have successfully learned how to prepare and plant an avocado seed, taking the first steps towards growing your very own avocado tree. By following the step-by-step process outlined in this guide, you have set yourself up for a rewarding journey of edible gardening.
From removing the seed from the avocado to cleaning it, preparing it for planting, choosing a suitable pot and soil, and caring for the seedling, each step is crucial in ensuring the healthy growth and development of your avocado tree. Remember to provide adequate sunlight, water, and nutrients, as well as monitoring for signs of pests or diseases.
Keep in mind that growing an avocado tree from seed requires patience and time. It may take several years before your seedling matures enough to produce fruit. However, the beauty of the process lies in the journey itself. You’ll experience the joy of seeing your seedling grow, witnessing the transformation from a tiny sprout to a robust tree.
Whether you choose to keep your avocado tree as a houseplant or eventually plant it in your garden, the lush foliage and the possibility of harvesting homegrown avocados will undoubtedly bring you immense satisfaction and pride.
Remember, gardening is an ongoing learning experience. Don’t hesitate to experiment and adapt based on your specific growing conditions and circumstances. There is always something new to discover and learn as you nurture your avocado tree.
So, embrace the adventure, enjoy the process, and soon enough, you may find yourself indulging in the fruits of your labor with a fresh, homegrown avocado on your plate. Happy gardening!