Home>Types of Gardening>Edible Gardening>How To Plant Apricot Seeds
Edible Gardening
How To Plant Apricot Seeds
Modified: January 22, 2024
Learn how to plant apricot seeds and grow your own edible garden with our step-by-step guide. Start enjoying fresh apricots right from your backyard!
(Many of the links in this article redirect to a specific reviewed product. Your purchase of these products through affiliate links helps to generate commission for Chicagolandgardening.com, at no extra cost. Learn more)
Table of Contents
Introduction
Welcome to the world of edible gardening! If you have ever dreamed of picking fresh, juicy apricots from your own backyard, then you’re in for a treat. Growing apricot trees from seeds is a rewarding and exciting experience that allows you to witness the entire life cycle of this delicious fruit. Whether you’re a seasoned gardener or a beginner, this guide will walk you through the steps of planting apricot seeds and nurturing them into thriving trees.
Apricots (Prunus armeniaca) are small, golden fruits that are packed with vitamins, antioxidants, and fiber. They are a member of the Rosaceae family and are closely related to peaches and plums. While apricots are typically propagated through grafting or budding techniques, growing them from seeds is a fun and cost-effective way to start your own mini orchard or add a beautiful tree to your garden.
Before you begin the journey of growing apricot seeds, it’s important to note that the resulting trees may not produce fruits that are identical to the parent tree. This is because apricot trees are usually grafted onto rootstock to ensure consistent fruit production and quality. However, growing apricots from seeds can still lead to the development of unique and interesting trees with their own characteristics.
In this guide, we will cover the step-by-step process of planting apricot seeds, from gathering the seeds to caring for the seedlings. We will also provide tips for selecting the right location, watering the plants, and even transplanting the seedlings if desired. By the end of this guide, you will have all the knowledge and confidence you need to start your own apricot growing adventure.
So let’s roll up our sleeves, grab some apricot seeds, and get ready to embark on a journey of edible gardening and reaping the rewards of delicious homegrown apricots!
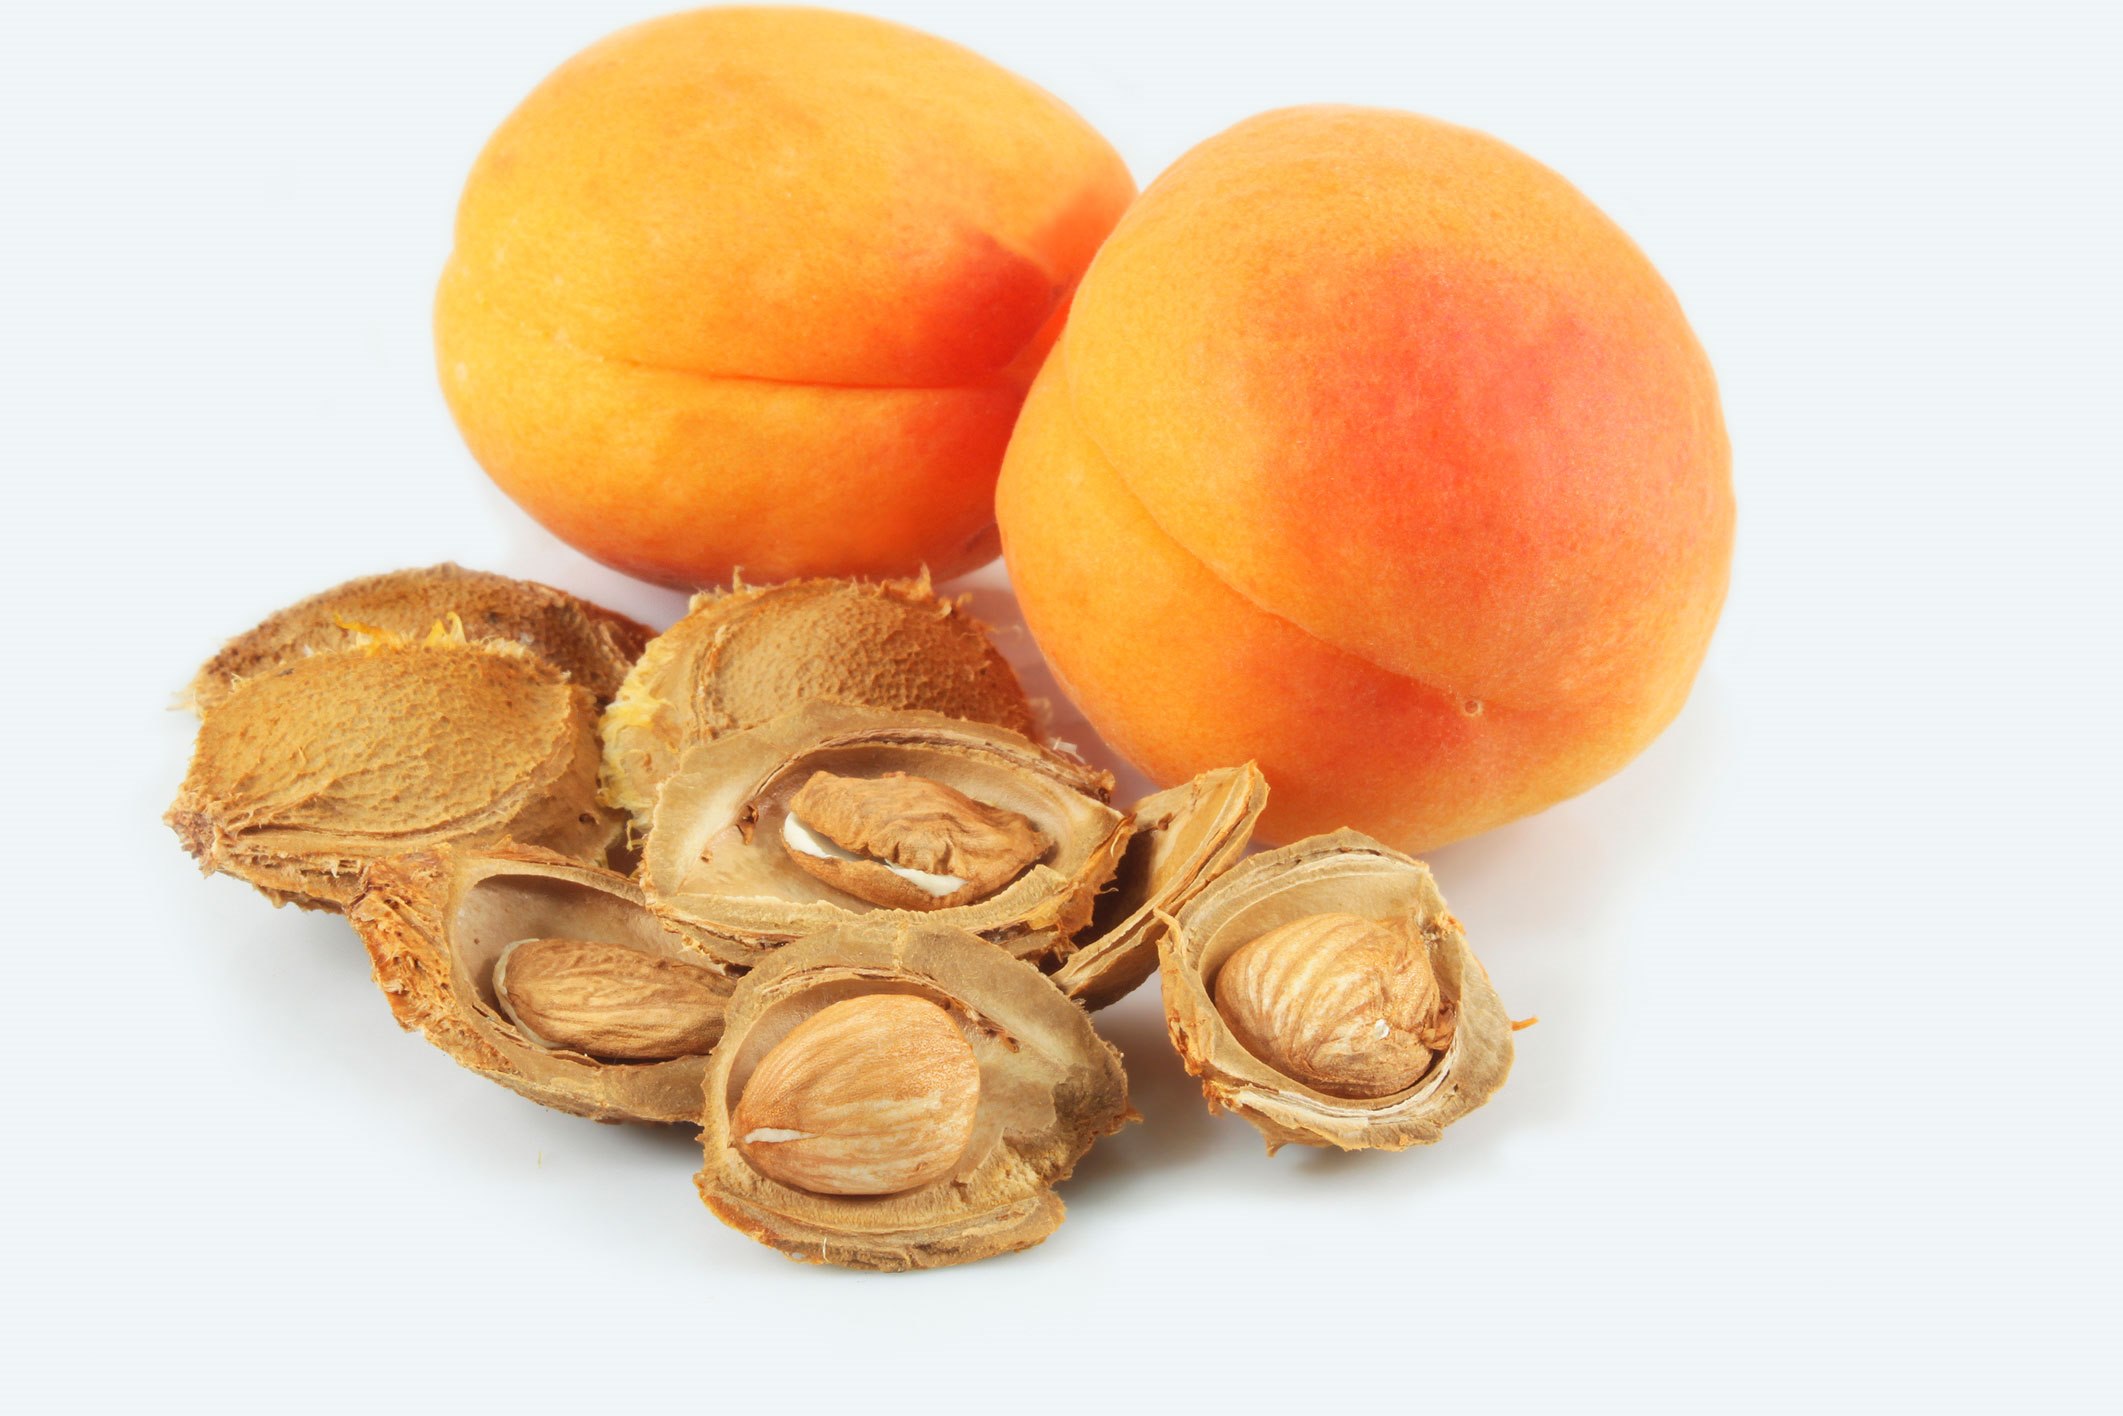
Step 1: Gather Apricot Seeds
The first step in planting apricot seeds is to gather the seeds themselves. You can obtain apricot seeds from ripe apricots that you have enjoyed eating. Here’s how to gather apricot seeds:
- Choose ripe, juicy apricots: Look for fully ripened apricots that have a rich color and yield slightly to pressure when gently squeezed. These apricots will have mature seeds inside.
- Remove the flesh: Carefully cut the apricots open and remove the flesh, exposing the hard seed inside. You can do this by slicing the apricot in half and using a spoon or your fingers to scoop out the flesh.
- Clean the seeds: Rinse the apricot seeds under cool running water to remove any remaining fruit residue. Avoid using soap or any harsh chemicals, as this can affect the viability of the seeds.
- Dry the seeds: Place the cleaned apricot seeds on a paper towel or a clean, dry cloth. Allow them to air dry for about a week or until they are completely dry. Make sure to keep them in a warm and well-ventilated area.
- Store the seeds properly: Once the apricot seeds are completely dry, transfer them to a clean, airtight container such as a glass jar or a zip-lock bag. Store them in a cool and dark place, such as a pantry or refrigerator, until you are ready to plant them.
Gathering apricot seeds is an enjoyable process, especially when you know that you are collecting the potential for future fruit-bearing trees. Remember to only gather seeds from ripe apricots to ensure the best chance of germination and growth.
Now that you have gathered your apricot seeds, it’s time to move on to the next step: preparing the seeds for planting.
Step 2: Prepare the Seeds for Planting
Preparing the apricot seeds for planting is an essential step to maximize their chances of germination and successful growth. By following these steps, you can create an optimal environment for the seeds to sprout:
- Stratify the seeds: Apricot seeds require a process called stratification to help break their dormancy and kickstart the germination process. To stratify the seeds, place them in a damp paper towel or in a sealed plastic bag with some moistened peat moss or vermiculite. Store the seeds in the refrigerator for 4-6 weeks. This cold and damp environment mimics the natural winter conditions that apricot seeds need to germinate.
- Perform a float test: After the stratification period, it’s a good idea to perform a float test to check the viability of your apricot seeds. Fill a bowl or glass with water and gently place the seeds in it. Discard any seeds that float as they are likely not viable. The viable seeds will sink to the bottom of the container.
- Remove the outer shell: Apricot seeds have a hard outer shell that may inhibit germination. To enhance germination rates, you can carefully crack open the outer shell of the seeds using a nutcracker or a small hammer. Be cautious not to damage the inner kernel while doing this.
- Soak the seeds: Once you have removed the outer shell, soak the seeds in room temperature water for 24 hours. This step helps to further loosen the shell and hydrate the kernel.
Preparing the apricot seeds through stratification and shell removal increases the chances of successful germination. Following these steps sets the stage for the next step, which involves choosing the right location for planting your apricot seeds.
Step 3: Choose the Right Location for Planting
Choosing the right location for planting your apricot seeds is crucial for their long-term growth and fruit production. Consider the following factors when selecting a suitable spot:
- Sunlight requirements: Apricot trees thrive in full sun, so choose a location that receives at least 6-8 hours of direct sunlight per day. Without sufficient sunlight, the trees may not produce abundant fruit or may have stunted growth.
- Soil quality: Apricot trees prefer well-draining soil that is rich in organic matter. Avoid planting in areas with heavy clay soil or those prone to waterlogging. If the soil in your chosen location is not ideal, you can improve it by adding compost or well-rotted manure to enhance the fertility and drainage.
- Climate considerations: Apricots thrive in temperate climates, with a chilling period in winter to promote flowering and fruit set. Make sure your chosen location experiences the necessary cold temperatures in winter and sufficient heat in summer for optimal fruit development.
- Protection from frost: Apricot trees are susceptible to frost damage, especially during the flowering stage. If you live in an area prone to late spring frosts, consider planting the apricot seeds near a south-facing wall or in a location with good air drainage to minimize the risk of frost damage.
- Space availability: Apricot trees require enough space for their mature size. Consider the eventual height and spread of the trees and ensure there is enough room for them to grow without being crowded by other plants or structures.
By selecting a location that meets these criteria, you provide the optimal conditions for your apricot seeds to flourish and produce abundant fruit in the future. Once you have chosen the perfect spot, it’s time to move on to the exciting step of planting the apricot seeds.
Step 4: Plant the Apricot Seeds
Now that you have prepared your apricot seeds and chosen the right location, it’s time to plant them. Follow these steps to ensure successful planting:
- Prepare the planting area: Start by clearing the planting area of any weeds, rocks, or debris. Dig a hole that is about 2-3 times the size of the seed. This will provide enough space for the roots to grow and establish.
- Plant the seed: Place the apricot seed vertically or horizontally in the hole, with the cracked side facing up if you removed the outer shell. Gently backfill the hole with soil, ensuring that the seed is covered by about an inch of soil. Pat down the soil lightly to firm it around the seed.
- Water thoroughly: After planting, water the area thoroughly to moisten the soil. Make sure to provide enough moisture without overwatering, as excessive water can lead to rotting of the seed. Maintain consistent moisture during the germination and early growth stages.
- Mark the planting area: It’s helpful to mark the area where you planted the apricot seed to avoid accidentally disturbing or forgetting about it. You can use a plant marker, a small stake, or even a rock to mark the spot.
Remember that apricot seeds take time to germinate, and it may take several weeks or even months before you see any signs of sprouting. Be patient and continue to provide the right conditions with proper watering and care.
Planting apricot seeds is a wonderful way to connect with nature and witness the growth of a beautiful tree from a humble seed. Now that the seeds are in the ground, it’s time to move on to the next step: watering and care tips for your growing seedlings.
Step 5: Watering and Care Tips
Proper watering and care are essential for the successful growth and development of your apricot seedlings. Follow these tips to ensure optimal conditions for your plants:
- Watering frequency: Apricot seedlings require regular watering, especially during their first year of growth. Water deeply once a week during dry spells, providing enough water to thoroughly saturate the root zone. Adjust the frequency based on rainfall and soil moisture levels.
- Moisture level: Apricot trees prefer well-draining soil, so avoid overwatering that can lead to root rot. Check the moisture level of the soil by inserting your finger about an inch into the soil. If it feels dry, it’s time to water. If it feels moist, hold off on watering until the soil dries out a bit.
- Mulching: Apply a layer of organic mulch around the base of your apricot seedlings to help conserve moisture, suppress weed growth, and regulate soil temperatures. Use materials like wood chips, straw, or compost, ensuring the mulch is about 2-3 inches deep and keeps a few inches away from the trunk to prevent rotting.
- Fertilizing: Apricot trees benefit from annual fertilization to provide them with essential nutrients. In early spring, apply a balanced fertilizer specifically formulated for fruit trees, following the manufacturer’s instructions. Avoid over-fertilizing, as excessive nitrogen can promote vegetative growth at the expense of fruit production.
- Pest and disease control: Keep an eye out for common pests and diseases that can affect apricot trees, such as aphids, peach leaf curl, or brown rot. Regularly inspect the leaves, fruit, and branches for any signs of damage or infections. If necessary, consult a local gardening expert for appropriate pest control methods.
- Pruning: As your apricot tree grows, pruning is essential for shaping and maintaining its structure. Prune during the dormant season, typically late winter or early spring, before new growth begins. Remove any dead, damaged, or crossing branches to improve air circulation and reduce the risk of disease.
By following these watering and care tips, you provide the necessary support for your apricot seedlings to thrive and grow into healthy, fruit-bearing trees. As they continue to grow, you may also consider the optional step of transplanting the seedlings to a larger container or into the ground, which we’ll explore in the next step.
Step 6: Transplanting Seedlings (Optional)
Transplanting your apricot seedlings is an optional step that you can take to provide them with more space and optimal growing conditions. Here’s how to transplant your seedlings:
- Choose the right time: The ideal time to transplant apricot seedlings is in the early spring, just before new growth begins. This allows the tree to establish its roots in the new location before the onset of summer heat.
- Select a suitable planting area: Choose a location that meets the same criteria mentioned earlier for choosing the initial planting location. Ensure the new area provides ample sunlight, well-draining soil, and sufficient space for the mature size of the apricot tree.
- Prepare the new planting hole: Dig a hole that is slightly larger than the root ball of the seedling. Gently loosen the soil around the edges of the hole to encourage root penetration and growth.
- Remove the seedling from the original container: Carefully remove the seedling from its current container by turning it upside down and lightly tapping the bottom. Gently tease the roots apart if they are tightly packed or circling the container.
- Plant the seedling: Place the seedling in the new planting hole at the same depth it was originally planted. Backfill the hole with soil, firming it gently to eliminate air pockets. Water the newly transplanted seedling thoroughly.
- Provide post-transplant care: After transplanting, continue to monitor the seedling’s water needs and provide regular irrigation as necessary. Apply a layer of mulch around the base of the tree to conserve moisture and suppress weed growth.
Transplanting your apricot seedlings can be beneficial if you want to provide them with more space to grow and thrive. However, keep in mind that transplanting can be stressful for the young trees, so ensure proper care and attention during the post-transplant period.
With these steps, you have successfully completed the process of planting, caring for, and potentially transplanting your apricot seedlings. Now, it’s time to watch your trees grow and anticipate the future harvest of delicious apricots!
Conclusion
Congratulations! You have now learned how to plant apricot seeds and nurture them into thriving trees. By following the steps outlined in this guide, you have set a solid foundation for your journey into edible gardening and the joy of growing your own apricots.
From gathering ripe apricot seeds to preparing them for planting and selecting the right location, every step is important to ensure the success of your apricot trees. Remember to provide regular watering, proper care, and attention to your seedlings as they grow.
While growing apricots from seeds may not guarantee identical fruits to the parent tree, you have the opportunity to witness the unique characteristics of the trees you grow. Each apricot tree will have its own personality, adding beauty and variety to your garden or orchard.
As your apricot trees mature, you can look forward to the delight of picking fresh, juicy apricots from your own backyard. These fruits are not only delicious but also packed with nutrients that contribute to a healthy diet.
Continue to provide ongoing care for your apricot trees, including proper watering, fertilizing, and pest control, as needed. Pruning and shaping the trees will help maintain their structure and ensure optimal fruit production.
Remember, gardening is a journey that offers endless opportunities for learning and discovery. Don’t hesitate to seek additional resources or advice from local gardening experts to enhance your knowledge and troubleshoot any challenges you may encounter along the way.
Now, go out and plant your apricot seeds with confidence, knowing that you have the knowledge and skills to nurture them into beautiful, fruit-bearing trees. Enjoy the rewarding experience of growing your own apricots and savoring the fruits of your labor.